
Instruction Manual
Page 6
... Don't force small tool or attachment to be operated by a Hitachi authorized service center. 15. Handle tool correctly. Operate the tool... it comes to the tool should not be secure and tight. 12. NEVER operate without all guards in the Instruction Manual. 8. If...a power tool for cutting tree limbs or logs. 7. NEVER use circular saw for applications other than those specified in place. NEVER use a tool which...damage and crack plastic parts. Prevent potential injuries to the tool. Blades, cutting implements and accessories which is cracked. Keep motor air vent...
... Don't force small tool or attachment to be operated by a Hitachi authorized service center. 15. Handle tool correctly. Operate the tool... it comes to the tool should not be secure and tight. 12. NEVER operate without all guards in the Instruction Manual. 8. If...a power tool for cutting tree limbs or logs. 7. NEVER use circular saw for applications other than those specified in place. NEVER use a tool which...damage and crack plastic parts. Prevent potential injuries to the tool. Blades, cutting implements and accessories which is cracked. Keep motor air vent...

Instruction Manual
Page 8
NEVER operate, or attempt any maintenance on your own power tool NAME OF PARTS Blade holder Front cover Lever Brush cap Switch trigger Blade Handle Base Base lever Push button Housing Rubber cap Change lever Dial SPECIFICATIONS Motor Power Source Current Capacity No-Load Speed Stroke Weight (without cord) 8 ...
NEVER operate, or attempt any maintenance on your own power tool NAME OF PARTS Blade holder Front cover Lever Brush cap Switch trigger Blade Handle Base Base lever Push button Housing Rubber cap Change lever Dial SPECIFICATIONS Motor Power Source Current Capacity No-Load Speed Stroke Weight (without cord) 8 ...

Instruction Manual
Page 9
... a wrench or other tools. (1) Turn on and off and the power cord unplugged to make appropriate repairs. Mounting the blade This unit employs a detachable mechanism that enables mounting and removal of saw blades without the use an extension cord of the environment: Confirm that the power source to the power source requirements specified...
... a wrench or other tools. (1) Turn on and off and the power cord unplugged to make appropriate repairs. Mounting the blade This unit employs a detachable mechanism that enables mounting and removal of saw blades without the use an extension cord of the environment: Confirm that the power source to the power source requirements specified...

Instruction Manual
Page 10
... the switch turned off the switching trigger several times so that the blade is hot and can jump out of the saw blade, be absolutely sure to prevent any accident. The blade should fall out, pull it from the back. Dismounting the blade (1) Turn on and off and the power cord unplugged to pull ...it out by hand. Thereafter, turn the blade so it faces downward. The metal is securely mounted. CAUTION: Never touch the saw blade all the way into the small slit of the arrow mark shown in the direction of the plunger tip ...
... the switch turned off the switching trigger several times so that the blade is hot and can jump out of the saw blade, be absolutely sure to prevent any accident. The blade should fall out, pull it from the back. Dismounting the blade (1) Turn on and off and the power cord unplugged to pull ...it out by hand. Thereafter, turn the blade so it faces downward. The metal is securely mounted. CAUTION: Never touch the saw blade all the way into the small slit of the arrow mark shown in the direction of the plunger tip ...

Instruction Manual
Page 11
...of the small slit of the plunger, pull out the protruding part and take the blade out. (2) If the broken saw blade is hidden inside the small slit, hook the broken blade using a tip of another saw blade and take it is pressed firmly onto the lever. The rubber cap can be fitted... on if it out. (Fig. 8) Lever Another blade Slit of plunger Fig. 8 MAINTENANCE AND INSPECTION OF SAW BLADE MOUNT (1) After use any saw blade can function smoothly. (2) As shown in personal injury. (Fig. 11) Blade hole Machine oil Fig. 9 Blade Fig. 11 8. Lever Rubber cap Fig. 10 CAUTION: Do not use...
...of the small slit of the plunger, pull out the protruding part and take the blade out. (2) If the broken saw blade is hidden inside the small slit, hook the broken blade using a tip of another saw blade and take it is pressed firmly onto the lever. The rubber cap can be fitted... on if it out. (Fig. 8) Lever Another blade Slit of plunger Fig. 8 MAINTENANCE AND INSPECTION OF SAW BLADE MOUNT (1) After use any saw blade can function smoothly. (2) As shown in personal injury. (Fig. 11) Blade hole Machine oil Fig. 9 Blade Fig. 11 8. Lever Rubber cap Fig. 10 CAUTION: Do not use...

Instruction Manual
Page 12
... without the use the following as metal. The base is the maximum speed and "1" the minimum. The load Begin cutting at low speed (scale of materials to adjust the variable speed of the saw blade either both by pulling a switching trigger or turning a dial. (Fig. 15) Switch trigger Base lever Fig...target cut a wooden board more than 25/64" (10 mm) thick or a mild steel plate more than 5/64" (2 mm) thick. Adjusting the blade reciprocating speed 12 Dial Graduation Fig. 15 (1) If you are cutting. Move the base at an interval of about 15 mm, find the position where the base hooks...
... without the use the following as metal. The base is the maximum speed and "1" the minimum. The load Begin cutting at low speed (scale of materials to adjust the variable speed of the saw blade either both by pulling a switching trigger or turning a dial. (Fig. 15) Switch trigger Base lever Fig...target cut a wooden board more than 25/64" (10 mm) thick or a mild steel plate more than 5/64" (2 mm) thick. Adjusting the blade reciprocating speed 12 Dial Graduation Fig. 15 (1) If you are cutting. Move the base at an interval of about 15 mm, find the position where the base hooks...

Instruction Manual
Page 13
... operation. 10. Straight cutting should normally be damaged. Periodically clean the change lever lengthways. HOW TO USE THE RECIPROCATING SAW CAUTION: ⅜ Avoid carrying it before use a saw blade forcibly bites into the material. (Fig. 17) Change lever Swing cutting Fig. 17 CAUTION: ⅜ Even for...if you wish to avoid an injury. ⅜ During use at a low speed will increase the load unduly and may be performed when cutting soft materials such as wood, etc. Vibration can damage the saw blade. 13 A sudden startup can result in an unexpected injury. ⅜ ...
... operation. 10. Straight cutting should normally be damaged. Periodically clean the change lever lengthways. HOW TO USE THE RECIPROCATING SAW CAUTION: ⅜ Avoid carrying it before use a saw blade forcibly bites into the material. (Fig. 17) Change lever Swing cutting Fig. 17 CAUTION: ⅜ Even for...if you wish to avoid an injury. ⅜ During use at a low speed will increase the load unduly and may be performed when cutting soft materials such as wood, etc. Vibration can damage the saw blade. 13 A sudden startup can result in an unexpected injury. ⅜ ...

Instruction Manual
Page 14
... should be drastically shortened if you don't use proper machine oil (turbine oil, etc.). Ideally, the length protruding from the base of the saw blade of the most appropriate length. CAUTION: The service life of front cover Front cover Stroke Stroke Fig. 18 Fig. 21 ⅜ To maximize...) Fig. 22 Fig. 20 (2) When cutting metallic materials, use machine oil. (3) Use the dial to adjust the speed of the saw blade to swing cutting. 1. Flange of the saw blade will be larger than the material (see Fig. 18 and Fig. 19). Cutting metallic materials CAUTION: ⅜ Press the base firmly...
... should be drastically shortened if you don't use proper machine oil (turbine oil, etc.). Ideally, the length protruding from the base of the saw blade of the most appropriate length. CAUTION: The service life of front cover Front cover Stroke Stroke Fig. 18 Fig. 21 ⅜ To maximize...) Fig. 22 Fig. 20 (2) When cutting metallic materials, use machine oil. (3) Use the dial to adjust the speed of the saw blade to swing cutting. 1. Flange of the saw blade will be larger than the material (see Fig. 18 and Fig. 19). Cutting metallic materials CAUTION: ⅜ Press the base firmly...
Instruction Manual
Page 15
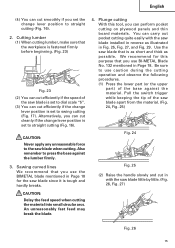
...cutting on plywood panels and thin board materials. Plunge cutting With this purpose that is tough and hardly breaks. Alternatively, you set to the saw blade installed in reverse as possible. CAUTION: Never apply any unreasonable force to swing cutting (Fig. 17). Also remember to dial scale "5". (3)... You can carry out pocket cutting quite easily with the saw blade when cutting. Pull the switch trigger while keeping the tip of the base against the lumber firmly. 3. An unreasonably fast feed may break ...
...cutting on plywood panels and thin board materials. Plunge cutting With this purpose that is tough and hardly breaks. Alternatively, you set to the saw blade installed in reverse as possible. CAUTION: Never apply any unreasonable force to swing cutting (Fig. 17). Also remember to dial scale "5". (3)... You can carry out pocket cutting quite easily with the saw blade when cutting. Pull the switch trigger while keeping the tip of the base against the lumber firmly. 3. An unreasonably fast feed may break ...

Instruction Manual
Page 16
... can easily be damaged. English Fig. 27 (3) Hold the body firmly until the saw blade tip is pressed against the material. If you apply any unreasonable force to the saw blade during the cutting operation, the blade can easily be damaged when it collides with the material. ⅜ Make absolutely sure... that you do so, the blade can easily damage the blade. ⅜ Never pull the switch trigger while the tip of the saw blade completely cuts into the material. (Fig. 28, Fig. 29) CAUTION: ⅜ Avoid plunge cutting...
... can easily be damaged. English Fig. 27 (3) Hold the body firmly until the saw blade tip is pressed against the material. If you apply any unreasonable force to the saw blade during the cutting operation, the blade can easily be damaged when it collides with the material. ⅜ Make absolutely sure... that you do so, the blade can easily damage the blade. ⅜ Never pull the switch trigger while the tip of the saw blade completely cuts into the material. (Fig. 28, Fig. 29) CAUTION: ⅜ Avoid plunge cutting...

Instruction Manual
Page 17
WARNING: Using this reciprocating saw with oil or water. 4. When they become worn to ensure the winding does noto become damaged and/or wet with loosen screws is noted. 2. Service ... as soon as excessive abrasion is extremely dangerous. 3. of the motor. To assure that only authorized replacement parts will be performed by an Hitachi Authorized Service Center. Inspecting the blade Continued use . At that they slide freely within the brush holders. This Parts List will result in motor trouble. Service parts list...
WARNING: Using this reciprocating saw with oil or water. 4. When they become worn to ensure the winding does noto become damaged and/or wet with loosen screws is noted. 2. Service ... as soon as excessive abrasion is extremely dangerous. 3. of the motor. To assure that only authorized replacement parts will be performed by an Hitachi Authorized Service Center. Inspecting the blade Continued use . At that they slide freely within the brush holders. This Parts List will result in motor trouble. Service parts list...

Instruction Manual
Page 18
STANDARD ACCESSORIES (1) Blade (Code No. 725362) ...1 (2) Case (Code No. 321142) ...1 18 Contact HITACHI if you are not sure whether it is safe to change without any obligation on the part of any other attachment or accessory can be ...dangerous and could cause injury or mechanical damage. NOTE: Accessories are not intended for use of the HITACHI. English ACCESSORIES WARNING: ALWAYS use replacement parts or accessories which are subject to use a particular replacement part or accessory with this tool. The use with...
STANDARD ACCESSORIES (1) Blade (Code No. 725362) ...1 (2) Case (Code No. 321142) ...1 18 Contact HITACHI if you are not sure whether it is safe to change without any obligation on the part of any other attachment or accessory can be ...dangerous and could cause injury or mechanical damage. NOTE: Accessories are not intended for use of the HITACHI. English ACCESSORIES WARNING: ALWAYS use replacement parts or accessories which are subject to use a particular replacement part or accessory with this tool. The use with...

Instruction Manual
Page 19
... 725314 725320 725321 725322 725323 725324 725326 725325 725327 725330 725331 725332 725340 725350 725351 725360 725361 725362 BLADES / POUCH 5 5 5 5 5 5 5 5 5 5 5 5 5 5 5 5 5 5 ...HCS: HIGHSPEED CARBON STEEL NOTE: Specifications are subject to change without any obligation on the part of the HITACHI. 19 PROG. English OPTIONAL ACCESSORIES.......sold separately TYPE WOOD CUTTING WOOD CUTTING NAIL-EMBEDED METAL CUTTING ALL PURPOSE...METAL NEW ALL PURPOSE LENGTH 6" (152 mm) 9" (228 mm) 12" (305 mm) 6" (152 mm) 6" (152 mm) 6" (152 mm) 9" (228 mm) 12" (305 mm) 6" (152 mm) 9" (228 mm) 6" ...
... 725314 725320 725321 725322 725323 725324 725326 725325 725327 725330 725331 725332 725340 725350 725351 725360 725361 725362 BLADES / POUCH 5 5 5 5 5 5 5 5 5 5 5 5 5 5 5 5 5 5 ...HCS: HIGHSPEED CARBON STEEL NOTE: Specifications are subject to change without any obligation on the part of the HITACHI. 19 PROG. English OPTIONAL ACCESSORIES.......sold separately TYPE WOOD CUTTING WOOD CUTTING NAIL-EMBEDED METAL CUTTING ALL PURPOSE...METAL NEW ALL PURPOSE LENGTH 6" (152 mm) 9" (228 mm) 12" (305 mm) 6" (152 mm) 6" (152 mm) 6" (152 mm) 9" (228 mm) 12" (305 mm) 6" (152 mm) 9" (228 mm) 6" ...
Instruction Manual
Page 56
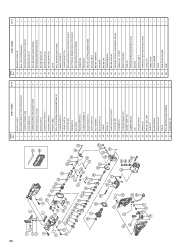
... (W/FLANGE) D4_30 74 SWITCH 75 SWITCH ASS'Y 76 TAPPING SCREW (W/FLANGE) D4X16 77 CORD CLIP 78 NAME PLATE 79 CORD ARMOR 80 CORD 501 SABER SAW BLADES 502 CASE Q'TY 1 2 2 1 4 2 1 1 1 1 2 1 1 1 2 1 1 1 2 1 2 1 2 2 2 4 1 1 2 2 1 1 2 1 1 1 1 1 1 PART NAME 41 BEARING COVER (B) 42 SEAL LOCK SCREW ...5 TAPPING SCREW (W/FLANGE) D4X25 6 FRONT COVER (D), (E) SET 7 BASE LEVER (C) 8 PUSHING BUTTON (C) 9 PUSHING SPRING 10 HITACHI LABEL 11 SEAL LOCK SCREW (W/WASHERS) M4X10 12 CHANGE KNOB (C) 13 O-RING (1AP-10) 14 LOCK NUT M8 15 WASHER (G) 16 BOLT M10 17 BASE ADAPTER (C) 18 CUSHION...
... (W/FLANGE) D4_30 74 SWITCH 75 SWITCH ASS'Y 76 TAPPING SCREW (W/FLANGE) D4X16 77 CORD CLIP 78 NAME PLATE 79 CORD ARMOR 80 CORD 501 SABER SAW BLADES 502 CASE Q'TY 1 2 2 1 4 2 1 1 1 1 2 1 1 1 2 1 1 1 2 1 2 1 2 2 2 4 1 1 2 2 1 1 2 1 1 1 1 1 1 PART NAME 41 BEARING COVER (B) 42 SEAL LOCK SCREW ...5 TAPPING SCREW (W/FLANGE) D4X25 6 FRONT COVER (D), (E) SET 7 BASE LEVER (C) 8 PUSHING BUTTON (C) 9 PUSHING SPRING 10 HITACHI LABEL 11 SEAL LOCK SCREW (W/WASHERS) M4X10 12 CHANGE KNOB (C) 13 O-RING (1AP-10) 14 LOCK NUT M8 15 WASHER (G) 16 BOLT M10 17 BASE ADAPTER (C) 18 CUSHION...
Parts List
Page 2
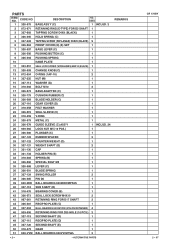
...1 7 326-597 BASE LEVER (C) 1 8 326-596 PUSHING BUTTON (C) 1 9 326-594 PUSHING SPRING 1 10 NAME PLATE 1 11 303-851 SEAL LOCK SCREW (W/WASHERS) M4X10 (BLACK) 1 12 326-593 CHANGE KNOB (C) 1 13 872-654 O-RING (1AP-10) 2 14 327-325 NUT M8 1 15 327-114 WASHER (G) 1 16 318-493 BOLT M10 2 17... 326-574 BASE ADAPTER (C) 1 18 326-779 CUSHION RUBBER (C) 1 19 326-589 BLADE HOLDER (C) 1 20 327-116 GEAR COVER (D) 1 21 318-458 FELT WASHER 1 22 326-576 SEAL SLEEVE (C) 1 23 318-459 V-RING 1 24 326-579 METAL (C)...
...1 7 326-597 BASE LEVER (C) 1 8 326-596 PUSHING BUTTON (C) 1 9 326-594 PUSHING SPRING 1 10 NAME PLATE 1 11 303-851 SEAL LOCK SCREW (W/WASHERS) M4X10 (BLACK) 1 12 326-593 CHANGE KNOB (C) 1 13 872-654 O-RING (1AP-10) 2 14 327-325 NUT M8 1 15 327-114 WASHER (G) 1 16 318-493 BOLT M10 2 17... 326-574 BASE ADAPTER (C) 1 18 326-779 CUSHION RUBBER (C) 1 19 326-589 BLADE HOLDER (C) 1 20 327-116 GEAR COVER (D) 1 21 318-458 FELT WASHER 1 22 326-576 SEAL SLEEVE (C) 1 23 318-459 V-RING 1 24 326-579 METAL (C)...

Parts List
Page 4
... 601 959-610 SABER SAW BLADES NO. 1 (5 PCS.) 1 602 958-182 SABER SAW BLADES NO. 2 (5 PCS.) 1 603 958-183 SABER SAW BLADES NO. 3 (5 PCS.) 1 604 959-611 SABER SAW BLADES NO. 4 (5 PCS.) 1 605 958-185 SABER SAW BLADES NO. 5 (5 PCS.) 1 606 958-188 SABER SAW BLADES NO. 8 (5 PCS.) 1 607 996-427 SABER SAW BLADES NO. 9 (3 PCS.) 1 608 318-611 SABER SAW BLADES NO. 101 150L P. 10...
... 601 959-610 SABER SAW BLADES NO. 1 (5 PCS.) 1 602 958-182 SABER SAW BLADES NO. 2 (5 PCS.) 1 603 958-183 SABER SAW BLADES NO. 3 (5 PCS.) 1 604 959-611 SABER SAW BLADES NO. 4 (5 PCS.) 1 605 958-185 SABER SAW BLADES NO. 5 (5 PCS.) 1 606 958-188 SABER SAW BLADES NO. 8 (5 PCS.) 1 607 996-427 SABER SAW BLADES NO. 9 (3 PCS.) 1 608 318-611 SABER SAW BLADES NO. 101 150L P. 10...


