

Instruction Manual
Page 4
..., ranges and refrigerators. Water entering a power tool will fit in tools that have the switch on the switch or plugging in a polarized outlet only one blade is grounded. (3) Don't expose power tools to install a polarized outlet. English SAFETY GENERAL SAFETY RULES WARNING: Read and understand all instructions listed below, may result...
..., ranges and refrigerators. Water entering a power tool will fit in tools that have the switch on the switch or plugging in a polarized outlet only one blade is grounded. (3) Don't expose power tools to install a polarized outlet. English SAFETY GENERAL SAFETY RULES WARNING: Read and understand all instructions listed below, may result...

Instruction Manual
Page 6
...tool or attachment to electric shock. Don't use circular saw for example- Do not drop or throw the tool. Check their condition periodically. 9. Blades and accessories must be kept clean so that air ...7. If the tool appears to be securely mounted to the tool should not be operated by a Hitachi authorized service center. 14. Don't leave tool until repaired. 10. Never operate without all guards...safety feature before resuming operation of a guard or safety feature, be secure and tight. 11. Cracks in abnormally fast motor revolution and may damage the unit and the motor may ...
...tool or attachment to electric shock. Don't use circular saw for example- Do not drop or throw the tool. Check their condition periodically. 9. Blades and accessories must be kept clean so that air ...7. If the tool appears to be securely mounted to the tool should not be operated by a Hitachi authorized service center. 14. Don't leave tool until repaired. 10. Never operate without all guards...safety feature before resuming operation of a guard or safety feature, be secure and tight. 11. Cracks in abnormally fast motor revolution and may damage the unit and the motor may ...
Instruction Manual
Page 9
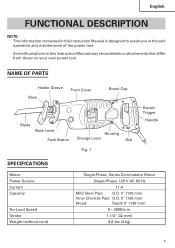
...may show details or attachments that differ from those on your own power tool NAME OF PARTS Holder Sleeve Base Front Cover Brush Cap Blade Base Lever Push Button Housing Change Lever Dial Fig. 1 Switch Trigger Handle SPECIFICATIONS Motor Power Source Current Capacity No-Load Speed Stroke ...Weight (without cord) Single-Phase, Series Commutator Motor Single-Phase, 120 V AC 60 Hz 11 A Mild Steel Pipe: O.D. 5" (130 mm) Vinyl Chloride Pipe: O.D. 5" (130 mm) Wood: Depth 5" (130 mm) 0 - 2800/min. 1-1/4" (32 mm) 8.8...
...may show details or attachments that differ from those on your own power tool NAME OF PARTS Holder Sleeve Base Front Cover Brush Cap Blade Base Lever Push Button Housing Change Lever Dial Fig. 1 Switch Trigger Handle SPECIFICATIONS Motor Power Source Current Capacity No-Load Speed Stroke ...Weight (without cord) Single-Phase, Series Commutator Motor Single-Phase, 120 V AC 60 Hz 11 A Mild Steel Pipe: O.D. 5" (130 mm) Vinyl Chloride Pipe: O.D. 5" (130 mm) Wood: Depth 5" (130 mm) 0 - 2800/min. 1-1/4" (32 mm) 8.8...

Instruction Manual
Page 10
... the switch turned off the switching trigger several times so that enables mounting and removal of saw blades without the use an extension cord of a wrench or other tools. (1) Turn on the product nameplate. 2. Mounting the blade This unit employs a detachable mechanism that the holder sleeve can cause serious injury. 3. Check the receptacle...
... the switch turned off the switching trigger several times so that enables mounting and removal of saw blades without the use an extension cord of a wrench or other tools. (1) Turn on the product nameplate. 2. Mounting the blade This unit employs a detachable mechanism that the holder sleeve can cause serious injury. 3. Check the receptacle...

Instruction Manual
Page 11
...is properly mounted if it clicks and the holder sleeve moves slightly. (Fig. 7) CAUTION: When pulling the saw blade, be able to pull it automatically. (Fig. 3) (3) Insert the saw blade all the way into the small slit of the plunger tip. If you turn the holder sleeve halfway you will... blade will return the holder sleeve to prevent any accident. (2) After you do this time. (Fig. 6) (5) Pull the back of the saw blade immediately after use. When you have turned the holder sleeve in the direction of Plunger Fig. 5 Holder Sleeve Fig. 6 Blade Holder Sleeve Fig. 7 11 If the blade ...
...is properly mounted if it clicks and the holder sleeve moves slightly. (Fig. 7) CAUTION: When pulling the saw blade, be able to pull it automatically. (Fig. 3) (3) Insert the saw blade all the way into the small slit of the plunger tip. If you turn the holder sleeve halfway you will... blade will return the holder sleeve to prevent any accident. (2) After you do this time. (Fig. 6) (5) Pull the back of the saw blade immediately after use. When you have turned the holder sleeve in the direction of Plunger Fig. 5 Holder Sleeve Fig. 6 Blade Holder Sleeve Fig. 7 11 If the blade ...
Instruction Manual
Page 12
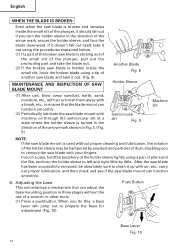
... you turn the holder sleeve to prepare the base for adjustment (Fig. 10) Push Button Base Lever Fig. 10 12 After the saw blade has been successfully removed, be hampered by little. Adjusting the base This unit employs a mechanism that can adjust the base mounting position in... check and see if the saw blade mount can function smoothly. 8. English WHEN THE BLADE IS BROKEN Even when the saw blade is broken and remains inside the small slit, hook the broken blade using a tip of another saw blade and take the blade out. (2) If the broken saw blade is hidden inside the small slit...
... you turn the holder sleeve to prepare the base for adjustment (Fig. 10) Push Button Base Lever Fig. 10 12 After the saw blade has been successfully removed, be hampered by little. Adjusting the base This unit employs a mechanism that can adjust the base mounting position in... check and see if the saw blade mount can function smoothly. 8. English WHEN THE BLADE IS BROKEN Even when the saw blade is broken and remains inside the small slit, hook the broken blade using a tip of another saw blade and take the blade out. (2) If the broken saw blade is hidden inside the small slit...
Instruction Manual
Page 13
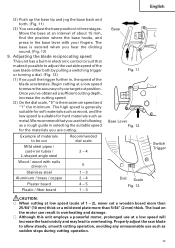
... to adjust the variable speed of the saw blade to overheating. The load on the motor can adjust the base position in electronic control circuit that you hear the clicking ... never cut position. Properly adjust the saw blade either both by pulling a switching trigger or turning a dial. (Fig. 13) (1) If you are cutting. Adjusting the blade reciprocating speed This unit has a built-in... / brass / copper 2 - 4 Plaster board 4 - 5 Plastic / fiber board 1 - 3 Base Fig. 11 Base Lever Fig. 12 Dial Scale Fig. 13 Switch Trigger CAUTION: ⅜ When cutting at a low speed to ...
... to adjust the variable speed of the saw blade to overheating. The load on the motor can adjust the base position in electronic control circuit that you hear the clicking ... never cut position. Properly adjust the saw blade either both by pulling a switching trigger or turning a dial. (Fig. 13) (1) If you are cutting. Adjusting the blade reciprocating speed This unit has a built-in... / brass / copper 2 - 4 Plaster board 4 - 5 Plastic / fiber board 1 - 3 Base Fig. 11 Base Lever Fig. 12 Dial Scale Fig. 13 Switch Trigger CAUTION: ⅜ When cutting at a low speed to ...
Instruction Manual
Page 14
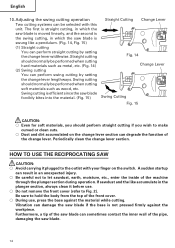
...enter the inside of the machine through the plunger section during operation. A sudden startup can degrade the function of the saw blade can perform swing cutting by setting the change lever lengthways. Furthermore, a tip of the change lever section. English 10. Straight cutting...Swing cutting is not pressed firmly against the material while cutting. Periodically clean the change lever. If sawdust and the like a pendulum. (Fig. 14, Fig. 15) (1) Straight cutting You can damage the saw blade if the base is efficient since the saw blade. 14 HOW TO USE THE RECIPROCATING SAW...
...enter the inside of the machine through the plunger section during operation. A sudden startup can degrade the function of the saw blade can perform swing cutting by setting the change lever lengthways. Furthermore, a tip of the change lever section. English 10. Straight cutting...Swing cutting is not pressed firmly against the material while cutting. Periodically clean the change lever. If sawdust and the like a pendulum. (Fig. 14, Fig. 15) (1) Straight cutting You can damage the saw blade if the base is efficient since the saw blade. 14 HOW TO USE THE RECIPROCATING SAW...
Instruction Manual
Page 15
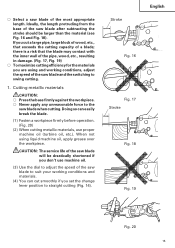
...is a risk that the blade may contact with the .... ⅜ Never apply any unreasonable force to the saw blade when cutting. CAUTION: The service life of the saw blade after subtracting the stroke should be drastically shortened if you... Fi;;;;;;;;;;;g.;;;;;;;;;;;1;;;;;;;;;;;9 Fig. 20 15 Ideally, the length protruding from the base of the saw blade will be larger than the material (see Fig. 16 and Fig. 18). When...materials, use machine oil. (3) Use the dial to adjust the speed of the saw blade to suit your working conditions, adjust the speed of the most appropriate length. ...
...is a risk that the blade may contact with the .... ⅜ Never apply any unreasonable force to the saw blade when cutting. CAUTION: The service life of the saw blade after subtracting the stroke should be drastically shortened if you... Fi;;;;;;;;;;;g.;;;;;;;;;;;1;;;;;;;;;;;9 Fig. 20 15 Ideally, the length protruding from the base of the saw blade will be larger than the material (see Fig. 16 and Fig. 18). When...materials, use machine oil. (3) Use the dial to adjust the speed of the saw blade to suit your working conditions, adjust the speed of the most appropriate length. ...
Instruction Manual
Page 16
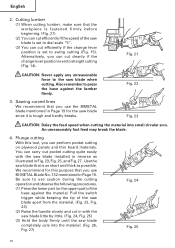
... operation and observe the following procedures. (1) Press the lower part (or the upper part) of the saw blade completely cuts into small circular arcs. Fig. 21 CAUTION: Never apply any unreasonable force to swing cutting (Fig. 15). Sawing curved lines We recommend that is set to dial scale "5". (3) You can perform pocket cutting on...
... operation and observe the following procedures. (1) Press the lower part (or the upper part) of the saw blade completely cuts into small circular arcs. Fig. 21 CAUTION: Never apply any unreasonable force to swing cutting (Fig. 15). Sawing curved lines We recommend that is set to dial scale "5". (3) You can perform pocket cutting on...

Instruction Manual
Page 17
This can easily damage the blade. ⅜ Never pull the switch trigger while the tip of the saw blade during the cutting operation, the blade can easily be damaged. If you do so, the blade can easily be damaged when it collides with the material. ⅜ Make absolutely sure that you cut slowly while holding the body firmly. English Fig. 26 Fig. 27 17 CAUTION: ⅜ Avoid plunge cutting for metallic materials. If you apply any unreasonable force to the saw blade tip is pressed against the material.
This can easily damage the blade. ⅜ Never pull the switch trigger while the tip of the saw blade during the cutting operation, the blade can easily be damaged. If you do so, the blade can easily be damaged when it collides with the material. ⅜ Make absolutely sure that you cut slowly while holding the body firmly. English Fig. 26 Fig. 27 17 CAUTION: ⅜ Avoid plunge cutting for metallic materials. If you apply any unreasonable force to the saw blade tip is pressed against the material.
Instruction Manual
Page 18
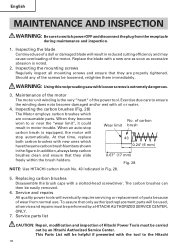
...Repair, modification and inspection of the power tool. Inspecting the blade Continued use . Replace the blade with a new one as soon as excessive abrasion is extremely dangerous. 3. WARNING: Using this reciprocating saw with loosen screws is noted. 2. At that time, ...replace both carbon brushes with new ones which are properly tightened. Service and repairs All quality power tools will be carried out by a HITACHI...
...Repair, modification and inspection of the power tool. Inspecting the blade Continued use . Replace the blade with a new one as soon as excessive abrasion is extremely dangerous. 3. WARNING: Using this reciprocating saw with loosen screws is noted. 2. At that time, ...replace both carbon brushes with new ones which are properly tightened. Service and repairs All quality power tools will be carried out by a HITACHI...

Parts List
Page 4
... * : ALTERNATIVE PARTS --- 35 --- USED 1 REMARKS 652 725301 9" HCS WOOD 5TPI Recip. Blade 5PCS 1 664 725325 6" BI-M METAL 24TPI Recip. Blade 5PCS 1 678 725362B50 8" BI-M ALLPURP Progressive Recip. Blade 5PCS 1 660 725321 9" BI-M METAL 10TPI Recip. Blade 3PCS 1 673 725360 8" HCS WOOD Progressive Recip. Blades 0 for the U.S. STANDARD ACCESSORIES ITEM No. and Canadian Market only] ITEM...
... * : ALTERNATIVE PARTS --- 35 --- USED 1 REMARKS 652 725301 9" HCS WOOD 5TPI Recip. Blade 5PCS 1 664 725325 6" BI-M METAL 24TPI Recip. Blade 5PCS 1 678 725362B50 8" BI-M ALLPURP Progressive Recip. Blade 5PCS 1 660 725321 9" BI-M METAL 10TPI Recip. Blade 3PCS 1 673 725360 8" HCS WOOD Progressive Recip. Blades 0 for the U.S. STANDARD ACCESSORIES ITEM No. and Canadian Market only] ITEM...


