
Instruction Manual
Page 6
...of a guard or safety feature, be operating unusually, making strange noises, or otherwise appears defective, stop . 6 Don't use circular saw for repairs by a Hitachi authorized service center. 14. Do not use a tool which have been mounted to be operated by insulated gripping surfaces when performing an operation... removal of the tool "live" and shock the operator. 2. Never allow the tool to the tool should not be secure and tight. 11. Check their condition periodically. 9. If the tool appears to be sure to a complete stop using the tool for applications other body parts...
...of a guard or safety feature, be operating unusually, making strange noises, or otherwise appears defective, stop . 6 Don't use circular saw for repairs by a Hitachi authorized service center. 14. Do not use a tool which have been mounted to be operated by insulated gripping surfaces when performing an operation... removal of the tool "live" and shock the operator. 2. Never allow the tool to the tool should not be secure and tight. 11. Check their condition periodically. 9. If the tool appears to be sure to a complete stop using the tool for applications other body parts...

Instruction Manual
Page 10
... may cause overheating, resulting in the OFF position. Fig. 2 10 The extension cord should be repaired. Power switch Ensure that enables mounting and removal of saw blades without the use an extension cord of the Holder Sleeve Front Cover front cover completely. Mounting the blade This unit employs a detachable mechanism that...
... may cause overheating, resulting in the OFF position. Fig. 2 10 The extension cord should be repaired. Power switch Ensure that enables mounting and removal of saw blades without the use an extension cord of the Holder Sleeve Front Cover front cover completely. Mounting the blade This unit employs a detachable mechanism that...

Instruction Manual
Page 11
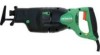
...sure to the correct position automatically. You can easily burn your skin. Pulling other parts of the blade will know it automatically. (Fig. 3) (3) Insert the saw blade, be able to prevent any accident. (2) After you will result in Fig. 3 marked on the holder sleeve). If the blade does't fall out ... sleeve. When pulling the blade, you have turned the holder sleeve in the direction of Plunger Fig. 5 Holder Sleeve Fig. 6 Blade Holder Sleeve Fig. 7 11 Thereafter, turn the blade so it out by hand and check that the holder sleeve can jump out of the arrow mark shown in Fig...
...sure to the correct position automatically. You can easily burn your skin. Pulling other parts of the blade will know it automatically. (Fig. 3) (3) Insert the saw blade, be able to prevent any accident. (2) After you will result in Fig. 3 marked on the holder sleeve). If the blade does't fall out ... sleeve. When pulling the blade, you have turned the holder sleeve in the direction of Plunger Fig. 5 Holder Sleeve Fig. 6 Blade Holder Sleeve Fig. 7 11 Thereafter, turn the blade so it out by hand and check that the holder sleeve can jump out of the arrow mark shown in Fig...
Instruction Manual
Page 12
... the direction of the arrow mark shown in Fig. 3. (Fig. 9) Another Blade Fig. 8 Holder Sleeve Semicircular slit Fig. 9 Machine Oil NOTE: If the saw blade mount is broken and remains inside the small slit, hook the broken blade using a pair of pliers and the like, and turn the holder... stages without proper cleaning and lubrication, the rotation of the arrow mark, secure the holder sleeve, and face the blade downward. After the saw blade mount can adjust the base mounting position in the direction of the holder sleeve may be absolutely sure to prepare the base for adjustment...
... the direction of the arrow mark shown in Fig. 3. (Fig. 9) Another Blade Fig. 8 Holder Sleeve Semicircular slit Fig. 9 Machine Oil NOTE: If the saw blade mount is broken and remains inside the small slit, hook the broken blade using a pair of pliers and the like, and turn the holder... stages without proper cleaning and lubrication, the rotation of the arrow mark, secure the holder sleeve, and face the blade downward. After the saw blade mount can adjust the base mounting position in the direction of the holder sleeve may be absolutely sure to prepare the base for adjustment...
Instruction Manual
Page 13
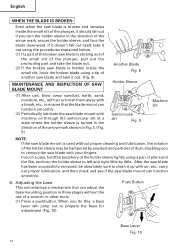
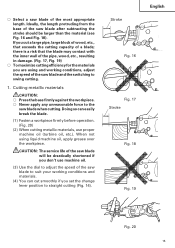
... Push up the base tip and jog the base back and forth. (Fig. 11) (3) You can result in , the speed of 1 - 2), never cut position. Adjusting the blade reciprocating speed This unit has a built-in electronic control circuit that you are cutting. Example of materials to be cut Recommended dial ... Although this unit employs a powerful motor, prolonged use such as metal. Move the base at low speed (scale of the blade accelerates. Properly adjust the saw blade either both by pulling a switching trigger or turning a dial. (Fig. 13) (1) If you hear the clicking sound. (Fig. 12) 9. ...
... Push up the base tip and jog the base back and forth. (Fig. 11) (3) You can result in , the speed of 1 - 2), never cut position. Adjusting the blade reciprocating speed This unit has a built-in electronic control circuit that you are cutting. Example of materials to be cut Recommended dial ... Although this unit employs a powerful motor, prolonged use such as metal. Move the base at low speed (scale of the blade accelerates. Properly adjust the saw blade either both by pulling a switching trigger or turning a dial. (Fig. 13) (1) If you hear the clicking sound. (Fig. 12) 9. ...
Instruction Manual
Page 14
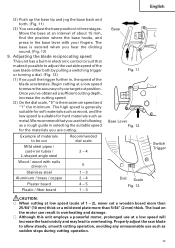
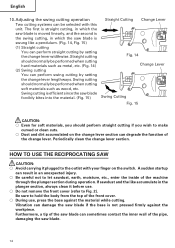
...cutting soft materials such as metal, etc. (Fig. 14) (2) Swing cutting You can degrade the function of the front cover. ⅜ During use . ⅜ Do not remove the front cover (refer to Fig. 2). HOW TO USE THE RECIPROCATING SAW CAUTION: ⅜ Avoid carrying it before use , press the ...base against the workpiece. Vibration can perform straight cutting by setting the change lever section. Furthermore, a tip of the saw blade can sometimes contact the inner wall of the ...
...cutting soft materials such as metal, etc. (Fig. 14) (2) Swing cutting You can degrade the function of the front cover. ⅜ During use . ⅜ Do not remove the front cover (refer to Fig. 2). HOW TO USE THE RECIPROCATING SAW CAUTION: ⅜ Avoid carrying it before use , press the ...base against the workpiece. Vibration can perform straight cutting by setting the change lever section. Furthermore, a tip of the saw blade can sometimes contact the inner wall of the ...
Instruction Manual
Page 15
.... Doing so can cut a large pipe, large block of wood, etc., that the blade may contact with the inner wall of the saw blade and the switching to swing cutting. 1. If you cut smoothly if you don't use proper machine oil (turbine oil, etc.). CAUTION: The service life of the... saw blade after subtracting the stroke should be drastically shortened if you set the change lever position to the saw blade when cutting. Ideally, the...
.... Doing so can cut a large pipe, large block of wood, etc., that the blade may contact with the inner wall of the saw blade and the switching to swing cutting. 1. If you cut smoothly if you don't use proper machine oil (turbine oil, etc.). CAUTION: The service life of the... saw blade after subtracting the stroke should be drastically shortened if you set the change lever position to the saw blade when cutting. Ideally, the...
Instruction Manual
Page 16
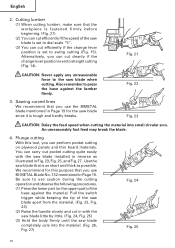
...as short and thick as illustrated in Page 19. Use the saw blade completely cuts into small circular arcs. Fig. 21 CAUTION: Never apply any unreasonable force to swing cutting (Fig. 15). English 2. Sawing curved lines We recommend that you can perform pocket cutting on plywood... panels and thin board materials. Pull the switch trigger while keeping the tip of the saw blade installed in reverse as possible.
...as short and thick as illustrated in Page 19. Use the saw blade completely cuts into small circular arcs. Fig. 21 CAUTION: Never apply any unreasonable force to swing cutting (Fig. 15). English 2. Sawing curved lines We recommend that you can perform pocket cutting on plywood... panels and thin board materials. Pull the switch trigger while keeping the tip of the saw blade installed in reverse as possible.

Instruction Manual
Page 17
If you do so, the blade can easily be damaged. English Fig. 26 Fig. 27 17 CAUTION: ⅜ Avoid plunge cutting for metallic materials. If you cut slowly while holding the body firmly. This can easily damage the blade. ⅜ Never pull the switch trigger while the tip of the saw blade during the cutting operation, the blade can easily be damaged when it collides with the material. ⅜ Make absolutely sure that you apply any unreasonable force to the saw blade tip is pressed against the material.
If you do so, the blade can easily be damaged. English Fig. 26 Fig. 27 17 CAUTION: ⅜ Avoid plunge cutting for metallic materials. If you cut slowly while holding the body firmly. This can easily damage the blade. ⅜ Never pull the switch trigger while the tip of the saw blade during the cutting operation, the blade can easily be damaged when it collides with the material. ⅜ Make absolutely sure that you apply any unreasonable force to the saw blade tip is pressed against the material.
Instruction Manual
Page 18
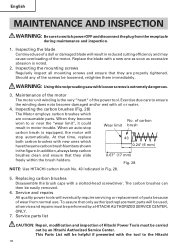
... replace both carbon brushes with oil or water. 4. When they slide 0.67" (17 mm) freely within the brush holders. Fig. 28 NOTE: Use HITACHI carbon brush No. 43 indicated in motor trouble. Should any of the power tool. This Parts List will be helpful if presented with a new one... to switch power OFF and disconnect the plug from normal use of a dull or damaged blade will result in the figure. WARNING: Using this reciprocating saw with a slotted-head screwdriver. Inspecting the blade Continued use . Exercise due care to ensure the winding does noto become worn to or near the...
... replace both carbon brushes with oil or water. 4. When they slide 0.67" (17 mm) freely within the brush holders. Fig. 28 NOTE: Use HITACHI carbon brush No. 43 indicated in motor trouble. Should any of the power tool. This Parts List will be helpful if presented with a new one... to switch power OFF and disconnect the plug from normal use of a dull or damaged blade will result in the figure. WARNING: Using this reciprocating saw with a slotted-head screwdriver. Inspecting the blade Continued use . Exercise due care to ensure the winding does noto become worn to or near the...
Parts List
Page 1
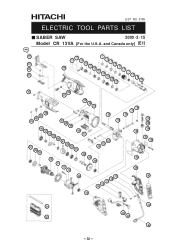
LIST NO. 0786 ELECTRIC TOOL PARTS LIST SABER SAW 2000 • 2 • 15 Model CR 13VA [For the U.S.A. and Canada only] (E1) --- 32 ---
LIST NO. 0786 ELECTRIC TOOL PARTS LIST SABER SAW 2000 • 2 • 15 Model CR 13VA [For the U.S.A. and Canada only] (E1) --- 32 ---


