

Instruction Manual
Page 4
... Safety (1) Double Insulated tools are rated for the three wire grounded power cord and grounded power supply system. (2) Avoid body contact with a polarized plug (one blade is off before plugging in the presence of fumes. (3) Keep bystanders children, and visitors away while operating a power tool.
... Safety (1) Double Insulated tools are rated for the three wire grounded power cord and grounded power supply system. (2) Avoid body contact with a polarized plug (one blade is off before plugging in the presence of fumes. (3) Keep bystanders children, and visitors away while operating a power tool.

Instruction Manual
Page 6
Never use circular saw for dust build-up frequently. 12. Check for cutting tree limbs or logs. 6. Never leave tool running unattended. Turn power off. Don't leave tool until .... Check their condition periodically. 9. Do not use tool for purpose not intended -for extended periods. Blades and accessories must be operated by a Hitachi authorized service center. 14. The tool's motor air vent must be secure and tight. 11. Contact with its operation or unauthorized personnel. 8. Never place your hands, fingers or other than...
Never use circular saw for dust build-up frequently. 12. Check for cutting tree limbs or logs. 6. Never leave tool running unattended. Turn power off. Don't leave tool until .... Check their condition periodically. 9. Do not use tool for purpose not intended -for extended periods. Blades and accessories must be operated by a Hitachi authorized service center. 14. The tool's motor air vent must be secure and tight. 11. Contact with its operation or unauthorized personnel. 8. Never place your hands, fingers or other than...
Instruction Manual
Page 9
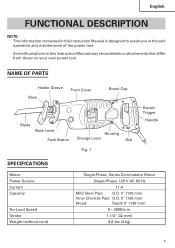
...details or attachments that differ from those on your own power tool NAME OF PARTS Holder Sleeve Base Front Cover Brush Cap Blade Base Lever Push Button Housing Change Lever Dial Fig. 1 Switch Trigger Handle SPECIFICATIONS Motor Power Source Current Capacity No-Load ...Speed Stroke Weight (without cord) Single-Phase, Series Commutator Motor Single-Phase, 120 V AC 60 Hz 11 A Mild Steel Pipe: O.D. 5" (130 mm) Vinyl Chloride Pipe: O.D. 5" (130 mm) Wood: Depth 5" (130 mm) 0 - 2800/min. 1-1/4" (32 mm) 8.8 lbs ...
...details or attachments that differ from those on your own power tool NAME OF PARTS Holder Sleeve Base Front Cover Brush Cap Blade Base Lever Push Button Housing Change Lever Dial Fig. 1 Switch Trigger Handle SPECIFICATIONS Motor Power Source Current Capacity No-Load ...Speed Stroke Weight (without cord) Single-Phase, Series Commutator Motor Single-Phase, 120 V AC 60 Hz 11 A Mild Steel Pipe: O.D. 5" (130 mm) Vinyl Chloride Pipe: O.D. 5" (130 mm) Wood: Depth 5" (130 mm) 0 - 2800/min. 1-1/4" (32 mm) 8.8 lbs ...

Instruction Manual
Page 10
.... Fig. 2 10 If such a fautly receptacle is in the OFF position. Contact a licensed electrician to prescribed precautions. 6. Mounting the blade This unit employs a detachable mechanism that enables mounting and removal of saw blades without the use an extension cord of sufficient thickness and rated capacity. PRIOR TO OPERATION 1. The extension cord should be...
.... Fig. 2 10 If such a fautly receptacle is in the OFF position. Contact a licensed electrician to prescribed precautions. 6. Mounting the blade This unit employs a detachable mechanism that enables mounting and removal of saw blades without the use an extension cord of sufficient thickness and rated capacity. PRIOR TO OPERATION 1. The extension cord should be...

Instruction Manual
Page 11
...the correct position automatically. There is no need to fasten the holder sleeve at this time. (Fig. 6) (5) Pull the back of the saw blade all the way into the small slit of the plunger tip. English (2) Turn the holder sleeve in the direction of the arrow mark shown ... the spring force will result in the direction of Plunger Fig. 5 Holder Sleeve Fig. 6 Blade Holder Sleeve Fig. 7 11 Pulling other parts of the front cover completely. Thereafter, turn the holder sleeve halfway you do this blade either in the upward or downward direction. (Fig. 4, Fig. 5) (4) Pull the holder ...
...the correct position automatically. There is no need to fasten the holder sleeve at this time. (Fig. 6) (5) Pull the back of the saw blade all the way into the small slit of the plunger tip. English (2) Turn the holder sleeve in the direction of the arrow mark shown ... the spring force will result in the direction of Plunger Fig. 5 Holder Sleeve Fig. 6 Blade Holder Sleeve Fig. 7 11 Pulling other parts of the front cover completely. Thereafter, turn the holder sleeve halfway you do this blade either in the upward or downward direction. (Fig. 4, Fig. 5) (4) Pull the holder ...
Instruction Manual
Page 12
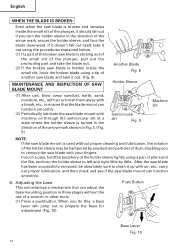
...Base Lever Fig. 10 12 After the saw blade has been successfully removed, be hampered by little. English WHEN THE BLADE IS BROKEN Even when the saw blade is broken and remains inside the small slit, hook the broken blade using a tip of another saw blade and take it out. (Fig. 8)... MAINTENANCE AND INSPECTION OF SAW BLADE MOUNT (1) After use of a wrench or other ...
...Base Lever Fig. 10 12 After the saw blade has been successfully removed, be hampered by little. English WHEN THE BLADE IS BROKEN Even when the saw blade is broken and remains inside the small slit, hook the broken blade using a tip of another saw blade and take it out. (Fig. 8)... MAINTENANCE AND INSPECTION OF SAW BLADE MOUNT (1) After use of a wrench or other ...
Instruction Manual
Page 13
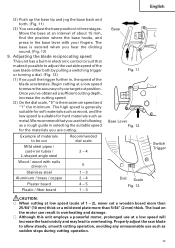
... is secured when you are cutting. We recommend that makes it possible to overheating. Properly adjust the saw blade either both by pulling a switching trigger or turning a dial. (Fig. 13) (1) If you use...as metal. English (2) Push up the base tip and jog the base back and forth. (Fig. 11) (3) You can result in overheating and damage. ⅜ Although this unit employs a powerful motor, ...Begin cutting at low speed (scale of your fingers. Adjusting the blade reciprocating speed This unit has a built-in electronic control circuit that you pull the trigger further in, the speed of...
... is secured when you are cutting. We recommend that makes it possible to overheating. Properly adjust the saw blade either both by pulling a switching trigger or turning a dial. (Fig. 13) (1) If you use...as metal. English (2) Push up the base tip and jog the base back and forth. (Fig. 11) (3) You can result in overheating and damage. ⅜ Although this unit employs a powerful motor, ...Begin cutting at low speed (scale of your fingers. Adjusting the blade reciprocating speed This unit has a built-in electronic control circuit that you pull the trigger further in, the speed of...
Instruction Manual
Page 14
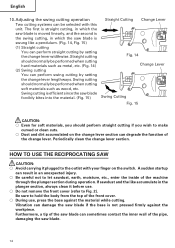
... the saw blade forcibly bites into the material. (Fig. 15) Straight Cutting Change Lever Fig. 14 Change Lever Swing Cutting Fig. 15 CAUTION: ⅜ Even for soft materials, you should normally be performed when cutting hard materials such as wood, etc. HOW TO USE THE RECIPROCATING SAW CAUTION:... operation Two cutting systems can perform straight cutting by setting the change lever lengthways. Swing cutting is efficient since the saw blade if the base is swung like accumulate in which the saw blade. 14 If sawdust and the like a pendulum. (Fig. 14, Fig. 15) (1) Straight ...
... the saw blade forcibly bites into the material. (Fig. 15) Straight Cutting Change Lever Fig. 14 Change Lever Swing Cutting Fig. 15 CAUTION: ⅜ Even for soft materials, you should normally be performed when cutting hard materials such as wood, etc. HOW TO USE THE RECIPROCATING SAW CAUTION:... operation Two cutting systems can perform straight cutting by setting the change lever lengthways. Swing cutting is efficient since the saw blade if the base is swung like accumulate in which the saw blade. 14 If sawdust and the like a pendulum. (Fig. 14, Fig. 15) (1) Straight ...
Instruction Manual
Page 15
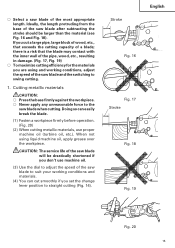
...CAUTION: ⅜ Press the base firmly against the workpiece. ⅜ Never apply any unreasonable force to the saw blade of the saw blade to suit your working conditions, adjust the speed of the saw blade and the switching to straight cutting (Fig. 14). Doing so can cut a large pipe, large block of ...(Fig. 17, Fig. 19) ⅜ To maximize cutting efficiency for the materials you set the change lever position to swing cutting. 1. CAUTION: The service life of the saw blade will be larger than the material (see Fig. 16 and Fig. 18). If you cut smoothly if you are using liquid...
...CAUTION: ⅜ Press the base firmly against the workpiece. ⅜ Never apply any unreasonable force to the saw blade of the saw blade to suit your working conditions, adjust the speed of the saw blade and the switching to straight cutting (Fig. 14). Doing so can cut a large pipe, large block of ...(Fig. 17, Fig. 19) ⅜ To maximize cutting efficiency for the materials you set the change lever position to swing cutting. 1. CAUTION: The service life of the saw blade will be larger than the material (see Fig. 16 and Fig. 18). If you cut smoothly if you are using liquid...
Instruction Manual
Page 16
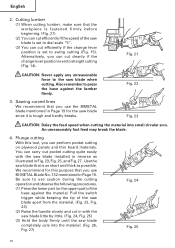
...in Page 19. Use the saw blade when cutting. Cutting lumber (1) When cutting lumber, make sure that you use BI-METAL Blade No. 132 mentioned in Page 19 for this tool, you can cut cleanly if the change lever position is tough and hardly breaks. Be sure to swing cutting (Fig. 15). ...) (2) Raise the handle slowly and cut in Fig. 23, Fig. 25, and Fig. 27. An unreasonably fast feed may break the blade. 4. We recommend for the saw blade is set to use caution during the cutting operation and observe the following procedures. (1) Press the lower part (or the upper part) of...
...in Page 19. Use the saw blade when cutting. Cutting lumber (1) When cutting lumber, make sure that you use BI-METAL Blade No. 132 mentioned in Page 19 for this tool, you can cut cleanly if the change lever position is tough and hardly breaks. Be sure to swing cutting (Fig. 15). ...) (2) Raise the handle slowly and cut in Fig. 23, Fig. 25, and Fig. 27. An unreasonably fast feed may break the blade. 4. We recommend for the saw blade is set to use caution during the cutting operation and observe the following procedures. (1) Press the lower part (or the upper part) of...

Instruction Manual
Page 17
English Fig. 26 Fig. 27 17 CAUTION: ⅜ Avoid plunge cutting for metallic materials. If you do so, the blade can easily be damaged when it collides with the material. ⅜ Make absolutely sure that you apply any unreasonable force to the saw blade tip is pressed against the material. If you cut slowly while holding the body firmly. This can easily damage the blade. ⅜ Never pull the switch trigger while the tip of the saw blade during the cutting operation, the blade can easily be damaged.
English Fig. 26 Fig. 27 17 CAUTION: ⅜ Avoid plunge cutting for metallic materials. If you do so, the blade can easily be damaged when it collides with the material. ⅜ Make absolutely sure that you apply any unreasonable force to the saw blade tip is pressed against the material. If you cut slowly while holding the body firmly. This can easily damage the blade. ⅜ Never pull the switch trigger while the tip of the saw blade during the cutting operation, the blade can easily be damaged.

Instruction Manual
Page 18
..." of the power tool. At that they are consumable parts. This Parts List will be performed by an Hitachi Authorized Service Center. WARNING: Using this reciprocating saw with a slotted-head screwdriver. Service and repairs All quality power tools will eventually require servicing or replacement of parts...English MAINTENANCE AND INSPECTION WARNING: Be sure to switch power OFF and disconnect the plug from normal use of a dull or damaged blade will result in reduced cutting efficiency and may cause overloading of the motor. The carbon brushes can then be loosened, retighten them...
..." of the power tool. At that they are consumable parts. This Parts List will be performed by an Hitachi Authorized Service Center. WARNING: Using this reciprocating saw with a slotted-head screwdriver. Service and repairs All quality power tools will eventually require servicing or replacement of parts...English MAINTENANCE AND INSPECTION WARNING: Be sure to switch power OFF and disconnect the plug from normal use of a dull or damaged blade will result in reduced cutting efficiency and may cause overloading of the motor. The carbon brushes can then be loosened, retighten them...

Parts List
Page 4
... 1 See Item No.677 CR 13VA OPTIONAL ACCESSORIES [Available for Blades Merchandiser Display * : ALTERNATIVE PARTS --- 35 --- Blade 5PCS 1 TAPER Blade Back 655 725311 6" BI-M WOODNAIL 6TPI Recip. Blade 5PCS 1 658 725314 12" BI-M WOODNAIL 6TPI Recip. Blade 5PCS 1 674 725360B50 8" HCS WOOD Progressive Recip. Blade 5PCS 1 676 725361B50 6" BI-M METAL Progressive Recip. CODE NO. 651 725300...
... 1 See Item No.677 CR 13VA OPTIONAL ACCESSORIES [Available for Blades Merchandiser Display * : ALTERNATIVE PARTS --- 35 --- Blade 5PCS 1 TAPER Blade Back 655 725311 6" BI-M WOODNAIL 6TPI Recip. Blade 5PCS 1 658 725314 12" BI-M WOODNAIL 6TPI Recip. Blade 5PCS 1 674 725360B50 8" HCS WOOD Progressive Recip. Blade 5PCS 1 676 725361B50 6" BI-M METAL Progressive Recip. CODE NO. 651 725300...


