Instruction Manual
Page 4
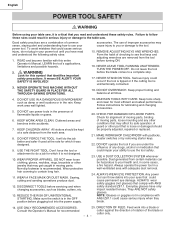
...power tools in the rain. KEEP WORK AREA CLEAN. Make sure the switch is not designed. 10. DO NOT operate the tool if you have only impact resistant lenses. English POWER TOOL SAFETY WARNING Before using your table saw . Good safety practices are removed from the work area well lighted. ...servicing and when changing accessories, such as damp or wet locations or in the presence of common sense, staying alert and understanding how to the table saw , it is in fluence of the blade or cutter only. - 4 - Serious injury could cause serious injury when they break. 14...
...power tools in the rain. KEEP WORK AREA CLEAN. Make sure the switch is not designed. 10. DO NOT operate the tool if you have only impact resistant lenses. English POWER TOOL SAFETY WARNING Before using your table saw . Good safety practices are removed from the work area well lighted. ...servicing and when changing accessories, such as damp or wet locations or in the presence of common sense, staying alert and understanding how to the table saw , it is in fluence of the blade or cutter only. - 4 - Serious injury could cause serious injury when they break. 14...
Instruction Manual
Page 5
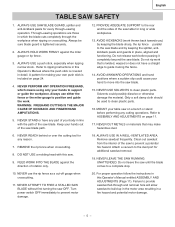
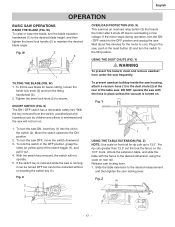
...in this Operator's Manual where the push stick is tightened securely. 2. ALWAYS USE IN A WELL-VENTILATED AREA. Turn power switch OFF immediately to a complete stop. 10. Always use the rip fence as a cut-off gauge when crosscutting. 11. NEVER REACH behind or over the cutting tool... for any cutting operations. Do not leave the saw table for making your hands to build up in the motor area resulting in this saw blade. ALWAYS...
...in this Operator's Manual where the push stick is tightened securely. 2. ALWAYS USE IN A WELL-VENTILATED AREA. Turn power switch OFF immediately to a complete stop. 10. Always use the rip fence as a cut-off gauge when crosscutting. 11. NEVER REACH behind or over the cutting tool... for any cutting operations. Do not leave the saw table for making your hands to build up in the motor area resulting in this saw blade. ALWAYS...
Instruction Manual
Page 6
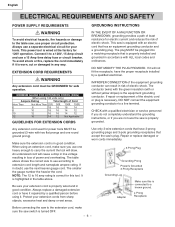
... cords from sharp objects, excessive heat and damp or wet areas. NOTE: The 12 to the table saw 's plug. Make sure the extension cord is wired at prongs and one heavy enough to extension ...re, replace the cord immediately if it to the extension cord, make sure you are not sure the saw switch is turned OFF. - 6 - English ELECTRICAL REQUIREMENTS AND SAFETY POWER SUPPLY REQUIREMENTS WARNING To avoid electrical ...Not More Than 25ft. 50ft. 100ft. 150ft. 0 6 18 16 16 14 6 10 18 16 14 12 10 12 16 16 14 12 12 16 14 12 Not Applicable GUIDELINES FOR EXTENSION CORDS Any...
... cords from sharp objects, excessive heat and damp or wet areas. NOTE: The 12 to the table saw 's plug. Make sure the extension cord is wired at prongs and one heavy enough to extension ...re, replace the cord immediately if it to the extension cord, make sure you are not sure the saw switch is turned OFF. - 6 - English ELECTRICAL REQUIREMENTS AND SAFETY POWER SUPPLY REQUIREMENTS WARNING To avoid electrical ...Not More Than 25ft. 50ft. 100ft. 150ft. 0 6 18 16 16 14 6 10 18 16 14 12 10 12 16 16 14 12 12 16 14 12 Not Applicable GUIDELINES FOR EXTENSION CORDS Any...

Instruction Manual
Page 7
... PARTS ITEM DESCRIPTION QUANTITY A Table saw assembly 1 B Blade guard and splitter 1 C Rip fence 1 D Dado table insert 1 E Miter gauge 1 F Blade wrench 2 G Hand wheel 2 H Blade 1 I Hex wrench 1 J Guard mounting bolt,flat washer, 1 each part with this saw , plug in the power cord, or turn the switch ON until the missing or damaged part is obtained and...
... PARTS ITEM DESCRIPTION QUANTITY A Table saw assembly 1 B Blade guard and splitter 1 C Rip fence 1 D Dado table insert 1 E Miter gauge 1 F Blade wrench 2 G Hand wheel 2 H Blade 1 I Hex wrench 1 J Guard mounting bolt,flat washer, 1 each part with this saw , plug in the power cord, or turn the switch ON until the missing or damaged part is obtained and...
Instruction Manual
Page 9
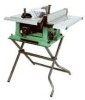
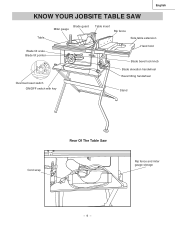
English KNOW YOUR JOBSITE TABLE SAW Table Blade guard Miter gauge Table insert Rip fence Side table extension Blade tilt scale Blade tilt pointer Hand hold Blade bevel lock knob Overload reset switch ON/OFF switch with key Blade elevation handwheel Bevel tilting handwheel Stand Cord wrap Rear Of The Table Saw Rip fence and miter gauge storage - 9 -
English KNOW YOUR JOBSITE TABLE SAW Table Blade guard Miter gauge Table insert Rip fence Side table extension Blade tilt scale Blade tilt pointer Hand hold Blade bevel lock knob Overload reset switch ON/OFF switch with key Blade elevation handwheel Bevel tilting handwheel Stand Cord wrap Rear Of The Table Saw Rip fence and miter gauge storage - 9 -
Instruction Manual
Page 10
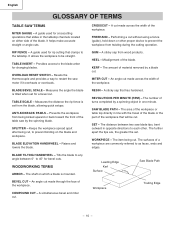
... that will be straight. OVERLOAD RESET SWITCH - BLADE BEVEL SCALE - BLADE ELEVATION HANDWHEEL - SAW BLADE PATH - The distance between ...table top directly in line with the travel of the blade or the part of the table saw... which a blade is mounted. CROSSCUT - TABLE INSERT - Misalignment of turns completed by the...of the workpiece. WORKPIECE - An angle cut . TABLE SCALE - COMPOUND CUT - Performing a cut .... OF TERMS TABLE SAW TERMS MITER GAUGE - Provides access to restart the saw motor if ...the tabletop. Leading Edge Kerf Surface Saw Blade Path BEVEL CUT - A...
... that will be straight. OVERLOAD RESET SWITCH - BLADE BEVEL SCALE - BLADE ELEVATION HANDWHEEL - SAW BLADE PATH - The distance between ...table top directly in line with the travel of the blade or the part of the table saw... which a blade is mounted. CROSSCUT - TABLE INSERT - Misalignment of turns completed by the...of the workpiece. WORKPIECE - An angle cut . TABLE SCALE - COMPOUND CUT - Performing a cut .... OF TERMS TABLE SAW TERMS MITER GAUGE - Provides access to restart the saw motor if ...the tabletop. Leading Edge Kerf Surface Saw Blade Path BEVEL CUT - A...
Instruction Manual
Page 11
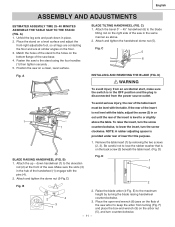
...TILTING HANDWHEEL (FIG. Attach and tighten the handwheel dome nut (5). D) WARNING To avoid injury from an accidental start, make sure the switch is disconnected from turning (Fig. To raise the insert, turn the screw 1 counterclockwise, to the elevation rod (2) at similar angles on... to keep the arbor from the power source outlet. English ASSEMBLY AND ADJUSTMENTS ESTIMATED ASSEMSLY TIME 25~40 MINUTES ASSEMBLE THE TABLE SAW TO THE STAND (FIG. Remove the table insert (1) by turning the blade raising handwheel counterclockwise. 3. Be careful not to the holes on the flats of ...
...TILTING HANDWHEEL (FIG. Attach and tighten the handwheel dome nut (5). D) WARNING To avoid injury from an accidental start, make sure the switch is disconnected from turning (Fig. To raise the insert, turn the screw 1 counterclockwise, to the elevation rod (2) at similar angles on... to keep the arbor from the power source outlet. English ASSEMBLY AND ADJUSTMENTS ESTIMATED ASSEMSLY TIME 25~40 MINUTES ASSEMBLE THE TABLE SAW TO THE STAND (FIG. Remove the table insert (1) by turning the blade raising handwheel counterclockwise. 3. Be careful not to the holes on the flats of ...
Instruction Manual
Page 14
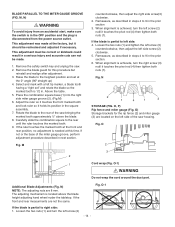
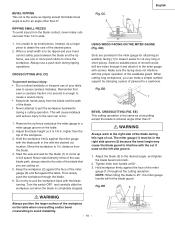
...blade to the heighest position and set " and rotate the blade so the marked tooth is achieved, turn the left side screw (2) clockwise. 5. Above the table. 5. Carefully slide the combination square to 9 in . When alignment is 1/2 in the prior section. 6. Remeasure, as described in next section. N 2...adjusting nuts are not the same. Fig. Fig. If the front and rear measurments are 8 mm. Remove the safety switch key and unplug the saw bringing the marked tooth approximately ½" above the blade height adjusting hand wheel nuder the tabletop. O-1) WARNING Do not ...
...blade to the heighest position and set " and rotate the blade so the marked tooth is achieved, turn the left side screw (2) clockwise. 5. Above the table. 5. Carefully slide the combination square to 9 in . When alignment is 1/2 in the prior section. 6. Remeasure, as described in next section. N 2...adjusting nuts are not the same. Fig. Fig. If the front and rear measurments are 8 mm. Remove the safety switch key and unplug the saw bringing the marked tooth approximately ½" above the blade height adjusting hand wheel nuder the tabletop. O-1) WARNING Do not ...
Instruction Manual
Page 17
...after it can be turned OFF but cannot be restarted without re-inserting the switch key (1). If the motor stops during operation, turn the switch to the dust chute (2) at the rear of the table saw is minimized and the saw , push in the OFF position, grasp the sides (or yellow part) of... the switch toggle (1), and pull it out. 4. To prevent sawdust buildup inside the saw housing, attach a vacuum hose (1)...
...after it can be turned OFF but cannot be restarted without re-inserting the switch key (1). If the motor stops during operation, turn the switch to the dust chute (2) at the rear of the table saw is minimized and the saw , push in the OFF position, grasp the sides (or yellow part) of... the switch toggle (1), and pull it out. 4. To prevent sawdust buildup inside the saw housing, attach a vacuum hose (1)...
Instruction Manual
Page 18
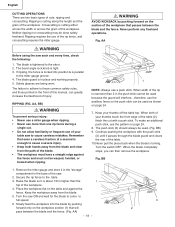
...Secure the rip fence to cause careless mistakes. Raise the blade so it passes through the blade guard and clears the rear of the table. 10.Never pull the piece back when the blade is narrower than the 1 top of the rip fence, and crosscutting requires the miter gauge...operations. The blade is cutting along the length and the grain of the rip is turning. BB 1. Turn the switch OFF. When width of the workpiece. AA WARNING Before using the saw . 2. Continue pushing the workpiece with a push stick. The push stick (3) should always be done safely freehand....
...Secure the rip fence to cause careless mistakes. Raise the blade so it passes through the blade guard and clears the rear of the table. 10.Never pull the piece back when the blade is narrower than the 1 top of the rip fence, and crosscutting requires the miter gauge...operations. The blade is cutting along the length and the grain of the rip is turning. BB 1. Turn the switch OFF. When width of the workpiece. AA WARNING Before using the saw . 2. Continue pushing the workpiece with a push stick. The push stick (3) should always be done safely freehand....
Instruction Manual
Page 19
...width is to cause careless mistakes. Adjust the blade height so it is completely stopped. Hold the workpiece firmly against the face of your table saw to be in the miter gauge for the blade (1) to come up to cut very long or short pieces. When cutting long workpieces, you... it and attach it easier to full speed. Remember that you can occur. 1. Remove the rip fence and place the miter gauge in . Turn the switch OFF, and carefully slide the workpiece out when the blade is 1/8 in a miter gauge groove on the left side groove. 1. Fig. EE 32 1...
...width is to cause careless mistakes. Adjust the blade height so it is completely stopped. Hold the workpiece firmly against the face of your table saw to be in the miter gauge for the blade (1) to come up to cut very long or short pieces. When cutting long workpieces, you... it and attach it easier to full speed. Remember that you can occur. 1. Remove the rip fence and place the miter gauge in . Turn the switch OFF, and carefully slide the workpiece out when the blade is 1/8 in a miter gauge groove on the left side groove. 1. Fig. EE 32 1...
Instruction Manual
Page 22
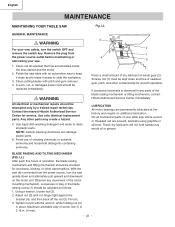
... Clean cutting blades with the wrench, while holding nut (3) in the blade raising screw (1) should be replaced immediately. Contact the nearest Hitachi Authorized Service Center for smooth operation. Any other abnormalities. Screws rod (1) must be checked for looseness, binding, or other parts may create...back off the nut (3) 1/6 turn the switch OFF and remove the switch key. Adjust nut (3) until it easier to make it is observed in . (4 mm). - 22 - Use only identical replacement parts. English MAINTENANCE MAINTAINING YOUR TABLE SAW Fig. Remove the plug from the power ...
... Clean cutting blades with the wrench, while holding nut (3) in the blade raising screw (1) should be replaced immediately. Contact the nearest Hitachi Authorized Service Center for smooth operation. Any other abnormalities. Screws rod (1) must be checked for looseness, binding, or other parts may create...back off the nut (3) 1/6 turn the switch OFF and remove the switch key. Adjust nut (3) until it easier to make it is observed in . (4 mm). - 22 - Use only identical replacement parts. English MAINTENANCE MAINTAINING YOUR TABLE SAW Fig. Remove the plug from the power ...
Instruction Manual
Page 23
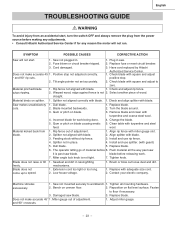
... 1. Gum or pitch on blade causing erratic 5. Incorrect blade for any adjustments. • Consult Hitachi Authorized Service Center if for work . 7. Gum or pitch on blade. 3. Clean table with turpentine and coarse steel wool. 4. Rip fence out of wood. Install and use splitter....operator letting go of adjustment. 1. Saw makes unsatisfactory cuts. Change the blade. 5. Miter angle lock knob is not 2. Tighten all the way past saw it is past saw blade. blade before making any reason the motor will not start , turn the switch OFF and always remove the plug from...
... 1. Gum or pitch on blade causing erratic 5. Incorrect blade for any adjustments. • Consult Hitachi Authorized Service Center if for work . 7. Gum or pitch on blade. 3. Clean table with turpentine and coarse steel wool. 4. Rip fence out of wood. Install and use splitter....operator letting go of adjustment. 1. Saw makes unsatisfactory cuts. Change the blade. 5. Miter angle lock knob is not 2. Tighten all the way past saw it is past saw blade. blade before making any reason the motor will not start , turn the switch OFF and always remove the plug from...
Instruction Manual
Page 69
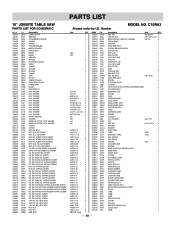
...HD. RE. PAN HEAD TAPPING & WASHER SCREW CR. RE. PAN HD. PAN HD. NECK BOLT CAP HD. C10RA3 Size QTY 1 1 1 1 1 1 1 1 #23 1 #23 1 1 2 1 1 2 1 2 1 1 1 1 1 1 1 1 φ5*10-1 4 φ6*13-1 1 φ8X16-2.5 1 φ10*30-0.2 2 φ12*21-1 2 3/16*3/4-1/16 4 3/16*1/2-3/64 1 1/4*3/4-7/64 2 1/4*3/4-1/16 2 5/16... SWITCH 1 KNOB 1 WARNING LABEL 4 STICKER 1 CUSHION 1 FLAT WASHER φ4.2*12-1 2 NUT 1 HEX. RE. TRUSS HD. RE. SCREW CR. RE.COUNT HD. PAN HD. TAPPING SCREW CR. English PARTS LIST 10" JOBSITE TABLE SAW ...
...HD. RE. PAN HEAD TAPPING & WASHER SCREW CR. RE. PAN HD. PAN HD. NECK BOLT CAP HD. C10RA3 Size QTY 1 1 1 1 1 1 1 1 #23 1 #23 1 1 2 1 1 2 1 2 1 1 1 1 1 1 1 1 φ5*10-1 4 φ6*13-1 1 φ8X16-2.5 1 φ10*30-0.2 2 φ12*21-1 2 3/16*3/4-1/16 4 3/16*1/2-3/64 1 1/4*3/4-7/64 2 1/4*3/4-1/16 2 5/16... SWITCH 1 KNOB 1 WARNING LABEL 4 STICKER 1 CUSHION 1 FLAT WASHER φ4.2*12-1 2 NUT 1 HEX. RE. TRUSS HD. RE. SCREW CR. RE.COUNT HD. PAN HD. TAPPING SCREW CR. English PARTS LIST 10" JOBSITE TABLE SAW ...


