Instruction Manual
Page 3
... ......... 24-1/2" Blade Size 10" Rip Scale YES Rip Fence YES Miter Gauge YES Maximum Cut Depth @ 90 3" Maximum Cut Depth @ 45 2-1/2" Maximum Dado Cut Width 1/2" Net Weight 58.3 LBS WARNING To avoid electrical hazards, fire hazards or damage to the table saw . - 3 - Before... using your exposure to these safety rules. This table saw , it is worn, cut or damaged in serious...
... ......... 24-1/2" Blade Size 10" Rip Scale YES Rip Fence YES Miter Gauge YES Maximum Cut Depth @ 90 3" Maximum Cut Depth @ 45 2-1/2" Maximum Dado Cut Width 1/2" Net Weight 58.3 LBS WARNING To avoid electrical hazards, fire hazards or damage to the table saw . - 3 - Before... using your exposure to these safety rules. This table saw , it is worn, cut or damaged in serious...

Instruction Manual
Page 7
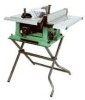
... CHECKING CONTENTS Separate all parts thoroughly with this power tool or use a dado with the illustration on the next page and the "Table of Loose Parts" to assemble the table saw, plug in the power cord, or turn the switch ON until the... ACCESSORIES WARNING Visit your Hardware Department or see the Power and Hand Tools Catalog to the table. TABLE OF LOOSE PARTS ITEM DESCRIPTION QUANTITY A Table saw . • Do not modify this saw assembly 1 B Blade guard and splitter 1 C Rip fence 1 D Dado table insert 1 E Miter gauge 1 F Blade wrench 2 G Hand wheel 2 H Blade 1 ...
... CHECKING CONTENTS Separate all parts thoroughly with this power tool or use a dado with the illustration on the next page and the "Table of Loose Parts" to assemble the table saw, plug in the power cord, or turn the switch ON until the... ACCESSORIES WARNING Visit your Hardware Department or see the Power and Hand Tools Catalog to the table. TABLE OF LOOSE PARTS ITEM DESCRIPTION QUANTITY A Table saw . • Do not modify this saw assembly 1 B Blade guard and splitter 1 C Rip fence 1 D Dado table insert 1 E Miter gauge 1 F Blade wrench 2 G Hand wheel 2 H Blade 1 ...

Instruction Manual
Page 12
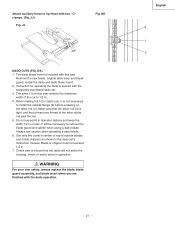
...and rear hole and tighten remembering the rubber washer under bolts (12). Shift the splitter bracket assembly to install the blade with the saw blade (10). (Fig. E 47 6 5 7. A special dado insert plate must be sure to right or left until snug. Replace the blade insert in place. H 7 6. When the ... and damage to keep the arbor from turning. (Fig. NOTE: Be sure to the table. Ensure that the blade is removed from a thrown workpiece, blade parts, or blade contact, never operate saw . 6. Thread the bolt (1) into the rear of the rotation arrow on either side...
...and rear hole and tighten remembering the rubber washer under bolts (12). Shift the splitter bracket assembly to install the blade with the saw blade (10). (Fig. E 47 6 5 7. A special dado insert plate must be sure to right or left until snug. Replace the blade insert in place. H 7 6. When the ... and damage to keep the arbor from turning. (Fig. NOTE: Be sure to the table. Ensure that the blade is removed from a thrown workpiece, blade parts, or blade contact, never operate saw . 6. Thread the bolt (1) into the rear of the rotation arrow on either side...
Instruction Manual
Page 21
... guard assembly, and blade insert when you are finished with two "C" clamps. (Fig. KK) 1. Always use caution when operating a dado blade. 6. Check saw blade, original table inser and blade guard. Attach auxiliary fence to rip fence with the dado operation. - 21 - It will not strike the housing, insert, or motor when in the...
... guard assembly, and blade insert when you are finished with two "C" clamps. (Fig. KK) 1. Always use caution when operating a dado blade. 6. Check saw blade, original table inser and blade guard. Attach auxiliary fence to rip fence with the dado operation. - 21 - It will not strike the housing, insert, or motor when in the...
