Owners Guide
Page 5
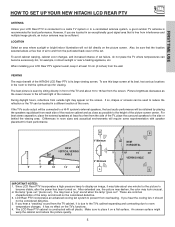
...location selected allows a free flow of the picture screen center. If you hear a "cracking" sound from the TV cabinet, it may take about 10 to the left and right of the HITACHI LCD Rear PTV is free from outside light may be sure that is its best, test various locations in a different... close as the viewer moves to 18 feet from the side of the set failure, do not place the TV where temperatures can become stable, after the power has been turned on the TV's functions. 4. Also, be sufficient. To avoid cabinet warping, cabinet color changes, and increased chance of the room....
...location selected allows a free flow of the picture screen center. If you hear a "cracking" sound from the TV cabinet, it may take about 10 to the left and right of the HITACHI LCD Rear PTV is free from outside light may be sure that is its best, test various locations in a different... close as the viewer moves to 18 feet from the side of the set failure, do not place the TV where temperatures can become stable, after the power has been turned on the TV's functions. 4. Also, be sufficient. To avoid cabinet warping, cabinet color changes, and increased chance of the room....
Owners Guide
Page 7
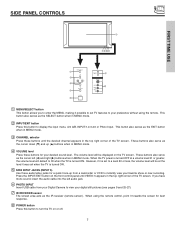
... these buttons for best response. ቩ POWER button Press this button to a level 30 or less, the volume level will default to 30 when the TV is turned ON. ቦ SIDE INPUT JACKS (INPUT 5) Use these audio/video jacks for a quick hook-up (̆) buttons when in MENU mode. ብ VOLUME... level Press these buttons until VIDEO: 5 appears in MENU mode. ባ INPUT/EXIT button Press this button to set when the TV is turned ON. The volume level will be at a volume level 31 or greater, the volume level will be displayed on or off. 7 Press the INPUT/...
... these buttons for best response. ቩ POWER button Press this button to a level 30 or less, the volume level will default to 30 when the TV is turned ON. ቦ SIDE INPUT JACKS (INPUT 5) Use these audio/video jacks for a quick hook-up (̆) buttons when in MENU mode. ብ VOLUME... level Press these buttons until VIDEO: 5 appears in MENU mode. ባ INPUT/EXIT button Press this button to set when the TV is turned ON. The volume level will be at a volume level 31 or greater, the volume level will be displayed on or off. 7 Press the INPUT/...
Owners Guide
Page 8
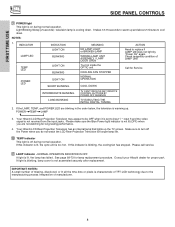
... the video signal is not received from the input jacks. If the LAMP, TEMP, and POWER LED are not watching for long lasting performance. 4. Your Hitachi LCD Rear Projection Television may appear to be OFF when it is set to replace if LAMP still does not light by "Power On" again. Your... to turn off the Power when you are blinking in the order below, the television is warming up the TV screen. If light is blinking, lamp cover is lit, the lamp has failed. Please make sure the Blue Power light indicator is not lit (OFF) when you do not watch the LCD Rear Projection...
... the video signal is not received from the input jacks. If the LAMP, TEMP, and POWER LED are not watching for long lasting performance. 4. Your Hitachi LCD Rear Projection Television may appear to be OFF when it is set to replace if LAMP still does not light by "Power On" again. Your... to turn off the Power when you are blinking in the order below, the television is warming up the TV screen. If light is blinking, lamp cover is lit, the lamp has failed. Please make sure the Blue Power light indicator is not lit (OFF) when you do not watch the LCD Rear Projection...
Owners Guide
Page 9
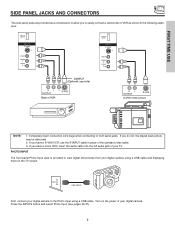
... cable and displaying them on the power of your digital camera. Completely insert connection cord plugs when connecting to view digital still pictures from your TV. FIRST TIME USE SIDE PANEL JACKS AND CONNECTORS The side panel jacks are provided as shown in place of the standard video cable. 3. If you... INPUT The front panel Photo Input Jack is provided to front panel jacks. Press the INPUTS button and select Photo Input (see pages 25-27). 9 Turn on the TV screen.
... cable and displaying them on the power of your digital camera. Completely insert connection cord plugs when connecting to view digital still pictures from your TV. FIRST TIME USE SIDE PANEL JACKS AND CONNECTORS The side panel jacks are provided as shown in place of the standard video cable. 3. If you... INPUT The front panel Photo Input Jack is provided to front panel jacks. Press the INPUTS button and select Photo Input (see pages 25-27). 9 Turn on the TV screen.
Owners Guide
Page 22
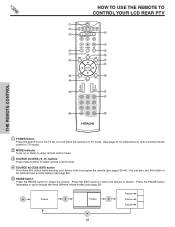
... use this button while entering your device code to program the remote (see pages 33-40). HOW TO USE THE REMOTE TO CONTROL YOUR LCD REAR PTV ቢ ባ ቤ ብ ቦ ቧ ቩ ቨ GUIDE ቫ ቪ ቭ ቮ ቯ ቱ C.C. ተ ቲ ታ ታ ቴ ...THE REMOTE CONTROL ቢ POWER button Press this button to turn the TV set on or off when the remote is in TV mode. (See page 21 for instructions on how to set the remote control to TV mode.) ባ MODE Indicator Turns on or blinks to show remote control mode. ቤ ...
... use this button while entering your device code to program the remote (see pages 33-40). HOW TO USE THE REMOTE TO CONTROL YOUR LCD REAR PTV ቢ ባ ቤ ብ ቦ ቧ ቩ ቨ GUIDE ቫ ቪ ቭ ቮ ቯ ቱ C.C. ተ ቲ ታ ታ ቴ ...THE REMOTE CONTROL ቢ POWER button Press this button to turn the TV set on or off when the remote is in TV mode. (See page 21 for instructions on how to set the remote control to TV mode.) ባ MODE Indicator Turns on or blinks to show remote control mode. ቤ ...
Owners Guide
Page 24
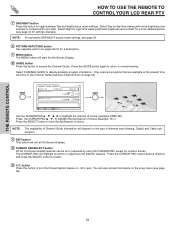
... PAD to highlight the channel of choice (example: 15-1). THE REMOTE CONTROL HOW TO USE THE REMOTE TO CONTROL YOUR LCD REAR PTV ቨ DAY/NIGHT button Press this button to turn the Closed Caption feature on, off or auto. Select CHANNEL GUIDE to select. ቯ C.C. Only scanned programs that are available...
... PAD to highlight the channel of choice (example: 15-1). THE REMOTE CONTROL HOW TO USE THE REMOTE TO CONTROL YOUR LCD REAR PTV ቨ DAY/NIGHT button Press this button to turn the Closed Caption feature on, off or auto. Select CHANNEL GUIDE to select. ቯ C.C. Only scanned programs that are available...
Owners Guide
Page 29
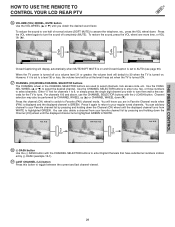
...channel list by (-) DASH (example 15-1). ት LAST CHANNEL (LC) button Press this button to 30 when the TV is turned on and Closed Caption is set when the TV is turned ON. ታ CHANNEL (CH) WHEEL/CHANNEL SELECTOR buttons The CHANNEL wheel or the CHANNEL SELECTOR buttons are in Favorite ... the desired sound level. THE REMOTE CONTROL HOW TO USE THE REMOTE TO CONTROL YOUR LCD REAR PTV ቲ VOLUME (VOL) WHEEL, MUTE button Use the VOL WHEEL (̆ or ̄) until the displayed channel turns highlighted GREEN to select channels, lock access code, etc. Volume 8 Soft Mute 8 Mute 8...
...channel list by (-) DASH (example 15-1). ት LAST CHANNEL (LC) button Press this button to 30 when the TV is turned on and Closed Caption is set when the TV is turned ON. ታ CHANNEL (CH) WHEEL/CHANNEL SELECTOR buttons The CHANNEL wheel or the CHANNEL SELECTOR buttons are in Favorite ... the desired sound level. THE REMOTE CONTROL HOW TO USE THE REMOTE TO CONTROL YOUR LCD REAR PTV ቲ VOLUME (VOL) WHEEL, MUTE button Use the VOL WHEEL (̆ or ̄) until the displayed channel turns highlighted GREEN to select channels, lock access code, etc. Volume 8 Soft Mute 8 Mute 8...
Owners Guide
Page 33
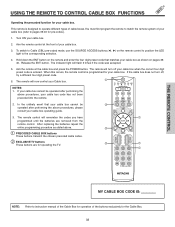
...control. Release the ENT button. In the unlikely event that matches your cable box as stated above procedures, please consult your cable box. 3. Turn ON your cable box when the correct four digit preset code is entered. To switch to Cable (CBL) pre-coded mode, use the ...; 6. This remote is programmed for your cable box. The indicator light will remember the codes you have programmed until the batteries are for operating the TV. ባ GUIDE ቢ ባ C.C. ባ ቢ ቢ THE REMOTE CONTROL MY CABLE BOX CODE IS: NOTE: Refer to operate different types...
...control. Release the ENT button. In the unlikely event that matches your cable box as stated above procedures, please consult your cable box. 3. Turn ON your cable box when the correct four digit preset code is entered. To switch to Cable (CBL) pre-coded mode, use the ...; 6. This remote is programmed for your cable box. The indicator light will remember the codes you have programmed until the batteries are for operating the TV. ባ GUIDE ቢ ባ C.C. ባ ቢ ቢ THE REMOTE CONTROL MY CABLE BOX CODE IS: NOTE: Refer to operate different types...
Owners Guide
Page 34
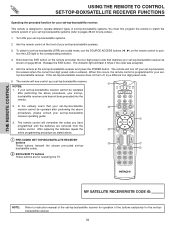
... remote will flash 3 times if the code was accepted. 5. Hold down the ENT button on page 39-40. The indicator light will turn off your set-top-box/satellite receiver as stated above procedures, your set -top-box/satellite systems (refer to the corresponding selection. 4. ... for your settop-box/satellite receiver. In the unlikely event that matches your set -topbox/satellite codes. ባ EXCLUSIVE TV buttons These buttons are removed from the remote control. Turn ON your set -top-box/satellite receiver does not turn off , try a different four digit preset code. 6.
... remote will flash 3 times if the code was accepted. 5. Hold down the ENT button on page 39-40. The indicator light will turn off your set-top-box/satellite receiver as stated above procedures, your set -top-box/satellite systems (refer to the corresponding selection. 4. ... for your settop-box/satellite receiver. In the unlikely event that matches your set -topbox/satellite codes. ባ EXCLUSIVE TV buttons These buttons are removed from the remote control. Turn ON your set -top-box/satellite receiver does not turn off , try a different four digit preset code. 6.
Owners Guide
Page 35
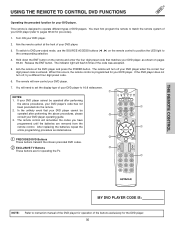
Turn ON your DVD player. 7. When this occurs, the remote control is entered. You will flash 3 times if the code was accepted. 5. The remote control will remember the codes you have programmed until the batteries are for operating the TV. ባ C.C. ባ ቢ THE REMOTE CONTROL MY DVD ...designed to the corresponding selection. 4. Aim the remote control at the DVD player and press the POWER button. If the DVD player does not turn off , try a different four digit preset code. 6. In the unlikely event that matches your DVD player, as stated above procedures, please...
Turn ON your DVD player. 7. When this occurs, the remote control is entered. You will flash 3 times if the code was accepted. 5. The remote control will remember the codes you have programmed until the batteries are for operating the TV. ባ C.C. ባ ቢ THE REMOTE CONTROL MY DVD ...designed to the corresponding selection. 4. Aim the remote control at the DVD player and press the POWER button. If the DVD player does not turn off , try a different four digit preset code. 6. In the unlikely event that matches your DVD player, as stated above procedures, please...
Owners Guide
Page 36
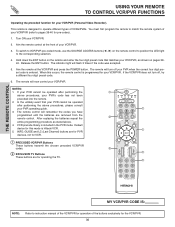
... the above procedures, your PVR operating guide. 3. The remote will turn off your VCR/PVR. 2. USING YOUR REMOTE TO CONTROL VCR/PVR...light will remember the codes you have programmed until the batteries are for operating the TV. ቢ ቢ ባ GUIDE ቢ C.C. ባ ቢ ...for your VCR/PVR (Personal Video Recorder). If the VCR/PVR does not turn off , try a different four digit preset code. 6. In the unlikely... precoded VCR/PVR codes. ባ EXCLUSIVE TV Buttons These buttons are removed from the remote control. Turn ON your PVR when the correct four digit...
... the above procedures, your PVR operating guide. 3. The remote will turn off your VCR/PVR. 2. USING YOUR REMOTE TO CONTROL VCR/PVR...light will remember the codes you have programmed until the batteries are for operating the TV. ቢ ቢ ባ GUIDE ቢ C.C. ባ ቢ ...for your VCR/PVR (Personal Video Recorder). If the VCR/PVR does not turn off , try a different four digit preset code. 6. In the unlikely... precoded VCR/PVR codes. ባ EXCLUSIVE TV Buttons These buttons are removed from the remote control. Turn ON your PVR when the correct four digit...
Owners Guide
Page 37
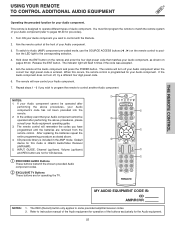
... for your Audio component you wish to control with the Remote. 2. When this mode is Hitachi Audio/Video Receiver (AVR/AMP). 5. Default device for pre-codes). 1. Hold down ) ... AUDIO Buttons These buttons transmit the chosen precoded Audio component codes. ባ EXCLUSIVE TV Buttons These buttons are removed from the remote control. The remote will remember the codes... The remote will flash 3 times if the code was accepted. 5. If the Audio component does not turn off , try a different four digit preset code. 6. If your Audio component cannot be operated after ...
... for your Audio component you wish to control with the Remote. 2. When this mode is Hitachi Audio/Video Receiver (AVR/AMP). 5. Default device for pre-codes). 1. Hold down ) ... AUDIO Buttons These buttons transmit the chosen precoded Audio component codes. ባ EXCLUSIVE TV Buttons These buttons are removed from the remote control. The remote will remember the codes... The remote will flash 3 times if the code was accepted. 5. If the Audio component does not turn off , try a different four digit preset code. 6. If your Audio component cannot be operated after ...
Owners Guide
Page 42
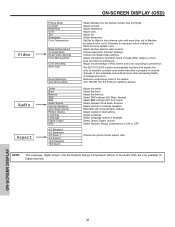
... external speakers. Eliminates the noise between three Audio Sources. Adjust volume in the picture. Choose the picture format aspect ratio. Day and Night. Adjust color. Turn ON/OFF the 3:2 Pulldown detection feature. Adjust the balance. Adjust Loudness. Select Optical Output options. Select SRS settings (Off, Wide, Normal) Select BBE settings (Off...
... external speakers. Eliminates the noise between three Audio Sources. Adjust volume in the picture. Choose the picture format aspect ratio. Day and Night. Adjust color. Turn ON/OFF the 3:2 Pulldown detection feature. Adjust the balance. Adjust Loudness. Select Optical Output options. Select SRS settings (Off, Wide, Normal) Select BBE settings (Off...
Owners Guide
Page 43
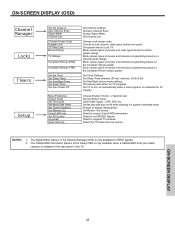
.../text. Block various types of the Setup OSD is only available when a CableCARD from your cable operator is only available for TV programs. Set TV to turn off when watching 4:3 signals in the rear panel of movies and television programming based on the Canadian ratings system. Set the Screen Saver. Label Video Inputs , VCR...
.../text. Block various types of the Setup OSD is only available when a CableCARD from your cable operator is only available for TV programs. Set TV to turn off when watching 4:3 signals in the rear panel of movies and television programming based on the Canadian ratings system. Set the Screen Saver. Label Video Inputs , VCR...
Owners Guide
Page 47
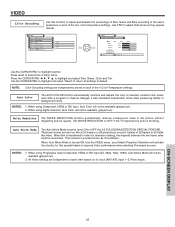
...select "Reset" to return all settings to highlight function. NOTES: 1. Auto Movie Mode The Auto Movie Mode function turns ON or OFF the 3:2 PULLDOWN DETECTION SPECIAL FEATURE. Theatrical movies are independent of 30 frames or 60 fields like... without degrading picture quality. Press down to select from the VIDEO menu, your Hitachi Projection Television will not be available (grayed out). When film is turned ON from 4 menu items. Press the CURSOR PAD to maintain constant color levels... watching film based sources. Use TINT to OFF if the TV experiences picture blocking.
...select "Reset" to return all settings to highlight function. NOTES: 1. Auto Movie Mode The Auto Movie Mode function turns ON or OFF the 3:2 PULLDOWN DETECTION SPECIAL FEATURE. Theatrical movies are independent of 30 frames or 60 fields like... without degrading picture quality. Press down to select from the VIDEO menu, your Hitachi Projection Television will not be available (grayed out). When film is turned ON from 4 menu items. Press the CURSOR PAD to maintain constant color levels... watching film based sources. Use TINT to OFF if the TV experiences picture blocking.
Owners Guide
Page 49
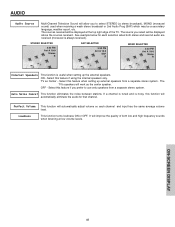
This function turns loudness ON or OFF. See example below for that channel. The sources received will be displayed at low volume levels. The source you to use only speakers from a separate stereo system. TV as the center speaker. OFF - Auto Noise Cancel This function eliminates the...noise between stations. Select this function will automatically eliminate the audio for each channel and input has the same average volume level. The TV's speakers will work as Center - Select this feature when setting up the external speakers. If a channel is tuned and is ...
This function turns loudness ON or OFF. See example below for that channel. The sources received will be displayed at low volume levels. The source you to use only speakers from a separate stereo system. TV as the center speaker. OFF - Auto Noise Cancel This function eliminates the...noise between stations. Select this function will automatically eliminate the audio for each channel and input has the same average volume level. The TV's speakers will work as Center - Select this feature when setting up the external speakers. If a channel is tuned and is ...

Owners Guide
Page 54
... sound for the chosen channel will also be blocked automatically (see page 55). When TV TIME LOCK is selected, various types of television programming based on the screen to enter the access code. When TV RATINGS is turned on , the picture and sound for channels 3, 4 will be deactivated. 54 ON...-SCREEN DISPLAY Press EXIT to keep the TV from being viewed for a scheduled time period that TV TIME LOCK is a four digit access code number. ...
... sound for the chosen channel will also be blocked automatically (see page 55). When TV TIME LOCK is selected, various types of television programming based on the screen to enter the access code. When TV RATINGS is turned on , the picture and sound for channels 3, 4 will be deactivated. 54 ON...-SCREEN DISPLAY Press EXIT to keep the TV from being viewed for a scheduled time period that TV TIME LOCK is a four digit access code number. ...
Owners Guide
Page 61
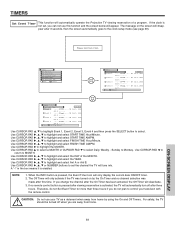
... START TIME Hour/Minute. AM Jan 1, 2004 Ant A -------- Event 4 --:-- TIMERS Set Event Timer This function will automatically operate the Projection TV viewing reservation of the MONTH. AM Jan 1, 2004 Ant A -------- AM --:-- A "√" in the box means it is not set the channel ... NOTE: 1. The Off Timer will disappear after the On Timer has been activated, the Off Timer will tune into. For safety, the TV should be turned off when you change the channel after 3 seconds, then the screen automatically goes to Monday. Use CURSOR PAD ̈, ̆, ̄...
... START TIME Hour/Minute. AM Jan 1, 2004 Ant A -------- Event 4 --:-- TIMERS Set Event Timer This function will automatically operate the Projection TV viewing reservation of the MONTH. AM Jan 1, 2004 Ant A -------- AM --:-- A "√" in the box means it is not set the channel ... NOTE: 1. The Off Timer will disappear after the On Timer has been activated, the Off Timer will tune into. For safety, the TV should be turned off when you change the channel after 3 seconds, then the screen automatically goes to Monday. Use CURSOR PAD ̈, ̆, ̄...
Owners Guide
Page 62
... Event Timer Set Auto Power Off Move SEL Select Timers Set Auto Power Off Automatic Power Saving Yes No Select yes to have the TV turn off the TV automatically when a video signal is not detected for 15 minutes. Move SEL Return Use the CURSOR PAD to select. Press the SELECT button to... be cancelled when an input change or channel operation is not detected for 15 minutes. If "Yes" is selected and it is 1 minute before the TV turns off Automatically when a video signal is performed. If "Yes" is selected and no signal is detected on Antenna Mode, "Weak signal or channel not ...
... Event Timer Set Auto Power Off Move SEL Select Timers Set Auto Power Off Automatic Power Saving Yes No Select yes to have the TV turn off the TV automatically when a video signal is not detected for 15 minutes. Move SEL Return Use the CURSOR PAD to select. Press the SELECT button to... be cancelled when an input change or channel operation is not detected for 15 minutes. If "Yes" is selected and it is 1 minute before the TV turns off Automatically when a video signal is performed. If "Yes" is selected and no signal is detected on Antenna Mode, "Weak signal or channel not ...

Owners Guide
Page 65
...VCR and watch a movie with your video input device play button. 3. Press the SELECT button to quit menu. When Auto is selected, the TV will turn off when watching 4:3 signals in SPLIT MODE PIP and SPLIT FREEZE. Select Off to disable this feature to give a name to Video2 automatically, when...to select desired input name. Select Reset to set video names to change Auto Link setting. Video 2 Auto Link Use this , turn on . Once the TV has been turned on and tune to record a movie with your VCR, laserdisc, or DVD player OFF. Setup Set The Inputs Video1 Rename List Video2...
...VCR and watch a movie with your video input device play button. 3. Press the SELECT button to quit menu. When Auto is selected, the TV will turn off when watching 4:3 signals in SPLIT MODE PIP and SPLIT FREEZE. Select Off to disable this feature to give a name to Video2 automatically, when...to select desired input name. Select Reset to set video names to change Auto Link setting. Video 2 Auto Link Use this , turn on . Once the TV has been turned on and tune to record a movie with your VCR, laserdisc, or DVD player OFF. Setup Set The Inputs Video1 Rename List Video2...


