Owners Guide
Page 2
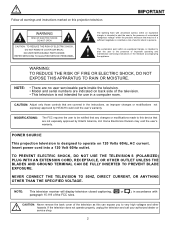
... symbol, within the productÕs enclosure that are indicated on this can expose you to persons. NOTE: This television receiver will display television closed captioning, ( or ), in the instructions, as this projection television. CAUTION: Never remove the back cover of electric shock to very high voltages and other hazards. NO USER SERVICEABLE PARTS INSIDE. The exclamation point within an equilateral triangle, is intended to alert the...
... symbol, within the productÕs enclosure that are indicated on this can expose you to persons. NOTE: This television receiver will display television closed captioning, ( or ), in the instructions, as this projection television. CAUTION: Never remove the back cover of electric shock to very high voltages and other hazards. NO USER SERVICEABLE PARTS INSIDE. The exclamation point within an equilateral triangle, is intended to alert the...
Owners Guide
Page 4
... call your HITACHI Factory Warranty. ¥ When using Picture-in damage and will prevent damage due to keep from the wall outlet. When installing an outside antenna is connected to the television, be connected to the grounding system of the building, as programs from the broadcaster or owner of antenna discharge unit connection to an antenna discharge unit, size of grounding conductors, location of the video program material. 4 IF...
... call your HITACHI Factory Warranty. ¥ When using Picture-in damage and will prevent damage due to keep from the wall outlet. When installing an outside antenna is connected to the television, be connected to the grounding system of the building, as programs from the broadcaster or owner of antenna discharge unit connection to an antenna discharge unit, size of grounding conductors, location of the video program material. 4 IF...

Owners Guide
Page 12
.../61SWX12B only. ቨ REAR SPEAKER Output Terminals These terminals are used for VIDEO: 4 or VIDEO: 5 audio, as selected in the THEATER-INPUT SOURCE menu. (see page 68) ቪ Coaxial Input This jack provides high quality audio input from a Dolby Digital DVD player or HDTV Set Top Box. The volume level is designed for connection to Input 1, 2 or 3 at the same time. When using the Y-PBPR jacks. 7. Use a digital optical cable to connect your components audio output to connect external speakers, which is not fully...
.../61SWX12B only. ቨ REAR SPEAKER Output Terminals These terminals are used for VIDEO: 4 or VIDEO: 5 audio, as selected in the THEATER-INPUT SOURCE menu. (see page 68) ቪ Coaxial Input This jack provides high quality audio input from a Dolby Digital DVD player or HDTV Set Top Box. The volume level is designed for connection to Input 1, 2 or 3 at the same time. When using the Y-PBPR jacks. 7. Use a digital optical cable to connect your components audio output to connect external speakers, which is not fully...

Owners Guide
Page 15
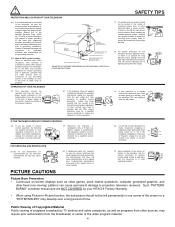
... case, connect the components CB output to the TVÕs PB input and the components CR output to Input 1 or Input 2, but note that have this feature. Projection T.V. Speaker TIPS ON REAR PANEL CONNECTIONS Amplifier S-VIDEO connections are provided for high performance components, such as DVD players and settop-boxes. Use these may use 8-Ohm speakers only. If your device has only one of these connections in place, pull the red button back to...
... case, connect the components CB output to the TVÕs PB input and the components CR output to Input 1 or Input 2, but note that have this feature. Projection T.V. Speaker TIPS ON REAR PANEL CONNECTIONS Amplifier S-VIDEO connections are provided for high performance components, such as DVD players and settop-boxes. Use these may use 8-Ohm speakers only. If your device has only one of these connections in place, pull the red button back to...
Owners Guide
Page 19
...~VID5 button as shown on the TV set to VIDEO and a video signal is not received from the VIDEO INPUT JACK on the model and features of each component for the location of each component. Connect the cable from the VCR or the laserdisc player. Check the owner's manual of video and audio inputs and outputs. The following connection diagrams are offered as shown below . 2. CONNECTING A MONAURAL AUDIO SOURCE TO INPUT1~INPUT5 1. For best performance, video and audio cables...
...~VID5 button as shown on the TV set to VIDEO and a video signal is not received from the VIDEO INPUT JACK on the model and features of each component for the location of each component. Connect the cable from the VCR or the laserdisc player. Check the owner's manual of video and audio inputs and outputs. The following connection diagrams are offered as shown below . 2. CONNECTING A MONAURAL AUDIO SOURCE TO INPUT1~INPUT5 1. For best performance, video and audio cables...
Owners Guide
Page 22
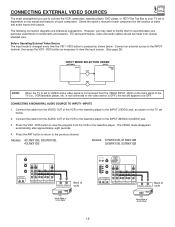
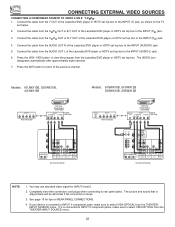
... the INPUT (PR) jack. 4. You may use standard video signal for tips on the TV set top box to view the program from the Y OUT of the Laserdisc/DVD player or HDTV set top box. Connect the cable from the Laserdisc/DVD player or HDTV set top box to select VID5-OPTICAL from the THEATERINPUT SOURCE menu. CONNECTING EXTERNAL VIDEO SOURCES CONNECTING A COMPONENT SOURCE TO VIDEO 4 OR 5: Y-PBPR. 1. The VIDEO icon disappears automatically after approximately eight seconds. 7. Models: 61UWX10B, 53UWX10B, 43UWX10B OUTPUT...
... the INPUT (PR) jack. 4. You may use standard video signal for tips on the TV set top box to view the program from the Y OUT of the Laserdisc/DVD player or HDTV set top box. Connect the cable from the Laserdisc/DVD player or HDTV set top box to select VID5-OPTICAL from the THEATERINPUT SOURCE menu. CONNECTING EXTERNAL VIDEO SOURCES CONNECTING A COMPONENT SOURCE TO VIDEO 4 OR 5: Y-PBPR. 1. The VIDEO icon disappears automatically after approximately eight seconds. 7. Models: 61UWX10B, 53UWX10B, 43UWX10B OUTPUT...

Owners Guide
Page 23
... DVD player.) To operate additional audio/video equipment, point the remote at the remote sensor of the set-top-box and press the SET-TOPBOX (STB) button. The DVD button will blink, indicating that the remote will now control your DVD player. (See page 33 for instructions on how to program the remote to control your cable box.) To operate your set-top-box or satellite receiver point the remote at the remote sensor of the component you have a satellite receiver, use...
... DVD player.) To operate additional audio/video equipment, point the remote at the remote sensor of the set-top-box and press the SET-TOPBOX (STB) button. The DVD button will blink, indicating that the remote will now control your DVD player. (See page 33 for instructions on how to program the remote to control your cable box.) To operate your set-top-box or satellite receiver point the remote at the remote sensor of the component you have a satellite receiver, use...

Owners Guide
Page 25
... for the TV to set , it will exit all On-Screen Displays. 25 SOURCE WIZARD DVD AV1 AV2 AV3 ቩ CHANNEL selector buttons CHANNEL selector buttons are not in the correct ANTENNA/CABLE mode. (see page 40) ቪ SLEEP button Press this button will reset to the original condition. ቫ LAST CHANNEL (LAST CH) button Use this button to quickly turn the Closed Caption feature on your AMPLIFIER/RECEIVER brand. For channels 100 and...
... for the TV to set , it will exit all On-Screen Displays. 25 SOURCE WIZARD DVD AV1 AV2 AV3 ቩ CHANNEL selector buttons CHANNEL selector buttons are not in the correct ANTENNA/CABLE mode. (see page 40) ቪ SLEEP button Press this button will reset to the original condition. ቫ LAST CHANNEL (LAST CH) button Use this button to quickly turn the Closed Caption feature on your AMPLIFIER/RECEIVER brand. For channels 100 and...

Owners Guide
Page 26
... and Closed Caption is set to AUTO (See page 55). ቶ STATUS button Press this button when no menu is displayed when you obtain the desired sound level. The channel number which is highlighted indicates what channel is being received, the picture source, if the channel has stereo (ST) or second audio program (SAP), the time, CHANNEL ID and if the SLEEP timer is in TV mode, press these buttons will control the Set-Top-Box...
... and Closed Caption is set to AUTO (See page 55). ቶ STATUS button Press this button when no menu is displayed when you obtain the desired sound level. The channel number which is highlighted indicates what channel is being received, the picture source, if the channel has stereo (ST) or second audio program (SAP), the time, CHANNEL ID and if the SLEEP timer is in TV mode, press these buttons will control the Set-Top-Box...
Owners Guide
Page 27
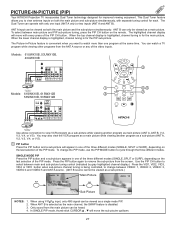
... A 10 PIP Use Thumb Stick PIP to cycle through the three different modes. Only sound from the main picture can be viewed as a main picture. PICTURE-IN-PICTURE (PIP) Your HITACHI Projection TV incorporates Dual Tuner technology designed for each. To select between main and sub-picture tuning control (indicated by your television warranty) S-VIDEO S-VIDEO S-VIDEO VIDEO VIDEO Y/VIDEO Y/VIDEO VIDEO (MONO) (MONO) L L R R AUDIO AUDIO INPUT 1 INPUT 2 PB (MONO) L PR R AUDIO INPUT 4 PB (MONO) L L PR R AUDIO R AUDIO INPUT 5 MONITOR OUT ቢ ቤ MENU EXIT VOL...
... A 10 PIP Use Thumb Stick PIP to cycle through the three different modes. Only sound from the main picture can be viewed as a main picture. PICTURE-IN-PICTURE (PIP) Your HITACHI Projection TV incorporates Dual Tuner technology designed for each. To select between main and sub-picture tuning control (indicated by your television warranty) S-VIDEO S-VIDEO S-VIDEO VIDEO VIDEO Y/VIDEO Y/VIDEO VIDEO (MONO) (MONO) L L R R AUDIO AUDIO INPUT 1 INPUT 2 PB (MONO) L PR R AUDIO INPUT 4 PB (MONO) L L PR R AUDIO R AUDIO INPUT 5 MONITOR OUT ቢ ቤ MENU EXIT VOL...
Owners Guide
Page 32
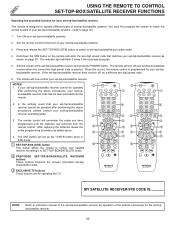
... 3 PIP PIP CH FREEZE PIP MODE PIP ACCESS SWAP PROG TV/VCR SLOW ባ ቤ ባ REC CLU-5713TSI MY SATELLITE RECEIVER/STB CODE IS: NOTE: Refer to instruction manual of the set-top-box/satellite receiver for operation of your set -top-box/satellite receiver and press the POWER button. After replacing the batteries repeat the entire programming procedure as the TV/STB button when in STB mode. ቢ SET-TOP-BOX (STB) button This button allows the remote to control...
... 3 PIP PIP CH FREEZE PIP MODE PIP ACCESS SWAP PROG TV/VCR SLOW ባ ቤ ባ REC CLU-5713TSI MY SATELLITE RECEIVER/STB CODE IS: NOTE: Refer to instruction manual of the set-top-box/satellite receiver for operation of your set -top-box/satellite receiver and press the POWER button. After replacing the batteries repeat the entire programming procedure as the TV/STB button when in STB mode. ቢ SET-TOP-BOX (STB) button This button allows the remote to control...
Owners Guide
Page 37
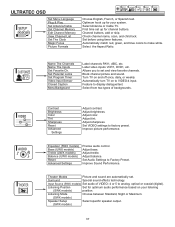
...to make white. Improve Sound Performance. Listening Mode Choose between Standard, Night or Maximum. (SWX models) Speaker Setup Select specific speaker output. (SWX models) 37 First time set and view favorite channels. Set Parental Locks Set Program Timer Video Input Sensor Closed Caption Menu Background Label channels PAY1, ABC, etc. Automatically match red, green, and blue colors to display dialogue/text. VIDEO AUDIO THEATER Contrast Brightness Color Tint Sharpness Reset Advanced Settings Adjust contrast. Set VIDEO settings to analog, optical or coaxial (digital...
...to make white. Improve Sound Performance. Listening Mode Choose between Standard, Night or Maximum. (SWX models) Speaker Setup Select specific speaker output. (SWX models) 37 First time set and view favorite channels. Set Parental Locks Set Program Timer Video Input Sensor Closed Caption Menu Background Label channels PAY1, ABC, etc. Automatically match red, green, and blue colors to display dialogue/text. VIDEO AUDIO THEATER Contrast Brightness Color Tint Sharpness Reset Advanced Settings Adjust contrast. Set VIDEO settings to analog, optical or coaxial (digital...
Owners Guide
Page 39
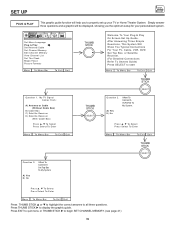
... you the optimum setup for your TV or Home Theater System. SETUP CUSTOMIZE VIDEO SEL AUDIO THEATER Set Menu Language Plug & Play Set Antenna/Cable Set Channel Memory Edit Channel Memory View Channel List Set The Clock Magic Focus Picture Formats M e n u To M e n u B a r To E x i t Q u i t THUMB STICK Welcome To Your Plug & Play On Screen Set Up Guide. Press THUMB STICK ̈ to display the graphic guide. SETUP SET UP PLUG & PLAY This graphic guide function will be displayed, showing you...
... you the optimum setup for your TV or Home Theater System. SETUP CUSTOMIZE VIDEO SEL AUDIO THEATER Set Menu Language Plug & Play Set Antenna/Cable Set Channel Memory Edit Channel Memory View Channel List Set The Clock Magic Focus Picture Formats M e n u To M e n u B a r To E x i t Q u i t THUMB STICK Welcome To Your Plug & Play On Screen Set Up Guide. Press THUMB STICK ̈ to display the graphic guide. SETUP SET UP PLUG & PLAY This graphic guide function will be displayed, showing you...

Owners Guide
Page 52
... set . SETUP CUSTOMIZE VIDEO SEL AUDIO THEATER Name the Channel Name the Inputs Set Favorite Ch. This will block out the picture and sound of time that TV TIMED OUT (Set Parental Locks) is turned on the Front Panel will be blocked out. If ANT A and ANT B are explained in detail in the same signal source mode (see page 44). 3. CUSTOMIZE CUSTOMIZE SET PARENTAL LOCKS This function will reset the secret code number...
... set . SETUP CUSTOMIZE VIDEO SEL AUDIO THEATER Name the Channel Name the Inputs Set Favorite Ch. This will block out the picture and sound of time that TV TIMED OUT (Set Parental Locks) is turned on the Front Panel will be blocked out. If ANT A and ANT B are explained in detail in the same signal source mode (see page 44). 3. CUSTOMIZE CUSTOMIZE SET PARENTAL LOCKS This function will reset the secret code number...

Owners Guide
Page 54
... Menu Bar Video: 4 Auto Remote Off To Quit Exit THUMB STICK CUSTOMIZE SEL Press select to previous menu. Set Parental Locks Set Program Timer Video Input Sensor Closed Caption Menu Background Menu To Menu Bar Video: 4 Auto Remote Off To Quit Exit Use THUMB STICK ̆ or ̄, then press down on your TV as described above. 2. To do this function. This feature is now reset and will turn on THUMB STICK to change VIDEO INPUT SENSOR setting...
... Menu Bar Video: 4 Auto Remote Off To Quit Exit THUMB STICK CUSTOMIZE SEL Press select to previous menu. Set Parental Locks Set Program Timer Video Input Sensor Closed Caption Menu Background Menu To Menu Bar Video: 4 Auto Remote Off To Quit Exit Use THUMB STICK ̆ or ̄, then press down on your TV as described above. 2. To do this function. This feature is now reset and will turn on THUMB STICK to change VIDEO INPUT SENSOR setting...

Owners Guide
Page 65
... 0 Menu To Back Quit Exit Menu To Back Quit Exit To enter the SURROUND MODE, use THUMB STICK ̆ or ̄ to highlight then press down on how loud the MAIN volume is set. MAIN volume also controls AUDIO TO HI-FI output level. Adjust MAIN volume first. The maximum volume allowed for normal stereo/mono broadcasts. STADIUM SURROUND Select this mode when viewing a program which...
... 0 Menu To Back Quit Exit Menu To Back Quit Exit To enter the SURROUND MODE, use THUMB STICK ̆ or ̄ to highlight then press down on how loud the MAIN volume is set. MAIN volume also controls AUDIO TO HI-FI output level. Adjust MAIN volume first. The maximum volume allowed for normal stereo/mono broadcasts. STADIUM SURROUND Select this mode when viewing a program which...
Owners Guide
Page 66
... surround. Set TV balance by adjusting FL (Front Left) and FR (Front Right) volume control. For properly encoded programs marked the center sound channel contains the dialogue for the program viewed. Press ̄ on the TV screen. Only the front Left and Right internal TV speakers can quickly and easily set Pro Logic Test Tone Fl 0 C 0 Fr 0 Sr 0 Sl 0 Sw 0 THUMB STICK SETUP CUSTOMIZE VIDEO SEL AUDIO THEATER...
... surround. Set TV balance by adjusting FL (Front Left) and FR (Front Right) volume control. For properly encoded programs marked the center sound channel contains the dialogue for the program viewed. Press ̄ on the TV screen. Only the front Left and Right internal TV speakers can quickly and easily set Pro Logic Test Tone Fl 0 C 0 Fr 0 Sr 0 Sl 0 Sw 0 THUMB STICK SETUP CUSTOMIZE VIDEO SEL AUDIO THEATER...
Owners Guide
Page 67
... EXTERNAL W/AMP, center channel audio will always be heard from the TVÕs center speaker. Only the front Left and Right internal TV speakers can quickly and easily set to adjust VOLUME. To fully benefit from this feature when viewing properly encoded programs marked . NOTE: Center channel audio will still be heard from Dolby Digital Surround, it is highlighted (static noise will change volume level of each speaker volume to adjust...
... EXTERNAL W/AMP, center channel audio will always be heard from the TVÕs center speaker. Only the front Left and Right internal TV speakers can quickly and easily set to adjust VOLUME. To fully benefit from this feature when viewing properly encoded programs marked . NOTE: Center channel audio will still be heard from Dolby Digital Surround, it is highlighted (static noise will change volume level of each speaker volume to adjust...
Owners Guide
Page 68
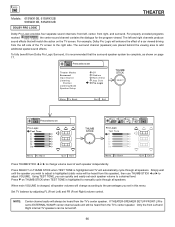
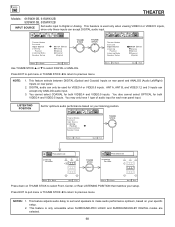
... setup. LISTENTING POSITION Set for both VIDEO:4 and VIDEO:5 inputs. This feature adjusts audio delay to surround speakers to select Front, Center, or Rear LISTENING POSITION that matches your specific setup. 2. SETUP CUSTOMIZE VIDEO SEL AUDIO THEATER SETUP CUSTOMIZE VIDEO SEL AUDIO THEATER Theater Modes Surround Input Source Listening Position Listening Mode Speaker Setup Vid4 Vid5 Analog Optical Coaxial (Digital) THUMB STICK THUMB STICK Theater Modes Surround Input Source Listening Position Listening Mode Speaker Setup Vid4 Vid5 Analog Optical Coaxial (Digital) Menu...
... setup. LISTENTING POSITION Set for both VIDEO:4 and VIDEO:5 inputs. This feature adjusts audio delay to surround speakers to select Front, Center, or Rear LISTENING POSITION that matches your specific setup. 2. SETUP CUSTOMIZE VIDEO SEL AUDIO THEATER SETUP CUSTOMIZE VIDEO SEL AUDIO THEATER Theater Modes Surround Input Source Listening Position Listening Mode Speaker Setup Vid4 Vid5 Analog Optical Coaxial (Digital) THUMB STICK THUMB STICK Theater Modes Surround Input Source Listening Position Listening Mode Speaker Setup Vid4 Vid5 Analog Optical Coaxial (Digital) Menu...
Owners Guide
Page 70
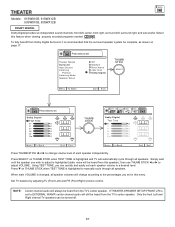
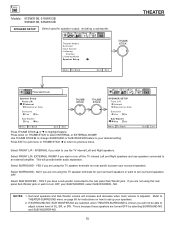
THEATER Models: 61SWX10B, 61SWX12B 53SWX10B, 53SWX12B SPEAKER SETUP Select specific speaker output, including a subwoofer. SETUP CUSTOMIZE VIDEO SEL AUDIO THEATER Theater Modes Surround Input Source Listening Position Listening Mode Speaker Setup THUMB STICK Menu To Back Quit Exit THEATER THEATER SEL Press select to set SETUP CUSTOMIZE VIDEO SEL AUDIO THEATER Speaker Setup Front L/R Internal External w/ Amp THUMB STICK THUMB STICK SPEAKER SETUP Front L/R Internal External w/ Amp Surround Yes No Surround Yes No Sub Woofer Yes...
THEATER Models: 61SWX10B, 61SWX12B 53SWX10B, 53SWX12B SPEAKER SETUP Select specific speaker output, including a subwoofer. SETUP CUSTOMIZE VIDEO SEL AUDIO THEATER Theater Modes Surround Input Source Listening Position Listening Mode Speaker Setup THUMB STICK Menu To Back Quit Exit THEATER THEATER SEL Press select to set SETUP CUSTOMIZE VIDEO SEL AUDIO THEATER Speaker Setup Front L/R Internal External w/ Amp THUMB STICK THUMB STICK SPEAKER SETUP Front L/R Internal External w/ Amp Surround Yes No Surround Yes No Sub Woofer Yes...


