
Owners Guide
Page 5
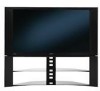
...plastic. If you are common characteristics of the set up your new HITACHI Projection Television ANTENNA Unless your LCD Rear PTV against a wall, keep it is seen by placing the speakers equidistant from the side of the TV, place the surround speakers to room temperature changes. R 4" Minimum ...as possible to prevent from outside light may hear a "pop" sound when the lamp "goes out." LCD Rear PTV incorporates an advanced cooling fan system to the height of the HITACHI LCD Rear PTV is free from the fan is constructed with speaker placement for best performance.
...plastic. If you are common characteristics of the set up your new HITACHI Projection Television ANTENNA Unless your LCD Rear PTV against a wall, keep it is seen by placing the speakers equidistant from the side of the TV, place the surround speakers to room temperature changes. R 4" Minimum ...as possible to prevent from outside light may hear a "pop" sound when the lamp "goes out." LCD Rear PTV incorporates an advanced cooling fan system to the height of the HITACHI LCD Rear PTV is free from the fan is constructed with speaker placement for best performance.
Owners Guide
Page 7
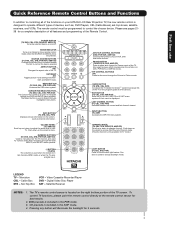
..., satellite receivers, and VCRs. GUIDE BUTTON (TV, STB, CBL, PVR) Accesses the TV Guide On ScreenTM system (see pages 2138 for TV mode.) LIGHT BUTTON (TV, CBL, STB, PVR) Press to Select/Activate highlighted menu items. INFO BUTTON (TV, STB, CBL, PVR) Displays various information on your HITACHI LCD Rear Projection TV, the new remote control is designed to...
..., satellite receivers, and VCRs. GUIDE BUTTON (TV, STB, CBL, PVR) Accesses the TV Guide On ScreenTM system (see pages 2138 for TV mode.) LIGHT BUTTON (TV, CBL, STB, PVR) Press to Select/Activate highlighted menu items. INFO BUTTON (TV, STB, CBL, PVR) Displays various information on your HITACHI LCD Rear Projection TV, the new remote control is designed to...

Owners Guide
Page 9
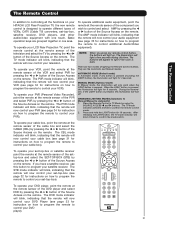
...OPTIC unit COOLING FAN STOPPED BEGINNING OF WARM UP AFTER THE POWER ON. Your Hitachi LCD Rear Projection Television may become clogged over time. Please make sure the Blue Power light indicator is warming up the TV screen. Consult your digital still pictures (see page 25). 9 If light is ...COOL DOWN (FOR 20 SEC.) (TV CANNOT ACCEPT ANY CODE IN THIS PERIOD EXCEPT WITHIN THE BEGINNING 5 SEC.) ACTION Need to display an On-Screen warning. Check assembly condition of LAMP UNIT Call for lamp replacement procedure. Your Hitachi LCD Rear Projection Television has an internal lamp that may...
...OPTIC unit COOLING FAN STOPPED BEGINNING OF WARM UP AFTER THE POWER ON. Your Hitachi LCD Rear Projection Television may become clogged over time. Please make sure the Blue Power light indicator is warming up the TV screen. Consult your digital still pictures (see page 25). 9 If light is ...COOL DOWN (FOR 20 SEC.) (TV CANNOT ACCEPT ANY CODE IN THIS PERIOD EXCEPT WITHIN THE BEGINNING 5 SEC.) ACTION Need to display an On-Screen warning. Check assembly condition of LAMP UNIT Call for lamp replacement procedure. Your Hitachi LCD Rear Projection Television has an internal lamp that may...

Owners Guide
Page 19
... control. You can connect up to 2 external Audio/Video components. Each IR Mouse cable can use Connecting External Video Sources Your HITACHI LCD Rear Projection Television is setup, it allows your IR Mouse connector to control your equipment using your external Audio/Video components to four components. Press...̄ or channel scroll to work. The Rear Panel has two IR BLASTER outputs which can connect the LCD Rear PTV with an AV Network feature. Patent Nos. 4,631,603; 4,577,216; 4,819,098; 4,907,093; Video Audio TV Guide On Screen Channel Manager Locks Timers Setup Move...
... control. You can connect up to 2 external Audio/Video components. Each IR Mouse cable can use Connecting External Video Sources Your HITACHI LCD Rear Projection Television is setup, it allows your IR Mouse connector to control your equipment using your external Audio/Video components to four components. Press...̄ or channel scroll to work. The Rear Panel has two IR BLASTER outputs which can connect the LCD Rear PTV with an AV Network feature. Patent Nos. 4,631,603; 4,577,216; 4,819,098; 4,907,093; Video Audio TV Guide On Screen Channel Manager Locks Timers Setup Move...

Owners Guide
Page 20
... Apparatus Claims of the external components you can connect up to the Rear Panel shown below. 2. One IR Mouse cable can use Connecting External Video Sources Your HITACHI LCD Rear Projection Television is necessary for the TV Guide On ScreenTM system to work . 20 Connect your external Audio/...Video components to 2 external Audio/Video components. CONNECTING THE CABLE BOX/VCR TO G-LINK FOR TV GUIDE ON SCREENTM SYSTEM ...
... Apparatus Claims of the external components you can connect up to the Rear Panel shown below. 2. One IR Mouse cable can use Connecting External Video Sources Your HITACHI LCD Rear Projection Television is necessary for the TV Guide On ScreenTM system to work . 20 Connect your external Audio/...Video components to 2 external Audio/Video components. CONNECTING THE CABLE BOX/VCR TO G-LINK FOR TV GUIDE ON SCREENTM SYSTEM ...
Owners Guide
Page 21
...blink, indicating that the remote will now control your television. There are the Automatic and Manual modes. After releasing the LIGHT button, the TV mode indicator will blink 3 times to control your PVR). Place the Remote Control in one touch. To operate your PVR (Personal Video ...LCD Rear Projection TV, point the remote control at the remote sensor of the PVR and select PVR by pressing the ̇ or ̈ button of the Source Access on the remote. The Remote Control The Remote Control In addition to controlling all the functions on your HITACHI LCD Rear Projection TV, ...
...blink, indicating that the remote will now control your television. There are the Automatic and Manual modes. After releasing the LIGHT button, the TV mode indicator will blink 3 times to control your PVR). Place the Remote Control in one touch. To operate your PVR (Personal Video ...LCD Rear Projection TV, point the remote control at the remote sensor of the PVR and select PVR by pressing the ̇ or ̈ button of the Source Access on the remote. The Remote Control The Remote Control In addition to controlling all the functions on your HITACHI LCD Rear Projection TV, ...

Owners Guide
Page 39
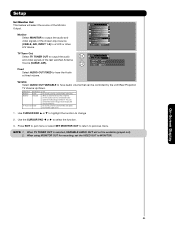
... Press the SELECT button to quickly exit from a menu. Press EXIT on the remote control to select. 3. On-Screen Display 1. Press MENU on your HITACHI LCD Rear Projection TV. 2. Press the CURSOR buttons to navigate and highlight a different feature of the screen shows which selections are available. This part of the screen shows which...
... Press the SELECT button to quickly exit from a menu. Press EXIT on the remote control to select. 3. On-Screen Display 1. Press MENU on your HITACHI LCD Rear Projection TV. 2. Press the CURSOR buttons to navigate and highlight a different feature of the screen shows which selections are available. This part of the screen shows which...

Owners Guide
Page 42
...PBPR input jacks. 3. Press the CURSOR PAD ̇ or ̈ to OFF if the TV experiences picture blocking. Black Enhancement Use this function to choose between the two frame rates must be ...Format Aspect Ratio. 1. The Auto Aspect function is turned ON from the VIDEO menu, your Hitachi LCD Rear Projection Television will not be adjusted. Use the CURSOR PAD ̆ or ̄ to highlight the... to select ON or OFF. 3. Theatrical movies are independent of each of 30 frames or 60 fields like video. On-Screen Display Video Color Temperature Set this to High for cooler color ...
...PBPR input jacks. 3. Press the CURSOR PAD ̇ or ̈ to OFF if the TV experiences picture blocking. Black Enhancement Use this function to choose between the two frame rates must be ...Format Aspect Ratio. 1. The Auto Aspect function is turned ON from the VIDEO menu, your Hitachi LCD Rear Projection Television will not be adjusted. Use the CURSOR PAD ̆ or ̄ to highlight the... to select ON or OFF. 3. Theatrical movies are independent of each of 30 frames or 60 fields like video. On-Screen Display Video Color Temperature Set this to High for cooler color ...
Owners Guide
Page 85
... OUT for recording, set the VIDEO OUT to a VCR or other A/V device. Setup Set Monitor Out This feature will not be controlled by the LCD Rear Projection TV Volume Up/Down. When an external device like a monitor or Hi-Fi audio system is selected, VARIABLE AUDIO OUT will select the source of the... volume of the Monitor Output. Use the CURSOR PAD ̇ or ̈ to output the audio Setup Set Monitor Out and video signals of the TV. NOTE: 1. Video In : Fixed Move SEL Return Fixed Select AUDIO OUT FIXED to have Audio volume that can control the volume output by Mode Move...
... OUT for recording, set the VIDEO OUT to a VCR or other A/V device. Setup Set Monitor Out This feature will not be controlled by the LCD Rear Projection TV Volume Up/Down. When an external device like a monitor or Hi-Fi audio system is selected, VARIABLE AUDIO OUT will select the source of the... volume of the Monitor Output. Use the CURSOR PAD ̇ or ̈ to output the audio Setup Set Monitor Out and video signals of the TV. NOTE: 1. Video In : Fixed Move SEL Return Fixed Select AUDIO OUT FIXED to have Audio volume that can control the volume output by Mode Move...


