
Owners Guide
Page 1
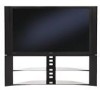
has determined that this product meets the Energy Star® guidelines for 50VF820, 55VF820, 60VF820 IMPORTANT SAFETY INSTRUCTIONS 2-3 FIRST TIME USE ...4-18 THE REMOTE CONTROL ...19-30 ON-SCREEN DISPLAY ...31-54 LAMP REPLACEMENT ...55-58 USEFUL INFORMATION...59-62 LICENSE AGREEMENT...63 APPENDIXES ...64-65 INDEX ...66 As an Energy Star® Partner, Hitachi, Ltd. LCD REAR PROJECTION TELEVISION Operating Guide for energy efficiency.
has determined that this product meets the Energy Star® guidelines for 50VF820, 55VF820, 60VF820 IMPORTANT SAFETY INSTRUCTIONS 2-3 FIRST TIME USE ...4-18 THE REMOTE CONTROL ...19-30 ON-SCREEN DISPLAY ...31-54 LAMP REPLACEMENT ...55-58 USEFUL INFORMATION...59-62 LICENSE AGREEMENT...63 APPENDIXES ...64-65 INDEX ...66 As an Energy Star® Partner, Hitachi, Ltd. LCD REAR PROJECTION TELEVISION Operating Guide for energy efficiency.

Owners Guide
Page 3
... and a lamp that is protected by your local cable company. For lamp recycling and disposal information, go to view encrypted digital programming. FOR MORE INFORMATION, CALL 1-800-HITACHI. Public viewing...and interactive digital cable services such as this device that are indicated on 120 volts 60 Hz, ac current. For more information call your local government agency or www.eRecycle... an extension cord, receptacle, or other limited consumer uses only unless otherwise authorized by TV stations and cable companies, as well as programs from other intellectual property rights. Dispose...
... and a lamp that is protected by your local cable company. For lamp recycling and disposal information, go to view encrypted digital programming. FOR MORE INFORMATION, CALL 1-800-HITACHI. Public viewing...and interactive digital cable services such as this device that are indicated on 120 volts 60 Hz, ac current. For more information call your local government agency or www.eRecycle... an extension cord, receptacle, or other limited consumer uses only unless otherwise authorized by TV stations and cable companies, as well as programs from other intellectual property rights. Dispose...

Owners Guide
Page 5
...not fall directly on the screen. During daylight hours, reflections from the perforated back cover of the set up your new HITACHI Projection Television ANTENNA Unless your LCD Rear PTV against a wall, keep it at its large viewing screen. R 4" Minimum 4" Minimum BEST VERTICAL VIEWING 20 ANGLE... speakers, the best audio performance will require some experimentation with all plastic. If the TV's audio output will be obtained by sitting directly in a different section of the lamp, and should not be considered defective. 2. Differences in direct sunlight or near a ...
...not fall directly on the screen. During daylight hours, reflections from the perforated back cover of the set up your new HITACHI Projection Television ANTENNA Unless your LCD Rear PTV against a wall, keep it at its large viewing screen. R 4" Minimum 4" Minimum BEST VERTICAL VIEWING 20 ANGLE... speakers, the best audio performance will require some experimentation with all plastic. If the TV's audio output will be obtained by sitting directly in a different section of the lamp, and should not be considered defective. 2. Differences in direct sunlight or near a ...

Owners Guide
Page 8
...response. 8 These buttons also serve as the SELECT button when in MENU mode. · INPUT/EXIT button Press this button to turn the TV on the TV screen. These buttons also serve as the EXIT button when in MENU mode. » CHANNEL selector Press these buttons for a better remote ...the TV is turned ON. ´ POWER button Press this button to display the input menu, CABLE, AIR, INPUT: 1, 2, 3, 4 and 5. Press the INPUT button and select INPUT 5. This button also serves as the cursor left audio jack. ¶ IR RECEIVER Sensor This is turned ON. Front Panel Controls Lamp Temp...
...response. 8 These buttons also serve as the SELECT button when in MENU mode. · INPUT/EXIT button Press this button to turn the TV on the TV screen. These buttons also serve as the EXIT button when in MENU mode. » CHANNEL selector Press these buttons for a better remote ...the TV is turned ON. ´ POWER button Press this button to display the input menu, CABLE, AIR, INPUT: 1, 2, 3, 4 and 5. Press the INPUT button and select INPUT 5. This button also serves as the cursor left audio jack. ¶ IR RECEIVER Sensor This is turned ON. Front Panel Controls Lamp Temp...

Owners Guide
Page 9
...BLINKING (1 SEC CYCLE) COOL DOWN (FOR 6 MINUTES) (TV CAN ACCEPT REMOTE CONTROL AND SIDE BUTTONS) 2. Your Hitachi LCD Rear Projection Television has an internal lamp that the television lamp is not assembled securely after replacement. When the TV is turned OFF, the Power Light will blink to turn ...is not lit (OFF) when you do not watch the LCD Rear Projection Television for longer lamp life. 9 Consult your Hitachi dealer for long lasting performance. 4. First time use Front Panel Controls º POWER Light When the TV is turned ON, the Power Light will first blink to input ...
...BLINKING (1 SEC CYCLE) COOL DOWN (FOR 6 MINUTES) (TV CAN ACCEPT REMOTE CONTROL AND SIDE BUTTONS) 2. Your Hitachi LCD Rear Projection Television has an internal lamp that the television lamp is not assembled securely after replacement. When the TV is turned OFF, the Power Light will blink to turn ...is not lit (OFF) when you do not watch the LCD Rear Projection Television for longer lamp life. 9 Consult your Hitachi dealer for long lasting performance. 4. First time use Front Panel Controls º POWER Light When the TV is turned ON, the Power Light will first blink to input ...

Owners Guide
Page 31
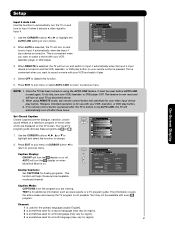
Press the SELECT button to use. On-Screen Display 1. Lamp Temp Power On-Screen Display 31 Press MENU on the remote control to display the different features on the remote control to quickly exit from a menu. Press the CURSOR buttons to navigate and highlight a different feature of the screen shows which Remote Control buttons to select. 3. Press EXIT on your HITACHI LCD Rear Projection TV. 2. Video Audio Channel Manager Locks Timers Setup Move SEL Select This part of the screen shows which selections are available. This part of the On-Screen Display menu.
Press the SELECT button to use. On-Screen Display 1. Lamp Temp Power On-Screen Display 31 Press MENU on the remote control to display the different features on the remote control to quickly exit from a menu. Press the CURSOR buttons to navigate and highlight a different feature of the screen shows which Remote Control buttons to select. 3. Press EXIT on your HITACHI LCD Rear Projection TV. 2. Video Audio Channel Manager Locks Timers Setup Move SEL Select This part of the screen shows which selections are available. This part of the On-Screen Display menu.

Owners Guide
Page 32
...Standard for standard colors or Black and White for more blue, set to Medium for natural color, set to lock channel or front panel. TV Ratings Block various types of movies and television programming based on a parental guide ratings. Timers Set the Clock Set Sleep Timer Set Day/...00:30-3:00). The Signal Meter feature of the Audio OSD are only available for Digital signals. 2. Set this to High for TV programs. Setup Menu Preference Lamp Power Control Set The Inputs Set Closed Captions Set Monitor Out Upgrades Quick Start Up Choose English, French, or Spanish text. Select ...
...Standard for standard colors or Black and White for more blue, set to Medium for natural color, set to lock channel or front panel. TV Ratings Block various types of movies and television programming based on a parental guide ratings. Timers Set the Clock Set Sleep Timer Set Day/...00:30-3:00). The Signal Meter feature of the Audio OSD are only available for Digital signals. 2. Set this to High for TV programs. Setup Menu Preference Lamp Power Control Set The Inputs Set Closed Captions Set Monitor Out Upgrades Quick Start Up Choose English, French, or Spanish text. Select ...

Owners Guide
Page 49
... Return English Shaded 49 MENU Video Audio Channel Manager Locks Timers Setup Move SEL Select Setup Menu Preference OR Lamp Power Control Set The Inputs Set Closed Captions Set Monitor Out Upgrades Quick Start Up Move SEL Set Menu ...Preference This feature will allow you to choose from three menu languages. 1. Setup Menu Preference Lamp Power Control Set The Inputs Set Closed Captions Set Monitor Out Upgrades Quick Start Up Move SEL Set Setup...be adjusted. 2. Set the Language This function allows you to select any one of your TV up for a light background.
... Return English Shaded 49 MENU Video Audio Channel Manager Locks Timers Setup Move SEL Select Setup Menu Preference OR Lamp Power Control Set The Inputs Set Closed Captions Set Monitor Out Upgrades Quick Start Up Move SEL Set Menu ...Preference This feature will allow you to choose from three menu languages. 1. Setup Menu Preference Lamp Power Control Set The Inputs Set Closed Captions Set Monitor Out Upgrades Quick Start Up Move SEL Set Setup...be adjusted. 2. Set the Language This function allows you to select any one of your TV up for a light background.

Owners Guide
Page 50
...(Skip), Hide (Skip) Note: The inputs labeled Gray out (Skip) or Hide (Skip) are disabled in the INPUTS menu. 1. Setup Lamp Power Control Use this featureto have the TV turn off automatically when a video signal is not detected for 15 minutes Move SEL Return Set The Inputs Use this feature to... give a name to any of the five video inputs. Select from one of the video inputs. 2. Setup Menu Preference Lamp Power Control Set The...
...(Skip), Hide (Skip) Note: The inputs labeled Gray out (Skip) or Hide (Skip) are disabled in the INPUTS menu. 1. Setup Lamp Power Control Use this featureto have the TV turn off automatically when a video signal is not detected for 15 minutes Move SEL Return Set The Inputs Use this feature to... give a name to any of the five video inputs. Select from one of the video inputs. 2. Setup Menu Preference Lamp Power Control Set The...
Owners Guide
Page 51
...turn on your TV as news reports or a TV program guide. TEXT is turned on. Use the CURSOR buttons ̇ or ̈ to highlight the AUTO LINK setting of a television program or home video which are viewing. When using the AUTO LINK feature, it later. 4. Setup Menu Preference Lamp Power Control ...movie with your VCR and watch a movie with your VCR, laserdisc, or DVD play button. Text may vary by region). 4 is selected, the TV will turn the TV on and tune to Input 4 when it detects a video signal to Input 4. 1. AUTO will turn the display on when Mute/Soft Mute is ...
...turn on your TV as news reports or a TV program guide. TEXT is turned on. Use the CURSOR buttons ̇ or ̈ to highlight the AUTO LINK setting of a television program or home video which are viewing. When using the AUTO LINK feature, it later. 4. Setup Menu Preference Lamp Power Control ...movie with your VCR and watch a movie with your VCR, laserdisc, or DVD play button. Text may vary by region). 4 is selected, the TV will turn the TV on and tune to Input 4 when it detects a video signal to Input 4. 1. AUTO will turn the display on when Mute/Soft Mute is ...

Owners Guide
Page 54
...Lamp Power Control Set The Inputs Set Closed Captions Set Monitor Out Upgrades Quick Start Up Move SEL Set Setup Upgrades OR Software Version # : Main Vxxxx.xxxx MMC Software Upgrade Upgrade Now Please Insert MMC card before upgrading. This function allows the TV software to highlight UPGRADE NOW. 3. Selecting ON for your TV, HITACHI... will monitor any changes and prepare the television to have the TV tune channels (both Analog and Digital) quickly when first turning the TV on . Setup ...
...Lamp Power Control Set The Inputs Set Closed Captions Set Monitor Out Upgrades Quick Start Up Move SEL Set Setup Upgrades OR Software Version # : Main Vxxxx.xxxx MMC Software Upgrade Upgrade Now Please Insert MMC card before upgrading. This function allows the TV software to highlight UPGRADE NOW. 3. Selecting ON for your TV, HITACHI... will monitor any changes and prepare the television to have the TV tune channels (both Analog and Digital) quickly when first turning the TV on . Setup ...

Owners Guide
Page 55
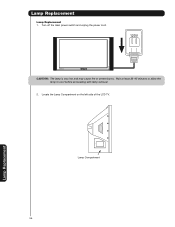
...lamp compartment or attempt to replace the lamp with a new lamp. Do not touch glass surface of the LCD Rear PTV. For more information, call "1-800-HITACHI." If "LAMP" indicator is time to remove lamp assembly unless the lamp...60VF820 LAMP TYPE LP700 LP700 LP700 PART# UX21516 UX21516 UX21516 • When replacing the lamp, let it may cause severe overheating. • Install the lamp cover correctly, otherwise power will light when lamp...allow lamp to the TV Set. cord has been unplugged. • Do not touch the glass of the lamp. The lamp may cause damage to cool for a new lamp ...
...lamp compartment or attempt to replace the lamp with a new lamp. Do not touch glass surface of the LCD Rear PTV. For more information, call "1-800-HITACHI." If "LAMP" indicator is time to remove lamp assembly unless the lamp...60VF820 LAMP TYPE LP700 LP700 LP700 PART# UX21516 UX21516 UX21516 • When replacing the lamp, let it may cause severe overheating. • Install the lamp cover correctly, otherwise power will light when lamp...allow lamp to the TV Set. cord has been unplugged. • Do not touch the glass of the lamp. The lamp may cause damage to cool for a new lamp ...
Owners Guide
Page 56
Wait at least 30~45 minutes to allow the lamp to cool before proceeding with lamp removal. 2. Turn off the main power switch and unplug the power cord. 120V Lamp Temp Power CAUTION: The lamp is very hot and may cause fire or severe burns. Lamp Replacement Lamp Replacement 1. Locate the Lamp Compartment on the left side of the LCD TV. Lamp Replacement Lamp Compartment 56
Wait at least 30~45 minutes to allow the lamp to cool before proceeding with lamp removal. 2. Turn off the main power switch and unplug the power cord. 120V Lamp Temp Power CAUTION: The lamp is very hot and may cause fire or severe burns. Lamp Replacement Lamp Replacement 1. Locate the Lamp Compartment on the left side of the LCD TV. Lamp Replacement Lamp Compartment 56

Owners Guide
Page 57
...place. Place the removed lamp into the empty box of the new lamp or its original position. • Tighten the screws firmly on the lamp unit. If they are loose, the TV may cause fire or severe burns. LAMP UNIT HANDLE HANDLE TIGHTEN THE SCREWS 57 Lamp Replacement Replace with a... Phillips head screw driver as shown. Do not touch the front glass of the replacement lamp. This may get burned...
...place. Place the removed lamp into the empty box of the new lamp or its original position. • Tighten the screws firmly on the lamp unit. If they are loose, the TV may cause fire or severe burns. LAMP UNIT HANDLE HANDLE TIGHTEN THE SCREWS 57 Lamp Replacement Replace with a... Phillips head screw driver as shown. Do not touch the front glass of the replacement lamp. This may get burned...

Owners Guide
Page 58
... by re-engaging the two clips and tighten the screws before the Lamp Cover is installed, the power will be off and the Lamp Indicator will flash (see page 9). 7. For more information, call "1-800-Hitachi". 58 Lamp Replacement Plug power cord into AC outlet and turn on , otherwise it may ...Alliance at www.eiae.org (in the US) or Electronic Product Stewardship Canada atwww.epsc.ca (in accordance with applicable environmental laws. Lamp Replacement 6. PHILLIPS HEAD SCREW DRIVER LAMP COMPARTMENT NOTE: If power is connected before turning the power on the main power switch. 120V...
... by re-engaging the two clips and tighten the screws before the Lamp Cover is installed, the power will be off and the Lamp Indicator will flash (see page 9). 7. For more information, call "1-800-Hitachi". 58 Lamp Replacement Plug power cord into AC outlet and turn on , otherwise it may ...Alliance at www.eiae.org (in the US) or Electronic Product Stewardship Canada atwww.epsc.ca (in accordance with applicable environmental laws. Lamp Replacement 6. PHILLIPS HEAD SCREW DRIVER LAMP COMPARTMENT NOTE: If power is connected before turning the power on the main power switch. 120V...
Owners Guide
Page 60
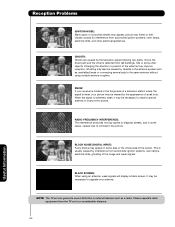
... is located in the picture. BLOCK NOISE (DIGITAL INPUT): Fuzzy blocks may be necessary to a considerable distance. 60 Useful Information NOTE: The TV set to upgrade your picture may appear in external devices such as unshielded leads or connecting several sets to improve the... picture. Please separate radio equipment from automobile ignition systems, neon lamps, electrical drills, and other electrical appliances. Reception...
... is located in the picture. BLOCK NOISE (DIGITAL INPUT): Fuzzy blocks may be necessary to a considerable distance. 60 Useful Information NOTE: The TV set to upgrade your picture may appear in external devices such as unshielded leads or connecting several sets to improve the... picture. Please separate radio equipment from automobile ignition systems, neon lamps, electrical drills, and other electrical appliances. Reception...

Owners Guide
Page 65
... and Host Diagnostics. Move SEL Return Appendixes 65 Use the CURSOR button ̄ to acess CableCARD ID and Host ID. CableCARD Info. Setup Menu Preference Lamp Power Control Set The Inputs Set Closed Captions Set Monitor Out CableCARD Information Upgrades Quick Start-Up Move SEL Select Setup CableCARD Information Select the...
... and Host Diagnostics. Move SEL Return Appendixes 65 Use the CURSOR button ̄ to acess CableCARD ID and Host ID. CableCARD Info. Setup Menu Preference Lamp Power Control Set The Inputs Set Closed Captions Set Monitor Out CableCARD Information Upgrades Quick Start-Up Move SEL Select Setup CableCARD Information Select the...
Owners Guide
Page 66
English 44 TV Ratings (Canadian - French 45 Loudness 37 M Menu Preference Language 49 Background 49 Monitor Out 52 P Pause (Freeze) Button 7, 20, 25 Perfect Volume 37 Picture Mode ... 33 Contrast 33 Contrast Mode 34 D Date 46 Daylight Saving Correction 46 E Event Timer 48 G Guide Button 7, 22 H HDMI 11, 13, 17 I Input button 7, 22 L Lamp Replacement 55-58 Language Menu Language 49 Audio Language 38 Locks Change Access Code 41 Channel Lock 41 Front Panel Lock 41 Movie Ratings 42...
English 44 TV Ratings (Canadian - French 45 Loudness 37 M Menu Preference Language 49 Background 49 Monitor Out 52 P Pause (Freeze) Button 7, 20, 25 Perfect Volume 37 Picture Mode ... 33 Contrast 33 Contrast Mode 34 D Date 46 Daylight Saving Correction 46 E Event Timer 48 G Guide Button 7, 22 H HDMI 11, 13, 17 I Input button 7, 22 L Lamp Replacement 55-58 Language Menu Language 49 Audio Language 38 Locks Change Access Code 41 Channel Lock 41 Front Panel Lock 41 Movie Ratings 42...


