Owners Guide
Page 1
has determined that this product meets the ENERGY STAR® guidelines for 42V710, 50V710, 60V710 42V715, 50V715, 60V715 IMPORTANT SAFETY INSTRUCTIONS 2-3 FIRST TIME USE ...4-20 THE REMOTE CONTROL 21-40 ON-SCREEN DISPLAY...41-68 LAMP REPLACEMENT ...69-72 CARE OF YOUR HITACHI TV & REMOTE CONTROL 73 RECEPTION PROBLEMS ...74 USEFUL INFORMATION / INDEX 75-83 As an ENERGY STAR® Partner, Hitachi, Ltd. LCD REAR PROJECTION TELEVISION Operating Guide for energy efficiency.
has determined that this product meets the ENERGY STAR® guidelines for 42V710, 50V710, 60V710 42V715, 50V715, 60V715 IMPORTANT SAFETY INSTRUCTIONS 2-3 FIRST TIME USE ...4-20 THE REMOTE CONTROL 21-40 ON-SCREEN DISPLAY...41-68 LAMP REPLACEMENT ...69-72 CARE OF YOUR HITACHI TV & REMOTE CONTROL 73 RECEPTION PROBLEMS ...74 USEFUL INFORMATION / INDEX 75-83 As an ENERGY STAR® Partner, Hitachi, Ltd. LCD REAR PROJECTION TELEVISION Operating Guide for energy efficiency.
Owners Guide
Page 4
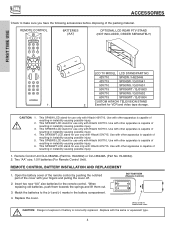
.... Remote Control Unit CLU-3842WL (Part No. LCD TV MODEL LCD STAND/PART NO. 42V710 SP42W / H520449 42V715 SPX42W / QJ01541 50V710 SP50WS / QJ01601 50V715 SPX50WT / QJ01603 60V710 SP60WS / QJ01602 60V715 SPX60WT / QJ01604 CUSTOM HITACHI TELEVISION STAND 2. Excellent for the remote control....with other apparatus is capable of the cover with Hitachi 60V715. Use with Hitachi 50V715. Lift up on tab to the (+) and (-) marks in instability causing possible injury. REMOTE CONTROL BATTERIES ("AA") OPTIONAL LCD REAR PTV STAND (NOT INCLUDED, ORDER SEPARATELY) FIRST ...
.... Remote Control Unit CLU-3842WL (Part No. LCD TV MODEL LCD STAND/PART NO. 42V710 SP42W / H520449 42V715 SPX42W / QJ01541 50V710 SP50WS / QJ01601 50V715 SPX50WT / QJ01603 60V710 SP60WS / QJ01602 60V715 SPX60WT / QJ01604 CUSTOM HITACHI TELEVISION STAND 2. Excellent for the remote control....with other apparatus is capable of the cover with Hitachi 60V715. Use with Hitachi 50V715. Lift up on tab to the (+) and (-) marks in instability causing possible injury. REMOTE CONTROL BATTERIES ("AA") OPTIONAL LCD REAR PTV STAND (NOT INCLUDED, ORDER SEPARATELY) FIRST ...
Owners Guide
Page 7
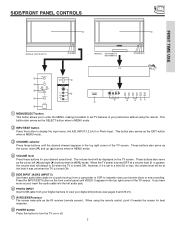
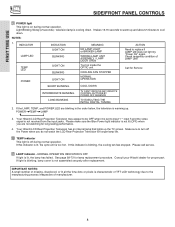
VOL+ CH- This button also serves as the SELECT button when in the top right corner of the TV screen. When using the remote control, point it possible to set TV features to display the input menu, Ant A/B, INPUT:1,2,3,4,5 or Photo Input. If you to enter the MENU, making.... ቩ POWER button Press this button to your desired sound level. SIDE/FRONT PANEL CONTROLS ቨ ቨ FIRST TIME USE MODELS: 42V710/42V715 ቨቭቫቪ PUSH MODELS: 50V710/50V715 60V710/60V715 PUSH MENU/SELECT ̆ CH+ VOL̇ VOL+ ̈ CH̄ INPUT/...
VOL+ CH- This button also serves as the SELECT button when in the top right corner of the TV screen. When using the remote control, point it possible to set TV features to display the input menu, Ant A/B, INPUT:1,2,3,4,5 or Photo Input. If you to enter the MENU, making.... ቩ POWER button Press this button to your desired sound level. SIDE/FRONT PANEL CONTROLS ቨ ቨ FIRST TIME USE MODELS: 42V710/42V715 ቨቭቫቪ PUSH MODELS: 50V710/50V715 60V710/60V715 PUSH MENU/SELECT ̆ CH+ VOL̇ VOL+ ̈ CH̄ INPUT/...
Owners Guide
Page 8
.... Check assembly condition of manufacturer. 8 Your Hitachi LCD Rear Projection Television may appear to be OFF when it is set to cool down . Your Hitachi LCD Rear Projection Television has an internal lamp that lights up . Consult your Hitachi dealer for lamp replacement procedure. POWER TEMP LAMP... indicator is not lit (OFF) when you do not watch the LCD Rear Projection Television for Service INTERMEDIATE BLINKING LONG BLINKING TV CAN'T RECEIVE ANY REMOTE CONTROL BUTTONS BY POWER OFF SEQENCE TV EXECUTING THE INITIAL DIGITAL TUNING 2. If this indicator is blinking, the cooling...
.... Check assembly condition of manufacturer. 8 Your Hitachi LCD Rear Projection Television may appear to be OFF when it is set to cool down . Your Hitachi LCD Rear Projection Television has an internal lamp that lights up . Consult your Hitachi dealer for lamp replacement procedure. POWER TEMP LAMP... indicator is not lit (OFF) when you do not watch the LCD Rear Projection Television for Service INTERMEDIATE BLINKING LONG BLINKING TV CAN'T RECEIVE ANY REMOTE CONTROL BUTTONS BY POWER OFF SEQENCE TV EXECUTING THE INITIAL DIGITAL TUNING 2. If this indicator is blinking, the cooling...
Owners Guide
Page 10
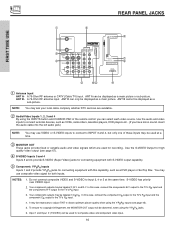
...to the TV's PB input and the components R-Y output to Input 3, 4 or 5 at a time. ቤ MONITOR OUT These jacks provide fixed or variable audio and video signals which are available. ባ Audio/Video Inputs 1, 2, 3 and 4 By using the INPUTS button and CURSOR PAD of the remote control you have... input and the component CR output to INPUT 3 and 4, but only one of U.S. Input 1 and Input 2 (Y/VIDEO) can select each video source. REAR PANEL JACKS FIRST TIME USE ቢ ቦ ANT A CableCARD (Top of card faces right) ቭ ቤ ብ ANT B MONITOR OUT S-VIDEO INPUT 4 ...
...to the TV's PB input and the components R-Y output to Input 3, 4 or 5 at a time. ቤ MONITOR OUT These jacks provide fixed or variable audio and video signals which are available. ባ Audio/Video Inputs 1, 2, 3 and 4 By using the INPUTS button and CURSOR PAD of the remote control you have... input and the component CR output to INPUT 3 and 4, but only one of U.S. Input 1 and Input 2 (Y/VIDEO) can select each video source. REAR PANEL JACKS FIRST TIME USE ቢ ቦ ANT A CableCARD (Top of card faces right) ቭ ቤ ብ ANT B MONITOR OUT S-VIDEO INPUT 4 ...
Owners Guide
Page 21
... this time. If you are grouped together in a dark room, press any button on the remote. The illumination will not appear to light if the room is designed to control your HITACHI Projection TV, the new remote control is too bright. 21 To operate your set-top-box or satellite receiver point the... remote at the screen of the TV and select the TV by pressing the ̇ or ̈ button of ...
... this time. If you are grouped together in a dark room, press any button on the remote. The illumination will not appear to light if the room is designed to control your HITACHI Projection TV, the new remote control is too bright. 21 To operate your set-top-box or satellite receiver point the... remote at the screen of the TV and select the TV by pressing the ̇ or ̈ button of ...
Owners Guide
Page 22
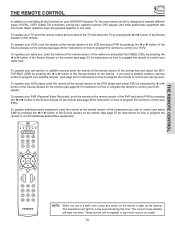
...use this button in TV mode. (See page 21 for instructions on how to set the remote control to TV mode.) ባ MODE Indicator Turns on or blinks to show remote control mode. ቤ SOURCE ACCESS (̇ , ̈) buttons Press these buttons to select remote control mode. ብ ... to program the remote (see page 32). HOW TO USE THE REMOTE TO CONTROL YOUR LCD REAR PTV ቢ ባ ቤ ብ ቦ ቧ ቩ ቨ GUIDE ቫ ቪ ቭ ቮ ቯ ቱ C.C. ተ ቲ ታ ታ ቴ ት THE REMOTE CONTROL ቢ POWER...
...use this button in TV mode. (See page 21 for instructions on how to set the remote control to TV mode.) ባ MODE Indicator Turns on or blinks to show remote control mode. ቤ SOURCE ACCESS (̇ , ̈) buttons Press these buttons to select remote control mode. ብ ... to program the remote (see page 32). HOW TO USE THE REMOTE TO CONTROL YOUR LCD REAR PTV ቢ ባ ቤ ብ ቦ ቧ ቩ ቨ GUIDE ቫ ቪ ቭ ቮ ቯ ቱ C.C. ተ ቲ ታ ታ ቴ ት THE REMOTE CONTROL ቢ POWER...

Owners Guide
Page 23
... format ASPECT ratio. Note: Use this button to Zoom-in once while in 16:9 aspect. (1) NTSC/480i/480P Input 4:3 INPUT 4:3 STANDARD 4:3 EXPANDED 4:3 ZOOM1 THE REMOTE CONTROL 16:9 ZOOM (2) 480i/480P Input 16:9 INPUT 4:3 STANDARD 16:9 STANDARD 4:3 EXPANDED 4:3 ZOOM2 4:3 ZOOM1 16:9 ZOOM (3) HDMI/720P/1080i Input 16:9 INPUT 16:9 STANDARD...original 16:9 aspect ratio. 16:9 Zoom Use this aspect mode to preserve the original aspect ratio of the phosphors. HOW TO USE THE REMOTE TO CONTROL YOUR LCD REAR PTV ቧ ASPECT button Press this mode for the other ANT inputs.
... format ASPECT ratio. Note: Use this button to Zoom-in once while in 16:9 aspect. (1) NTSC/480i/480P Input 4:3 INPUT 4:3 STANDARD 4:3 EXPANDED 4:3 ZOOM1 THE REMOTE CONTROL 16:9 ZOOM (2) 480i/480P Input 16:9 INPUT 4:3 STANDARD 16:9 STANDARD 4:3 EXPANDED 4:3 ZOOM2 4:3 ZOOM1 16:9 ZOOM (3) HDMI/720P/1080i Input 16:9 INPUT 16:9 STANDARD...original 16:9 aspect ratio. 16:9 Zoom Use this aspect mode to preserve the original aspect ratio of the phosphors. HOW TO USE THE REMOTE TO CONTROL YOUR LCD REAR PTV ቧ ASPECT button Press this mode for the other ANT inputs.
Owners Guide
Page 24
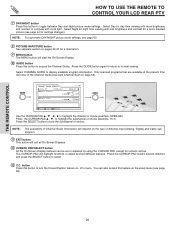
...60. ቩ PICTURE-IN-PICTURE button See separate section on pages 30-31 for a description. ቪ MENU button The MENU button will show in the Channel Guide (see page 44 for night time viewing with room light. Select CHANNEL GUIDE to tune the subchannel of choice (example: KPBS-HD). THE REMOTE CONTROL... HOW TO USE THE REMOTE TO CONTROL YOUR LCD REAR PTV ቨ DAY/NIGHT button Press this button to access the Channel Guide. Press the SELECT button to...
...60. ቩ PICTURE-IN-PICTURE button See separate section on pages 30-31 for a description. ቪ MENU button The MENU button will show in the Channel Guide (see page 44 for night time viewing with room light. Select CHANNEL GUIDE to tune the subchannel of choice (example: KPBS-HD). THE REMOTE CONTROL... HOW TO USE THE REMOTE TO CONTROL YOUR LCD REAR PTV ቨ DAY/NIGHT button Press this button to access the Channel Guide. Press the SELECT button to...

Owners Guide
Page 25
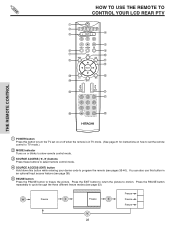
... 2 Move SEL Sel Select to access your pictures from a digital camera connected to choose Input 2 for Video 2. Select to the Photo Input in TV mode, press this button to choose Input 1 for Video 3. Select to select. Pressing the INPUTS button repeatedly will also cycle through the Inputs menu ...choose Input 5 for Video 4. Select to choose Input 4 for Video 5. HOW TO USE THE REMOTE TO CONTROL YOUR LCD REAR PTV ተ INPUTS button When the remote control is in the front panel of the TV (see page 26). Select to access the INPUTS menu. Use the CURSOR PAD and SELECT button to...
... 2 Move SEL Sel Select to access your pictures from a digital camera connected to choose Input 2 for Video 2. Select to the Photo Input in TV mode, press this button to choose Input 1 for Video 3. Select to select. Pressing the INPUTS button repeatedly will also cycle through the Inputs menu ...choose Input 5 for Video 4. Select to choose Input 4 for Video 5. HOW TO USE THE REMOTE TO CONTROL YOUR LCD REAR PTV ተ INPUTS button When the remote control is in the front panel of the TV (see page 26). Select to access the INPUTS menu. Use the CURSOR PAD and SELECT button to...
Owners Guide
Page 26
... before checking your digital camera using the Photo Input in the side panel (Models 42V710, 42V715) or the front panel (Models 50V710, 60V710, 50V715, 60V715) of the TV. THE REMOTE CONTROL NOTES: 1. The screen may show "Input device not detected" due to slow access time on a DVD-RAM disc may not properly display your... maximum number of digital cameras may show "Input device not detected" if the digital camera's large capacity memory is fully loaded. HOW TO USE THE REMOTE TO CONTROL YOUR LCD REAR PTV PHOTO INPUT This feature is 999. 2.
... before checking your digital camera using the Photo Input in the side panel (Models 42V710, 42V715) or the front panel (Models 50V710, 60V710, 50V715, 60V715) of the TV. THE REMOTE CONTROL NOTES: 1. The screen may show "Input device not detected" due to slow access time on a DVD-RAM disc may not properly display your... maximum number of digital cameras may show "Input device not detected" if the digital camera's large capacity memory is fully loaded. HOW TO USE THE REMOTE TO CONTROL YOUR LCD REAR PTV PHOTO INPUT This feature is 999. 2.

Owners Guide
Page 27
... a sub directory name with DCF Standard (Design rule for Camera File System). 3. HOW TO USE THE REMOTE TO CONTROL YOUR LCD REAR PTV SLIDESHOW Select this menu item to rotate selected photos either clockwise (CURSOR PAD ̈) and counterclockwise (...TV set from 5, 10 and 30 seconds. While interval is also available in your digital camera. ROTATE Select this menu item to change interval time from digital cameras which meet DCF Standard. Rotate menu item is highlighted, press SELECT to start a slideshow of the slideshow. Jump Slideshow Rotate Rotate 1/10 THE REMOTE CONTROL...
... a sub directory name with DCF Standard (Design rule for Camera File System). 3. HOW TO USE THE REMOTE TO CONTROL YOUR LCD REAR PTV SLIDESHOW Select this menu item to rotate selected photos either clockwise (CURSOR PAD ̈) and counterclockwise (...TV set from 5, 10 and 30 seconds. While interval is also available in your digital camera. ROTATE Select this menu item to change interval time from digital cameras which meet DCF Standard. Rotate menu item is highlighted, press SELECT to start a slideshow of the slideshow. Jump Slideshow Rotate Rotate 1/10 THE REMOTE CONTROL...

Owners Guide
Page 28
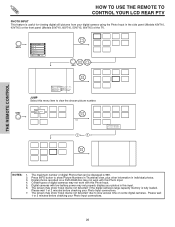
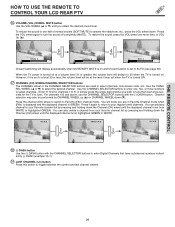
... 3:32PM Picture Source Ant A 122-1 Channel ID KPBS-DT Program Language Engl Broadcast Rating TV-Y INFO Signal Format 720p Format Day/Night Mode Closed Captioning Aspect Mode Day CC Off 4:3 Expanded View --:-- PM --:-- NOTES: 1. AM REC --:-- Press ...: 1 COMPONENT VID 1 VIDEO: Y-PBPR Input is set. The Sleep Timer info will show momentarily after releasing INFO button. 2. THE REMOTE CONTROL HOW TO USE THE REMOTE TO CONTROL YOUR LCD REAR PTV ቱ INFO button Press this button when you want to check the channel being received, the picture source, if the channel...
... 3:32PM Picture Source Ant A 122-1 Channel ID KPBS-DT Program Language Engl Broadcast Rating TV-Y INFO Signal Format 720p Format Day/Night Mode Closed Captioning Aspect Mode Day CC Off 4:3 Expanded View --:-- PM --:-- NOTES: 1. AM REC --:-- Press ...: 1 COMPONENT VID 1 VIDEO: Y-PBPR Input is set. The Sleep Timer info will show momentarily after releasing INFO button. 2. THE REMOTE CONTROL HOW TO USE THE REMOTE TO CONTROL YOUR LCD REAR PTV ቱ INFO button Press this button when you want to check the channel being received, the picture source, if the channel...
Owners Guide
Page 29
...wheel down the Channel (CH) wheel until the displayed channel turns highlighted GREEN to tune. However, if it is on . THE REMOTE CONTROL HOW TO USE THE REMOTE TO CONTROL YOUR LCD REAR PTV ቲ VOLUME (VOL) WHEEL, MUTE button Use the VOL WHEEL (̆ or ̄) until you are in Favorite.... Enter "0" first for channels 1 to 9, or simply press the single digit channel you wish to tune then wait a few seconds for the TV to WHITE. Channel selection may also be at a volume level 31 or greater, the volume level will know you obtain the desired sound level. ...
...wheel down the Channel (CH) wheel until the displayed channel turns highlighted GREEN to tune. However, if it is on . THE REMOTE CONTROL HOW TO USE THE REMOTE TO CONTROL YOUR LCD REAR PTV ቲ VOLUME (VOL) WHEEL, MUTE button Use the VOL WHEEL (̆ or ̄) until you are in Favorite.... Enter "0" first for channels 1 to 9, or simply press the single digit channel you wish to tune then wait a few seconds for the TV to WHITE. Channel selection may also be at a volume level 31 or greater, the volume level will know you obtain the desired sound level. ...

Owners Guide
Page 30
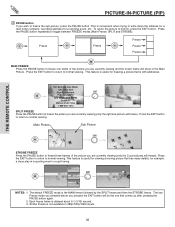
... INPUT 3 INPUT 2 Y/ VIDEO PB INPUT 1 Y/ VIDEO PB HDMI 1 VIDEO L AUDIO R AUDIO TO HI-FI PR PR (MONO) (MONO) (MONO) (MONO) TV AS CENTER CableCARD (Top of card faces right) OPTICAL OUT Digital Audio Upgrade Card Apparatus Claims of the main picture. ANT B will not be viewed... as main picture (ANT A, ANT B, INPUT:2, INPUT:3, INPUT:4, or INPUT:5). Main Picture Sub Picture NOTES: 1. THE REMOTE CONTROL PICTURE-IN-PICTURE (PIP) Your HITACHI LCD Rear PTV incorporates Two Tuner technology designed for limited viewing uses only. This Two Tuner feature allows you want to ANT A (...
... INPUT 3 INPUT 2 Y/ VIDEO PB INPUT 1 Y/ VIDEO PB HDMI 1 VIDEO L AUDIO R AUDIO TO HI-FI PR PR (MONO) (MONO) (MONO) (MONO) TV AS CENTER CableCARD (Top of card faces right) OPTICAL OUT Digital Audio Upgrade Card Apparatus Claims of the main picture. ANT B will not be viewed... as main picture (ANT A, ANT B, INPUT:2, INPUT:3, INPUT:4, or INPUT:5). Main Picture Sub Picture NOTES: 1. THE REMOTE CONTROL PICTURE-IN-PICTURE (PIP) Your HITACHI LCD Rear PTV incorporates Two Tuner technology designed for limited viewing uses only. This Two Tuner feature allows you want to ANT A (...

Owners Guide
Page 31
... the main picture and sub-picture evenly on a chosen channel. Ant A/B - 480p - 720p - 1080i Yes Yes Yes - - - - - Main Picture Sub Picture THE REMOTE CONTROL SURF MODE PICTURE-IN-PICTURE Surf Mode PIP automatically scans all active channels (those set in memory) and displays them as PIP pictures or Thumbnail... channels. Use the remote CURSOR PADS to stop on the screen. Press the EXIT button to enable your chosen channel and return to normal viewing. 12 34 56...
... the main picture and sub-picture evenly on a chosen channel. Ant A/B - 480p - 720p - 1080i Yes Yes Yes - - - - - Main Picture Sub Picture THE REMOTE CONTROL SURF MODE PICTURE-IN-PICTURE Surf Mode PIP automatically scans all active channels (those set in memory) and displays them as PIP pictures or Thumbnail... channels. Use the remote CURSOR PADS to stop on the screen. Press the EXIT button to enable your chosen channel and return to normal viewing. 12 34 56...
Owners Guide
Page 32
... EXIT button will be the one frame of the picture you are currently viewing (only the 3 sub-pictures will freeze). Main Picture Sub Picture THE REMOTE CONTROL STROBE FREEZE Press the PAUSE button to toggle between FREEZE modes (Main Freeze, SPLIT and STROBE). Press the PAUSE button repeatedly to freeze three frames...
... EXIT button will be the one frame of the picture you are currently viewing (only the 3 sub-pictures will freeze). Main Picture Sub Picture THE REMOTE CONTROL STROBE FREEZE Press the PAUSE button to toggle between FREEZE modes (Main Freeze, SPLIT and STROBE). Press the PAUSE button repeatedly to freeze three frames...
Owners Guide
Page 33
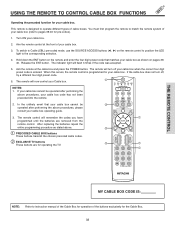
... . ቢ PRECODED CABLE BOX buttons These buttons transmit the chosen precoded cable codes. ባ EXCLUSIVE TV buttons These buttons are removed from the remote control. When this occurs, the remote control is programmed for your cable box. 2. USING THE REMOTE TO CONTROL CABLE BOX FUNCTIONS Operating the precoded function for your cable box. 3. The indicator light will...
... . ቢ PRECODED CABLE BOX buttons These buttons transmit the chosen precoded cable codes. ባ EXCLUSIVE TV buttons These buttons are removed from the remote control. When this occurs, the remote control is programmed for your cable box. 2. USING THE REMOTE TO CONTROL CABLE BOX FUNCTIONS Operating the precoded function for your cable box. 3. The indicator light will...
Owners Guide
Page 34
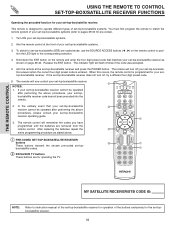
.... 6. The indicator light will remember the codes you have programmed until the batteries are for operating the TV. ባ GUIDE ቢ ባ C.C. ባ ቢ ቢ THE REMOTE CONTROL MY SATELLITE RECEIVER/STB CODE IS: NOTE: Refer to the corresponding selection. 4. After replacing the batteries ... transmit the chosen pre-coded set-topbox/satellite codes. ባ EXCLUSIVE TV buttons These buttons are removed from the remote control. Hold down the ENT button on page 39-40. The remote will turn off your set-top-box/satellite receiver when the correct four...
.... 6. The indicator light will remember the codes you have programmed until the batteries are for operating the TV. ባ GUIDE ቢ ባ C.C. ባ ቢ ቢ THE REMOTE CONTROL MY SATELLITE RECEIVER/STB CODE IS: NOTE: Refer to the corresponding selection. 4. After replacing the batteries ... transmit the chosen pre-coded set-topbox/satellite codes. ባ EXCLUSIVE TV buttons These buttons are removed from the remote control. Hold down the ENT button on page 39-40. The remote will turn off your set-top-box/satellite receiver when the correct four...
Owners Guide
Page 35
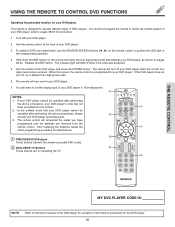
...programmed until the batteries are for operating the TV. ባ C.C. ባ ቢ THE REMOTE CONTROL MY DVD PLAYER CODE IS: NOTE: Refer to set the display type of the buttons exclusively for the DVD player. 35 The remote control will need to instruction manual of the DVD...4706; ቢ PRECODED DVD Buttons These buttons transmit the chosen precoded DVD codes. ባ EXCLUSIVE TV Buttons These buttons are removed from the remote control. Hold down the ENT button on the remote control to position the LED light to operate different types of your DVD player. 3. Turn ON your ...
...programmed until the batteries are for operating the TV. ባ C.C. ባ ቢ THE REMOTE CONTROL MY DVD PLAYER CODE IS: NOTE: Refer to set the display type of the buttons exclusively for the DVD player. 35 The remote control will need to instruction manual of the DVD...4706; ቢ PRECODED DVD Buttons These buttons transmit the chosen precoded DVD codes. ባ EXCLUSIVE TV Buttons These buttons are removed from the remote control. Hold down the ENT button on the remote control to position the LED light to operate different types of your DVD player. 3. Turn ON your ...


