
Owners Guide
Page 1
has determined that this product meets the Energy Star® guidelines for 50VS69A 55VS69A and 62VS69A IMPORTANT SAFETY INSTRUCTIONS 2-3 FIRST TIME USE ...4-18 THE REMOTE CONTROL ...19-30 ON-SCREEN DISPLAY ...31-55 LAMP REPLACEMENT ...56-59 USEFUL INFORMATION...60-64 LICENSE AGREEMENT...65-73 APPENDIXES ...74-75 INDEX ...76 As an Energy Star® Partner, Hitachi, Ltd. LCD REAR PROJECTION TELEVISION Operating Guide for energy efficiency.
has determined that this product meets the Energy Star® guidelines for 50VS69A 55VS69A and 62VS69A IMPORTANT SAFETY INSTRUCTIONS 2-3 FIRST TIME USE ...4-18 THE REMOTE CONTROL ...19-30 ON-SCREEN DISPLAY ...31-55 LAMP REPLACEMENT ...56-59 USEFUL INFORMATION...60-64 LICENSE AGREEMENT...65-73 APPENDIXES ...74-75 INDEX ...76 As an Energy Star® Partner, Hitachi, Ltd. LCD REAR PROJECTION TELEVISION Operating Guide for energy efficiency.
Owners Guide
Page 4
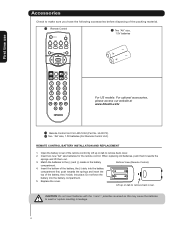
... or rupture resulting in the battery Bottom View (Remote Control) compartment. 4. HL02072). 2 2 Two "AA" size, 1.5V batteries (For Remote Control Unit). Replace the cover. Insert two new "AA" size batteries for the remote control. REMOTE CONTROL BATTERY INSTALLATION AND REPLACEMENT 1. Do not force the...on tab to remove back cover. Insert the bottom of the packing material. 1 Remote Control 2 Two "AA" size, 1.5V batteries First time use For US models: For optional accessories, please access our website at www.hitachi.us/tv 1 Remote Control Unit CLU-4351UG2 (Part No.
... or rupture resulting in the battery Bottom View (Remote Control) compartment. 4. HL02072). 2 2 Two "AA" size, 1.5V batteries (For Remote Control Unit). Replace the cover. Insert two new "AA" size batteries for the remote control. REMOTE CONTROL BATTERY INSTALLATION AND REPLACEMENT 1. Do not force the...on tab to remove back cover. Insert the bottom of the packing material. 1 Remote Control 2 Two "AA" size, 1.5V batteries First time use For US models: For optional accessories, please access our website at www.hitachi.us/tv 1 Remote Control Unit CLU-4351UG2 (Part No.

Owners Guide
Page 7
...VOLUME BUTTONS (TV) Adjusts the audio level of your VCR and DVD. First time use Quick Reference Remote Control Buttons and Functions In addition to controlling all features and programming of the Remote Control. CHANNEL BUTTONS (TV, CBL, SAT, VCR) Changes the channel. LEGEND TV- FAVORITE CHANNEL (FAV...access Favorite Channel (FAV) mode. POWER BUTTON (TV, CBL, VCR, DVD, SAT) Turns the selected device on your HITACHI LCD Rear Projection TV, the new remote control is designed to navigate the cursor through the OSD menu system. (-) BUTTON (TV, SAT) The (-) button is in the...
...VOLUME BUTTONS (TV) Adjusts the audio level of your VCR and DVD. First time use Quick Reference Remote Control Buttons and Functions In addition to controlling all features and programming of the Remote Control. CHANNEL BUTTONS (TV, CBL, SAT, VCR) Changes the channel. LEGEND TV- FAVORITE CHANNEL (FAV...access Favorite Channel (FAV) mode. POWER BUTTON (TV, CBL, VCR, DVD, SAT) Turns the selected device on your HITACHI LCD Rear Projection TV, the new remote control is designed to navigate the cursor through the OSD menu system. (-) BUTTON (TV, SAT) The (-) button is in the...

Owners Guide
Page 8
This button also serves as the cursor left audio jack. ¶ IR RECEIVER Sensor Point the remote control at a volume level 31 or greater, the volume level will be displayed on the TV screen. Press the INPUT button and select INPUT 5. If you ... to set TV features to your favorite show , new recording or Video game. First time use Front Panel Controls ቩ ቦ ቨ ቪ ቫ Front Control Panel Buttons & Connections Push to open the Front Control Panel Door ቢ ብ ቤ ባ ቧ ³ MENU/SELECT button This button allows you have mono ...
This button also serves as the cursor left audio jack. ¶ IR RECEIVER Sensor Point the remote control at a volume level 31 or greater, the volume level will be displayed on the TV screen. Press the INPUT button and select INPUT 5. If you ... to set TV features to your favorite show , new recording or Video game. First time use Front Panel Controls ቩ ቦ ቨ ቪ ቫ Front Control Panel Buttons & Connections Push to open the Front Control Panel Door ቢ ብ ቤ ባ ቧ ³ MENU/SELECT button This button allows you have mono ...
Owners Guide
Page 9
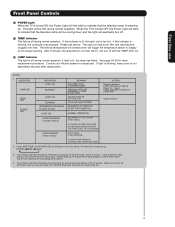
... for lamp replacement procedure. If this indicator is lit, the optic unit is too hot. Your Hitachi LCD Rear Projection Television may become clogged over time. Your Hitachi LCD Rear Projection Television has an internal lamp that the television lamp will be cooling down and the...Light will first blink to indicate that may appear to be ON during normal operation. Consult your Hitachi dealer for Service LONG BLINKING (1 SEC CYCLE) COOL DOWN (FOR 6 MINUTES) (TV CAN ACCEPT REMOTE CONTROL AND FRONT BUTTONS) 2. Make sure to replace if LAMP still does not light by Power On ...
... for lamp replacement procedure. If this indicator is lit, the optic unit is too hot. Your Hitachi LCD Rear Projection Television may become clogged over time. Your Hitachi LCD Rear Projection Television has an internal lamp that the television lamp will be cooling down and the...Light will first blink to indicate that may appear to be ON during normal operation. Consult your Hitachi dealer for Service LONG BLINKING (1 SEC CYCLE) COOL DOWN (FOR 6 MINUTES) (TV CAN ACCEPT REMOTE CONTROL AND FRONT BUTTONS) 2. Make sure to replace if LAMP still does not light by Power On ...
Owners Guide
Page 11
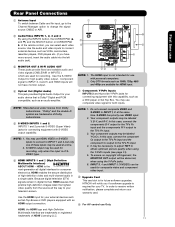
...3 and 4 By using the INPUTS button, the CURSOR PAD (̆ and ̄), and the SELECT button or CURSOR PAD ̈ of the remote control, you if a software upgrade is required for your TV. The HDMI input is for connecting equipment with personal computers. 2. NOTE: 1. In this ...and return your audio device that pristine high-definition images retain the highest video quality from Dolby Laboratories. Use the HDMI input for both inputs. HITACHI will not have mono sound, insert the audio cable into the left audio jack). ቢ ቪ ቦ ቨ ቫ ቩ...
...3 and 4 By using the INPUTS button, the CURSOR PAD (̆ and ̄), and the SELECT button or CURSOR PAD ̈ of the remote control, you if a software upgrade is required for your TV. The HDMI input is for connecting equipment with personal computers. 2. NOTE: 1. In this ...and return your audio device that pristine high-definition images retain the highest video quality from Dolby Laboratories. Use the HDMI input for both inputs. HITACHI will not have mono sound, insert the audio cable into the left audio jack). ቢ ቪ ቦ ቨ ቫ ቩ...
Owners Guide
Page 19
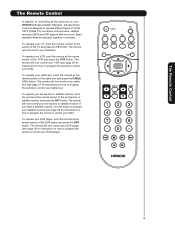
Basic operation keys are grouped together in one touch. The remote will now control your DVD player (see page 27 for instruction on how to program the remote to control your cable box). To operate your HITACHI LCD rear projection Television , the new remote control is designed to operate different types of VCRs, CATV (Cable TV) converters, set...
Basic operation keys are grouped together in one touch. The remote will now control your DVD player (see page 27 for instruction on how to program the remote to control your cable box). To operate your HITACHI LCD rear projection Television , the new remote control is designed to operate different types of VCRs, CATV (Cable TV) converters, set...
Owners Guide
Page 20
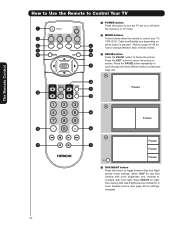
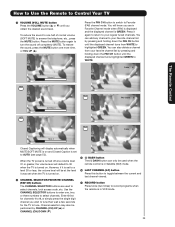
...viewing with less brightness and contrast for day time viewing with room light. Refer to page 31~34 for settings changes). 20 The Remote Control How to Use the Remote to Control Your TV ³ POWER button Press this button to toggle between each of these modes. ´ ¶ º µ...; » PAUSE button Press the PAUSE button to control your TV, VCR, DVD, Cable box/Satellite box depending on or off when ³ the remote is in TV mode. · MODE buttons · These buttons allow the remote to freeze the picture. Press the PAUSE button repeatedly to cycle...
...viewing with less brightness and contrast for day time viewing with room light. Refer to page 31~34 for settings changes). 20 The Remote Control How to Use the Remote to Control Your TV ³ POWER button Press this button to toggle between each of these modes. ´ ¶ º µ...; » PAUSE button Press the PAUSE button to control your TV, VCR, DVD, Cable box/Satellite box depending on or off when ³ the remote is in TV mode. · MODE buttons · These buttons allow the remote to freeze the picture. Press the PAUSE button repeatedly to cycle...
Owners Guide
Page 21
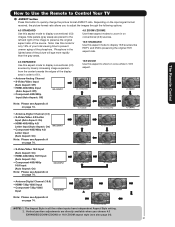
... the original aspect ratio of the image to Zoom-in once while in all five video inputs have independent Aspect Style setting. 2. The Remote Control How to Use the Remote to Control Your TV ´ ASPECT button Press this aspect mode to prevent uneven aging of your total viewing time to display conventional (4:3) images...
... the original aspect ratio of the image to Zoom-in once while in all five video inputs have independent Aspect Style setting. 2. The Remote Control How to Use the Remote to Control Your TV ´ ASPECT button Press this aspect mode to prevent uneven aging of your total viewing time to display conventional (4:3) images...
Owners Guide
Page 22
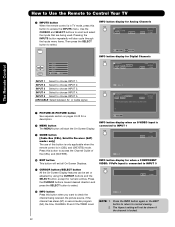
... Cable 8 -1 KXYZ-HD 1080i 3:17PM The show description will exit all On-Screen Displays. How to Use the Remote to Control Your TV ² INPUTS button When the remote control is in this area of the screen. INPUT 5 Select to select. Pressing the INPUTS button repeatedly will not be... set . INFO button display for numeric entries. The Remote Control ¶ PICTURE-IN-PICTURE button See separate section on pages 24-25 for Digital Channels INFO Show Name 3:00PM- 3:30PM Engl DTVCC ...
... Cable 8 -1 KXYZ-HD 1080i 3:17PM The show description will exit all On-Screen Displays. How to Use the Remote to Control Your TV ² INPUTS button When the remote control is in this area of the screen. INPUT 5 Select to select. Pressing the INPUTS button repeatedly will not be... set . INFO button display for numeric entries. The Remote Control ¶ PICTURE-IN-PICTURE button See separate section on pages 24-25 for Digital Channels INFO Show Name 3:00PM- 3:30PM Engl DTVCC ...
Owners Guide
Page 23
First time use The Remote Control How to Use the Remote to Control Your TV Ƹ VOLUME (VOL), MUTE button Press the VOLUME button (̆ or ̄... the current and last channel viewed. Ƽ RECORD button Press twice (two times) to record programs when the remote is set to a level 30 or less, the volume level will be at a volume level 31 or greater,...FAV Cable 6 MUTE Soft Mute 8 FAV CH Cable 6 Mute 8 Closed Captioning will know you are used when the remote control is in VCR mode. 23 You can add any channel to your favorite channel list by pressing and holding down the ...
First time use The Remote Control How to Use the Remote to Control Your TV Ƹ VOLUME (VOL), MUTE button Press the VOLUME button (̆ or ̄... the current and last channel viewed. Ƽ RECORD button Press twice (two times) to record programs when the remote is set to a level 30 or less, the volume level will be at a volume level 31 or greater,...FAV Cable 6 MUTE Soft Mute 8 FAV CH Cable 6 Mute 8 Closed Captioning will know you are used when the remote control is in VCR mode. 23 You can add any channel to your favorite channel list by pressing and holding down the ...

Owners Guide
Page 24
...with a 1080i/720p signal. Use connection at the same time. Please see page 25). The Green highlighted channel display will appear in -Picture (PIP) Your HITACHI LCD TV incorporates one Tuner technology designed for PIP availability. Press the CURSOR PAD ( ̇ or ̈) to view VCR program as a subpicture while ... sub-picture outside of VCR AUDIO OUT VIDEO OUT OUTPUT VCR ³ · To change the PIP mode, use the CURSOR PAD button the remote. The Remote Control Picture-in one of the four different modes (POP, PIP, or SPLIT), depending on the INPUT signal.
...with a 1080i/720p signal. Use connection at the same time. Please see page 25). The Green highlighted channel display will appear in -Picture (PIP) Your HITACHI LCD TV incorporates one Tuner technology designed for PIP availability. Press the CURSOR PAD ( ̇ or ̈) to view VCR program as a subpicture while ... sub-picture outside of VCR AUDIO OUT VIDEO OUT OUTPUT VCR ³ · To change the PIP mode, use the CURSOR PAD button the remote. The Remote Control Picture-in one of the four different modes (POP, PIP, or SPLIT), depending on the INPUT signal.
Owners Guide
Page 25
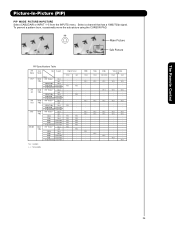
The Remote Control Picture-In-Picture (PIP) PIP MODE PICTURE-IN-PICTURE Select CABLE/AIR or INPUT 1~5 from the INPUTS menu. Main Picture Sub Picture SWAP PIP Specifications ...
The Remote Control Picture-In-Picture (PIP) PIP MODE PICTURE-IN-PICTURE Select CABLE/AIR or INPUT 1~5 from the INPUTS menu. Main Picture Sub Picture SWAP PIP Specifications ...

Owners Guide
Page 26
... FREEZE modes (Main Freeze, SPLIT and STROBE). This feature is useful for viewing a moving picture that comes up after pressing the PAUSE button again. 2. The Remote Control Picture-In-Picture (PIP) ባ PAUSE button If you pressed the EXIT button will be the one frame of the picture you are currently viewing...
... FREEZE modes (Main Freeze, SPLIT and STROBE). This feature is useful for viewing a moving picture that comes up after pressing the PAUSE button again. 2. The Remote Control Picture-In-Picture (PIP) ባ PAUSE button If you pressed the EXIT button will be the one frame of the picture you are currently viewing...

Owners Guide
Page 27
...remote control is programmed for Cable Box Functions The Remote Control OPERATING THE PRECODED FUNCTION FOR YOUR CABLE BOX. NOTE: 1. The Remote Control for your cable box. Aim the remote control at the cable box and press the POWER button. The remote control will now control your Cable box. This remote is entered. Aim the remote... CABLE BOX buttons These buttons transmit the chosen precoded cable codes. » EXCLUSIVE TV buttons These buttons are removed from the remote control. CABLE BRAND Analog Type CODES HAMLIN 22, 23, 24, 25 JERROLD 00, 01, 02, 03, 04, 05, 06...
...remote control is programmed for Cable Box Functions The Remote Control OPERATING THE PRECODED FUNCTION FOR YOUR CABLE BOX. NOTE: 1. The Remote Control for your cable box. Aim the remote control at the cable box and press the POWER button. The remote control will now control your Cable box. This remote is entered. Aim the remote... CABLE BOX buttons These buttons transmit the chosen precoded cable codes. » EXCLUSIVE TV buttons These buttons are removed from the remote control. CABLE BRAND Analog Type CODES HAMLIN 22, 23, 24, 25 JERROLD 00, 01, 02, 03, 04, 05, 06...
Owners Guide
Page 28
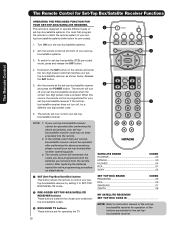
... -topbox/satellite receiver code has not been precoded into the remote. 2. The remote control will now control your set -top-box/satellite receiver and press the POWER button. Aim the remote control at the set - ³ top-box/satellite systems ...remote control is designed to operate different types of · set-top-box/satellite systems. You must first program the remote to instruction manual of the set -top-box/satellite receiver. The remote will remember the codes you have programmed until the batteries are for operating the TV. 28 SATELLITE BRAND CODES ECOSTAR 03 HITACHI...
... -topbox/satellite receiver code has not been precoded into the remote. 2. The remote control will now control your set -top-box/satellite receiver and press the POWER button. Aim the remote control at the set - ³ top-box/satellite systems ...remote control is designed to operate different types of · set-top-box/satellite systems. You must first program the remote to instruction manual of the set -top-box/satellite receiver. The remote will remember the codes you have programmed until the batteries are for operating the TV. 28 SATELLITE BRAND CODES ECOSTAR 03 HITACHI...

Owners Guide
Page 29
...remote to match the remote system of · DVD players. When this occurs, the remote control is designed to instruction manual of the DVD player for operation of the buttons exclusively for operating the TV. · DVD BRAND CODES APEX 10 GO VIDEO 09 HITACHI ...1. If your DVD player cannot be operated after performing the above procedures, your DVD · player. 3. The remote control will need to 16:9 WIDESCREEN. The Remote Control The Remote Control for pre-codes). ³ » 1. Turn ON your DVD player, as stated above procedures, please consult ...
...remote to match the remote system of · DVD players. When this occurs, the remote control is designed to instruction manual of the DVD player for operation of the buttons exclusively for operating the TV. · DVD BRAND CODES APEX 10 GO VIDEO 09 HITACHI ...1. If your DVD player cannot be operated after performing the above procedures, your DVD · player. 3. The remote control will need to 16:9 WIDESCREEN. The Remote Control The Remote Control for pre-codes). ³ » 1. Turn ON your DVD player, as stated above procedures, please consult ...
Owners Guide
Page 30
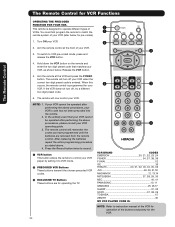
... operated after performing the above . 4. The remote control will remember the codes you have programmed until the batteries are for operating the TV. 30 · · VCR BRAND CODES EMERSON 20, 21, 22, 23 ,24 FISHER 34, 37, 38, 39 FUNAI 52 GE 33 HITACHI 00, 01, 02, 03, 04, 05... when the correct two digit preset code is designed to VCR pre-coded mode, press and release the VCR button. 4. The Remote Control for pre-codes). 1. Aim the remote control at the VCR and press the POWER button. In the unlikely event that matches your VCR operating guide. 3. Press the Record...
... operated after performing the above . 4. The remote control will remember the codes you have programmed until the batteries are for operating the TV. 30 · · VCR BRAND CODES EMERSON 20, 21, 22, 23 ,24 FISHER 34, 37, 38, 39 FUNAI 52 GE 33 HITACHI 00, 01, 02, 03, 04, 05... when the correct two digit preset code is designed to VCR pre-coded mode, press and release the VCR button. 4. The Remote Control for pre-codes). 1. Aim the remote control at the VCR and press the POWER button. In the unlikely event that matches your VCR operating guide. 3. Press the Record...
Owners Guide
Page 31
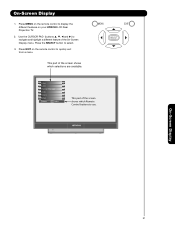
Press EXIT on the remote control to display the different features on the remote control to quickly exit from a menu. This part of the screen shows which Remote Control buttons to use. Use the CURSOR PAD (buttons ̆, ̄, ̇ and ̈) to select. 3. Video Audio Channel ...Manager Locks Timers Setup Move SEL Select This part of the On-Screen Display menu. On-Screen Display 1. Press MENU on your HITACHI LCD Rear Projection...
Press EXIT on the remote control to display the different features on the remote control to quickly exit from a menu. This part of the screen shows which Remote Control buttons to use. Use the CURSOR PAD (buttons ̆, ̄, ̇ and ̈) to select. 3. Video Audio Channel ...Manager Locks Timers Setup Move SEL Select This part of the On-Screen Display menu. On-Screen Display 1. Press MENU on your HITACHI LCD Rear Projection...
Owners Guide
Page 48
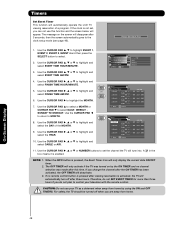
...seconds, then the screen automatically goes to set , you are away from home by the ON TIMER and no remote control button is pressed after the ON TIMER has been activated, the OFF TIMER will deactivate. 3. Timers Set Event Timer...to return to highlight and OR select FINISH TIME AM/PM. 6. Use the CURSOR PAD ̈, ̆ or ̄ to control your TV as a deterrent when away from home. Use the CURSOR PAD ̈, ̆ or ̄ to highlight and ... turn off when you can not use your television with the remote control. CAUTION: Do not use this time. On-Screen Display 48
...seconds, then the screen automatically goes to set , you are away from home by the ON TIMER and no remote control button is pressed after the ON TIMER has been activated, the OFF TIMER will deactivate. 3. Timers Set Event Timer...to return to highlight and OR select FINISH TIME AM/PM. 6. Use the CURSOR PAD ̈, ̆ or ̄ to control your TV as a deterrent when away from home. Use the CURSOR PAD ̈, ̆ or ̄ to highlight and ... turn off when you can not use your television with the remote control. CAUTION: Do not use this time. On-Screen Display 48


