
Owners Guide
Page 3
...property rights. Public viewing of copyrighted material Public viewing of programs broadcast by your local cable company. A CableCARD provided by TV stations and cable companies, as well as programs from the broadcaster or owner of the television. For lamp recycling and disposal... Dispose of receiving analog basic, digital basic and digital premium cable television programming by Macrovision. FOR MORE INFORMATION, CALL 1-800-HITACHI. Important Safety Instructions Power source This television is prohibited. Insert the power cord into a 120 volt 60 Hz outlet. Note ...
...property rights. Public viewing of copyrighted material Public viewing of programs broadcast by your local cable company. A CableCARD provided by TV stations and cable companies, as well as programs from the broadcaster or owner of the television. For lamp recycling and disposal... Dispose of receiving analog basic, digital basic and digital premium cable television programming by Macrovision. FOR MORE INFORMATION, CALL 1-800-HITACHI. Important Safety Instructions Power source This television is prohibited. Insert the power cord into a 120 volt 60 Hz outlet. Note ...

Owners Guide
Page 4
... before disposing of the remote control by pushing down and slide back to remove. models: For optional accessories, please access our web site at: www.hitachi.us/tv ³ Remote Control Unit CLU-3851WL (Part No. REMOTE CONTROL BATTERY INSTALLATION AND REPLACEMENT 1. Open the battery cover of the packing material. ³ Remote...
... before disposing of the remote control by pushing down and slide back to remove. models: For optional accessories, please access our web site at: www.hitachi.us/tv ³ Remote Control Unit CLU-3851WL (Part No. REMOTE CONTROL BATTERY INSTALLATION AND REPLACEMENT 1. Open the battery cover of the packing material. ³ Remote...

Owners Guide
Page 5
...multiple image ghosts, an indoor antenna may appear on the screen. To avoid cabinet warping, cabinet color changes, and increased chance of the TV, place the surround speakers to a Hi-Fi system's external speakers, the best audio performance will be sure that is its best, test...located in room sizes and acoustical environments will not fall directly on . After extended use How to set up your new HITACHI Projection Television ANTENNA Unless your LCD Rear PTV against a wall, keep it should not be noticeable in an exceptionally good signal area that the location selected allows ...
...multiple image ghosts, an indoor antenna may appear on the screen. To avoid cabinet warping, cabinet color changes, and increased chance of the TV, place the surround speakers to a Hi-Fi system's external speakers, the best audio performance will be sure that is its best, test...located in room sizes and acoustical environments will not fall directly on . After extended use How to set up your new HITACHI Projection Television ANTENNA Unless your LCD Rear PTV against a wall, keep it should not be noticeable in an exceptionally good signal area that the location selected allows ...

Owners Guide
Page 6
... HDMI output connection to an audio amplifier with shielded video and audio cables that sell audio/video products. ANTENNA CONNECTIONS TO REAR JACK PANEL VHF (75-Ohm) antenna/CATV (Cable TV) When using a 300-Ohm twin lead from most stores that have an antenna, connect the coaxial cable to produce a high quality...
... HDMI output connection to an audio amplifier with shielded video and audio cables that sell audio/video products. ANTENNA CONNECTIONS TO REAR JACK PANEL VHF (75-Ohm) antenna/CATV (Cable TV) When using a 300-Ohm twin lead from most stores that have an antenna, connect the coaxial cable to produce a high quality...

Owners Guide
Page 7
... the OSD, INPUTS, and AV NET menu systems. (-) BUTTON (TV,STB) The (-) button is displayed. Television CBL - Satellite Receiver NOTES: 1. Please see page 55) of the TV or the program guide of the Remote Control. NUMERIC BUTTONS (TV, DVD, CBL, STB, PVR/VCR, AMP/CD) Used to ... picture mode settings between the current and last channel viewed. PIP CONTROL BUTTONS (TV) Press to show and change backlight mode. The TV's remote control sensor is located on your HITACHI LCD Rear Projection TV, the new remote control is included in the PVR mode. 3. CD precode is designed to...
... the OSD, INPUTS, and AV NET menu systems. (-) BUTTON (TV,STB) The (-) button is displayed. Television CBL - Satellite Receiver NOTES: 1. Please see page 55) of the TV or the program guide of the Remote Control. NUMERIC BUTTONS (TV, DVD, CBL, STB, PVR/VCR, AMP/CD) Used to ... picture mode settings between the current and last channel viewed. PIP CONTROL BUTTONS (TV) Press to show and change backlight mode. The TV's remote control sensor is located on your HITACHI LCD Rear Projection TV, the new remote control is included in the PVR mode. 3. CD precode is designed to...

Owners Guide
Page 8
...as the cursor down (̄) and up from a camcorder or VCR to your favorite show or new recording. However, if it possible to set TV features to instantly view your preference without using the AV NET Learning Wizard. º IR RECEIVER Sensor 8 Point the remote control at this button to... 30 when the TV is set to a level 30 or less, the volume level will default to display the input menu, CABLE, AIR, INPUT: 1, 2, 3, 4 and 5. These buttons ...
...as the cursor down (̄) and up from a camcorder or VCR to your favorite show or new recording. However, if it possible to set TV features to instantly view your preference without using the AV NET Learning Wizard. º IR RECEIVER Sensor 8 Point the remote control at this button to... 30 when the TV is set to a level 30 or less, the volume level will default to display the input menu, CABLE, AIR, INPUT: 1, 2, 3, 4 and 5. These buttons ...

Owners Guide
Page 9
... PERIOD EXCEPT WITHIN THE BEGINNING 5 SEC.) ACTION Need to warm up the TV screen. Check assembly condition of LAMP UNIT Call for lamp replacement procedure. If this indicator is not assembled securely after replacement. POWER TEMP LAMP 3. Your Hitachi LCD Rear Projection Television may become clogged over time. The ternal termperature will increse which...
... PERIOD EXCEPT WITHIN THE BEGINNING 5 SEC.) ACTION Need to warm up the TV screen. Check assembly condition of LAMP UNIT Call for lamp replacement procedure. If this indicator is not assembled securely after replacement. POWER TEMP LAMP 3. Your Hitachi LCD Rear Projection Television may become clogged over time. The ternal termperature will increse which...

Owners Guide
Page 10
If you have a S-VHS VCR, use Side Panel Jacks and Connections The side panel jacks are provided as shown in place of your TV. 10 If you have a mono VCR, insert the audio cable into the left audio jack of the standard video cable. 3. First time use the S-INPUT ...
If you have a S-VHS VCR, use Side Panel Jacks and Connections The side panel jacks are provided as shown in place of your TV. 10 If you have a mono VCR, insert the audio cable into the left audio jack of the standard video cable. 3. First time use the S-INPUT ...

Owners Guide
Page 11
...VIDEO) can select each video source. and 6,381,747 licensed for future software upgrades. Hitachi will be abnormal, when using the Y-PBPR jacks. 6. Use the audio and video inputs...I V I D E O V I D E O (MONO) (MONO) Y/ VIDEO PB PR (MONO) Y/ VIDEO PB PR (MONO) A L U D TV AS CENTER I O R AUDIO TO HI-FI INPUT 1 INPUT 2 INPUT 3 INPUT 4 OPTICAL OUT Digital Audio / G-LINK HDMI INPUT 1 ² HDMI INPUT ... sound, insert the audio cable into the left audio jack.) NOTE: You may use Rear Panel Connections ³ Antenna Input CABLE - Use the HDMI input for both inputs....
...VIDEO) can select each video source. and 6,381,747 licensed for future software upgrades. Hitachi will be abnormal, when using the Y-PBPR jacks. 6. Use the audio and video inputs...I V I D E O V I D E O (MONO) (MONO) Y/ VIDEO PB PR (MONO) Y/ VIDEO PB PR (MONO) A L U D TV AS CENTER I O R AUDIO TO HI-FI INPUT 1 INPUT 2 INPUT 3 INPUT 4 OPTICAL OUT Digital Audio / G-LINK HDMI INPUT 1 ² HDMI INPUT ... sound, insert the audio cable into the left audio jack.) NOTE: You may use Rear Panel Connections ³ Antenna Input CABLE - Use the HDMI input for both inputs....

Owners Guide
Page 12
... channels. IMPORTANT: Please read the "Lamp Power Control" feature on the Internal Speakers Settings of the Rear Panel Jacks. 2. NOTE: 1. The TV must be provided by the A/V network OR feature. Rear Panel Connections First time use ¾ TV AS CENTER (INPUTS 1-4) These jacks are for viewing. The G-LINK connection will display the following respective...
... channels. IMPORTANT: Please read the "Lamp Power Control" feature on the Internal Speakers Settings of the Rear Panel Jacks. 2. NOTE: 1. The TV must be provided by the A/V network OR feature. Rear Panel Connections First time use ¾ TV AS CENTER (INPUTS 1-4) These jacks are for viewing. The G-LINK connection will display the following respective...

Owners Guide
Page 13
... page). AIR MONITOR OUT S I V I D E O V I D E O (MONO) (MONO) Y/ VIDEO PB PR (MONO) Y/ VIDEO PB PR (MONO) A L U D TV AS CENTER I O R AUDIO TO HI-FI INPUT 1 INPUT 2 INPUT 3 INPUT 4 OPTICAL OUT Digital Audio / G-LINK Upgrade Card HDMI INPUT 1 HDMI INPUT 2 CAUTION OPTICAL IN To...; COMPONENT: Y-PBPR (INPUT 3 and INPUT 4) connections are provided for high performance laserdisc players, VCRs etc. Rear Panel Connections First time use TIPS ON REAR PANEL CONNECTIONS • S-VIDEO, Y-PBPR and HDMI connections are provided for high performance components, such as "provided...
... page). AIR MONITOR OUT S I V I D E O V I D E O (MONO) (MONO) Y/ VIDEO PB PR (MONO) Y/ VIDEO PB PR (MONO) A L U D TV AS CENTER I O R AUDIO TO HI-FI INPUT 1 INPUT 2 INPUT 3 INPUT 4 OPTICAL OUT Digital Audio / G-LINK Upgrade Card HDMI INPUT 1 HDMI INPUT 2 CAUTION OPTICAL IN To...; COMPONENT: Y-PBPR (INPUT 3 and INPUT 4) connections are provided for high performance laserdisc players, VCRs etc. Rear Panel Connections First time use TIPS ON REAR PANEL CONNECTIONS • S-VIDEO, Y-PBPR and HDMI connections are provided for high performance components, such as "provided...

Owners Guide
Page 14
... These FRONT left and right speakers are connected to the FRONT output of a separate audio amplifier. » These REAR left and right speakers are connected to the Rear output of a separate audio amplifier. ¿ This subwoofer is connected to the LFE/SUB Out output of the... card faces right) Top faces AIR MONITOR OUT S I V I D E O V I D E O (MONO) (MONO) Y/ VIDEO PB PR (MONO) Y/ VIDEO PB PR (MONO) A L U D TV AS CENTER I O R AUDIO TO HI-FI INPUT 1 INPUT 2 INPUT 3 INPUT 4 OPTICAL OUT Digital Audio / G-LINK Upgrade Card HDMI INPUT 1 HDMI INPUT 2 CAUTION · · RCA...
... These FRONT left and right speakers are connected to the FRONT output of a separate audio amplifier. » These REAR left and right speakers are connected to the Rear output of a separate audio amplifier. ¿ This subwoofer is connected to the LFE/SUB Out output of the... card faces right) Top faces AIR MONITOR OUT S I V I D E O V I D E O (MONO) (MONO) Y/ VIDEO PB PR (MONO) Y/ VIDEO PB PR (MONO) A L U D TV AS CENTER I O R AUDIO TO HI-FI INPUT 1 INPUT 2 INPUT 3 INPUT 4 OPTICAL OUT Digital Audio / G-LINK Upgrade Card HDMI INPUT 1 HDMI INPUT 2 CAUTION · · RCA...
Owners Guide
Page 15
...connection diagrams are offered as shown on the right. For best performance, video and audio cables should be OFF. NOTE: When the TV is set is not received from the INPUTS menu to return to the last channel tuned. and 6,381,747 licensed for the location ...of card faces right) Top faces AIR MONITOR OUT S I V I D E O V I D E O (MONO) (MONO) Y/ VIDEO PB PR (MONO) Y/ VIDEO PB PR (MONO) A L U D TV AS CENTER I O R AUDIO TO HI-FI INPUT 1 INPUT 2 INPUT 3 INPUT 4 OPTICAL OUT Digital Audio / G-LINK Upgrade Card HDMI INPUT 1 HDMI INPUT 2 CAUTION Audio Video OUTPUT...
...connection diagrams are offered as shown on the right. For best performance, video and audio cables should be OFF. NOTE: When the TV is set is not received from the INPUTS menu to return to the last channel tuned. and 6,381,747 licensed for the location ...of card faces right) Top faces AIR MONITOR OUT S I V I D E O V I D E O (MONO) (MONO) Y/ VIDEO PB PR (MONO) Y/ VIDEO PB PR (MONO) A L U D TV AS CENTER I O R AUDIO TO HI-FI INPUT 1 INPUT 2 INPUT 3 INPUT 4 OPTICAL OUT Digital Audio / G-LINK Upgrade Card HDMI INPUT 1 HDMI INPUT 2 CAUTION Audio Video OUTPUT...

Owners Guide
Page 16
...) Top faces AIR MONITOR OUT S I V I D E O V I D E O (MONO) (MONO) Y/ VIDEO PB PR (MONO) Y/ VIDEO PB PR (MONO) A L U D TV AS CENTER I O R AUDIO TO HI-FI INPUT 1 INPUT 2 INPUT 3 INPUT 4 OPTICAL OUT Digital Audio / G-LINK R LV OUTPUT VCR HDMI INPUT 1 HDMI INPUT 2 CAUTION NOTE: 1. The... HDMI INPUT 1 HDMI INPUT 2 CAUTION R LV OUTPUT S-VIDEO VCR NOTE: 1. Completely insert the connection cord plugs when connecting to rear panel jacks. Connect the cable from the device to your VCR operating guide for more information on the right. 2. CABLE Apparatus Claims ...
...) Top faces AIR MONITOR OUT S I V I D E O V I D E O (MONO) (MONO) Y/ VIDEO PB PR (MONO) Y/ VIDEO PB PR (MONO) A L U D TV AS CENTER I O R AUDIO TO HI-FI INPUT 1 INPUT 2 INPUT 3 INPUT 4 OPTICAL OUT Digital Audio / G-LINK R LV OUTPUT VCR HDMI INPUT 1 HDMI INPUT 2 CAUTION NOTE: 1. The... HDMI INPUT 1 HDMI INPUT 2 CAUTION R LV OUTPUT S-VIDEO VCR NOTE: 1. Completely insert the connection cord plugs when connecting to rear panel jacks. Connect the cable from the device to your VCR operating guide for more information on the right. 2. CABLE Apparatus Claims ...
Owners Guide
Page 17
... four seconds. 3. AIR MONITOR OUT S I V I D E O V I D E O (MONO) (MONO) Y/ VIDEO PB PR (MONO) Y/ VIDEO PB PR (MONO) A L U D TV AS CENTER I O R AUDIO TO HI-FI INPUT 1 INPUT 2 INPUT 3 INPUT 4 OPTICAL OUT Digital Audio / G-LINK DVI - When using HDMI connections to view the program from...video signals when using a component with DVI output, you also have to connect the AUDIO OUT (R/L) of the component to rear panel jacks. The connected digital output device controls the HDMI interface so proper setup of device user settings determines final video appearance...
... four seconds. 3. AIR MONITOR OUT S I V I D E O V I D E O (MONO) (MONO) Y/ VIDEO PB PR (MONO) Y/ VIDEO PB PR (MONO) A L U D TV AS CENTER I O R AUDIO TO HI-FI INPUT 1 INPUT 2 INPUT 3 INPUT 4 OPTICAL OUT Digital Audio / G-LINK DVI - When using HDMI connections to view the program from...video signals when using a component with DVI output, you also have to connect the AUDIO OUT (R/L) of the component to rear panel jacks. The connected digital output device controls the HDMI interface so proper setup of device user settings determines final video appearance...

Owners Guide
Page 18
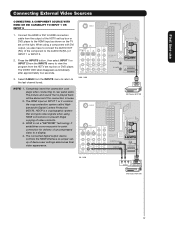
...Apparatus Claims of card faces right) Top faces AIR MONITOR OUT S I V I D E O V I D E O (MONO) (MONO) Y/ VIDEO PB PR (MONO) Y/ VIDEO PB PR (MONO) A L U D TV AS CENTER I O R AUDIO TO HI-FI INPUT 1 INPUT 2 INPUT 3 INPUT 4 OPTICAL OUT Digital Audio / G-LINK Upgrade Card HDMI INPUT 1 HDMI INPUT 2 CAUTION R L PR PB Y OUTPUT...Laserdisc/DVD player or HDTV set top box to the INPUT (Y) jack, as shown on the TV set top box. Select CABLE from the Laserdisc/DVD player or HDTV set on REAR PANEL CONNECTIONS. 18 Connect the cable from the AUDIO OUT R of the Laserdisc/DVD player ...
...Apparatus Claims of card faces right) Top faces AIR MONITOR OUT S I V I D E O V I D E O (MONO) (MONO) Y/ VIDEO PB PR (MONO) Y/ VIDEO PB PR (MONO) A L U D TV AS CENTER I O R AUDIO TO HI-FI INPUT 1 INPUT 2 INPUT 3 INPUT 4 OPTICAL OUT Digital Audio / G-LINK Upgrade Card HDMI INPUT 1 HDMI INPUT 2 CAUTION R L PR PB Y OUTPUT...Laserdisc/DVD player or HDTV set top box to the INPUT (Y) jack, as shown on the TV set top box. Select CABLE from the Laserdisc/DVD player or HDTV set on REAR PANEL CONNECTIONS. 18 Connect the cable from the AUDIO OUT R of the Laserdisc/DVD player ...

Owners Guide
Page 19
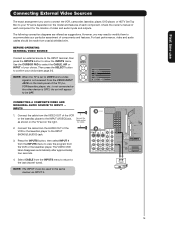
... of the external components you can connect up to highlight the SET AV NET features then press the SELECT button. 8. Video Audio TV Guide On Screen Channel Manager Locks Timers Setup Move SEL Select Setup Menu Preference Lamp Power Control Set The Inputs Set AV NET Set...CURSOR PAD ̄ or channel scroll down to select. 7. The Rear Panel has two IR BLASTER outputs which can use Connecting External Video Sources Your HITACHI LCD Rear Projection Television is setup, it allows your HITACHI LCD Rear PTV and external Audio/Video equipment (VCR and DVD Player). CONNECTING ...
... of the external components you can connect up to highlight the SET AV NET features then press the SELECT button. 8. Video Audio TV Guide On Screen Channel Manager Locks Timers Setup Move SEL Select Setup Menu Preference Lamp Power Control Set The Inputs Set AV NET Set...CURSOR PAD ̄ or channel scroll down to select. 7. The Rear Panel has two IR BLASTER outputs which can use Connecting External Video Sources Your HITACHI LCD Rear Projection Television is setup, it allows your HITACHI LCD Rear PTV and external Audio/Video equipment (VCR and DVD Player). CONNECTING ...

Owners Guide
Page 20
... Network to work with a G-LINK feature. One IR Mouse cable can use Connecting External Video Sources Your HITACHI LCD Rear Projection Television is necessary for limited viewing uses only. CONNECTING THE CABLE BOX/VCR TO G-LINK FOR TV GUIDE ON SCREENTM SYSTEM 1. CABLE Apparatus Claims of card faces right) Top faces AIR MONITOR OUT...
... Network to work with a G-LINK feature. One IR Mouse cable can use Connecting External Video Sources Your HITACHI LCD Rear Projection Television is necessary for limited viewing uses only. CONNECTING THE CABLE BOX/VCR TO G-LINK FOR TV GUIDE ON SCREENTM SYSTEM 1. CABLE Apparatus Claims of card faces right) Top faces AIR MONITOR OUT...
Owners Guide
Page 21
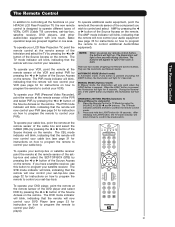
...top-box or satellite receiver point the remote at the remote sensor of the television and select the TV by pressing the ̇ or ̈ button of the Source Access on the remote. The...Control In addition to controlling all the functions on your HITACHI LCD Rear Projection TV, the new remote control is designed to operate different types of VCRs, CATV (Cable TV) converters, set -top-box). Basic operation keys are... the Automatic and Manual modes. To operate your LCD Rear Projection TV, point the remote control at the remote sensor of the settop-box and select...
...top-box or satellite receiver point the remote at the remote sensor of the television and select the TV by pressing the ̇ or ̈ button of the Source Access on the remote. The...Control In addition to controlling all the functions on your HITACHI LCD Rear Projection TV, the new remote control is designed to operate different types of VCRs, CATV (Cable TV) converters, set -top-box). Basic operation keys are... the Automatic and Manual modes. To operate your LCD Rear Projection TV, point the remote control at the remote sensor of the settop-box and select...

Owners Guide
Page 22
... button repeatedly to freeze the picture. The Remote Control How to Use the Remote to Control Your TV ቢ POWER button Press this button to turn the TV set on or off when the remote is in TV mode. (See page 21 for ቢ instructions on how to set the remote control to... TV mode.) ባ ቤ ብ ባ MODE Indicator Turns on or blinks to show remote control mode. ቤ SOURCE ACCESS (̇ or ̈) buttons Press these ...
... button repeatedly to freeze the picture. The Remote Control How to Use the Remote to Control Your TV ቢ POWER button Press this button to turn the TV set on or off when the remote is in TV mode. (See page 21 for ቢ instructions on how to set the remote control to... TV mode.) ባ ቤ ብ ባ MODE Indicator Turns on or blinks to show remote control mode. ቤ SOURCE ACCESS (̇ or ̈) buttons Press these ...


