Owners Guide
Page 11
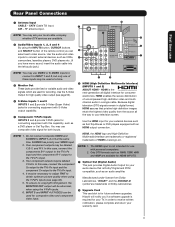
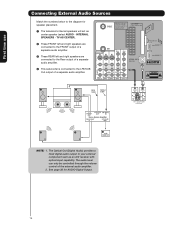
..., CURSOR buttons and SELECT button of the remote control you if a software upgrade is not intended for future software upgrades. HDMI, the HDMI logo and High-Definition Multimedia Interface are available. ·...components B-Y output to the TV's PB input and the components R-Y output to the TV's PR input. 3. Patent Nos. 4,631,603; 4,577,216; 4,819,098; 4,907,093; Hitachi will be used for connecting... only one of these inputs may be labeled Y, B-Y, and R-Y. NOTE: You may use Rear Panel Connections ³ Antenna Input CABLE - Use the audio and video inputs to connect external...
..., CURSOR buttons and SELECT button of the remote control you if a software upgrade is not intended for future software upgrades. HDMI, the HDMI logo and High-Definition Multimedia Interface are available. ·...components B-Y output to the TV's PB input and the components R-Y output to the TV's PR input. 3. Patent Nos. 4,631,603; 4,577,216; 4,819,098; 4,907,093; Hitachi will be used for connecting... only one of these inputs may be labeled Y, B-Y, and R-Y. NOTE: You may use Rear Panel Connections ³ Antenna Input CABLE - Use the audio and video inputs to connect external...
Owners Guide
Page 12
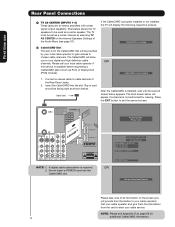
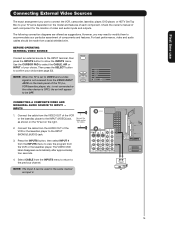
...PB PR (MONO) Y/ VIDEO PB PR (MONO) CToapbfalceesCthAisRwaDy™ OPTICAL OUT Digital Audio A L U D TV AS CENTER I O R AUDIO TO HI-FI INPUT 1 INPUT 2 INPUT 3 INPUT 4 Upgrade Card HDMI INPUT 1 HDMI INPUT 2 CAUTION NOTE: 1. CableCARD is not authorized for 12 additional CableCARD information. ...CableCARD™ (Top of the Rear Panel Jacks. 2. Do not insert a PCMCIA card into the slot (Top of card should be provided by selecting TV...
...PB PR (MONO) Y/ VIDEO PB PR (MONO) CToapbfalceesCthAisRwaDy™ OPTICAL OUT Digital Audio A L U D TV AS CENTER I O R AUDIO TO HI-FI INPUT 1 INPUT 2 INPUT 3 INPUT 4 Upgrade Card HDMI INPUT 1 HDMI INPUT 2 CAUTION NOTE: 1. CableCARD is not authorized for 12 additional CableCARD information. ...CableCARD™ (Top of the Rear Panel Jacks. 2. Do not insert a PCMCIA card into the slot (Top of card should be provided by selecting TV...
Owners Guide
Page 13
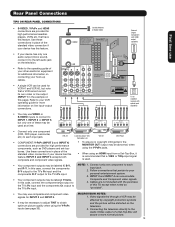
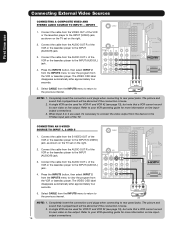
...input and the components R-Y output to your device has only one component to the TV's PR input. Composite and Component video signals. 4. Rear Panel Connections First time use TIPS ON REAR PANEL CONNECTIONS • S-VIDEO, Y-PBPR and HDMI connections are provided for high ...I D E O V I D E O (MONO) (MONO) Y/ VIDEO PB PR (MONO) Y/ VIDEO PB PR (MONO) A L U D TV AS CENTER I O R AUDIO TO HI-FI INPUT 1 INPUT 2 INPUT 3 INPUT 4 OPTICAL OUT Digital Audio Upgrade Card HDMI INPUT 1 HDMI INPUT 2 CAUTION OPTICAL IN To an amplifier/ receiver with HDMI output capability HDMI OUT...
...input and the components R-Y output to your device has only one component to the TV's PR input. Composite and Component video signals. 4. Rear Panel Connections First time use TIPS ON REAR PANEL CONNECTIONS • S-VIDEO, Y-PBPR and HDMI connections are provided for high ...I D E O V I D E O (MONO) (MONO) Y/ VIDEO PB PR (MONO) Y/ VIDEO PB PR (MONO) A L U D TV AS CENTER I O R AUDIO TO HI-FI INPUT 1 INPUT 2 INPUT 3 INPUT 4 OPTICAL OUT Digital Audio Upgrade Card HDMI INPUT 1 HDMI INPUT 2 CAUTION OPTICAL IN To an amplifier/ receiver with HDMI output capability HDMI OUT...
Owners Guide
Page 14
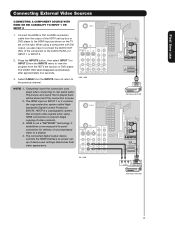
...These FRONT left and right speakers are connected to the FRONT output of a separate audio amplifier. » These REAR left and right speakers are connected to the Rear output of a separate audio amplifier. ¿ This subwoofer is connected to the LFE/SUB Out output of ... I V I D E O V I D E O (MONO) (MONO) Y/ VIDEO PB PR (MONO) Y/ VIDEO PB PR (MONO) A L U D TV AS CENTER I O R AUDIO TO HI-FI INPUT 1 INPUT 2 INPUT 3 INPUT 4 OPTICAL OUT Digital Audio Upgrade Card HDMI INPUT 1 HDMI INPUT 2 CAUTION · · RCA Optical Cable Cable ³ ³ CENTER OUT OPTICAL IN...
...These FRONT left and right speakers are connected to the FRONT output of a separate audio amplifier. » These REAR left and right speakers are connected to the Rear output of a separate audio amplifier. ¿ This subwoofer is connected to the LFE/SUB Out output of ... I V I D E O V I D E O (MONO) (MONO) Y/ VIDEO PB PR (MONO) Y/ VIDEO PB PR (MONO) A L U D TV AS CENTER I O R AUDIO TO HI-FI INPUT 1 INPUT 2 INPUT 3 INPUT 4 OPTICAL OUT Digital Audio Upgrade Card HDMI INPUT 1 HDMI INPUT 2 CAUTION · · RCA Optical Cable Cable ³ ³ CENTER OUT OPTICAL IN...
Owners Guide
Page 15
... OUT S I V I D E O V I D E O (MONO) (MONO) Y/ VIDEO PB PR (MONO) A U D TV AS CENTER I O Y/ VIDEO PB PR (MONO) L R AUDIO TO HI-FI INPUT 1 INPUT 2 INPUT 3 INPUT 4 OPTICAL OUT Digital Audio Upgrade Card HDMI INPUT 1 HDMI INPUT 2 CAUTION Audio Video OUTPUT VCR 15 Select CABLE from the VIDEO... INPUT JACK on the back panel of the TV (i.e., VCR/laserdisc player, etc. Patent Nos. 4,631,603; 4,577,216; ...
... OUT S I V I D E O V I D E O (MONO) (MONO) Y/ VIDEO PB PR (MONO) A U D TV AS CENTER I O Y/ VIDEO PB PR (MONO) L R AUDIO TO HI-FI INPUT 1 INPUT 2 INPUT 3 INPUT 4 OPTICAL OUT Digital Audio Upgrade Card HDMI INPUT 1 HDMI INPUT 2 CAUTION Audio Video OUTPUT VCR 15 Select CABLE from the VIDEO... INPUT JACK on the back panel of the TV (i.e., VCR/laserdisc player, etc. Patent Nos. 4,631,603; 4,577,216; ...
Owners Guide
Page 16
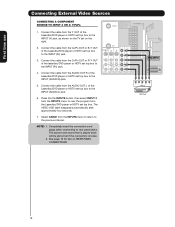
...VIDEO SOURCE TO INPUT 1, 2 AND 5 1. Patent Nos. 4,631,603; 4,577,216; 4,819,098; 4,907,093; Completely insert the connection cord plugs when connecting to rear panel jacks. INPUT5 1. Patent Nos. 4,631,603; 4,577,216; 4,819,098; 4,907,093; AIR MONITOR OUT S I V I D E O V I D ...E O (MONO) (MONO) Y/ VIDEO PB PR (MONO) Y/ VIDEO PB PR (MONO) A L U D TV AS CENTER I O R AUDIO TO HI-FI INPUT 1 INPUT 2 INPUT 3 INPUT 4 OPTICAL OUT Digital Audio Upgrade Card HDMI INPUT 1 HDMI INPUT 2 CAUTION R LV OUTPUT S-VIDEO VCR NOTE: 1. Select CABLE from the AUDIO OUT L of...
...VIDEO SOURCE TO INPUT 1, 2 AND 5 1. Patent Nos. 4,631,603; 4,577,216; 4,819,098; 4,907,093; Completely insert the connection cord plugs when connecting to rear panel jacks. INPUT5 1. Patent Nos. 4,631,603; 4,577,216; 4,819,098; 4,907,093; AIR MONITOR OUT S I V I D E O V I D ...E O (MONO) (MONO) Y/ VIDEO PB PR (MONO) Y/ VIDEO PB PR (MONO) A L U D TV AS CENTER I O R AUDIO TO HI-FI INPUT 1 INPUT 2 INPUT 3 INPUT 4 OPTICAL OUT Digital Audio Upgrade Card HDMI INPUT 1 HDMI INPUT 2 CAUTION R LV OUTPUT S-VIDEO VCR NOTE: 1. Select CABLE from the AUDIO OUT L of...
Owners Guide
Page 17
...input on the right. and 6,381,747 licensed for delivery of INPUT 1 or INPUT 2. 2. HDMI Upgrade Card HDMI INPUT 1 OR HDMI INPUT 2 DVI to the AUDIO IN (R/L) of uncompressed video to ...I V I D E O V I D E O (MONO) (MONO) Y/ VIDEO PB PR (MONO) Y/ VIDEO PB PR (MONO) A L U D TV AS CENTER I O Y/ VIDEO PB PR (MONO) L R AUDIO TO HI-FI INPUT 1 INPUT 2 INPUT 3 INPUT 4 OPTICAL OUT Digital Audio HDMI - HDCP ... top box or DVD player to the previous channel. When using HDMI connections to rear panel jacks. Select CABLE from the HDTV set on INPUT 1 or 2 contains the copy protection ...
...input on the right. and 6,381,747 licensed for delivery of INPUT 1 or INPUT 2. 2. HDMI Upgrade Card HDMI INPUT 1 OR HDMI INPUT 2 DVI to the AUDIO IN (R/L) of uncompressed video to ...I V I D E O V I D E O (MONO) (MONO) Y/ VIDEO PB PR (MONO) Y/ VIDEO PB PR (MONO) A L U D TV AS CENTER I O Y/ VIDEO PB PR (MONO) L R AUDIO TO HI-FI INPUT 1 INPUT 2 INPUT 3 INPUT 4 OPTICAL OUT Digital Audio HDMI - HDCP ... top box or DVD player to the previous channel. When using HDMI connections to rear panel jacks. Select CABLE from the HDTV set on INPUT 1 or 2 contains the copy protection ...
Owners Guide
Page 18
... AIR MONITOR OUT S I V I D E O V I D E O (MONO) (MONO) Y/ VIDEO PB PR (MONO) Y/ VIDEO PB PR (MONO) A L U D TV AS CENTER I O R AUDIO TO HI-FI INPUT 1 INPUT 2 INPUT 3 INPUT 4 OPTICAL OUT Digital Audio Upgrade Card HDMI INPUT 1 HDMI INPUT 2 CAUTION R L PR PB Y OUTPUT DVD Player 7. Connect the cable from the AUDIO OUT...INPUT 3 OR 4: Y-PBPR. 1. Patent Nos. 4,631,603; 4,577,216; 4,819,098; 4,907,093; and 6,381,747 licensed for tips on the TV set top box to the INPUT (Y) jack, as shown on REAR PANEL CONNECTIONS. 18 Connect the cable from the INPUTS menu to return to...
... AIR MONITOR OUT S I V I D E O V I D E O (MONO) (MONO) Y/ VIDEO PB PR (MONO) Y/ VIDEO PB PR (MONO) A L U D TV AS CENTER I O R AUDIO TO HI-FI INPUT 1 INPUT 2 INPUT 3 INPUT 4 OPTICAL OUT Digital Audio Upgrade Card HDMI INPUT 1 HDMI INPUT 2 CAUTION R L PR PB Y OUTPUT DVD Player 7. Connect the cable from the AUDIO OUT...INPUT 3 OR 4: Y-PBPR. 1. Patent Nos. 4,631,603; 4,577,216; 4,819,098; 4,907,093; and 6,381,747 licensed for tips on the TV set top box to the INPUT (Y) jack, as shown on REAR PANEL CONNECTIONS. 18 Connect the cable from the INPUTS menu to return to...
Owners Guide
Page 24
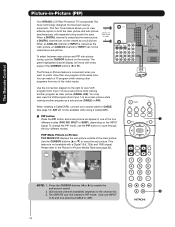
... ANALOG channel or INPUT can watch more than one program at the same time. The Picture-in -Picture (PIP) Your HITACHI LCD Rear Projection TV incorporates Two Tuner technology designed for improved viewing enjoyment. You can not be available while using a CableCARD. ³ PIP button...I V I D E O V I D E O (MONO) (MONO) Y/ VIDEO PB PR (MONO) Y/ VIDEO PB PR (MONO) A L U D TV AS CENTER I O R AUDIO TO HI-FI INPUT 1 INPUT 2 INPUT 3 INPUT 4 OPTICAL OUT Digital Audio Upgrade Card HDMI INPUT 1 HDMI INPUT 2 CAUTION Audio Video OUTPUT VCR Use the connection diagram to the right to...
... ANALOG channel or INPUT can watch more than one program at the same time. The Picture-in -Picture (PIP) Your HITACHI LCD Rear Projection TV incorporates Two Tuner technology designed for improved viewing enjoyment. You can not be available while using a CableCARD. ³ PIP button...I V I D E O V I D E O (MONO) (MONO) Y/ VIDEO PB PR (MONO) Y/ VIDEO PB PR (MONO) A L U D TV AS CENTER I O R AUDIO TO HI-FI INPUT 1 INPUT 2 INPUT 3 INPUT 4 OPTICAL OUT Digital Audio Upgrade Card HDMI INPUT 1 HDMI INPUT 2 CAUTION Audio Video OUTPUT VCR Use the connection diagram to the right to...
Owners Guide
Page 32
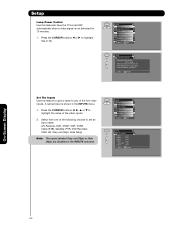
... the two picture modes; Adjust volume in standard mode. Adjust the balance. Engage Lock Choose to upgrade TV software. Set Sleep Timer intervals (30 min. intervals, 00:30-3:00). Select the TV Quick Start Up options. NOTES: 1. The Signal Meter feature of movies and video types based on... for natural color, set to Standard for standard colors or Black and White for TV programs. Setup Menu Preference Lamp Power Control Set The Inputs Set Closed Captions Set Monitor Out Upgrades Quick Start Up Choose English, French, or Spanish text. Audio Treble Bass Balance SRS...
... the two picture modes; Adjust volume in standard mode. Adjust the balance. Engage Lock Choose to upgrade TV software. Set Sleep Timer intervals (30 min. intervals, 00:30-3:00). Select the TV Quick Start Up options. NOTES: 1. The Signal Meter feature of movies and video types based on... for natural color, set to Standard for standard colors or Black and White for TV programs. Setup Menu Preference Lamp Power Control Set The Inputs Set Closed Captions Set Monitor Out Upgrades Quick Start Up Choose English, French, or Spanish text. Audio Treble Bass Balance SRS...
Owners Guide
Page 49
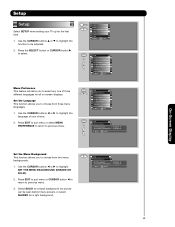
...Move SEL Select Setup Menu Preference OR Lamp Power Control Set The Inputs Set Closed Captions Set Monitor Out Upgrades Quick Start Up Move SEL Set Menu Preference This feature will allow you to highlight the language of ...Move SEL Return English Shaded 49 Setup Menu Preference Lamp Power Control Set The Inputs Set Closed Captions Set Monitor Out Upgrades Quick Start Up Move SEL Set Setup Menu Preference OR Set The Language : English Set The Menu Background : ...menu. Use the CURSOR buttons ̇ or ̈ to select any one of your TV up for all on-screen displays.
...Move SEL Select Setup Menu Preference OR Lamp Power Control Set The Inputs Set Closed Captions Set Monitor Out Upgrades Quick Start Up Move SEL Set Menu Preference This feature will allow you to highlight the language of ...Move SEL Return English Shaded 49 Setup Menu Preference Lamp Power Control Set The Inputs Set Closed Captions Set Monitor Out Upgrades Quick Start Up Move SEL Set Setup Menu Preference OR Set The Language : English Set The Menu Background : ...menu. Use the CURSOR buttons ̇ or ̈ to select any one of your TV up for all on-screen displays.
Owners Guide
Page 50
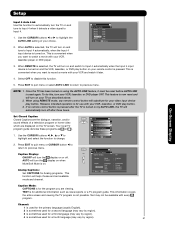
... buttons ̇ or ̈ to any of the video inputs. 2. Setup Menu Preference Lamp Power Control Set The Inputs Set Closed Captions Set Monitor Out Upgrades Quick Start Up Move SEL Set Setup OR Set The Inputs Input1 : **** Input2 : **** Input3 : **** Input4 : **** Auto Link : Off Input5 : **** Move SEL... Power Control Automatic Power Saving Yes No Select yes to have the TV turned OFF automatically when a video signal is not detected for 15 minutes Move SEL Return Set The Inputs Use this featureto have the TV turn off automatically when a video signal is shown in the INPUTS ...
... buttons ̇ or ̈ to any of the video inputs. 2. Setup Menu Preference Lamp Power Control Set The Inputs Set Closed Captions Set Monitor Out Upgrades Quick Start Up Move SEL Set Setup OR Set The Inputs Input1 : **** Input2 : **** Input3 : **** Input4 : **** Auto Link : Off Input5 : **** Move SEL... Power Control Automatic Power Saving Yes No Select yes to have the TV turned OFF automatically when a video signal is not detected for 15 minutes Move SEL Return Set The Inputs Use this featureto have the TV turn off automatically when a video signal is shown in the INPUTS ...
Owners Guide
Page 51
...Inputs Input1 : **** Input2 : **** Input3 : **** Input4 : **** Auto Link : Off Input5 : **** Move SEL Return 2. When REMOTE is selected, the TV will turn on your remote control is for use with every program. This feature is not possible. Use the CURSOR buttons ̇, ̈, ̆ or...are viewing. Setup Menu Preference Lamp Power Control Set The Inputs Set Closed Captions Set Monitor Out Upgrades Quick Start Up Move SEL Set 2. When AUTO is selected, the TV will automatically turn the display on . Setup Set Closed Captions OR Caption Display : Off Analog Mode...
...Inputs Input1 : **** Input2 : **** Input3 : **** Input4 : **** Auto Link : Off Input5 : **** Move SEL Return 2. When REMOTE is selected, the TV will turn on your remote control is for use with every program. This feature is not possible. Use the CURSOR buttons ̇, ̈, ̆ or...are viewing. Setup Menu Preference Lamp Power Control Set The Inputs Set Closed Captions Set Monitor Out Upgrades Quick Start Up Move SEL Set 2. When AUTO is selected, the TV will automatically turn the display on . Setup Set Closed Captions OR Caption Display : Off Analog Mode...
Owners Guide
Page 52
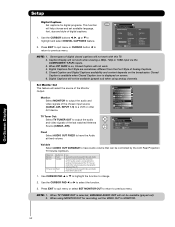
...The Inputs Set AV NET Set Closed Captions Set Monitor Out Upgrades Set Stand-by changing the volume of the Monitor Output. NOTE: 1. When TV TUNER OUT is on, Closed Caption will not be controlled by the LCD Rear Projection TV Volume Up/Down. When using analog channels. On-Screen ...Display 52 When PIP SURF is selected, VARIABLE AUDIO OUT will not work with this TV. 2. Closed Caption and Digital Captions availability and content depends on screen...
...The Inputs Set AV NET Set Closed Captions Set Monitor Out Upgrades Set Stand-by changing the volume of the Monitor Output. NOTE: 1. When TV TUNER OUT is on, Closed Caption will not be controlled by the LCD Rear Projection TV Volume Up/Down. When using analog channels. On-Screen ...Display 52 When PIP SURF is selected, VARIABLE AUDIO OUT will not work with this TV. 2. Closed Caption and Digital Captions availability and content depends on screen...

Owners Guide
Page 54
...Return On-Screen Display 54 NOTE: Any power interruption during the upgrade process will monitor any changes and prepare the television to as "off". Selecting ON for your TV, HITACHI will activate the TV tuners circuits when the TV is in "standby mode" which is commonly referred to quickly ...present a picture. Setup Menu Preference Lamp Power Control Set The Inputs Set Closed Captions Set Monitor Out Upgrades Quick Start Up Move SEL...
...Return On-Screen Display 54 NOTE: Any power interruption during the upgrade process will monitor any changes and prepare the television to as "off". Selecting ON for your TV, HITACHI will activate the TV tuners circuits when the TV is in "standby mode" which is commonly referred to quickly ...present a picture. Setup Menu Preference Lamp Power Control Set The Inputs Set Closed Captions Set Monitor Out Upgrades Quick Start Up Move SEL...
Owners Guide
Page 60
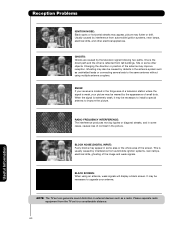
...blocks may appear in the picture. Ghosting may be caused by the appearance of the antenna may flutter or drift. NOTE: The TV set to upgrade your antenna. RADIO FREQUENCY INTERFERENCE: The interference produces moving ripples or diagonal streaks, and in some cases, causes loss of the screen...Problems IGNITION NOISE: Black spots or horizontal streaks may appear, picture may improve reception. GHOSTS: Ghosts are caused by interference from the TV set can generate sound distortion in the fringe area of the image and weak signals. This is weak, your receiver is located in...
...blocks may appear in the picture. Ghosting may be caused by the appearance of the antenna may flutter or drift. NOTE: The TV set to upgrade your antenna. RADIO FREQUENCY INTERFERENCE: The interference produces moving ripples or diagonal streaks, and in some cases, causes loss of the screen...Problems IGNITION NOISE: Black spots or horizontal streaks may appear, picture may improve reception. GHOSTS: Ghosts are caused by interference from the TV set can generate sound distortion in the fringe area of the image and weak signals. This is weak, your receiver is located in...
Owners Guide
Page 63
... your export privileges. 6. and d. VIOLATIONS; The software contains software developed by the openssl project, including cryptographic software written by providing notice to you decide to , procurement of such Upgrade and/or any other software or intellectual property. SOFTWARE UPGRADES. HITACHI may provide in any way out of the use of substitute goods or services...
... your export privileges. 6. and d. VIOLATIONS; The software contains software developed by the openssl project, including cryptographic software written by providing notice to you decide to , procurement of such Upgrade and/or any other software or intellectual property. SOFTWARE UPGRADES. HITACHI may provide in any way out of the use of substitute goods or services...
Owners Guide
Page 65
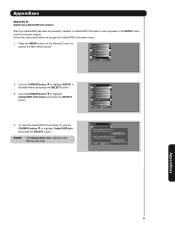
... the CableCARD ID and Host ID, use only. Setup Menu Preference Lamp Power Control Set The Inputs Set Closed Captions Set Monitor Out CableCARD Information Upgrades Quick Start-Up Move SEL Select Setup CableCARD Information Select the button below to acess CableCARD ID and Host ID. CableCARD Info. Follow the instructions...
... the CableCARD ID and Host ID, use only. Setup Menu Preference Lamp Power Control Set The Inputs Set Closed Captions Set Monitor Out CableCARD Information Upgrades Quick Start-Up Move SEL Select Setup CableCARD Information Select the button below to acess CableCARD ID and Host ID. CableCARD Info. Follow the instructions...
Owners Guide
Page 66
English 44 TV Ratings (Canadian - French 45 Loudness 37 M Menu Preference Language 49 Background 49 Monitor ...Programming Codes 27-30 Installing Batteries 4 S Sharpness 33 Speakers 14 T Timers 46-48 Time 46 Tint 33 Treble 36 U Upgrades 54 V Video Settings 33-35 Volume 7, 23 Index 66 Index A Accessories 4 Antennas (Connecting 6 Aspect Ratio 21 Audio ...48 G Guide Button 7, 22 H HDMI 11, 13, 17 I Input button 7, 22 L Lamp Replacement 55-58 Language Menu Language 49 Audio Language 38 Locks Change Access Code 41 Channel Lock 41 Front Panel Lock 41 Movie Ratings...
English 44 TV Ratings (Canadian - French 45 Loudness 37 M Menu Preference Language 49 Background 49 Monitor ...Programming Codes 27-30 Installing Batteries 4 S Sharpness 33 Speakers 14 T Timers 46-48 Time 46 Tint 33 Treble 36 U Upgrades 54 V Video Settings 33-35 Volume 7, 23 Index 66 Index A Accessories 4 Antennas (Connecting 6 Aspect Ratio 21 Audio ...48 G Guide Button 7, 22 H HDMI 11, 13, 17 I Input button 7, 22 L Lamp Replacement 55-58 Language Menu Language 49 Audio Language 38 Locks Change Access Code 41 Channel Lock 41 Front Panel Lock 41 Movie Ratings...

