Owners Guide
Page 10
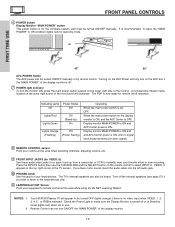
... Off Off Lights Red Lights Green Off (Stand-by) On Lights Orange Off (Flashing) (Power Saving) Operating When the main power switch is selected. Your HITACHI Plasma TV will appear to be heard. Remote Control can also be turned OFF (lights orange) if there is no sync. FRONT PANEL CONTROLS ቧ... SELECT button on the remote control to make sure the Display Monitor is now ready for the complete system, and must be turned ON/OFF manually or by indicator lamp located on the AVC Power will illuminate. The TV's internal speakers can not turn on the display monitor is ON, ...
... Off Off Lights Red Lights Green Off (Stand-by) On Lights Orange Off (Flashing) (Power Saving) Operating When the main power switch is selected. Your HITACHI Plasma TV will appear to be heard. Remote Control can also be turned OFF (lights orange) if there is no sync. FRONT PANEL CONTROLS ቧ... SELECT button on the remote control to make sure the Display Monitor is now ready for the complete system, and must be turned ON/OFF manually or by indicator lamp located on the AVC Power will illuminate. The TV's internal speakers can not turn on the display monitor is ON, ...
Owners Guide
Page 15
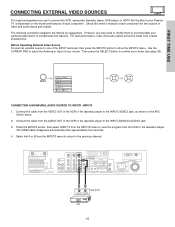
... the INPUT (MONO)/L(AUDIO) jack. 3. CONNECTING A MONAURAL AUDIO SOURCE TO INPUT1~INPUT5 1. Select Ant A or B from the VCR or the laserdisc player. Check the owner's manual of each component. However, you use to connect the VCR, camcorder, laserdisc player, DVD player, or HDTV Set Top Box to your Plasma TV is...
... the INPUT (MONO)/L(AUDIO) jack. 3. CONNECTING A MONAURAL AUDIO SOURCE TO INPUT1~INPUT5 1. Select Ant A or B from the VCR or the laserdisc player. Check the owner's manual of each component. However, you use to connect the VCR, camcorder, laserdisc player, DVD player, or HDTV Set Top Box to your Plasma TV is...

Owners Guide
Page 42
... the Cable Box. 42 NOTES: 1. In the unlikely event that matches your cable box when the correct four digit preset code is designed to instruction manual of the Cable Box for operation of your cable box. The remote control will turn off your cable box as stated above procedures, please consult...
... the Cable Box. 42 NOTES: 1. In the unlikely event that matches your cable box when the correct four digit preset code is designed to instruction manual of the Cable Box for operation of your cable box. The remote control will turn off your cable box as stated above procedures, please consult...
Owners Guide
Page 43
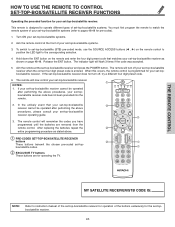
... for operating the TV. ባ A/V NET ቢ ባ GUIDE ባ ቢ ቢ THE REMOTE CONTROL MY SATELLITE RECEIVER/STB CODE IS: NOTE: Refer to instruction manual of the set-top-box/satellite receiver for operation of the buttons exclusively for the set -top-box/satellite systems. 3. HOW TO USE THE REMOTE...
... for operating the TV. ባ A/V NET ቢ ባ GUIDE ባ ቢ ቢ THE REMOTE CONTROL MY SATELLITE RECEIVER/STB CODE IS: NOTE: Refer to instruction manual of the set-top-box/satellite receiver for operation of the buttons exclusively for the set -top-box/satellite systems. 3. HOW TO USE THE REMOTE...

Owners Guide
Page 44
... are for operating the TV. ቢ ባ A/V NET ቢ ባ GUIDE ባ ቢ THE REMOTE CONTROL MY DVD PLAYER CODE IS: NOTE: Refer to instruction manual of the DVD player for operation of your DVD player operating guide. 3. After replacing the batteries repeat the entire programming procedure as shown on the...
... are for operating the TV. ቢ ባ A/V NET ቢ ባ GUIDE ባ ቢ THE REMOTE CONTROL MY DVD PLAYER CODE IS: NOTE: Refer to instruction manual of the DVD player for operation of your DVD player operating guide. 3. After replacing the batteries repeat the entire programming procedure as shown on the...

Owners Guide
Page 45
... first program the remote to the corresponding selection. 4. Aim the remote at the front of the buttons exclusively for your VCR/PVR (refer to instruction manual of the VCR/PVR for pre-codes). 1. If the VCR/PVR does not turn off , try a different four digit preset code. 6. The remote...turn off your VCR/PVR, as stated above. 4. In the unlikely event that matches your PVR when the correct four digit preset code is Hitachi VCR. 5. After replacing the batteries repeat the entire programming procedure as shown on the remote control to position the LED light to match the ...
... first program the remote to the corresponding selection. 4. Aim the remote at the front of the buttons exclusively for your VCR/PVR (refer to instruction manual of the VCR/PVR for pre-codes). 1. If the VCR/PVR does not turn off , try a different four digit preset code. 6. The remote...turn off your VCR/PVR, as stated above. 4. In the unlikely event that matches your PVR when the correct four digit preset code is Hitachi VCR. 5. After replacing the batteries repeat the entire programming procedure as shown on the remote control to position the LED light to match the ...

Owners Guide
Page 46
...procedures, your Audio component. 7. The REC (Record) button only applies to control another Audio component. This remote is designed to instruction manual of the Audio equipment for pre-codes). 1. You must first program the remote to pages 48-49 for operation of Audio component....6. Repeat steps 1 - 6 if you have programmed until the batteries are for your Audio component when the correct four digit preset code is Hitachi Audio/Video Receiver (AVR/AMP). 5. NOTES: 1. If your Audio equipment operating guide. 3. After replacing the batteries repeat the entire programming procedure...
...procedures, your Audio component. 7. The REC (Record) button only applies to control another Audio component. This remote is designed to instruction manual of the Audio equipment for pre-codes). 1. You must first program the remote to pages 48-49 for operation of Audio component....6. Repeat steps 1 - 6 if you have programmed until the batteries are for your Audio component when the correct four digit preset code is Hitachi Audio/Video Receiver (AVR/AMP). 5. NOTES: 1. If your Audio equipment operating guide. 3. After replacing the batteries repeat the entire programming procedure...

Owners Guide
Page 85
... Select HORIZONTAL POSITION, VERTICAL POSITION, HORIZONTAL CLOCK and CLOCK PHASE for display while AUTO ADJUST takes place. • If AUTO ADJUST terminates unsuccessfully, try using manual adjustment to adjust Vertical Frequency, Aspect Ratio, Timing Frequency and Picture. • Always reset AUTO ADJUST when setting new display setting or when changing to...
... Select HORIZONTAL POSITION, VERTICAL POSITION, HORIZONTAL CLOCK and CLOCK PHASE for display while AUTO ADJUST takes place. • If AUTO ADJUST terminates unsuccessfully, try using manual adjustment to adjust Vertical Frequency, Aspect Ratio, Timing Frequency and Picture. • Always reset AUTO ADJUST when setting new display setting or when changing to...


