Owners Guide
Page 7
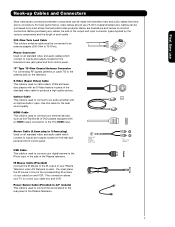
...Use this cable for the best sound quality. This connection allows your TV to control your digital camera to inputs and outputs located on the rear jack panel and front control panel. Below are illustrations and names of the Plasma Television. Stereo Cable (3.8mm plug to 3.5mm plug) Used on ...the television. HDMI Cable This cable is used to connect your Plasma Television when A/V Network is used to connect to inputs and outputs located on the television's rear jack panel and front control panel. You must be purchased from most stores ...
...Use this cable for the best sound quality. This connection allows your TV to control your digital camera to inputs and outputs located on the rear jack panel and front control panel. Below are illustrations and names of the Plasma Television. Stereo Cable (3.8mm plug to 3.5mm plug) Used on ...the television. HDMI Cable This cable is used to connect your Plasma Television when A/V Network is used to connect to inputs and outputs located on the television's rear jack panel and front control panel. You must be purchased from most stores ...
Owners Guide
Page 8
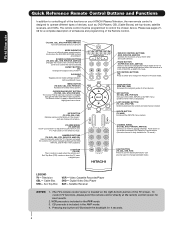
...the wheel to access (FAV) Favorite Channel mode. (Favorite channel is included in Set-Top-Box (STB) mode or when the TV uses a digital input. Television CBL - POWER BUTTON (TV, DVD, CBL, STB, PVR/VCR, AMP/CD) Turns the selected device on the right bottom portion of your VCR, DVD..., CBL (Cable Boxes), set-top-boxes, satellite receivers, and VCRs. NUMERIC BUTTONS (TV, DVD, CBL, STB, PVR/VCR, AMP/CD) Used to manually enter the TV channel, and used to operate different types of the functions on your HITACHI Plasma Television, the new remote control is in the PVR mode. 3. LEGEND...
...the wheel to access (FAV) Favorite Channel mode. (Favorite channel is included in Set-Top-Box (STB) mode or when the TV uses a digital input. Television CBL - POWER BUTTON (TV, DVD, CBL, STB, PVR/VCR, AMP/CD) Turns the selected device on the right bottom portion of your VCR, DVD..., CBL (Cable Boxes), set-top-boxes, satellite receivers, and VCRs. NUMERIC BUTTONS (TV, DVD, CBL, STB, PVR/VCR, AMP/CD) Used to manually enter the TV channel, and used to operate different types of the functions on your HITACHI Plasma Television, the new remote control is in the PVR mode. 3. LEGEND...
Owners Guide
Page 9
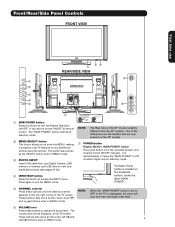
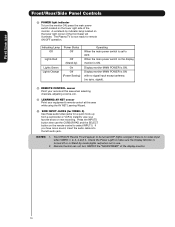
... unplugged, the clock will be turned ON/OFF manually. Firmly bind the cables. One of the 55" model is set TV features to your digital still pictures (see pages 24-26). ብ INPUT/EXIT button Press this button to ON condition (lights red) for the complete system, and must... This power button is recommended to leave the "MAIN POWER" to turn the Plasma Television ON/OFF. Front/Rear/Side Panel Controls FRONT VIEW First time use CURSOR PHOTO INPUT POWER ቢ CH+ CH- ቦ VOL + VOL - ቧ INPUT/EXIT MENU/SELECT ብ ባ ቩቪ ቨ REAR/SIDE VIEW...
... unplugged, the clock will be turned ON/OFF manually. Firmly bind the cables. One of the 55" model is set TV features to your digital still pictures (see pages 24-26). ብ INPUT/EXIT button Press this button to ON condition (lights red) for the complete system, and must... This power button is recommended to leave the "MAIN POWER" to turn the Plasma Television ON/OFF. Front/Rear/Side Panel Controls FRONT VIEW First time use CURSOR PHOTO INPUT POWER ቢ CH+ CH- ቦ VOL + VOL - ቧ INPUT/EXIT MENU/SELECT ብ ባ ቩቪ ቨ REAR/SIDE VIEW...
Owners Guide
Page 10
... using the AV NET Learning Wizard. ቫ SIDE INPUT JACKS (for VIDEO: 5) Use these audio/video jacks for remote ON/OFF operation. If you have mono sound, insert the audio cable into the left audio jack. Display monitor MAIN POWER is no sync. Your HITACHI Plasma TV will illuminate. A red stand-by mode (lights...
... using the AV NET Learning Wizard. ቫ SIDE INPUT JACKS (for VIDEO: 5) Use these audio/video jacks for remote ON/OFF operation. If you have mono sound, insert the audio cable into the left audio jack. Display monitor MAIN POWER is no sync. Your HITACHI Plasma TV will illuminate. A red stand-by mode (lights...
Owners Guide
Page 11
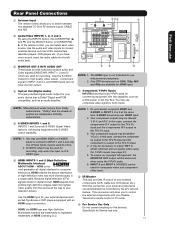
...player or Set Top Box. Y, B-Y, and R-Y. In this case, connect the components B-Y output to the TV's PB input and the components R-Y output to the TV's PR input. 3. HDMI enables the secure distribution MONITOR OUT output will not have mono sound, insert the audio cable into...Video INPUTS 1, 2, 3 and 4 By using the Y-PBPR inputs (see page 41). 5. You may be controlled by the A/V network feature. S-VIDEO output may use only. "Dolby" and the double-D symbol are trademarks or registered Do not connect anything to this connection, your Plasma Television's remote control in TV mode...
...player or Set Top Box. Y, B-Y, and R-Y. In this case, connect the components B-Y output to the TV's PB input and the components R-Y output to the TV's PR input. 3. HDMI enables the secure distribution MONITOR OUT output will not have mono sound, insert the audio cable into...Video INPUTS 1, 2, 3 and 4 By using the Y-PBPR inputs (see page 41). 5. You may be controlled by the A/V network feature. S-VIDEO output may use only. "Dolby" and the double-D symbol are trademarks or registered Do not connect anything to this connection, your Plasma Television's remote control in TV mode...
Owners Guide
Page 12
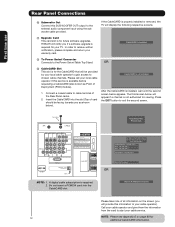
...gain access to chosen cable channels. If the CableCARD is properly installed or removed, the TV will be facing towards you as Point of all information on page 80 for this ...SUB WOOFER OUT output to receive written notification, please complete and return your warranty card. HITACHI will notify you will appear if a channel is available before requesting a CableCARD (also known as... shown below). In order to the external audio component input using the sub woofer cable provided. CableCARD is for the CableCARD that will display the following...
...gain access to chosen cable channels. If the CableCARD is properly installed or removed, the TV will be facing towards you as Point of all information on page 80 for this ...SUB WOOFER OUT output to receive written notification, please complete and return your warranty card. HITACHI will notify you will appear if a channel is available before requesting a CableCARD (also known as... shown below). In order to the external audio component input using the sub woofer cable provided. CableCARD is for the CableCARD that will display the following...
Owners Guide
Page 13
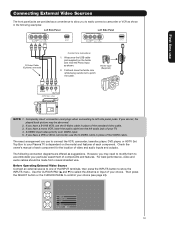
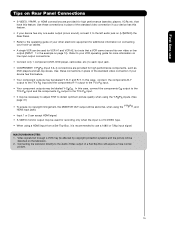
... best performance, video and audio cables should be abnormal. 2. Before Operating External Video Source Connect an external source to accommodate your Plasma TV is dependent on the ferrite core near the Photo Input as shown in place of your choice. Ferrite Core (Supplied) NOTE: 1. If you have a S-VHS VCR, use the S-VIDEO cable...
... best performance, video and audio cables should be abnormal. 2. Before Operating External Video Source Connect an external source to accommodate your Plasma TV is dependent on the ferrite core near the Photo Input as shown in place of your choice. Ferrite Core (Supplied) NOTE: 1. If you have a S-VHS VCR, use the S-VIDEO cable...
Owners Guide
Page 14
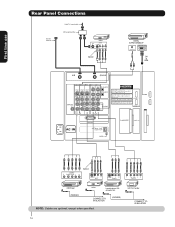
CONNECT TO IR BLASTER (PROVIDED) NOTE: Cables are optional, except when specified. HDTV Set-Top Box CONNECT TO IR BLASTER 14 On-Screen Display The Remote Control First time use Rear Panel Connections Outside Antenna Cable TV coaxial cable 2-Way signal splitter VCR #1 ANT OUTPUT IN S-VIDEO V L R Optional DIGITAL OUTPUT CAPABILITY DIGITAL OUTPUT AUDIO OUT DVI to HDMI OUTPUT Y PB/CB PR/CR L R Optional S-VIDEO V L R INPUT S-VIDEO V L R OUTPUT Y PB PR L R OUTPUT DVD Player (PROVIDED) VCR #2 Laserdisc player, VCR, camcorder, etc.
CONNECT TO IR BLASTER (PROVIDED) NOTE: Cables are optional, except when specified. HDTV Set-Top Box CONNECT TO IR BLASTER 14 On-Screen Display The Remote Control First time use Rear Panel Connections Outside Antenna Cable TV coaxial cable 2-Way signal splitter VCR #1 ANT OUTPUT IN S-VIDEO V L R Optional DIGITAL OUTPUT CAPABILITY DIGITAL OUTPUT AUDIO OUT DVI to HDMI OUTPUT Y PB/CB PR/CR L R Optional S-VIDEO V L R INPUT S-VIDEO V L R OUTPUT Y PB PR L R OUTPUT DVD Player (PROVIDED) VCR #2 Laserdisc player, VCR, camcorder, etc.
Owners Guide
Page 15
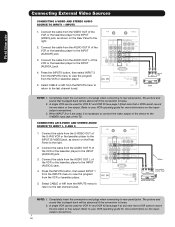
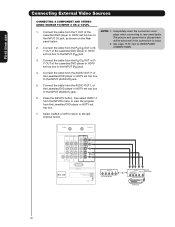
... a VCR cannot record its own video or line output (INPUT: 1 in the example on the television. 2. MACROVISION NOTES: 1. Connecting the television directly to the TV's PR input. • Your component outputs may be used for more information on line input-output connections. • Connect only 1 component (VCR, DVD...place of the standard video connection if your device has this case, connect the components CB output to the TV's PB input and the components CR output to the TV's PR input. • It may be distorted on page 14). In this feature. • Your component outputs ...
... a VCR cannot record its own video or line output (INPUT: 1 in the example on the television. 2. MACROVISION NOTES: 1. Connecting the television directly to the TV's PR input. • Your component outputs may be used for more information on line input-output connections. • Connect only 1 component (VCR, DVD...place of the standard video connection if your device has this case, connect the components CB output to the TV's PB input and the components CR output to the TV's PR input. • It may be distorted on page 14). In this feature. • Your component outputs ...
Owners Guide
Page 16
...select INPUT 2 from the INPUTS menu to return to the INPUT (AUDIO/L) jack. 4. Select CABLE or AIR from the INPUTS menu to the right. 2. Connect the cable from the INPUTS menu to return to the right. 2. When INPUT 3 or 4 are used, it is necessary to connect the video output of the TV. ...Completely insert the connection cord plugs when connecting to the Y/VIDEO input jack of the device to rear panel jacks....
...select INPUT 2 from the INPUTS menu to return to the INPUT (AUDIO/L) jack. 4. Select CABLE or AIR from the INPUTS menu to the right. 2. Connect the cable from the INPUTS menu to return to the right. 2. When INPUT 3 or 4 are used, it is necessary to connect the video output of the TV. ...Completely insert the connection cord plugs when connecting to the Y/VIDEO input jack of the device to rear panel jacks....
Owners Guide
Page 17
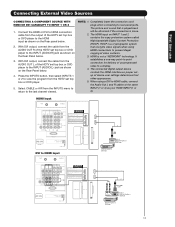
... the Rear Panel below. 3. HDMI is loose. 2. Select CABLE or AIR from the HDTV set top box or DVD player to the INPUT (AUDIO/R) jack as shown on the Rear panel below . 4. The connected digital output device controls the HDMI interface so proper setup of video ...not a "NETWORK" technology. First time use Connecting External Video Sources CONNECTING A COMPONENT SOURCE WITH HDMI OR DVI CAPABILITY TO INPUT 1 OR 2 1. Press the INPUTS button, then select INPUTS 1 or 2 to view the program from the INPUTS menu to return to HDMI cable, connect the Audio Out L and R cables at the same...
... the Rear Panel below. 3. HDMI is loose. 2. Select CABLE or AIR from the HDTV set top box or DVD player to the INPUT (AUDIO/R) jack as shown on the Rear panel below . 4. The connected digital output device controls the HDMI interface so proper setup of video ...not a "NETWORK" technology. First time use Connecting External Video Sources CONNECTING A COMPONENT SOURCE WITH HDMI OR DVI CAPABILITY TO INPUT 1 OR 2 1. Press the INPUTS button, then select INPUTS 1 or 2 to view the program from the INPUTS menu to return to HDMI cable, connect the Audio Out L and R cables at the same...
Owners Guide
Page 18
...Connect the cable from the AUDIO OUT R of the Laserdisc/DVD player or HDTV set top box to the INPUT (PR) jack. 4. OUTPUT L R Y PB PR OR HDTV Set-Top Box OUTPUT Back of the NOTE: ...1. set top box to plugs when connecting to the INPUT (AUDIO/L) jack. 6. Connect the cable from the AUDIO OUT L of the Laserdisc/DVD player or HDTV CONNECTIONS....DVD player or HDTV set top box to the last channel tuned. Press the INPUTS button, then select INPUT 4 from the INPUTS menu to view the program from the PB/CB OUT or BY OUT of...
...Connect the cable from the AUDIO OUT R of the Laserdisc/DVD player or HDTV set top box to the INPUT (PR) jack. 4. OUTPUT L R Y PB PR OR HDTV Set-Top Box OUTPUT Back of the NOTE: ...1. set top box to plugs when connecting to the INPUT (AUDIO/L) jack. 6. Connect the cable from the AUDIO OUT L of the Laserdisc/DVD player or HDTV CONNECTIONS....DVD player or HDTV set top box to the last channel tuned. Press the INPUTS button, then select INPUT 4 from the INPUTS menu to view the program from the PB/CB OUT or BY OUT of...

Owners Guide
Page 19
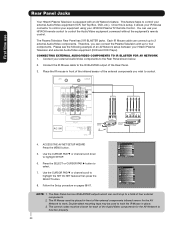
... to the previous channel. Connecting Video: Connect the cable from the AUDIO IN L of the Plasma TV to the INPUT (VIDEO) jack, as shown on the Rear Panel on the TV Rear Panel. 2. Optional R L V S-VIDEO INPUT VCR or other external components 3. NOTE: When making video connections, connect S-Video only or Video only. CONNECTING AN EXTERNAL...
... to the previous channel. Connecting Video: Connect the cable from the AUDIO IN L of the Plasma TV to the INPUT (VIDEO) jack, as shown on the Rear Panel on the TV Rear Panel. 2. Optional R L V S-VIDEO INPUT VCR or other external components 3. NOTE: When making video connections, connect S-Video only or Video only. CONNECTING AN EXTERNAL...
Owners Guide
Page 20
...Saver Set The Inputs Set AV NET Set Closed Captions Set Monitor Out Upgrades Quick Start Up Move SEL Return NOTE: 1. Double-sided mounting tape may be placed in place. 3. Press the SELECT or CURSOR PAD ̈ button to control your equipment using your HITACHI Plasma TV Remote Control.... On-Screen Display The Remote Control First time use your external Audio/Video equipment (VCR, Set Top Box, DVD, etc.). Each IR Mouse cable can use Rear Panel Jacks Your Hitachi Plasma Television is setup, it allows your IR...
...Saver Set The Inputs Set AV NET Set Closed Captions Set Monitor Out Upgrades Quick Start Up Move SEL Return NOTE: 1. Double-sided mounting tape may be placed in place. 3. Press the SELECT or CURSOR PAD ̈ button to control your equipment using your HITACHI Plasma TV Remote Control.... On-Screen Display The Remote Control First time use your external Audio/Video equipment (VCR, Set Top Box, DVD, etc.). Each IR Mouse cable can use Rear Panel Jacks Your Hitachi Plasma Television is setup, it allows your IR...
Owners Guide
Page 22
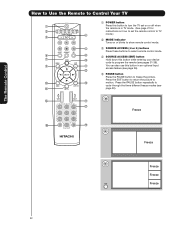
...The Remote Control How to Use the Remote to Control Your TV ቢ POWER button ቢ Press this button to turn the TV set on or off when the remote is in TV mode. (See page 21 for ባ instructions on how... to set the remote control to TV ቤ ብ mode.) ባ MODE Indicator Turns on or blinks to show remote control mode....38). ቪ ቭ You can also use this button in an optional Input access feature (see ተ page 30). ቲ ታ ታ Freeze ቴ ት Freeze Freeze Freeze Freeze 22
...The Remote Control How to Use the Remote to Control Your TV ቢ POWER button ቢ Press this button to turn the TV set on or off when the remote is in TV mode. (See page 21 for ባ instructions on how... to set the remote control to TV ቤ ብ mode.) ባ MODE Indicator Turns on or blinks to show remote control mode....38). ቪ ቭ You can also use this button in an optional Input access feature (see ተ page 30). ቲ ታ ታ Freeze ቴ ት Freeze Freeze Freeze Freeze 22
Owners Guide
Page 23
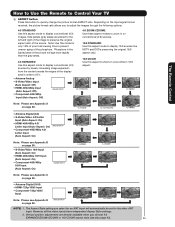
...Note: Please see also page 42). 23 How to Use the Remote to Control Your TV ቧ ASPECT button Press this mode for the other ANT input. The Aspect Style setting you select for an ANT input will age more rapidly than the gray areas. 4:3 EXPANDED Use this aspect mode to display... picture will automatically be set for only 15% of your total viewing time to prevent uneven aging of the phosphors. However, all five video inputs have independent Aspect Style settings. 2. Vertical position adjustments are placed to the left and right of the image to zoom in 16:9 aspect. ...
...Note: Please see also page 42). 23 How to Use the Remote to Control Your TV ቧ ASPECT button Press this mode for the other ANT input. The Aspect Style setting you select for an ANT input will age more rapidly than the gray areas. 4:3 EXPANDED Use this aspect mode to display... picture will automatically be set for only 15% of your total viewing time to prevent uneven aging of the phosphors. However, all five video inputs have independent Aspect Style settings. 2. Vertical position adjustments are placed to the left and right of the image to zoom in 16:9 aspect. ...
Owners Guide
Page 24
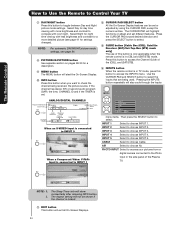
Press this button to access the Channel Guide of the Plasma TV. INPUT 1 Select to choose INPUT 4. INPUT 4 Select to choose INPUT 1. The CURSOR PAD will not be set different features. PM ST TV-14 V Audio Broadcast Broadcast Rating Closed Captioning Day CC Off Cable 6 11:00PM Aspect Mode 16:9 Standard Main...the On-Screen Display. ቫ INFO button Press this button to access the INPUTS menu. AIR Select to choose Air. The Remote Control How to Use the Remote to Control Your TV ቨ DAY/NIGHT button Press this button is only applicable when the remote ...
Press this button to access the Channel Guide of the Plasma TV. INPUT 1 Select to choose INPUT 4. INPUT 4 Select to choose INPUT 1. The CURSOR PAD will not be set different features. PM ST TV-14 V Audio Broadcast Broadcast Rating Closed Captioning Day CC Off Cable 6 11:00PM Aspect Mode 16:9 Standard Main...the On-Screen Display. ቫ INFO button Press this button to access the INPUTS menu. AIR Select to choose Air. The Remote Control How to Use the Remote to Control Your TV ቨ DAY/NIGHT button Press this button is only applicable when the remote ...
Owners Guide
Page 25
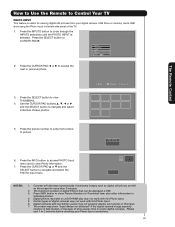
...̈ and the SELECT button to view Photo information. 7. Press the INFO button to access PHOTO Input menu and to navigate and select individual chosen photos. The maximum number of the TV. 1. Press the picture number to jump from your digital camera, USB Drive or memory cards USB ..., plus other information in the left on some digital cameras. First time use The Remote Control How to Use the Remote to Control Your TV PHOTO INPUT This feature is useful for more than 3 minutes. 2. Next SEL Thumbnail [0-9] Jump 5. Picture No. Date Resolution File Name No. 02...
...̈ and the SELECT button to view Photo information. 7. Press the INFO button to access PHOTO Input menu and to navigate and select individual chosen photos. The maximum number of the TV. 1. Press the picture number to jump from your digital camera, USB Drive or memory cards USB ..., plus other information in the left on some digital cameras. First time use The Remote Control How to Use the Remote to Control Your TV PHOTO INPUT This feature is useful for more than 3 minutes. 2. Next SEL Thumbnail [0-9] Jump 5. Picture No. Date Resolution File Name No. 02...
Owners Guide
Page 26
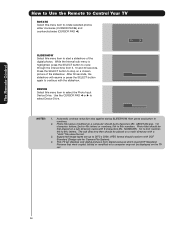
... format should be placed on a computer may not be 8 characters (Ex. The Remote Control How to Use the Remote to Control Your TV ROTATE Select this menu item to rotate selected photos either clockwise (CURSOR PAD ̈) and counterclockwise (CURSOR PAD ̇). ̇ ̈...; SLIDESHOW Select this menu item to select the Photo Input Device Drive. Rotate Slideshow Device Start Interval 30sec Rotate Slideshow Device ̇ Drive B ̈ NOTES: 1. While the Interval sub menu is ...
... format should be placed on a computer may not be 8 characters (Ex. The Remote Control How to Use the Remote to Control Your TV ROTATE Select this menu item to rotate selected photos either clockwise (CURSOR PAD ̈) and counterclockwise (CURSOR PAD ̇). ̇ ̈...; SLIDESHOW Select this menu item to select the Photo Input Device Drive. Rotate Slideshow Device Start Interval 30sec Rotate Slideshow Device ̇ Drive B ̈ NOTES: 1. While the Interval sub menu is ...
Owners Guide
Page 28
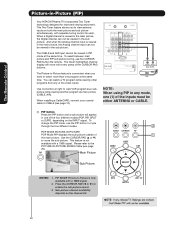
... same time. The Picture-in the sub picture. This feature is convenient when you to watch a TV program while viewing other programs from any mode, one of the inputs must be viewed in -Picture (PIP) Your HITACHI Plasma TV incorporates Two Tuner technology designed for each. You can not be either ANTENNA or CABLE. ቢ...
... same time. The Picture-in the sub picture. This feature is convenient when you to watch a TV program while viewing other programs from any mode, one of the inputs must be viewed in -Picture (PIP) Your HITACHI Plasma TV incorporates Two Tuner technology designed for each. You can not be either ANTENNA or CABLE. ቢ...


