
Owners Guide
Page 2
... 29 • PROGRAM LIST ...29 • TIMER SET ...29 2 VCR Precoded remote controls 22 TABLE 2. TABLE OF CONTENTS TABLE OF CONTENTS TABLE OF CONTENTS ...2 IMPORTANT SAFEGUARDS 4 ACCESSORIES ...9 REMOTE CONTROL BATTERY INSTALLATION AND REPLACEMENT 10 PICTURE CAUTIONS ...11 HOW TO SET UP YOUR NEW HITACHI PROJECTION TV 12 ANTENNA...12 LOCATION ...12 VIEWING...12 HOOK-UP...
... 29 • PROGRAM LIST ...29 • TIMER SET ...29 2 VCR Precoded remote controls 22 TABLE 2. TABLE OF CONTENTS TABLE OF CONTENTS TABLE OF CONTENTS ...2 IMPORTANT SAFEGUARDS 4 ACCESSORIES ...9 REMOTE CONTROL BATTERY INSTALLATION AND REPLACEMENT 10 PICTURE CAUTIONS ...11 HOW TO SET UP YOUR NEW HITACHI PROJECTION TV 12 ANTENNA...12 LOCATION ...12 VIEWING...12 HOOK-UP...
Owners Guide
Page 3
... • MTS MODE (Multi-Channel Television Sound 38 • DYNAMIC BASS ...39 • LOUDNESS ...39 • INT. SPEAKERS ...39 CARE OF YOUR PROJECTION TV AND REMOTE CONTROLS 40 TROUBLESHOOTING ...41 RECEPTION PROBLEMS (EXTERNAL TO THE TV 41 CHECK HERE BEFORE CALLING FOR SERVICE 41 SPECIFICATIONS ...43 3 FUNCTIONS 35 • PICTURE PROGRAM 35...
... • MTS MODE (Multi-Channel Television Sound 38 • DYNAMIC BASS ...39 • LOUDNESS ...39 • INT. SPEAKERS ...39 CARE OF YOUR PROJECTION TV AND REMOTE CONTROLS 40 TROUBLESHOOTING ...41 RECEPTION PROBLEMS (EXTERNAL TO THE TV 41 CHECK HERE BEFORE CALLING FOR SERVICE 41 SPECIFICATIONS ...43 3 FUNCTIONS 35 • PICTURE PROGRAM 35...
Owners Guide
Page 9
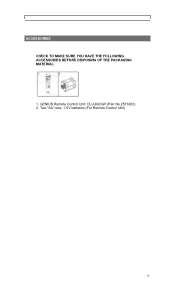
GENIUS Remote Control Unit: CLU-692GR (Part No.2573922) 2. Two "AA" size, 1.5V batteries (For Remote Control Unit) 9 ACCESSORIES ACCESSORIES CHECK TO MAKE SURE YOU HAVE THE FOLLOWING ACCESSORIES BEFORE DISPOSING OF THE PACKAGING MATERIAL. 1.
GENIUS Remote Control Unit: CLU-692GR (Part No.2573922) 2. Two "AA" size, 1.5V batteries (For Remote Control Unit) 9 ACCESSORIES ACCESSORIES CHECK TO MAKE SURE YOU HAVE THE FOLLOWING ACCESSORIES BEFORE DISPOSING OF THE PACKAGING MATERIAL. 1.

Owners Guide
Page 10
d) Replace the cover. 10 b) Replace the old batteries with your fingers. REMOTE CONTROL BATTERY INSTALLATION AND REPLACEMENT REMOTE CONTROL BATTERY INSTALLATION AND REPLACEMENT Open the battery cover of the remote transmitter by pushing the notched part of the batteries. c) Match the (+) and (-) marks in the battery compartment with the (+) and (-) terminal of the cover with two new "AA" size batteries for the Genius Remote. a) Push batteries towards the springs and lift them out.
d) Replace the cover. 10 b) Replace the old batteries with your fingers. REMOTE CONTROL BATTERY INSTALLATION AND REPLACEMENT REMOTE CONTROL BATTERY INSTALLATION AND REPLACEMENT Open the battery cover of the remote transmitter by pushing the notched part of the batteries. c) Match the (+) and (-) marks in the battery compartment with the (+) and (-) terminal of the cover with two new "AA" size batteries for the Genius Remote. a) Push batteries towards the springs and lift them out.
Owners Guide
Page 15
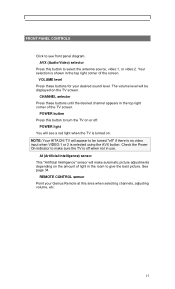
... picture adjustments depending on . NOTE: Your HITACHI TV will see front panel diagram. CHANNEL selector Press these buttons for your Genius Remote at this button to see a red light when the TV is off when not in the top right corner of the TV screen. REMOTE CONTROL sensor Point your desired sound level. Your...
... picture adjustments depending on . NOTE: Your HITACHI TV will see front panel diagram. CHANNEL selector Press these buttons for your Genius Remote at this button to see a red light when the TV is off when not in the top right corner of the TV screen. REMOTE CONTROL sensor Point your desired sound level. Your...
Owners Guide
Page 17
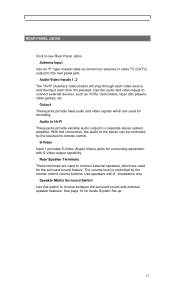
Audio/Video Inputs 1, 2 The "AVX" (Auxiliary video) button will step through each video source and the input each time it is controlled by the television's remote control. Rear Speaker Terminals These terminals are used to connect external devices, such as VCRs, camcorders, laser disc players, video games, etc. Use speakers with S-Video ... this rear panel jack. Antenna Input Use an "F" type coaxial cable to connect an antenna or cable TV (CATV) output to the stereo can be controlled by the remote control volume buttons.
Audio/Video Inputs 1, 2 The "AVX" (Auxiliary video) button will step through each video source and the input each time it is controlled by the television's remote control. Rear Speaker Terminals These terminals are used to connect external devices, such as VCRs, camcorders, laser disc players, video games, etc. Use speakers with S-Video ... this rear panel jack. Antenna Input Use an "F" type coaxial cable to connect an antenna or cable TV (CATV) output to the stereo can be controlled by the remote control volume buttons.
Owners Guide
Page 20
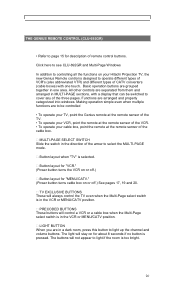
...to light if the room is too bright. 20 All other controls are separated from them and arranged in a dark room, press this button to controlling all the functions on your cable box, point the remote at the remote sensor of remote control buttons. LIGHT BUTTON When you are grouped together in the VCR...Multi-Page select switch is in the direction of the arrow to cover any of the VCR. • To operate your Hitachi Projection TV, the new Genius Remote control is in one touch. Functions are to be switched to select the MULTI-PAGE mode. PRECODED BUTTONS These buttons will not ...
...to light if the room is too bright. 20 All other controls are separated from them and arranged in a dark room, press this button to controlling all the functions on your cable box, point the remote at the remote sensor of remote control buttons. LIGHT BUTTON When you are grouped together in the VCR...Multi-Page select switch is in the direction of the arrow to cover any of the VCR. • To operate your Hitachi Projection TV, the new Genius Remote control is in one touch. Functions are to be switched to select the MULTI-PAGE mode. PRECODED BUTTONS These buttons will not ...
Owners Guide
Page 21
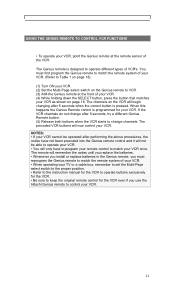
... sure to keep the original remote control for your VCR as shown on the VCR will remember the codes until you replace the batteries. • Whenever you install or replace batteries in the Genius remote, you use the Hitachi Genius remote to match your VCR, point the Genius remote at the remote sensor of VCR's. NOTES: •...
... sure to keep the original remote control for your VCR as shown on the VCR will remember the codes until you replace the batteries. • Whenever you install or replace batteries in the Genius remote, you use the Hitachi Genius remote to match your VCR, point the Genius remote at the remote sensor of VCR's. NOTES: •...
Owners Guide
Page 22
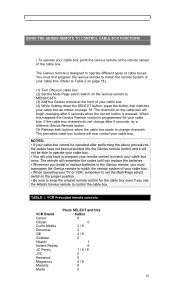
...; When operating your cable box once. When this button 6 0 2 / 6 2 2 / 6 0 1 6 1 / 6 / 9 0 0 4 / 6 9 0 22 VCR Precoded remote controls VCR Brand Canon Citizen Curtis Mathis Dimensia GE Goldstar Hitachi Instant Replay JC Penny JVC Kenwood Magnavox Marantz Marta Press SELECT and this happens the Genius Remote control is pressed. NOTES: • If your cable box cannot be operated after 5 seconds...
...; When operating your cable box once. When this button 6 0 2 / 6 2 2 / 6 0 1 6 1 / 6 / 9 0 0 4 / 6 9 0 22 VCR Precoded remote controls VCR Brand Canon Citizen Curtis Mathis Dimensia GE Goldstar Hitachi Instant Replay JC Penny JVC Kenwood Magnavox Marantz Marta Press SELECT and this happens the Genius Remote control is pressed. NOTES: • If your cable box cannot be operated after 5 seconds...

Owners Guide
Page 24
USING THE GENIUS REMOTE TO CONTROL CABLE BOX FUNCTIONS TABLE 2. Cable Box Precoded remote controls Press SELECT and this CATV brand General Instrument button 0 / 1 / 2 / 3 / 8 Hamlin 4 Jerrold 0 / 1 / 2 / 3 / 8 Pioneer 7 Regal 4 Scientific Atlantic 6 Viewstar 9 Zenith 5 24
USING THE GENIUS REMOTE TO CONTROL CABLE BOX FUNCTIONS TABLE 2. Cable Box Precoded remote controls Press SELECT and this CATV brand General Instrument button 0 / 1 / 2 / 3 / 8 Hamlin 4 Jerrold 0 / 1 / 2 / 3 / 8 Pioneer 7 Regal 4 Scientific Atlantic 6 Viewstar 9 Zenith 5 24

Owners Guide
Page 25
...program, press the "RECALL" button. The "MENU" button will highlight functions or adjust different features. RECALL button When you want to see the Remote. SET UP section beginning on page 22.) You can be performed by using these buttons. CHANNEL SELECTOR buttons Enter two or three numbers to 9.... preference. The "ENTER" button will set . (These functions are explained in the MENU - HOW TO USE THE GENIUS REMOTE TO CONTROL YOUR TV HOW TO USE THE GENIUS REMOTE TO CONTROL YOUR TV POWER button Press this button to turn the TV set or adjusted by pressing channel up ( down ( ). ...
...program, press the "RECALL" button. The "MENU" button will highlight functions or adjust different features. RECALL button When you want to see the Remote. SET UP section beginning on page 22.) You can be performed by using these buttons. CHANNEL SELECTOR buttons Enter two or three numbers to 9.... preference. The "ENTER" button will set . (These functions are explained in the MENU - HOW TO USE THE GENIUS REMOTE TO CONTROL YOUR TV HOW TO USE THE GENIUS REMOTE TO CONTROL YOUR TV POWER button Press this button to turn the TV set or adjusted by pressing channel up ( down ( ). ...
Owners Guide
Page 26
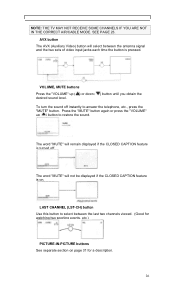
HOW TO USE THE GENIUS REMOTE TO CONTROL YOUR TV NOTE: THE TV MAY NOT RECEIVE SOME CHANNELS IF YOU ARE NOT IN THE CORRECT AIR/CABLE MODE. Press the "MUTE" button again ...
HOW TO USE THE GENIUS REMOTE TO CONTROL YOUR TV NOTE: THE TV MAY NOT RECEIVE SOME CHANNELS IF YOU ARE NOT IN THE CORRECT AIR/CABLE MODE. Press the "MUTE" button again ...
Owners Guide
Page 27
... the on the TV screen. To exit the on the TV set . • INITIAL SETTING 27 FUNCTIONS Press MENU, 1, and ENTER to practice using the remote control, press and hold the POWER button on -screen display, press MENU or RECALL.
... the on the TV screen. To exit the on the TV set . • INITIAL SETTING 27 FUNCTIONS Press MENU, 1, and ENTER to practice using the remote control, press and hold the POWER button on -screen display, press MENU or RECALL.
Owners Guide
Page 28
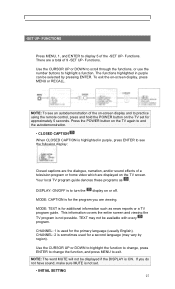
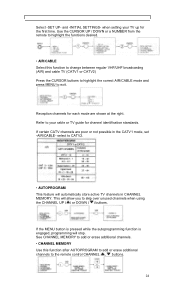
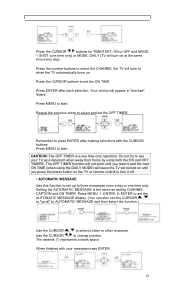
... broadcasting (AIR) and cable TV (CATV1 or CATV2) Press the CURSOR buttons to highlight the correct AIR/CABLE mode and press MENU to the remote control CHANNEL , buttons. 28 FUNCTIONS Select -SET UP- and -INITIAL SETTINGS- Refer to your TV up for channel identification standards. select to skip... will automatically store active TV channels in the CATV1 mode, set -AIR/CABLE- Use the CURSOR UP / DOWN or a NUMBER from the remote to highlight the functions desired. • AIR/CABLE Select this function after AUTOPROGRAM to add or erase additional channels to exit. Reception channels for...
... broadcasting (AIR) and cable TV (CATV1 or CATV2) Press the CURSOR buttons to highlight the correct AIR/CABLE mode and press MENU to the remote control CHANNEL , buttons. 28 FUNCTIONS Select -SET UP- and -INITIAL SETTINGS- Refer to your TV up for channel identification standards. select to skip... will automatically store active TV channels in the CATV1 mode, set -AIR/CABLE- Use the CURSOR UP / DOWN or a NUMBER from the remote to highlight the functions desired. • AIR/CABLE Select this function after AUTOPROGRAM to add or erase additional channels to exit. Reception channels for...
Owners Guide
Page 29
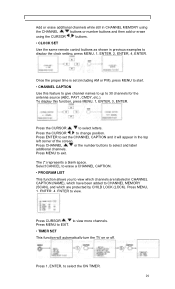
... in CHANNEL MEMORY using the CHANNEL , buttons or number buttons and then add or erase using the CURSOR , buttons. • CLOCK SET Use the same remote control buttons as shown in previous examples to select the ON TIMER. 29 Press CHANNEL , or the number buttons to exit. To display this feature to...
... in CHANNEL MEMORY using the CHANNEL , buttons or number buttons and then add or erase using the CURSOR , buttons. • CLOCK SET Use the same remote control buttons as shown in previous examples to select the ON TIMER. 29 Press CHANNEL , or the number buttons to exit. To display this feature to...
Owners Guide
Page 30
... (*) represents a blank space. Press MENU to turn on . -SET UP- Your choice will not work until you press the power button on the TV or remote control to start . Press ENTER after making selections with your TV as setting CHANNEL CAPTION and ON TIMER.
... (*) represents a blank space. Press MENU to turn on . -SET UP- Your choice will not work until you press the power button on the TV or remote control to start . Press ENTER after making selections with your TV as setting CHANNEL CAPTION and ON TIMER.
Owners Guide
Page 40
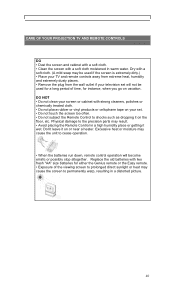
...• Do not place rubber or vinyl products or cellophane tape on or near a heater. CARE OF YOUR PROJECTION TV AND REMOTE CONTROLS CARE OF YOUR PROJECTION TV AND REMOTE CONTROLS DO • Dust the screen and cabinet with a soft cloth. • Clean the screen with two fresh "AA" size ...precision parts may cause the screen to cease operation. • When the batteries run down, remote control operation will not be used if the screen is extremely dirty.) • Place your TV and remote controls away from extreme heat, humidity and extremely dusty places. • Remove the plug from the...
...• Do not place rubber or vinyl products or cellophane tape on or near a heater. CARE OF YOUR PROJECTION TV AND REMOTE CONTROLS CARE OF YOUR PROJECTION TV AND REMOTE CONTROLS DO • Dust the screen and cabinet with a soft cloth. • Clean the screen with two fresh "AA" size ...precision parts may cause the screen to cease operation. • When the batteries run down, remote control operation will not be used if the screen is extremely dirty.) • Place your TV and remote controls away from extreme heat, humidity and extremely dusty places. • Remove the plug from the...
Owners Guide
Page 43
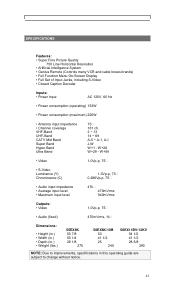
....) 55EX9K 55 7/8 50 1/4 28 1/8 275 50EX8K/10B 50 41 1/2 25 245 50EX11BV/12KV 54 1/2 41 1/2 28 5/8 390 NOTE: Due to improvements, specifications in this operating guide are subject to change without notice. 43 SPECIFICATIONS SPECIFICATIONS Features: • Super Fine Picture Quality 750 Line Horizontal Resolution • Artificial Intelligence System • Genius Remote (Controls...
....) 55EX9K 55 7/8 50 1/4 28 1/8 275 50EX8K/10B 50 41 1/2 25 245 50EX11BV/12KV 54 1/2 41 1/2 28 5/8 390 NOTE: Due to improvements, specifications in this operating guide are subject to change without notice. 43 SPECIFICATIONS SPECIFICATIONS Features: • Super Fine Picture Quality 750 Line Horizontal Resolution • Artificial Intelligence System • Genius Remote (Controls...


