Owners Guide
Page 1
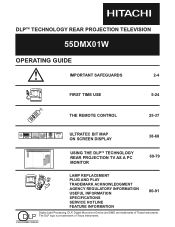
The DLP logo is a trademanrk of Texas Instruments. DLPTM TECHNOLOGY REAR PROJECTION TELEVISION 55DMX01W OPERATING GUIDE IMPORTANT SAFEGUARDS 2-4 FIRST TIME USE 5-24 THE REMOTE CONTROL 25-37 SETUP CUSTOMIZE VIDEO AUDIO THEATER ULTRATEC BIT MAP ON... SCREEN DISPLAY 38-68 USING THE DLPTM TECHNOLOGY REAR PROJECTION TV AS A PC MONITOR 69-79 LAMP REPLACEMENT PLUG AND PLAY TRADEMARK ACKNOWLEDGMENT AGENCY REGULATORY INFORMATION USEFUL INFORMATION SPECIFICATIONS SERVICE HOTLINE FEATURE INFORMATION 80-91 Digital Light Processing, DLP, Digital ...
The DLP logo is a trademanrk of Texas Instruments. DLPTM TECHNOLOGY REAR PROJECTION TELEVISION 55DMX01W OPERATING GUIDE IMPORTANT SAFEGUARDS 2-4 FIRST TIME USE 5-24 THE REMOTE CONTROL 25-37 SETUP CUSTOMIZE VIDEO AUDIO THEATER ULTRATEC BIT MAP ON... SCREEN DISPLAY 38-68 USING THE DLPTM TECHNOLOGY REAR PROJECTION TV AS A PC MONITOR 69-79 LAMP REPLACEMENT PLUG AND PLAY TRADEMARK ACKNOWLEDGMENT AGENCY REGULATORY INFORMATION USEFUL INFORMATION SPECIFICATIONS SERVICE HOTLINE FEATURE INFORMATION 80-91 Digital Light Processing, DLP, Digital ...

Owners Guide
Page 6
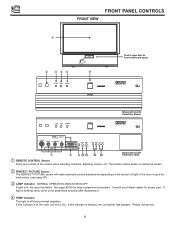
.../size change The television CPU sets picture blanking to hide unnecessary noise, until it is on television compared to a conventional color television. The lamp rarely breaks. On: Three LED s blink alternately. However, this is free from outside light may disappear when signal is recommended that you...AC power cord. 8 Bend, tilt Due to varying signal content, you move your set proper signal strength. HOW TO SET UP YOUR NEW HITACHI DLPTM REAR PROJECTION TV ANTENNA Unless your Rear Projection TV is connected to a cable TV system or to a centralized antenna system, a good outdoor...
.../size change The television CPU sets picture blanking to hide unnecessary noise, until it is on television compared to a conventional color television. The lamp rarely breaks. On: Three LED s blink alternately. However, this is free from outside light may disappear when signal is recommended that you...AC power cord. 8 Bend, tilt Due to varying signal content, you move your set proper signal strength. HOW TO SET UP YOUR NEW HITACHI DLPTM REAR PROJECTION TV ANTENNA Unless your Rear Projection TV is connected to a cable TV system or to a centralized antenna system, a good outdoor...
Owners Guide
Page 8
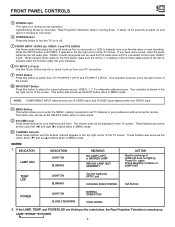
... channels, adjusting volume, etc. Please call service. 8 The remote control sensor is lit, the lamp has failed. DLP A TEXAS INSTRUMENTS TECHNOLOGY LAMP TEMP POWER POWER Shown with Control Panel Door Open. ቢ REMOTE CONTROL Sensor Point your Hitachi dealer for proper part. NORMAL OPERATION INDICATOR IS OFF If light is inside the screen...
... channels, adjusting volume, etc. Please call service. 8 The remote control sensor is lit, the lamp has failed. DLP A TEXAS INSTRUMENTS TECHNOLOGY LAMP TEMP POWER POWER Shown with Control Panel Door Open. ቢ REMOTE CONTROL Sensor Point your Hitachi dealer for proper part. NORMAL OPERATION INDICATOR IS OFF If light is inside the screen...
Owners Guide
Page 9
...when in menu mode. ቮ VOLUME Level Press these buttons until VIDEO: 3 appears in MENU mode. Light Blinking Slowly (2 seconds): Rear Projection Television lamp is cooling down (Ĭ) and up from TV, PC INPUT 1 (PC1) and PC INPUT 2 (PC2). The volume level will be used for PC2... in the top right corner of the TV screen. These buttons also serve as the cursor down . INDICATOR LAMP LED INDICATION LIGHT ON BLINKING MEANING NO LAMP LIGHT or BROKEN LAMP WRONG LAMP UNIT ASSEMBLY ACTION Need to properly insert the S-Video cable into the left (ǡ) and right (Ǡ)...
...when in menu mode. ቮ VOLUME Level Press these buttons until VIDEO: 3 appears in MENU mode. Light Blinking Slowly (2 seconds): Rear Projection Television lamp is cooling down (Ĭ) and up from TV, PC INPUT 1 (PC1) and PC INPUT 2 (PC2). The volume level will be used for PC2... in the top right corner of the TV screen. These buttons also serve as the cursor down . INDICATOR LAMP LED INDICATION LIGHT ON BLINKING MEANING NO LAMP LIGHT or BROKEN LAMP WRONG LAMP UNIT ASSEMBLY ACTION Need to properly insert the S-Video cable into the left (ǡ) and right (Ǡ)...

Owners Guide
Page 38
...highlight a different feature. 3. AUTO CHANNEL SET 5. SIGNAL SOURCE 4. CLOCK SET 8. PICTURE FORMATS 9. PLUG & PLAY 3. CHANNEL MEMORY 6. LAMP TIME TO QUIT EXIT PUSH This part of the screen shows what selections are available. SETUP CUSTOMIZE VIDEO AUDIO THEATER 1. CHANNEL LIST 7. ...Press EXIT on your HITACHI Projection TV. 2. MENU LANGUAGE 2. Press HELP on the remote control when a menu is displayed, and text will appear giving a...
...highlight a different feature. 3. AUTO CHANNEL SET 5. SIGNAL SOURCE 4. CLOCK SET 8. PICTURE FORMATS 9. PLUG & PLAY 3. CHANNEL MEMORY 6. LAMP TIME TO QUIT EXIT PUSH This part of the screen shows what selections are available. SETUP CUSTOMIZE VIDEO AUDIO THEATER 1. CHANNEL LIST 7. ...Press EXIT on your HITACHI Projection TV. 2. MENU LANGUAGE 2. Press HELP on the remote control when a menu is displayed, and text will appear giving a...

Owners Guide
Page 39
... VCR1, DVD1, etc. 3. FAMILY FAVORITES Allows you to set . CLOSED CAPTION Feature to factory preset. SHARPNESS 6. Adjust color. Improve picture performance. 1. SIGNAL SOURCE 4. CHANNEL MEMORY 6. LAMP TIME Choose English, French, or Spanish text. Optimum hook up for channel buttons. Select type of VIDEO 1 or VIDEO 2 to factory preset. CHANNEL ID. Label...
... VCR1, DVD1, etc. 3. FAMILY FAVORITES Allows you to set . CLOSED CAPTION Feature to factory preset. SHARPNESS 6. Adjust color. Improve picture performance. 1. SIGNAL SOURCE 4. CHANNEL MEMORY 6. LAMP TIME Choose English, French, or Spanish text. Optimum hook up for channel buttons. Select type of VIDEO 1 or VIDEO 2 to factory preset. CHANNEL ID. Label...

Owners Guide
Page 40
...MENU LANGUAGE 2. CLOCK SET 8. PLUG & PLAY 3. CHANNEL LIST 7. MENU LANGUAGE This feature will take you to select any one of your choice. CHANNEL LIST 7. LAMP TIME AUDIO THEATER ENGLISH FRANCAIS ESPA ÑOL MENU TO MENU BAR TO QUIT EXIT THUMB STICK SETUP CUSTOMIZE VIDEO 1. SIGNAL SOURCE...LIST 7. CHANNEL MEMORY 6. SET UP SET UP SET UP Select SETUP when setting your TV up for all on the remote to previous menu. 40 LAMP TIME AUDIO THEATER TO QUIT EXIT Use THUMB STICK ̆ or ̄ to directly access the submenu of your choice. CHANNEL MEMORY 6. PICTURE FORMATS...
...MENU LANGUAGE 2. CLOCK SET 8. PLUG & PLAY 3. CHANNEL LIST 7. MENU LANGUAGE This feature will take you to select any one of your choice. CHANNEL LIST 7. LAMP TIME AUDIO THEATER ENGLISH FRANCAIS ESPA ÑOL MENU TO MENU BAR TO QUIT EXIT THUMB STICK SETUP CUSTOMIZE VIDEO 1. SIGNAL SOURCE...LIST 7. CHANNEL MEMORY 6. SET UP SET UP SET UP Select SETUP when setting your TV up for all on the remote to previous menu. 40 LAMP TIME AUDIO THEATER TO QUIT EXIT Use THUMB STICK ̆ or ̄ to directly access the submenu of your choice. CHANNEL MEMORY 6. PICTURE FORMATS...
Owners Guide
Page 41
.... (see page 43) 41 SET UP SET UP PLUG & PLAY This graphic guide function will be displayed, showing you to all three questions. MENU LANGUAGE 2. LAMP TIME AUDIO THEATER MENU TO MENU BAR TO QUIT EXIT THUMB STICK WELCOME TO YOUR PLUG & PLAY ON SCREEN SET UP GUIDE. AUTO CHANNEL SET...
.... (see page 43) 41 SET UP SET UP PLUG & PLAY This graphic guide function will be displayed, showing you to all three questions. MENU LANGUAGE 2. LAMP TIME AUDIO THEATER MENU TO MENU BAR TO QUIT EXIT THUMB STICK WELCOME TO YOUR PLUG & PLAY ON SCREEN SET UP GUIDE. AUTO CHANNEL SET...

Owners Guide
Page 42
... select the correct SIGNAL SOURCE mode. Refer to CATV2. 42 Select CATV if you are shown at the left. MENU LANGUAGE 2. LAMP TIME ANTENNA C ATV 1 C ATV 2 MENU TO MENU BAR TO QUIT EXIT THUMB STICK SETUP CUSTOMIZE VIDEO AUDIO THEATER 1. CHANNEL...outdoor antenna. PLUG & PLAY 3. PICTURE FORMATS 9. PICTURE FORMATS 9. PICTURE FORMATS 9. SETUP CUSTOMIZE VIDEO AUDIO THEATER 1. SIGNAL SOURCE 4. CHANNEL LIST 7. LAMP TIME ANTENNA CAT V 1 CAT V 2 MENU TO MENU BAR TO QUIT EXIT THUMB STICK SETUP CUSTOMIZE VIDEO AUDIO THEATER 1. SIGNAL SOURCE 4. CHANNEL MEMORY...
... select the correct SIGNAL SOURCE mode. Refer to CATV2. 42 Select CATV if you are shown at the left. MENU LANGUAGE 2. LAMP TIME ANTENNA C ATV 1 C ATV 2 MENU TO MENU BAR TO QUIT EXIT THUMB STICK SETUP CUSTOMIZE VIDEO AUDIO THEATER 1. CHANNEL...outdoor antenna. PLUG & PLAY 3. PICTURE FORMATS 9. PICTURE FORMATS 9. PICTURE FORMATS 9. SETUP CUSTOMIZE VIDEO AUDIO THEATER 1. SIGNAL SOURCE 4. CHANNEL LIST 7. LAMP TIME ANTENNA CAT V 1 CAT V 2 MENU TO MENU BAR TO QUIT EXIT THUMB STICK SETUP CUSTOMIZE VIDEO AUDIO THEATER 1. SIGNAL SOURCE 4. CHANNEL MEMORY...

Owners Guide
Page 43
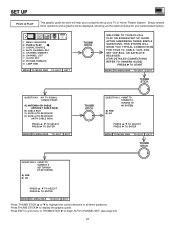
CHANNEL LIST 7. MENU LANGUAGE 2. CHANNEL MEMORY 6. PICTURE FORMATS 9. LAMP TIME BEGIN MENU TO MENU BAR TO QUIT EXIT THUMB STICK SELECT SETUP CUSTOMIZE VIDEO AUTO CHANNEL SET AUDIO THEATER I N S TA L L I N G CHANNEL 110 88% COMPLETE ... & PLAY 3. If two antenna are connected, switch antenna inputs with the INPUT button and repeat AUTO CHANNEL SET for the second antenna input. SIGNAL SOURCE 4. LAMP TIME BEGIN MENU TO MENU BAR TO QUIT EXIT THUMB STICK PRESS SELECT TO ACTIVATE/DEACTIVATE SETUP 1.
CHANNEL LIST 7. MENU LANGUAGE 2. CHANNEL MEMORY 6. PICTURE FORMATS 9. LAMP TIME BEGIN MENU TO MENU BAR TO QUIT EXIT THUMB STICK SELECT SETUP CUSTOMIZE VIDEO AUTO CHANNEL SET AUDIO THEATER I N S TA L L I N G CHANNEL 110 88% COMPLETE ... & PLAY 3. If two antenna are connected, switch antenna inputs with the INPUT button and repeat AUTO CHANNEL SET for the second antenna input. SIGNAL SOURCE 4. LAMP TIME BEGIN MENU TO MENU BAR TO QUIT EXIT THUMB STICK PRESS SELECT TO ACTIVATE/DEACTIVATE SETUP 1.

Owners Guide
Page 44
... SIGNAL SOURCE 4. Press EXIT to quit menu or THUMB STICK ̇ to return to change the channel. CHANNEL MEMORY 6. CHANNEL LIST 7. LAMP TIME CHANNEL 3 ADD ERASE NEXT CH CH ̆ CH ̄ OR # KEYS MENU TO MENU BAR TO QUIT EXIT THUMB STICK SETUP... AUDIO THEATER 1. MENU LANGUAGE 2. PICTURE FORMATS 9. SETUP CUSTOMIZE VIDEO AUDIO THEATER 1. CLOCK SET 8. CHANNEL LIST 7. CHANNEL MEMORY 6. SIGNAL SOURCE 4. LAMP TIME CHANNEL 3 ADD ERASE MENU TO MENU BAR TO QUIT EXIT THUMB STICK SETUP CUSTOMIZE VIDEO AUDIO THEATER 1. CLOCK SET 8. MENU LANGUAGE 2. PLUG ...
... SIGNAL SOURCE 4. Press EXIT to quit menu or THUMB STICK ̇ to return to change the channel. CHANNEL MEMORY 6. CHANNEL LIST 7. LAMP TIME CHANNEL 3 ADD ERASE NEXT CH CH ̆ CH ̄ OR # KEYS MENU TO MENU BAR TO QUIT EXIT THUMB STICK SETUP... AUDIO THEATER 1. MENU LANGUAGE 2. PICTURE FORMATS 9. SETUP CUSTOMIZE VIDEO AUDIO THEATER 1. CLOCK SET 8. CHANNEL LIST 7. CHANNEL MEMORY 6. SIGNAL SOURCE 4. LAMP TIME CHANNEL 3 ADD ERASE MENU TO MENU BAR TO QUIT EXIT THUMB STICK SETUP CUSTOMIZE VIDEO AUDIO THEATER 1. CLOCK SET 8. MENU LANGUAGE 2. PLUG ...

Owners Guide
Page 45
... SCAN LOCK 9 HBO ON -- 10 HGTV ON -- 11 FOX ON -- 12 BET ON -- 13 AMC ON -- 14 HSN ON ON 15 **** -- -- ĭ 16 FAM ON -- LAMP TIME AUDIO THEATER MENU TO MENU BAR TO QUIT EXIT THUMB STICK SETUP CUSTOMIZE VIDEO AUDIO THEATER CHANNEL LIST ANT A İ CH ID SCAN LOCK...
... SCAN LOCK 9 HBO ON -- 10 HGTV ON -- 11 FOX ON -- 12 BET ON -- 13 AMC ON -- 14 HSN ON ON 15 **** -- -- ĭ 16 FAM ON -- LAMP TIME AUDIO THEATER MENU TO MENU BAR TO QUIT EXIT THUMB STICK SETUP CUSTOMIZE VIDEO AUDIO THEATER CHANNEL LIST ANT A İ CH ID SCAN LOCK...

Owners Guide
Page 46
... 4 EVENT PROGRAM or TV TIME OUT. Press EXIT to quit menu or THUMB STICK ̇ to return to change position. AUTO CHANNEL SET 5. CHANNEL LIST 7. LAMP TIME MENU TO MENU BAR TO QUIT EXIT THUMB STICK SETUP İ TO SET TIME ĭ CLOCK SET - - - - CLOC K S E T 8. PICTURE FORMATS 9. SET UP SETUP CUSTOMIZE...
... 4 EVENT PROGRAM or TV TIME OUT. Press EXIT to quit menu or THUMB STICK ̇ to return to change position. AUTO CHANNEL SET 5. CHANNEL LIST 7. LAMP TIME MENU TO MENU BAR TO QUIT EXIT THUMB STICK SETUP İ TO SET TIME ĭ CLOCK SET - - - - CLOC K S E T 8. PICTURE FORMATS 9. SET UP SETUP CUSTOMIZE...

Owners Guide
Page 47
... image with side panels (blank areas) on your 16:9 screen. No side panels will be added, and the image is vertically unaltered. AUTO CHANNEL SET 5. LAMP TIME MENU TO MENU BAR TO QUIT EXIT THUMB STICK PRESS SELECT TO ACTIVATE/DEACTIVATE SETUP PICTURE FORMATS ANT A ASPECT STYLE NORMAL FULL FILL SMOOTH...
... image with side panels (blank areas) on your 16:9 screen. No side panels will be added, and the image is vertically unaltered. AUTO CHANNEL SET 5. LAMP TIME MENU TO MENU BAR TO QUIT EXIT THUMB STICK PRESS SELECT TO ACTIVATE/DEACTIVATE SETUP PICTURE FORMATS ANT A ASPECT STYLE NORMAL FULL FILL SMOOTH...

Owners Guide
Page 49
... TO ACTIVATE/DEACTIVATE SETUP LAMP TIME 15 H RESET ARE YOU SURE? PICTURE FORMATS 9. NOTE: the lamp should be replaced every 4,000 hours to keep track of time lamp operates. SET UP LAMP TIME The LAMP TIME counts the hours the lamp has operated. NOTE: LAMP TIME should be left ...TO MENU BAR TO QUIT EXIT Press SELECT to be reset when lamp is a spare lamp for Lamp Replacement procedure. CLOCK SET 8. See page 80-83 for replacement at the rear of operations, the lamp needs to reset LAMP TIME (after lamp replacement). AUTO CHANNEL SET 5. M EN U LAN GUAGE 2. ...
... TO ACTIVATE/DEACTIVATE SETUP LAMP TIME 15 H RESET ARE YOU SURE? PICTURE FORMATS 9. NOTE: the lamp should be replaced every 4,000 hours to keep track of time lamp operates. SET UP LAMP TIME The LAMP TIME counts the hours the lamp has operated. NOTE: LAMP TIME should be left ...TO MENU BAR TO QUIT EXIT Press SELECT to be reset when lamp is a spare lamp for Lamp Replacement procedure. CLOCK SET 8. See page 80-83 for replacement at the rear of operations, the lamp needs to reset LAMP TIME (after lamp replacement). AUTO CHANNEL SET 5. M EN U LAN GUAGE 2. ...

Owners Guide
Page 80
... contact your authorized service center. (see page 8) NOTES: ¥ Contact your Hitachi dealer for at least 30-45 minutes for approximately 30 to replace the lamp with the new lamp. TYPE NAME: DLPTM LAMP ASSEMBLY PART NUMBER: DP00341 ¥ When replacing the lamp, let it may explode if improperly handled. Do not touch the receptacle...
... contact your authorized service center. (see page 8) NOTES: ¥ Contact your Hitachi dealer for at least 30-45 minutes for approximately 30 to replace the lamp with the new lamp. TYPE NAME: DLPTM LAMP ASSEMBLY PART NUMBER: DP00341 ¥ When replacing the lamp, let it may explode if improperly handled. Do not touch the receptacle...

Owners Guide
Page 81
...✰✢ ✬ 54321 10 9 8 7 6 15 14 13 12 11 ANTA ✴✯ CONVERTER ✡✮✴✢ Lamp Cover Two Clips Retaining Screw Spare Lamp Retaining Screw 81 Release the two clips on the front panel and unplug the power cord from the wall outlet. Loosen the... screw that secures the lamp cover with a Phillips Head Screw Driver. LAMP TEMP POWER POWER PUSH DLP A TEXAS INSTRUMENTS TECHNOLOGY PUSH 120V CAUTION: THE LAMP IS VERY HOT AND MAY CAUSE FIRE OR SEVERE BURNS. Turn off ...
...✰✢ ✬ 54321 10 9 8 7 6 15 14 13 12 11 ANTA ✴✯ CONVERTER ✡✮✴✢ Lamp Cover Two Clips Retaining Screw Spare Lamp Retaining Screw 81 Release the two clips on the front panel and unplug the power cord from the wall outlet. Loosen the... screw that secures the lamp cover with a Phillips Head Screw Driver. LAMP TEMP POWER POWER PUSH DLP A TEXAS INSTRUMENTS TECHNOLOGY PUSH 120V CAUTION: THE LAMP IS VERY HOT AND MAY CAUSE FIRE OR SEVERE BURNS. Turn off ...

Owners Guide
Page 82
... OUT L R PC AUDIO INPUT 1 54321 10 9 8 7 6 15 14 13 12 11 PC RGB INPUT 1 ANT A TO CONVERTER ANT B Handle Lamp Unit 82 REAR SPEAKER 8Ω ONLY STOP CONNECT ONLY 8 OHM SPEAKERS DO NOT SHORT CIRCUIT THESE TERMINALS (Such damage is NOT COVERED by your television...;✢ ✲ ✣✲ ✬ 54321 10 9 8 7 6 15 14 13 12 11 ANTA ✡✮✴✢ Lamp Unit Retaining Screws CAUTION: THE LAMP IS VERY HOT AND MAY CAUSE FIRE OR SEVERE BURNS. If these screws are loosened completely. L R + - DEMAN MOI! Remove the...
... OUT L R PC AUDIO INPUT 1 54321 10 9 8 7 6 15 14 13 12 11 PC RGB INPUT 1 ANT A TO CONVERTER ANT B Handle Lamp Unit 82 REAR SPEAKER 8Ω ONLY STOP CONNECT ONLY 8 OHM SPEAKERS DO NOT SHORT CIRCUIT THESE TERMINALS (Such damage is NOT COVERED by your television...;✢ ✲ ✣✲ ✬ 54321 10 9 8 7 6 15 14 13 12 11 ANTA ✡✮✴✢ Lamp Unit Retaining Screws CAUTION: THE LAMP IS VERY HOT AND MAY CAUSE FIRE OR SEVERE BURNS. If these screws are loosened completely. L R + - DEMAN MOI! Remove the...

Owners Guide
Page 83
... 10 9 8 7 6 15 14 13 12 11 PC RGB INPUT 1 ANTA TO CONVERTER ANT B Retaining Screws Lamp Unit Retaining Screws 7. Remove the two screws securing the spare lamp unit. Remove the spare lamp unit. If they are loose, the TV may cause unusual colors. ✬ ☞✍ ✬ ✲... t forget to its original position. ¥ Tighten the scres firmly on the lamp unit. The old lamp must be disposed of properly. For assistance, please call 1-800-HITACHI. 83 Be sure to install the lamp cover securely and tighten the screw before turning the power on the main power switch...
... 10 9 8 7 6 15 14 13 12 11 PC RGB INPUT 1 ANTA TO CONVERTER ANT B Retaining Screws Lamp Unit Retaining Screws 7. Remove the two screws securing the spare lamp unit. Remove the spare lamp unit. If they are loose, the TV may cause unusual colors. ✬ ☞✍ ✬ ✲... t forget to its original position. ¥ Tighten the scres firmly on the lamp unit. The old lamp must be disposed of properly. For assistance, please call 1-800-HITACHI. 83 Be sure to install the lamp cover securely and tighten the screw before turning the power on the main power switch...
Owners Guide
Page 88
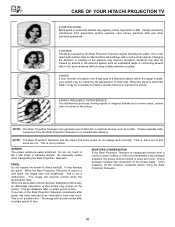
One is the direct path and the other is reflected from automobile ignition systems, neon lamps, electrical drills and other objects. NOTE: The Rear Projection Television can generate sound distortion in some other electrical appliances. ¥ GHOSTS: Ghosts are caused by... antenna couplers. ¥ SNOW: If your receiver is located in a cold place, the image may be caused by defects in the picture. CARE OF YOUR HITACHI PROJECTION TV ¥ IGNITION NOISE: Black spots or horizontal streaks may appear, picture may improve reception. SCREEN The screen surface is used in the fringe...
One is the direct path and the other is reflected from automobile ignition systems, neon lamps, electrical drills and other objects. NOTE: The Rear Projection Television can generate sound distortion in some other electrical appliances. ¥ GHOSTS: Ghosts are caused by... antenna couplers. ¥ SNOW: If your receiver is located in a cold place, the image may be caused by defects in the picture. CARE OF YOUR HITACHI PROJECTION TV ¥ IGNITION NOISE: Black spots or horizontal streaks may appear, picture may improve reception. SCREEN The screen surface is used in the fringe...


