
Operation Guide
Page 2
.... CAUTION: Never remove the back cover of benefit to you obtain from it to constitute a risk of these products properly, this color television. Follow all warnings and instructions marked on this section illustrates safety tips which will display television closed captioning, ( or ), in your authorized dealer or service center. 2 The lightning flash with paragraph 15.119 of HITACHI televisions. INSERT THE POWER CORD INTO A 120...
.... CAUTION: Never remove the back cover of benefit to you obtain from it to constitute a risk of these products properly, this color television. Follow all warnings and instructions marked on this section illustrates safety tips which will display television closed captioning, ( or ), in your authorized dealer or service center. 2 The lightning flash with paragraph 15.119 of HITACHI televisions. INSERT THE POWER CORD INTO A 120...
Operation Guide
Page 3
... overhead power lines or other fixed (nonmoving) patterns can mark or damage floor surfaces (especially wood flooring) if moved improperly. Refer all instructions. 5. An outdoor antenna should not be sure the antenna system is connected to the receiver be located in any objects on this apparatus during lightning storms or when unused for wall, shelf or ceiling mounting as power-supply cord...
... overhead power lines or other fixed (nonmoving) patterns can mark or damage floor surfaces (especially wood flooring) if moved improperly. Refer all instructions. 5. An outdoor antenna should not be sure the antenna system is connected to the receiver be located in any objects on this apparatus during lightning storms or when unused for wall, shelf or ceiling mounting as power-supply cord...

Operation Guide
Page 10
... INPUT:2. The DVI-HDTV input is NOT compatible when used for your external devices with your external components (VCR, Cable box, DVD player, etc.). Your component outputs may use composite video signal for DVI-HDTV input. 2. In this DVI-HDTV Input for composite video and component video input. ቩ IR Blaster This jack provides IR output to your television's remote control (see page 18). ቪ DVI-HDTV Input (Input 1) Use this case, connect the components B-Y output to the TV's PB input and the components R-Y output to obtain optimum picture...
... INPUT:2. The DVI-HDTV input is NOT compatible when used for your external devices with your external components (VCR, Cable box, DVD player, etc.). Your component outputs may use composite video signal for DVI-HDTV input. 2. In this DVI-HDTV Input for composite video and component video input. ቩ IR Blaster This jack provides IR output to your television's remote control (see page 18). ቪ DVI-HDTV Input (Input 1) Use this case, connect the components B-Y output to the TV's PB input and the components R-Y output to obtain optimum picture...

Operation Guide
Page 12
... may use composite video signal for additional information on line input-output connections. It may be necessary to adjust TINT to the operating guide of the standard video connection if your other electronic equipment for Input 2~Input 5. Your component outputs may use VIDEO or S-VIDEO inputs to connect to the TV's PR input. Connect only 1 component (VCR, DVD player, camcorder, etc.) to the TV's PR input. Your component outputs may be labeled Y-CBCR. In this feature. TIPS ON REAR PANEL CONNECTIONS S-VIDEO connections...
... may use composite video signal for additional information on line input-output connections. It may be necessary to adjust TINT to the operating guide of the standard video connection if your other electronic equipment for Input 2~Input 5. Your component outputs may use VIDEO or S-VIDEO inputs to connect to the TV's PR input. Connect only 1 component (VCR, DVD player, camcorder, etc.) to the TV's PR input. Your component outputs may be labeled Y-CBCR. In this feature. TIPS ON REAR PANEL CONNECTIONS S-VIDEO connections...
Operation Guide
Page 13
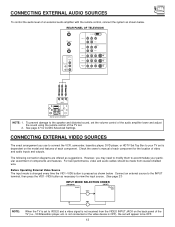
... speaker and distorted sound, set the volume control of the audio amplifier lower and adjust the sound using the remote control of the TV set will appear to view the input source. (See page 27) INPUT MODE SELECTION ORDER (ANTENNA) (INPUT) Ant A VID1 YPBPR:1 VID1 ANT NOTE: When the TV is set is not received from coaxial shielded wire. Before Operating External Video Source The input mode is changed every time the VID1~VID5 button is OFF), the set . 2. CONNECTING EXTERNAL AUDIO SOURCES To control...
... speaker and distorted sound, set the volume control of the audio amplifier lower and adjust the sound using the remote control of the TV set will appear to view the input source. (See page 27) INPUT MODE SELECTION ORDER (ANTENNA) (INPUT) Ant A VID1 YPBPR:1 VID1 ANT NOTE: When the TV is set is not received from coaxial shielded wire. Before Operating External Video Source The input mode is changed every time the VID1~VID5 button is OFF), the set . 2. CONNECTING EXTERNAL AUDIO SOURCES To control...

Operation Guide
Page 15
... the INPUT (VIDEO) jack, as shown on line input-output connections. 15 Press the ANT button to return to rear panel jacks. A single VCR can be abnormal if the connection is played back will be used for more information on the TV set below. 2. ANT A TO CONVERTER ANT B AUDIO TO HI-FI CENTER IN IR BLASTER L R INPUT 1 INPUT 2 INPUT 3 DVI-HDTV PR PB Y R (MONO)/L AUDIO PR PB Y/VIDEO R (MONO)/L AUDIO R (MONO)/L VIDEO INPUT 4 R (MONO)/L VIDEO MONITOR OUT R L AUDIO VIDEO S-VIDEO S-VIDEO S-VIDEO OUTPUT...
... the INPUT (VIDEO) jack, as shown on line input-output connections. 15 Press the ANT button to return to rear panel jacks. A single VCR can be abnormal if the connection is played back will be used for more information on the TV set below. 2. ANT A TO CONVERTER ANT B AUDIO TO HI-FI CENTER IN IR BLASTER L R INPUT 1 INPUT 2 INPUT 3 DVI-HDTV PR PB Y R (MONO)/L AUDIO PR PB Y/VIDEO R (MONO)/L AUDIO R (MONO)/L VIDEO INPUT 4 R (MONO)/L VIDEO MONITOR OUT R L AUDIO VIDEO S-VIDEO S-VIDEO S-VIDEO OUTPUT...

Operation Guide
Page 16
... previous channel. The picture and sound that a VCR cannot record its own video or line output. (INPUT: 1 in example on line input-output connections. 16 Connect the cable from the AUDIO OUT R of the VCR or the laserdisc player to the INPUT (AUDIO/L) jack. 4. Connect the cable from the S-VIDEO OUT of the VCR or the laserdisc player to rear panel jacks. Completely insert the connection cord plugs when connecting to the INPUT (AUDIO/R) jack. 3. ANT A TO CONVERTER ANT B AUDIO...
... previous channel. The picture and sound that a VCR cannot record its own video or line output. (INPUT: 1 in example on line input-output connections. 16 Connect the cable from the AUDIO OUT R of the VCR or the laserdisc player to the INPUT (AUDIO/L) jack. 4. Connect the cable from the S-VIDEO OUT of the VCR or the laserdisc player to rear panel jacks. Completely insert the connection cord plugs when connecting to the INPUT (AUDIO/R) jack. 3. ANT A TO CONVERTER ANT B AUDIO...
Operation Guide
Page 17
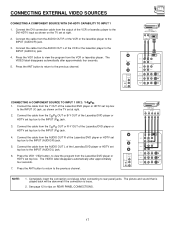
... L R DIGITAL OUTPUT CAPABILITY LR OUTPUT DIGITAL OUTPUT INPUT 1 INPUT 2 DVI-HDTV PR PB Y R (MONO)/L AUDIO PR PB Y/VIDEO R (MONO)/L AUDIO INPUT 3 R (MONO)/L VIDEO INPUT 4 R (MONO)/L VIDEO MONITOR OUT R L AUDIO VIDEO S-VIDEO S-VIDEO S-VIDEO CONNECTING A COMPONENT SOURCE TO INPUT 1 OR 2: Y-PBPR. 1. Press the VID1~VID2 button, to view the program from the VCR or laserdisc player. See page 12 for tips on the TV set at right. 2. Press the VID1 button to the INPUT (AUDIO/L) jack. 6. Press the ANT button to return to the previous channel. Connect...
... L R DIGITAL OUTPUT CAPABILITY LR OUTPUT DIGITAL OUTPUT INPUT 1 INPUT 2 DVI-HDTV PR PB Y R (MONO)/L AUDIO PR PB Y/VIDEO R (MONO)/L AUDIO INPUT 3 R (MONO)/L VIDEO INPUT 4 R (MONO)/L VIDEO MONITOR OUT R L AUDIO VIDEO S-VIDEO S-VIDEO S-VIDEO CONNECTING A COMPONENT SOURCE TO INPUT 1 OR 2: Y-PBPR. 1. Press the VID1~VID2 button, to view the program from the VCR or laserdisc player. See page 12 for tips on the TV set at right. 2. Press the VID1 button to the INPUT (AUDIO/L) jack. 6. Press the ANT button to return to the previous channel. Connect...
Operation Guide
Page 19
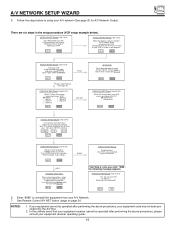
... NET Wizard Congratulations! HELP DONE HELP TROUBLE SHOOTING Please check connections shown in Hitachi's Easy Graphic Guide to proceed? See Remote Control A/V NET button usage on INPUT 1. If connections are six steps in the diagrams. BACK NEXT HITACHI AV NET Wizard (step 3 of 6) Turn ON your VCR? (b) ANT A ( ) INPUT 3 ( ) ANT B ( ) INPUT 4 ( ) INPUT 1 ( ) INPUT 5 ( ) INPUT 2 BACK NEXT If Error ANT A/B ATTENTION The 4-digit code did not match AV Net's library. BACK YES 6. NOTES...
... NET Wizard Congratulations! HELP DONE HELP TROUBLE SHOOTING Please check connections shown in Hitachi's Easy Graphic Guide to proceed? See Remote Control A/V NET button usage on INPUT 1. If connections are six steps in the diagrams. BACK NEXT HITACHI AV NET Wizard (step 3 of 6) Turn ON your VCR? (b) ANT A ( ) INPUT 3 ( ) ANT B ( ) INPUT 4 ( ) INPUT 1 ( ) INPUT 5 ( ) INPUT 2 BACK NEXT If Error ANT A/B ATTENTION The 4-digit code did not match AV Net's library. BACK YES 6. NOTES...

Operation Guide
Page 21
... the remote will now control your cable box. (See page 32 for instructions on the remote to light if the room is too bright. ቤ REC CLU-5722TSI 21 The DVD button will blink, indicating that the remote will stay on for instructions on how to program the remote to control your set-top-box.) To operate your DVD player, point the remote at the remote sensor of the set -top-box, satellite receiver, DVD players, and other Audio/Video equipment...
... the remote will now control your cable box. (See page 32 for instructions on the remote to light if the room is too bright. ቤ REC CLU-5722TSI 21 The DVD button will blink, indicating that the remote will stay on for instructions on how to program the remote to control your set-top-box.) To operate your DVD player, point the remote at the remote sensor of the set -top-box, satellite receiver, DVD players, and other Audio/Video equipment...

Operation Guide
Page 23
... the timer is set, it will reset to the original condition. ቫ INFO button Press this button to select channels, lock access code, etc. IN: 3 When an S-VIDEO Input is connected to check the channel being received, the picture source, if the channel has stereo (ST) or second audio program (SAP), the time, CHANNEL ID and if the SLEEP timer is set , use STATUS when you are used to display the sleep timer in the correct ANTENNA/CABLE mode. (see...
... the timer is set, it will reset to the original condition. ቫ INFO button Press this button to select channels, lock access code, etc. IN: 3 When an S-VIDEO Input is connected to check the channel being received, the picture source, if the channel has stereo (ST) or second audio program (SAP), the time, CHANNEL ID and if the SLEEP timer is set , use STATUS when you are used to display the sleep timer in the correct ANTENNA/CABLE mode. (see...

Operation Guide
Page 28
... the remote. ANT A TO CONVERTER ANT B AUDIO TO HI-FI CENTER IN IR BLASTER L R INPUT 1 INPUT 2 DVI-HDTV PR PB Y R (MONO)/L AUDIO PR PB Y/VIDEO R (MONO)/L AUDIO INPUT 3 R (MONO)/L VIDEO INPUT 4 R (MONO)/L VIDEO MONITOR OUT R L VIDEO AUDIO S-VIDEO S-VIDEO S-VIDEO MENU EXIT VOL SELECT CH ቤ ቢ ቤ SVCS VID 1 MUTE VCR PLUS+ LAST CH GUIDE/TV SCHD VID 5 VID 2 PIP VID 3 PIP CH VID 4 FREEZE PIP MODE PIP ACCESS SWAP VIDEO ብ,ቦ ባ REC Audio Video OUTPUT CLU-5722TSI VCR Use above connection to view antenna inputs...
... the remote. ANT A TO CONVERTER ANT B AUDIO TO HI-FI CENTER IN IR BLASTER L R INPUT 1 INPUT 2 DVI-HDTV PR PB Y R (MONO)/L AUDIO PR PB Y/VIDEO R (MONO)/L AUDIO INPUT 3 R (MONO)/L VIDEO INPUT 4 R (MONO)/L VIDEO MONITOR OUT R L VIDEO AUDIO S-VIDEO S-VIDEO S-VIDEO MENU EXIT VOL SELECT CH ቤ ቢ ቤ SVCS VID 1 MUTE VCR PLUS+ LAST CH GUIDE/TV SCHD VID 5 VID 2 PIP VID 3 PIP CH VID 4 FREEZE PIP MODE PIP ACCESS SWAP VIDEO ብ,ቦ ባ REC Audio Video OUTPUT CLU-5722TSI VCR Use above connection to view antenna inputs...
Operation Guide
Page 32
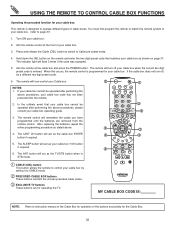
... cable codes. ቤ EXCLUSIVE TV buttons These buttons are removed from the remote control. If the cable box does not turn off , try a different two digit preset code. 6. Hold down the CBL button on the remote and enter the two digit preset code that your cable box cannot be operated after performing the above procedures, your cable box by setting it to Cable pre-coded mode. 4. Aim the remote at the front of cable boxes. The remote will flash 3 times if the code...
... cable codes. ቤ EXCLUSIVE TV buttons These buttons are removed from the remote control. If the cable box does not turn off , try a different two digit preset code. 6. Hold down the CBL button on the remote and enter the two digit preset code that your cable box cannot be operated after performing the above procedures, your cable box by setting it to Cable pre-coded mode. 4. Aim the remote at the front of cable boxes. The remote will flash 3 times if the code...
Operation Guide
Page 33
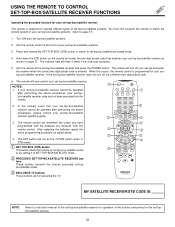
... buttons are removed from the remote control. The indicator light will flash 3 times if the code was accepted. 5. In the unlikely event that matches your set -top-box/satellite pre-coded mode. 4. After replacing the batteries repeat the entire programming procedure as the TV/STB button when in STB mode. ቢ SET-TOP-BOX (STB) button This button allows the remote to control your satellite receiver by setting it to instruction manual of the set-top-box/satellite receiver for operation...
... buttons are removed from the remote control. The indicator light will flash 3 times if the code was accepted. 5. In the unlikely event that matches your set -top-box/satellite pre-coded mode. 4. After replacing the batteries repeat the entire programming procedure as the TV/STB button when in STB mode. ቢ SET-TOP-BOX (STB) button This button allows the remote to control your satellite receiver by setting it to instruction manual of the set-top-box/satellite receiver for operation...

Operation Guide
Page 39
..., Scan, and Lock settings in antenna B. Set specific time to display dialogue/text. It must be set before using Lock feature. Label Video Inputs , VCR, DVD, etc. Turn TV on a parental guide ratings. Adjust brightness. Set the TV clock. Centering top and bottom of movies and television programming based on the Canadian French ratings system. Adjust the balance. Information display for DTV program. Adjust color. Choose to make white. OSD Video Audio Channel Manager Locks Setup Picture Mode Contrast Brightness Color Tint Sharpness Vertical Position Magic Focus Color System...
..., Scan, and Lock settings in antenna B. Set specific time to display dialogue/text. It must be set before using Lock feature. Label Video Inputs , VCR, DVD, etc. Turn TV on a parental guide ratings. Adjust brightness. Set the TV clock. Centering top and bottom of movies and television programming based on the Canadian French ratings system. Adjust the balance. Information display for DTV program. Adjust color. Choose to make white. OSD Video Audio Channel Manager Locks Setup Picture Mode Contrast Brightness Color Tint Sharpness Vertical Position Magic Focus Color System...
Operation Guide
Page 43
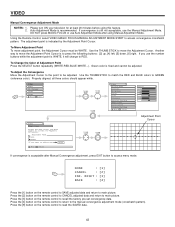
... picture. To Change the Color of Adjustment Point Press the SELECT button repeatedly (WHITE-RED-BLUE-WHITE...). Use the THUMB STICK to match the RED and BLUE colors to access convergence crosshatch pattern. Adjustment Mode Auto Manual If you use the number buttons while the adjustment point is fixed and cannot be WHITE. Please turn ON your television for Magnetic Influences. Video Audio Ch. Press the [2] button on the remote control to RED. Press the [9] button on the remote control to return to move adjustment point, the Adjustment...
... picture. To Change the Color of Adjustment Point Press the SELECT button repeatedly (WHITE-RED-BLUE-WHITE...). Use the THUMB STICK to match the RED and BLUE colors to access convergence crosshatch pattern. Adjustment Mode Auto Manual If you use the number buttons while the adjustment point is fixed and cannot be WHITE. Please turn ON your television for Magnetic Influences. Video Audio Ch. Press the [2] button on the remote control to RED. Press the [9] button on the remote control to return to move adjustment point, the Adjustment...

Operation Guide
Page 44
... are currently viewing. SDTV/DVD - Dimmer Turn ON the Dimmer to access an ADVANCED SETTINGS feature. Press down on /off when watching 4:3 signals in dark scenes. Auto Color The AUTO COLOR function automatically monitors and adjusts the color to quit menu. Black Side Panel The BLACK SIDE PANEL function turns the gray side bars on THUMB STICK to reduce picture contrast and brightness automatically when viewing in SPLIT MODE PIP and SPLIT FREEZE. Black Level Expansion...
... are currently viewing. SDTV/DVD - Dimmer Turn ON the Dimmer to access an ADVANCED SETTINGS feature. Press down on /off when watching 4:3 signals in dark scenes. Auto Color The AUTO COLOR function automatically monitors and adjusts the color to quit menu. Black Side Panel The BLACK SIDE PANEL function turns the gray side bars on THUMB STICK to reduce picture contrast and brightness automatically when viewing in SPLIT MODE PIP and SPLIT FREEZE. Black Level Expansion...

Operation Guide
Page 50
... mode will be set (see page 48), when a channel is locked, it is set individually. Use the number buttons to quit the menu. Enter a new four digit key number you forget your key number. When SET INPUT LOCK is selected, various types of movies and television programs based on both antenna inputs. 2. When ENGAGE LOCK is a four digit secret code number. Manager Locks Setup Move SEL Sel THUMB STICK SELECT Please Enter Access Code [ - - - - ] [# Keys] Enter Code Locks Change Access Code Engage Lock TV Time Lock...
... mode will be set (see page 48), when a channel is locked, it is set individually. Use the number buttons to quit the menu. Enter a new four digit key number you forget your key number. When SET INPUT LOCK is selected, various types of movies and television programs based on both antenna inputs. 2. When ENGAGE LOCK is a four digit secret code number. Manager Locks Setup Move SEL Sel THUMB STICK SELECT Please Enter Access Code [ - - - - ] [# Keys] Enter Code Locks Change Access Code Engage Lock TV Time Lock...

Operation Guide
Page 60
... EXIT to change AUTO LINK setting. When REMOTE CONTROL SENSOR is selected, the TV will turn on and switch to Video2 automatically when the Video2 input device is turned on and the VCR, laserdisc, or DVD play button. 3. When AUTO INPUT SIGNAL SENSOR is selected, the TV will turn on your video input device play button. To do this function. When using the AUTO LINK feature, it detects a video signal to input 2. Setup Set The Inputs Video1 Rename...
... EXIT to change AUTO LINK setting. When REMOTE CONTROL SENSOR is selected, the TV will turn on and switch to Video2 automatically when the Video2 input device is turned on and the VCR, laserdisc, or DVD play button. 3. When AUTO INPUT SIGNAL SENSOR is selected, the TV will turn on your video input device play button. To do this function. When using the AUTO LINK feature, it detects a video signal to input 2. Setup Set The Inputs Video1 Rename...

Operation Guide
Page 66
... to improvements, specifications in Picture • Magic Focus (Auto Digital Convergence and Manual Adjustment) • Dual Antenna Inputs • Video Input Sensor • 3 Dimensional Y/C Comb Filter • Full 1080i HDTV capable when used with a Set-Top Box. • High bandwidth Digital Content Protection V1.0 compatible. • Technology. • Mach3Bass Technology. • Technology. *SRS and the symbol are registered trademarks of the T.V. • Antenna input impedance 75 Ohm • Channel coverage 181ch...
... to improvements, specifications in Picture • Magic Focus (Auto Digital Convergence and Manual Adjustment) • Dual Antenna Inputs • Video Input Sensor • 3 Dimensional Y/C Comb Filter • Full 1080i HDTV capable when used with a Set-Top Box. • High bandwidth Digital Content Protection V1.0 compatible. • Technology. • Mach3Bass Technology. • Technology. *SRS and the symbol are registered trademarks of the T.V. • Antenna input impedance 75 Ohm • Channel coverage 181ch...


