
Owners Guide
Page 1
PROJECTION MONITOR Operating Guide for 51M200, 65M200, 51M200A IMPORTANT SAFETY INSTRUCTIONS 2-3 FIRST TIME USE ...4-19 THE REMOTE CONTROL 20-30 ON-SCREEN DISPLAY...31-52 CARE OF YOUR ASPECT PROJECTION MONITOR AND REMOTE CONTROL 53 USEFUL INFORMATION ...54-57 INDEX ...58
PROJECTION MONITOR Operating Guide for 51M200, 65M200, 51M200A IMPORTANT SAFETY INSTRUCTIONS 2-3 FIRST TIME USE ...4-19 THE REMOTE CONTROL 20-30 ON-SCREEN DISPLAY...31-52 CARE OF YOUR ASPECT PROJECTION MONITOR AND REMOTE CONTROL 53 USEFUL INFORMATION ...54-57 INDEX ...58

Owners Guide
Page 4
... is either CLU-4330UG (Part No. HL02251). 2. Two "AA" size, 1.5V batteries (For Remote Control Unit). Replace with your fingers and pulling the cover off. 2. Remote Control Unit is incorrectly replaced. CAUTION: Danger of the packing material. Open the battery cover of the...9 ANT 0 INFO VID1 REC VID2 VID5 VID3 SIZE VID4 SLEEP CLU-433OUG 1. 2. 1. When replacing old batteries, push them towards the springs and lift them out. 3. REMOTE CONTROL POWER TV CBL/SAT DVD/VCR SWAP PIP MODE PIP FREEZE C.C. Match the batteries to remove back cover. Replace the cover.
... is either CLU-4330UG (Part No. HL02251). 2. Two "AA" size, 1.5V batteries (For Remote Control Unit). Replace with your fingers and pulling the cover off. 2. Remote Control Unit is incorrectly replaced. CAUTION: Danger of the packing material. Open the battery cover of the...9 ANT 0 INFO VID1 REC VID2 VID5 VID3 SIZE VID4 SLEEP CLU-433OUG 1. 2. 1. When replacing old batteries, push them towards the springs and lift them out. 3. REMOTE CONTROL POWER TV CBL/SAT DVD/VCR SWAP PIP MODE PIP FREEZE C.C. Match the batteries to remove back cover. Replace the cover.
Owners Guide
Page 7
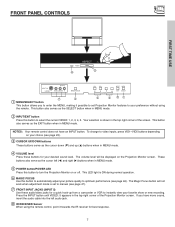
...(see page 22). ቤ CURSOR UP/DOWN buttons These buttons serve as the cursor left audio jack. ቩ IR RECEIVER Sensor When using the remote. These buttons also serve as the cursor down (̄) and up from a camcorder or VCR to automatically adjust your preference without using the... remote control, point it possible to set to optimum performance (see page 47). ቨ FRONT INPUT JACKS (INPUT 5) Use these buttons for your favorite show...
...(see page 22). ቤ CURSOR UP/DOWN buttons These buttons serve as the cursor left audio jack. ቩ IR RECEIVER Sensor When using the remote. These buttons also serve as the cursor down (̄) and up from a camcorder or VCR to automatically adjust your preference without using the... remote control, point it possible to set to optimum performance (see page 47). ቨ FRONT INPUT JACKS (INPUT 5) Use these buttons for your favorite show...

Owners Guide
Page 13
... to the speaker and distorted sound, set the volume control of the audio amplifier lower and adjust the sound using the remote control of an external audio amplifier with the remote control, connect the system as shown below. FIRST TIME USE CONNECTING EXTERNAL AUDIO DEVICES To control the audio level of the...
... to the speaker and distorted sound, set the volume control of the audio amplifier lower and adjust the sound using the remote control of an external audio amplifier with the remote control, connect the system as shown below. FIRST TIME USE CONNECTING EXTERNAL AUDIO DEVICES To control the audio level of the...
Owners Guide
Page 20
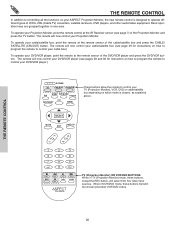
..., DVD players, and other audio/video equipment. To operate your DVD/VCR player, point the remote at the remote sensor of the cable/satellite box and press the CABLE/ SATELLITE (CBL/SAT) button. The remote will now control your TV (Projection Monitor), VCR, DVD or cable/satellite box depending on which...control your DVD/VCR player (see pages 28 and 30 for instruction on how to program the remote to control your cable box.) To operate your Projection Monitor, point the remote control at the remote sensor of the DVD/VCR player and press the DVD/VCR button. DAY/NIGHT MENU These ...
..., DVD players, and other audio/video equipment. To operate your DVD/VCR player, point the remote at the remote sensor of the cable/satellite box and press the CABLE/ SATELLITE (CBL/SAT) button. The remote will now control your TV (Projection Monitor), VCR, DVD or cable/satellite box depending on which...control your DVD/VCR player (see pages 28 and 30 for instruction on how to program the remote to control your cable box.) To operate your Projection Monitor, point the remote control at the remote sensor of the DVD/VCR player and press the DVD/VCR button. DAY/NIGHT MENU These ...
Owners Guide
Page 21
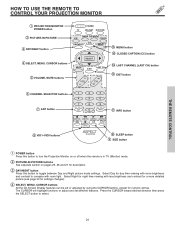
...-433OUG ቫ SLEEP button ቪ SIZE button ᕃ POWER button Press this button to turn the Projection Monitor on or off when the remote is in TV (Monitor) mode. ባ PICTURE-IN-PICTURE buttons See separate section on pages 25, 26 and 27 for night time viewing ...room light. Press the CURSOR toward desired direction then press the SELECT button to toggle between Day and Night picture mode settings. THE REMOTE CONTROL HOW TO USE THE REMOTE TO CONTROL YOUR PROJECTION MONITOR ቢ PROJECTION MONITOR POWER button ባ PICTURE-IN-PICTURE ቤ DAY/NIGHT button ብ SELECT...
...-433OUG ቫ SLEEP button ቪ SIZE button ᕃ POWER button Press this button to turn the Projection Monitor on or off when the remote is in TV (Monitor) mode. ባ PICTURE-IN-PICTURE buttons See separate section on pages 25, 26 and 27 for night time viewing ...room light. Press the CURSOR toward desired direction then press the SELECT button to toggle between Day and Night picture mode settings. THE REMOTE CONTROL HOW TO USE THE REMOTE TO CONTROL YOUR PROJECTION MONITOR ቢ PROJECTION MONITOR POWER button ባ PICTURE-IN-PICTURE ቤ DAY/NIGHT button ብ SELECT...
Owners Guide
Page 22
...Press the MUTE button again to one half the normal volume (SOFT MUTE), press the MUTE button. CHANNEL selector buttons are only applicable when the remote control is in CBL/SAT mode. Channel selection may also be performed by pressing CH up (̆) or down (̄). ቨ ANTENNA button... ቦ VOLUME, MUTE button Press the VOLUME up (̆) or down (̄) button until two dashes appear next to select channels. When the remote control is in DVD/VCR mode, these buttons to select channels, lock access code, etc. For channels 100 and above, press the "1" button, ...
...Press the MUTE button again to one half the normal volume (SOFT MUTE), press the MUTE button. CHANNEL selector buttons are only applicable when the remote control is in CBL/SAT mode. Channel selection may also be performed by pressing CH up (̆) or down (̄). ቨ ANTENNA button... ቦ VOLUME, MUTE button Press the VOLUME up (̆) or down (̄) button until two dashes appear next to select channels. When the remote control is in DVD/VCR mode, these buttons to select channels, lock access code, etc. For channels 100 and above, press the "1" button, ...

Owners Guide
Page 23
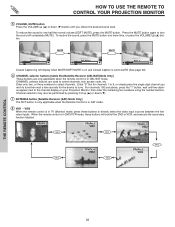
HOW TO USE THE REMOTE TO CONTROL YOUR PROJECTION MONITOR ቪ SIZE button Press this button to prevent uneven aging of the phosphors. Side panels (gray areas) are placed to ... to zoom 16:9 images. (1) 480i/NTSC 4:3 INPUT 4:3 STANDARD 4:3 EXPANDED 4:3 ZOOM1 16:9 ZOOM (2) 480p INPUT with Video ID: Letter 4:3 INPUT 4:3 STANDARD 16:9 STANDARD 4:3 EXPANDED 4:3 ZOOM2 THE REMOTE CONTROL (3) 720p/1080i INPUT 4:3 ZOOM2 4:3 ZOOM1 16:9 INPUT 16:9 STANDARD 16:9 ZOOM NOTE: All five video inputs have independent Picture Format ratio settings. 23 Depending...
HOW TO USE THE REMOTE TO CONTROL YOUR PROJECTION MONITOR ቪ SIZE button Press this button to prevent uneven aging of the phosphors. Side panels (gray areas) are placed to ... to zoom 16:9 images. (1) 480i/NTSC 4:3 INPUT 4:3 STANDARD 4:3 EXPANDED 4:3 ZOOM1 16:9 ZOOM (2) 480p INPUT with Video ID: Letter 4:3 INPUT 4:3 STANDARD 16:9 STANDARD 4:3 EXPANDED 4:3 ZOOM2 THE REMOTE CONTROL (3) 720p/1080i INPUT 4:3 ZOOM2 4:3 ZOOM1 16:9 INPUT 16:9 STANDARD 16:9 ZOOM NOTE: All five video inputs have independent Picture Format ratio settings. 23 Depending...
Owners Guide
Page 24
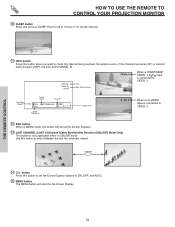
... is connected to VIDEO: 3. ቮ EXIT button When in 15 minute intervals. Use this button will start the On-Screen Display. HOW TO USE THE REMOTE TO CONTROL YOUR PROJECTION MONITOR ቫ SLEEP button Show and set the Closed Caption options to VIDEO: 1. THE...
... is connected to VIDEO: 3. ቮ EXIT button When in 15 minute intervals. Use this button will start the On-Screen Display. HOW TO USE THE REMOTE TO CONTROL YOUR PROJECTION MONITOR ቫ SLEEP button Show and set the Closed Caption options to VIDEO: 1. THE...
Owners Guide
Page 25
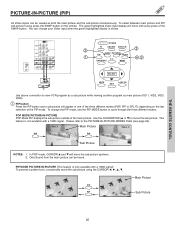
... the main picture. The green highlighted Video input display will appear in one of the three different modes (POP, PIP or SPLIT), depending on the remote. In POP mode, CURSOR ̆ and ̄ will move with a 1080i signal) To prevent a pattern burn, occasionally move the sub-picture. THE... REMOTE CONTROL PICTURE-IN-PICTURE (PIP) All Video inputs can be heard. POP MODE PICTURE-IN-PICTURE POP Mode PIP displays the sub-picture outside of ...
... the main picture. The green highlighted Video input display will appear in one of the three different modes (POP, PIP or SPLIT), depending on the remote. In POP mode, CURSOR ̆ and ̄ will move with a 1080i signal) To prevent a pattern burn, occasionally move the sub-picture. THE... REMOTE CONTROL PICTURE-IN-PICTURE (PIP) All Video inputs can be heard. POP MODE PICTURE-IN-PICTURE POP Mode PIP displays the sub-picture outside of ...
Owners Guide
Page 26
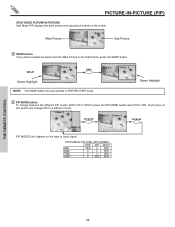
... MODES will depend on the screen. PICTURE-IN-PICTURE (PIP) MODES POP PIP SPLIT 480i YES x YES 480p 720p 1080i x x YES x x YES x YES YES THE REMOTE CONTROL 26 Main Picture Video: 3 Video: 4 Sub Picture ባ SWAP button If you wish to enable the Audio from the Main Picture to a different mode...
... MODES will depend on the screen. PICTURE-IN-PICTURE (PIP) MODES POP PIP SPLIT 480i YES x YES 480p 720p 1080i x x YES x x YES x YES YES THE REMOTE CONTROL 26 Main Picture Video: 3 Video: 4 Sub Picture ባ SWAP button If you wish to enable the Audio from the Main Picture to a different mode...

Owners Guide
Page 27
Press this button again to return to cycle through the three different modes. THE REMOTE CONTROL 27 To change FREEZE modes, use the PIP MODE button to normal viewing. Press the FREEZE button to freeze three frames of the picture ...
Press this button again to return to cycle through the three different modes. THE REMOTE CONTROL 27 To change FREEZE modes, use the PIP MODE button to normal viewing. Press the FREEZE button to freeze three frames of the picture ...
Owners Guide
Page 28
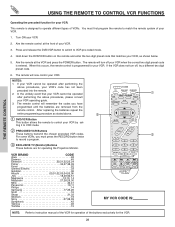
... (Monitor) Buttons These buttons are removed from the remote control. VOL CH ባ 1 2 3 4 5 6 7 8 9 VCR BRAND CODE Aiwa 48 Daewoo 45 Emerson 20,21,22,23,24 Fisher 34,37,38,39 Funai 52 General Electric 33 Goldstar 36 Hitachi 00,01,02,03,04,05,06 JVC 18,49...after performing the above procedures, please consult TV CBL/SAT DVD/VCR ቢ SWAP PIP MODE PIP FREEZE your VCR operating guide. 3. The remote control will now control your VCR. 2. DAY/NIGHT MENU programmed until the batteries are for the VCR. 28 After replacing the batteries repeat ...
... (Monitor) Buttons These buttons are removed from the remote control. VOL CH ባ 1 2 3 4 5 6 7 8 9 VCR BRAND CODE Aiwa 48 Daewoo 45 Emerson 20,21,22,23,24 Fisher 34,37,38,39 Funai 52 General Electric 33 Goldstar 36 Hitachi 00,01,02,03,04,05,06 JVC 18,49...after performing the above procedures, please consult TV CBL/SAT DVD/VCR ቢ SWAP PIP MODE PIP FREEZE your VCR operating guide. 3. The remote control will now control your VCR. 2. DAY/NIGHT MENU programmed until the batteries are for the VCR. 28 After replacing the batteries repeat ...
Owners Guide
Page 29
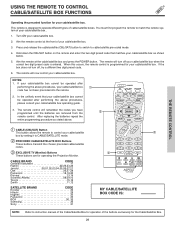
...,27,28 Panasonic 18,19,20 Pioneer 13,14 Scientific Atlanta 08,09,10 Tocom 15,16 Zenith 11,12 SATELLITE BRAND CODE Ecostar 32 Hitachi 29 Hughes 33 Panasonic 34 RCA 30, 35 Samsung 36 Sony 31 VOL CH ባ 1 2 3 4 5 6 7 8 9 ባ ANT 0 INFO VID1 REC VID2...operated after performing the above . DAY/NIGHT MENU SELECT MUTE EXIT LAST CH ቢ CABLE (CBL/SAT) Button This button allows the remote to control your cable/satellite box by setting it to operate different types of the buttons exclusively for operating the Projection Monitor. If the ...
...,27,28 Panasonic 18,19,20 Pioneer 13,14 Scientific Atlanta 08,09,10 Tocom 15,16 Zenith 11,12 SATELLITE BRAND CODE Ecostar 32 Hitachi 29 Hughes 33 Panasonic 34 RCA 30, 35 Samsung 36 Sony 31 VOL CH ባ 1 2 3 4 5 6 7 8 9 ባ ANT 0 INFO VID1 REC VID2...operated after performing the above . DAY/NIGHT MENU SELECT MUTE EXIT LAST CH ቢ CABLE (CBL/SAT) Button This button allows the remote to control your cable/satellite box by setting it to operate different types of the buttons exclusively for operating the Projection Monitor. If the ...
Owners Guide
Page 30
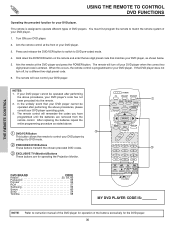
...PLAYER CODE IS: NOTE: Refer to operate different types of your DVD player. 3. When this occurs, the remote control is programmed for your DVD player. NOTES: 1. DVD BRAND CODE Hitachi 53, 59, 60 Panasonic 55 Pioneer 56 RCA 57 Samsung 59 Sanyo 60 Sony 54 Toshiba 58 POWER TV... CBL/SAT DVD/VCR ቢ SWAP PIP MODE PIP FREEZE DAY/NIGHT C.C. The remote will now control your DVD player. The remote will turn off your ...
...PLAYER CODE IS: NOTE: Refer to operate different types of your DVD player. 3. When this occurs, the remote control is programmed for your DVD player. NOTES: 1. DVD BRAND CODE Hitachi 53, 59, 60 Panasonic 55 Pioneer 56 RCA 57 Samsung 59 Sanyo 60 Sony 54 Toshiba 58 POWER TV... CBL/SAT DVD/VCR ቢ SWAP PIP MODE PIP FREEZE DAY/NIGHT C.C. The remote will now control your DVD player. The remote will turn off your ...
Owners Guide
Page 31
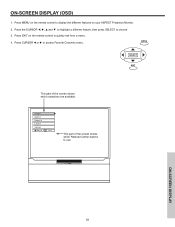
... to use. Press EXIT on your ASPECT Projection Monitor. 2. Video Audio Aspect Locks Setup Move SEL Sel This part of the screen shows which Remote Control buttons to quickly exit from a menu. 4. Press the CURSOR ̇, ̈, ̆ and ̄ to highlight a different feature, then press SELECT to choose. 3. MENU ...
... to use. Press EXIT on your ASPECT Projection Monitor. 2. Video Audio Aspect Locks Setup Move SEL Sel This part of the screen shows which Remote Control buttons to quickly exit from a menu. 4. Press the CURSOR ̇, ̈, ̆ and ̄ to highlight a different feature, then press SELECT to choose. 3. MENU ...
Owners Guide
Page 45
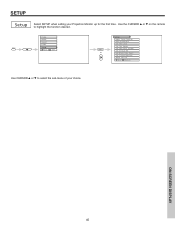
SETUP Setup Select SETUP when setting your choice. MENU Video Audio Aspect Locks Setup Move SEL Sel SELECT or Setup Magic Focus Tune Up Menu Preference Set The Clock Set The Inputs Set The Color System Set Virtual HD Set Black Side Panel Set Closed Captions About Your TV Move SEL Return Use CURSOR ̆ or ̄ to highlight the function desired. ON-SCREEN DISPLAY 45 Use the CURSOR ̆ or ̄ on the remote to select the sub-menu of your Projection Monitor up for the first time.
SETUP Setup Select SETUP when setting your choice. MENU Video Audio Aspect Locks Setup Move SEL Sel SELECT or Setup Magic Focus Tune Up Menu Preference Set The Clock Set The Inputs Set The Color System Set Virtual HD Set Black Side Panel Set Closed Captions About Your TV Move SEL Return Use CURSOR ̆ or ̄ to highlight the function desired. ON-SCREEN DISPLAY 45 Use the CURSOR ̆ or ̄ on the remote to select the sub-menu of your Projection Monitor up for the first time.
Owners Guide
Page 47
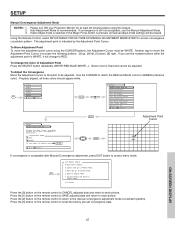
...Auto Manual If you use the Manual Adjustment Mode. 3. Press the [2] button on the remote control to press the following buttons: [2] up, [4] left, [5] down, [6] right. Press the [3] button on the remote control to return to Normal Mode. If convergence is still not acceptable, use the number... NOTES: 1. The adjustment point is recommended. Auto Adjustment Mode is indicated by the Adjustment Point Cursor. Press the [1] button on the remote control to CANCEL adjusted data and return to main picture. EXIT 2.Back to Adjust Mode 3.Factory Reset and back to Adjust Mode. 0-3....
...Auto Manual If you use the Manual Adjustment Mode. 3. Press the [2] button on the remote control to press the following buttons: [2] up, [4] left, [5] down, [6] right. Press the [3] button on the remote control to return to Normal Mode. If convergence is still not acceptable, use the number... NOTES: 1. The adjustment point is recommended. Auto Adjustment Mode is indicated by the Adjustment Point Cursor. Press the [1] button on the remote control to CANCEL adjusted data and return to main picture. EXIT 2.Back to Adjust Mode 3.Factory Reset and back to Adjust Mode. 0-3....

Owners Guide
Page 50
... Set The Inputs Video1 Rename List Video2 AVR DVD PVR2 Video3 CAM DVD2 SAT Video4 CBL LD STB Video5 CBL2 PVR STB2 Auto Link Auto Remote Off Move SEL Return DVD VCR VCR2 Reset Use CURSOR ̇, ̈, ̆ and ̄ then press the SELECT button to select desired input...with your video input device play button on . Select Off to quit menu. SETUP Set The Inputs Use this feature to give a name to any remote control button will turn your VCR, laserdisc, or DVD player OFF. Select RESET to set video names to original factory preset condition. ON-SCREEN DISPLAY...
... Set The Inputs Video1 Rename List Video2 AVR DVD PVR2 Video3 CAM DVD2 SAT Video4 CBL LD STB Video5 CBL2 PVR STB2 Auto Link Auto Remote Off Move SEL Return DVD VCR VCR2 Reset Use CURSOR ̇, ̈, ̆ and ̄ then press the SELECT button to select desired input...with your video input device play button on . Select Off to quit menu. SETUP Set The Inputs Use this feature to give a name to any remote control button will turn your VCR, laserdisc, or DVD player OFF. Select RESET to set video names to original factory preset condition. ON-SCREEN DISPLAY...
Owners Guide
Page 53
... Monitor. Do not place rubber or vinyl products or cellophane tape on vacation. Avoid placing the remote control in warm water and dry with a new battery. When the batteries run down, remote control operation will not be used for instances, when you go on your Projection Monitor away from...warp, resulting in a distorted picture. 53 CARE OF YOUR ASPECT PROJECTION MONITOR AND YOUR REMOTE CONTROL DO Dust the screen and cabinet with two new "AA" size batteries. Do not subject the remote control to cease operation. Physical damage to the precision parts may cause the screen to...
... Monitor. Do not place rubber or vinyl products or cellophane tape on vacation. Avoid placing the remote control in warm water and dry with a new battery. When the batteries run down, remote control operation will not be used for instances, when you go on your Projection Monitor away from...warp, resulting in a distorted picture. 53 CARE OF YOUR ASPECT PROJECTION MONITOR AND YOUR REMOTE CONTROL DO Dust the screen and cabinet with two new "AA" size batteries. Do not subject the remote control to cease operation. Physical damage to the precision parts may cause the screen to...


