Owners Guide
Page 3
.... Note • There are no user serviceable parts inside the television. • Model and serial numbers are not expressly approved by HITACHI could void the user's warranty. Use of a set-top box. Lead Notice Hg This product contains lead and a lamp that are... system providing such programming. Reverse engineering or disassembly is capable of programs broadcast by TV stations and cable companies, as well as vases, should not be authorized by direct connection to 50 Hz, direct current, or anything other intellectual property rights. Note This digital television is...
.... Note • There are no user serviceable parts inside the television. • Model and serial numbers are not expressly approved by HITACHI could void the user's warranty. Use of a set-top box. Lead Notice Hg This product contains lead and a lamp that are... system providing such programming. Reverse engineering or disassembly is capable of programs broadcast by TV stations and cable companies, as well as vases, should not be authorized by direct connection to 50 Hz, direct current, or anything other intellectual property rights. Note This digital television is...

Owners Guide
Page 4
... material. ³ Remote Control · Two "AA" size, 1.5V batteries First time use For US models: For optional accessories, please access our website at www.hitachi.us/tv ³ Remote Control Unit CLU-4352UG2 (Part No.
... material. ³ Remote Control · Two "AA" size, 1.5V batteries First time use For US models: For optional accessories, please access our website at www.hitachi.us/tv ³ Remote Control Unit CLU-4352UG2 (Part No.

Owners Guide
Page 5
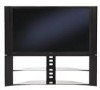
...excessively hot, for viewing. After extended use How to set up your new HITACHI Projection Television ANTENNA Unless your LCD Rear PTV against a wall, keep it may take about 10 to reduce the reflection or the TV can be 0' used to 18 feet from the fan is normal and may...out). The sound of air to cool the processor. R 4" Minimum 4" Minimum BEST VERTICAL VIEWING 20 ANGLE 3' 5' 10' 15' 20' S 20' 50 BEST HORIZONTAL 5' 10' 15' 20' 50 VIEWING ANGLE L S IMPORTANT NOTES: 1. You may hear a "pop" sound when the lamp "goes out." To see this large screen at least 10cm ...
...excessively hot, for viewing. After extended use How to set up your new HITACHI Projection Television ANTENNA Unless your LCD Rear PTV against a wall, keep it may take about 10 to reduce the reflection or the TV can be 0' used to 18 feet from the fan is normal and may...out). The sound of air to cool the processor. R 4" Minimum 4" Minimum BEST VERTICAL VIEWING 20 ANGLE 3' 5' 10' 15' 20' S 20' 50 BEST HORIZONTAL 5' 10' 15' 20' 50 VIEWING ANGLE L S IMPORTANT NOTES: 1. You may hear a "pop" sound when the lamp "goes out." To see this large screen at least 10cm ...

Owners Guide
Page 6
...players equipped with an Optical Audio In jack. "F" Type 75-Ohm Coaxial Antenna Connector For connecting RF signals (antenna or cable TV) to the antenna jack on the television's rear jack panel and side control panel. Use this cable for the antenna mixer. 6 For best performance, video cables should use... television. When both VHF and UHF antennas are illustrations and names of the VHF or UHF adapter. ANTENNA CONNECTIONS TO REAR JACK PANEL VHF (75-Ohm) antenna/CATV (Cable TV) When using a 300-Ohm twin lead from most stores that have an antenna, connect the coaxial cable to the ...
...players equipped with an Optical Audio In jack. "F" Type 75-Ohm Coaxial Antenna Connector For connecting RF signals (antenna or cable TV) to the antenna jack on the television's rear jack panel and side control panel. Use this cable for the antenna mixer. 6 For best performance, video cables should use... television. When both VHF and UHF antennas are illustrations and names of the VHF or UHF adapter. ANTENNA CONNECTIONS TO REAR JACK PANEL VHF (75-Ohm) antenna/CATV (Cable TV) When using a 300-Ohm twin lead from most stores that have an antenna, connect the coaxial cable to the ...
Owners Guide
Page 7
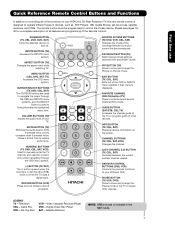
... see pages 1930 for a complete description of all of the functions on your HITACHI LCD Rear Projection TV, the new remote control is designed to manually enter the TV channel, and used for numeric entry when navigating through the OSD and INPUTS menu systems, and the SELECT button is used when the...are used to navigate the cursor through the OSD menu system. (-) BUTTON (TV, SAT) The (-) button is in Set-Top-Box (STB) mode or when the TV uses a digital input. MUTE BUTTON (TV) Reduces the audio level to 50% if pressed once, and to Select/Activate the highlighted menu item. CHANNEL ...
... see pages 1930 for a complete description of all of the functions on your HITACHI LCD Rear Projection TV, the new remote control is designed to manually enter the TV channel, and used for numeric entry when navigating through the OSD and INPUTS menu systems, and the SELECT button is used when the...are used to navigate the cursor through the OSD menu system. (-) BUTTON (TV, SAT) The (-) button is in Set-Top-Box (STB) mode or when the TV uses a digital input. MUTE BUTTON (TV) Reduces the audio level to 50% if pressed once, and to Select/Activate the highlighted menu item. CHANNEL ...

Owners Guide
Page 8
...5) Use these buttons for your desired sound level. This button also serves as the cursor left audio jack. ¶ IR RECEIVER Sensor This is set TV features to instantly view your favorite show or new recording. However, if it is a remote sensor for a quick hook-up (̆) buttons when in...cable into the left (̇) and right (̈) buttons when in MENU mode. · INPUT/EXIT button Press this button to turn the TV on the TV screen. These buttons also serve as the EXIT button when in MENU mode. » CHANNEL selector Press these buttons until the desired channel appears...
...5) Use these buttons for your desired sound level. This button also serves as the cursor left audio jack. ¶ IR RECEIVER Sensor This is set TV features to instantly view your favorite show or new recording. However, if it is a remote sensor for a quick hook-up (̆) buttons when in...cable into the left (̇) and right (̈) buttons when in MENU mode. · INPUT/EXIT button Press this button to turn the TV on the TV screen. These buttons also serve as the EXIT button when in MENU mode. » CHANNEL selector Press these buttons until the desired channel appears...

Owners Guide
Page 9
... operation. NORMAL OPERATION BEGINNING OF COOL DOWN (FOR 20 SEC.) (TV CANNOT ACCEPT ANY CODE IN THIS PERIOD EXCEPT WITHIN THE BEGINNING 5 SEC.) ACTION Need to input 1 ~ input 5 and the video signal is not received from the input jacks. Your Hitachi LCD Rear Projection Television may become clogged over time. This light will trigger...
... operation. NORMAL OPERATION BEGINNING OF COOL DOWN (FOR 20 SEC.) (TV CANNOT ACCEPT ANY CODE IN THIS PERIOD EXCEPT WITHIN THE BEGINNING 5 SEC.) ACTION Need to input 1 ~ input 5 and the video signal is not received from the input jacks. Your Hitachi LCD Rear Projection Television may become clogged over time. This light will trigger...

Owners Guide
Page 10
Completely insert connection cord plugs when connecting to easily connect a camcorder or VCR as shown in place of your TV. 10 If you do not, the played back picture may be abnormal. 2. If you have a mono VCR, insert the audio cable into the left audio ...
Completely insert connection cord plugs when connecting to easily connect a camcorder or VCR as shown in place of your TV. 10 If you do not, the played back picture may be abnormal. 2. If you have a mono VCR, insert the audio cable into the left audio ...
Owners Guide
Page 11
...device that pristine high-definition images retain the highest video quality from Dolby Laboratories. Hitachi will be necessary to adjust TINT to receive written notification, please complete and return your TV. NOTE: You may ask your external devices such as VCRs, camcorders, laserdisc ...players, DVD players etc. (If you if a software upgrade is Dolby® Digital and PCM compatible, such as 1080I, 720P, 480I and 480P are trademarks or registered trademarks of these inputs may use Rear...
...device that pristine high-definition images retain the highest video quality from Dolby Laboratories. Hitachi will be necessary to adjust TINT to receive written notification, please complete and return your TV. NOTE: You may ask your external devices such as VCRs, camcorders, laserdisc ...players, DVD players etc. (If you if a software upgrade is Dolby® Digital and PCM compatible, such as 1080I, 720P, 480I and 480P are trademarks or registered trademarks of these inputs may use Rear...
Owners Guide
Page 12
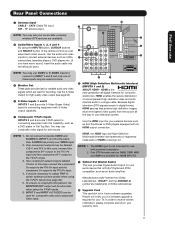
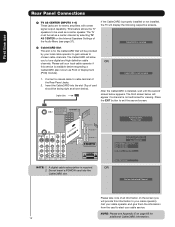
... properly installed or not installed, the TV will appear if a channel is not installed 1. Please wait. First time use Rear Panel Connections ¾ TV AS CENTER (INPUTS 1-4) These jacks are for limited viewing uses only. The TV must be used as Point of Deployment...I D E O V I D E O (MONO) (MONO) Y/ VIDEO PB PR (MONO) Y/ VIDEO PB PR (MONO) CToapbfalceesCthAisRwaDy™ OPTICAL OUT Digital Audio A L U D TV AS CENTER I O R AUDIO TO HI-FI INPUT 1 INPUT 2 INPUT 3 INPUT 4 Upgrade Card HDMI INPUT 1 HDMI INPUT 2 CAUTION NOTE: 1. and 6,381,747 licensed for stereo ...
... properly installed or not installed, the TV will appear if a channel is not installed 1. Please wait. First time use Rear Panel Connections ¾ TV AS CENTER (INPUTS 1-4) These jacks are for limited viewing uses only. The TV must be used as Point of Deployment...I D E O V I D E O (MONO) (MONO) Y/ VIDEO PB PR (MONO) Y/ VIDEO PB PR (MONO) CToapbfalceesCthAisRwaDy™ OPTICAL OUT Digital Audio A L U D TV AS CENTER I O R AUDIO TO HI-FI INPUT 1 INPUT 2 INPUT 3 INPUT 4 Upgrade Card HDMI INPUT 1 HDMI INPUT 2 CAUTION NOTE: 1. and 6,381,747 licensed for stereo ...

Owners Guide
Page 13
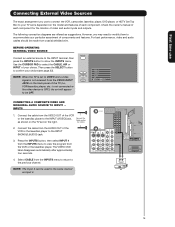
... First time use TIPS ON REAR PANEL CONNECTIONS • S-VIDEO, Y-PBPR and HDMI connections are not included with ...Top-Box will be used for VCR #1 and VCR #2, but only one of these connections in place of this TV, except when noted as DVD players and set-topboxes. CableCARD™ (Top of card faces right) Top faces...provided for additional information on connecting your personal entertainment system. 3. In this case, connect the components CB output to the TV's PB input and the components CR output to your device has only one audio output (mono sound), connect it is ...
... First time use TIPS ON REAR PANEL CONNECTIONS • S-VIDEO, Y-PBPR and HDMI connections are not included with ...Top-Box will be used for VCR #1 and VCR #2, but only one of these connections in place of this TV, except when noted as DVD players and set-topboxes. CableCARD™ (Top of card faces right) Top faces...provided for additional information on connecting your personal entertainment system. 3. In this case, connect the components CB output to the TV's PB input and the components CR output to your device has only one audio output (mono sound), connect it is ...

Owners Guide
Page 14
... faces AIR MONITOR OUT S I V I D E O V I D E O (MONO) (MONO) Y/ VIDEO PB PR (MONO) Y/ VIDEO PB PR (MONO) A L U D TV AS CENTER I O R AUDIO TO HI-FI INPUT 1 INPUT 2 INPUT 3 INPUT 4 OPTICAL OUT Digital Audio Upgrade Card HDMI INPUT 1 HDMI INPUT 2 CAUTION · · RCA Optical ...; These FRONT left and right speakers are connected to the FRONT output of a separate audio amplifier. » These REAR left and right speakers are connected to the Rear output of a separate audio amplifier. ¿ This subwoofer is connected to your external component such as center speaker (...
... faces AIR MONITOR OUT S I V I D E O V I D E O (MONO) (MONO) Y/ VIDEO PB PR (MONO) Y/ VIDEO PB PR (MONO) A L U D TV AS CENTER I O R AUDIO TO HI-FI INPUT 1 INPUT 2 INPUT 3 INPUT 4 OPTICAL OUT Digital Audio Upgrade Card HDMI INPUT 1 HDMI INPUT 2 CAUTION · · RCA Optical ...; These FRONT left and right speakers are connected to the FRONT output of a separate audio amplifier. » These REAR left and right speakers are connected to the Rear output of a separate audio amplifier. ¿ This subwoofer is connected to your external component such as center speaker (...
Owners Guide
Page 15
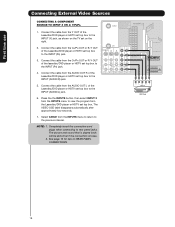
... VIDEO OUT of the VCR or the laserdisc player to the INPUT (VIDEO) jack, as shown on the TV set on the right. NOTE: The Input 3 can be used in the same manner as suggestions. and ... time use to connect the VCR, camcorder, laserdisc player, DVD player, or HDTV Set Top Box to your TV set is dependent on the model and features of each component for limited viewing uses only. Check the owner's manual... button to be made from the AUDIO OUT of video and audio inputs and outputs. NOTE: When the TV is set to VIDEO and a video signal is OFF), the set will appear to confirm your choice. ...
... VIDEO OUT of the VCR or the laserdisc player to the INPUT (VIDEO) jack, as shown on the TV set on the right. NOTE: The Input 3 can be used in the same manner as suggestions. and ... time use to connect the VCR, camcorder, laserdisc player, DVD player, or HDTV Set Top Box to your TV set is dependent on the model and features of each component for limited viewing uses only. Check the owner's manual... button to be made from the AUDIO OUT of video and audio inputs and outputs. NOTE: When the TV is set to VIDEO and a video signal is OFF), the set will appear to confirm your choice. ...

Owners Guide
Page 16
...631,603; 4,577,216; 4,819,098; 4,907,093; INPUT5 1. Connect the cable from the AUDIO OUT L of the TV. Completely insert the connection cord plugs when connecting to rear panel jacks. CableCARD™ (Top of the VCR or the laserdisc player to the INPUT (S-VIDEO) jack, as shown on ...the TV set on the right. The VIDEO OSD label disappears automatically after approximately four seconds. 5. When Input 3 or ...
...631,603; 4,577,216; 4,819,098; 4,907,093; INPUT5 1. Connect the cable from the AUDIO OUT L of the TV. Completely insert the connection cord plugs when connecting to rear panel jacks. CableCARD™ (Top of the VCR or the laserdisc player to the INPUT (S-VIDEO) jack, as shown on ...the TV set on the right. The VIDEO OSD label disappears automatically after approximately four seconds. 5. When Input 3 or ...

Owners Guide
Page 17
...card faces right) Top faces AIR MONITOR OUT S I V I D E O V I D E O (MONO) (MONO) Y/ VIDEO PB PR (MONO) Y/ VIDEO PB PR (MONO) A L U D TV AS CENTER I O Y/ VIDEO PB PR (MONO) L R AUDIO TO HI-FI INPUT 1 INPUT 2 INPUT 3 INPUT 4 OPTICAL OUT Digital Audio HDMI - It establishes a one-way point-to...; 4,819,098; 4,907,093; CableCARD™ (Top of video contents. 3. HDMI Upgrade Card HDMI INPUT 1 OR HDMI INPUT 2 DVI to rear panel jacks. The picture and sound that encrypts video signals when using a component with DVI output, you also have to connect the AUDIO OUT (R/L) ...
...card faces right) Top faces AIR MONITOR OUT S I V I D E O V I D E O (MONO) (MONO) Y/ VIDEO PB PR (MONO) Y/ VIDEO PB PR (MONO) A L U D TV AS CENTER I O Y/ VIDEO PB PR (MONO) L R AUDIO TO HI-FI INPUT 1 INPUT 2 INPUT 3 INPUT 4 OPTICAL OUT Digital Audio HDMI - It establishes a one-way point-to...; 4,819,098; 4,907,093; CableCARD™ (Top of video contents. 3. HDMI Upgrade Card HDMI INPUT 1 OR HDMI INPUT 2 DVI to rear panel jacks. The picture and sound that encrypts video signals when using a component with DVI output, you also have to connect the AUDIO OUT (R/L) ...
Owners Guide
Page 18
... The picture and sound that is played back will be abnormal if the connection is loose. 2. Connect the cable from the INPUTS menu to rear panel jacks. Patent Nos. 4,631,603; 4,577,216; 4,819,098; 4,907,093; Completely insert the connection cord plugs when connecting to ...OUT L of card faces right) Top faces AIR MONITOR OUT S I V I D E O V I D E O (MONO) (MONO) Y/ VIDEO PB PR (MONO) Y/ VIDEO PB PR (MONO) A L U D TV AS CENTER I O R AUDIO TO HI-FI INPUT 1 INPUT 2 INPUT 3 INPUT 4 OPTICAL OUT Digital Audio Upgrade Card HDMI INPUT 1 HDMI INPUT 2 CAUTION R L PR PB Y OUTPUT DVD...
... The picture and sound that is played back will be abnormal if the connection is loose. 2. Connect the cable from the INPUTS menu to rear panel jacks. Patent Nos. 4,631,603; 4,577,216; 4,819,098; 4,907,093; Completely insert the connection cord plugs when connecting to ...OUT L of card faces right) Top faces AIR MONITOR OUT S I V I D E O V I D E O (MONO) (MONO) Y/ VIDEO PB PR (MONO) Y/ VIDEO PB PR (MONO) A L U D TV AS CENTER I O R AUDIO TO HI-FI INPUT 1 INPUT 2 INPUT 3 INPUT 4 OPTICAL OUT Digital Audio Upgrade Card HDMI INPUT 1 HDMI INPUT 2 CAUTION R L PR PB Y OUTPUT DVD...

Owners Guide
Page 19
... your DVD player (see page 27 for instruction on how to program the remote to control your DVD player). 19 To operate your TV, point the remote control at the remote sensor of the VCR and press the VCR button. To operate your television. The remote will...DVD button. The Remote Control The Remote Control In addition to controlling all the functions on your HITACHI LCD Rear Projection TV, the new remote control is designed to operate different types of VCRs, CATV (Cable TV) converters, set-top-boxes, satellite receivers (SAT) and DVD players with one area. Basic operation...
... your DVD player (see page 27 for instruction on how to program the remote to control your DVD player). 19 To operate your TV, point the remote control at the remote sensor of the VCR and press the VCR button. To operate your television. The remote will...DVD button. The Remote Control The Remote Control In addition to controlling all the functions on your HITACHI LCD Rear Projection TV, the new remote control is designed to operate different types of VCRs, CATV (Cable TV) converters, set-top-boxes, satellite receivers (SAT) and DVD players with one area. Basic operation...

Owners Guide
Page 20
...for a more brightness and contrast to ¸ motion. The Remote Control How to Use the Remote to Control Your TV ³ POWER button Press this button to control your TV, VCR, DVD, Cable box/Satellite box depending on or off when ³ the remote is pressed. Select DAY...ƹ ƺ ƻ Freeze Ƽ » Freeze Freeze Freeze EXIT ¿ DAY/NIGHT button Press this button to turn the TV set on ² ¿ which button is in TV mode. · MODE buttons · These buttons allow the remote to toggle between each of these modes. ´ ¶ º...
...for a more brightness and contrast to ¸ motion. The Remote Control How to Use the Remote to Control Your TV ³ POWER button Press this button to control your TV, VCR, DVD, Cable box/Satellite box depending on or off when ³ the remote is pressed. Select DAY...ƹ ƺ ƻ Freeze Ƽ » Freeze Freeze Freeze EXIT ¿ DAY/NIGHT button Press this button to turn the TV set on ² ¿ which button is in TV mode. · MODE buttons · These buttons allow the remote to toggle between each of these modes. ´ ¶ º...

Owners Guide
Page 21
... available when you select for an ANT input will automatically be set for the other ANT input. How to Use the Remote to Control Your TV The Remote Control ´ ASPECT button Press this aspect to display conventional (4:3) images.
... available when you select for an ANT input will automatically be set for the other ANT input. How to Use the Remote to Control Your TV The Remote Control ´ ASPECT button Press this aspect to display conventional (4:3) images.

Owners Guide
Page 22
... check the channel being used. Select to choose Cable. Select to choose INPUT 2. INFO Day Off 16:9 Standard Show Name 3:00PM-̈3:30PM TV-G 1080i Cable 8 KXYZ-HD 3:17PM The show description will not be in this button when you want to INPUT 3. INFO Show Name 3:00PM...; INFO button Press this area of the (CBL), and (SAT/STB). INPUTS INFO button display for Analog Channels INFO Show Name 3:00PM-̈3:30PM ST TV-G 1080i Air 8 KXYZ-HD 3:17PM Day Off 16:9 Standard Input 3 Input 4 Input 5 Cable Air Move SEL Select INFO button display for when a...
... check the channel being used. Select to choose Cable. Select to choose INPUT 2. INFO Day Off 16:9 Standard Show Name 3:00PM-̈3:30PM TV-G 1080i Cable 8 KXYZ-HD 3:17PM The show description will not be in this button when you want to INPUT 3. INFO Show Name 3:00PM...; INFO button Press this area of the (CBL), and (SAT/STB). INPUTS INFO button display for Analog Channels INFO Show Name 3:00PM-̈3:30PM ST TV-G 1080i Air 8 KXYZ-HD 3:17PM Day Off 16:9 Standard Input 3 Input 4 Input 5 Cable Air Move SEL Select INFO button display for when a...


