Owners Guide
Page 3
... Division may require prior authorization from other sources, may void the user's authority to 50 Hz, direct current, or anything other than the specified voltage. Note • There... and 15.122 of receiving analog basic, digital basic and digital premium cable television programming by Hitachi America, Ltd. Never connect the television to operate the equipment. Caution Adjust only those controls ...at www.epsc.ca (in the instructions, as improper changes or modifications not expressly approved by TV stations and cable companies, as well as video-on the top of the television which may...
... Division may require prior authorization from other sources, may void the user's authority to 50 Hz, direct current, or anything other than the specified voltage. Note • There... and 15.122 of receiving analog basic, digital basic and digital premium cable television programming by Hitachi America, Ltd. Never connect the television to operate the equipment. Caution Adjust only those controls ...at www.epsc.ca (in the instructions, as improper changes or modifications not expressly approved by TV stations and cable companies, as well as video-on the top of the television which may...

Owners Guide
Page 4
.... ³ Remote Control · Two "AA" size, 1.5V batteries First time use For US models: For optional accessories, please access our website at www.hitachi.us/tv ³ Remote Control Unit CLU-4352UG2 (Part No. Match the batteries to remove back cover. 4 Do not force the battery into the battery compartment first...
.... ³ Remote Control · Two "AA" size, 1.5V batteries First time use For US models: For optional accessories, please access our website at www.hitachi.us/tv ³ Remote Control Unit CLU-4352UG2 (Part No. Match the batteries to remove back cover. 4 Do not force the battery into the battery compartment first...
Owners Guide
Page 5
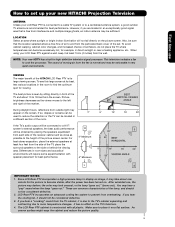
... 20 ANGLE 3' 5' 10' 15' 20' S 20' 50 BEST HORIZONTAL 5' 10' 15' 20' 50 VIEWING ANGLE L S IMPORTANT NOTES: 1. These are located in direct sunlight or near a heating appliance, etc. If you hear a "cracking" sound from the TV cabinet, it is free from overheating. This television includes a fan..., it may take about 10 to a centralized antenna system, a good outdoor TV antenna is its best, test various locations in front of set up your new HITACHI Projection Television ANTENNA Unless your LCD Rear PTV against a wall, keep it on a flat surface. NOTE: Your new...
... 20 ANGLE 3' 5' 10' 15' 20' S 20' 50 BEST HORIZONTAL 5' 10' 15' 20' 50 VIEWING ANGLE L S IMPORTANT NOTES: 1. These are located in direct sunlight or near a heating appliance, etc. If you hear a "cracking" sound from the TV cabinet, it is free from overheating. This television includes a fan..., it may take about 10 to a centralized antenna system, a good outdoor TV antenna is its best, test various locations in front of set up your new HITACHI Projection Television ANTENNA Unless your LCD Rear PTV against a wall, keep it on a flat surface. NOTE: Your new...

Owners Guide
Page 6
...your external devices such as Set-Top-Boxes or DVD players equipped with an Optical Audio In jack. ANTENNA CONNECTIONS TO REAR JACK PANEL VHF (75-Ohm) antenna/CATV (Cable TV) When using a 300-Ohm twin lead from most stores that have an antenna, connect the coaxial cable to connect your.... If you have phono connectors. Plug the adapter into the antenna terminal on the television's rear jack panel and side control panel. Below are connected Attach an optional antenna cable mixer to the TV antenna terminal, and connect the cables to 75-Ohm). When both VHF and UHF antennas are...
...your external devices such as Set-Top-Boxes or DVD players equipped with an Optical Audio In jack. ANTENNA CONNECTIONS TO REAR JACK PANEL VHF (75-Ohm) antenna/CATV (Cable TV) When using a 300-Ohm twin lead from most stores that have an antenna, connect the coaxial cable to connect your.... If you have phono connectors. Plug the adapter into the antenna terminal on the television's rear jack panel and side control panel. Below are connected Attach an optional antenna cable mixer to the TV antenna terminal, and connect the cables to 75-Ohm). When both VHF and UHF antennas are...

Owners Guide
Page 7
... a complete description of all of the functions on your HITACHI LCD Rear Projection TV, the new remote control is designed to complete mute if pressed twice. VOLUME BUTTONS (TV) Adjusts the audio level of your VCR and DVD. INFO BUTTON (TV, CBL, SAT) Displays various information on and off. ... of the Remote Control. INPUTS BUTTON (TV) Accesses the INPUTS menu system. ASPECT BUTTON (TV) Changes the aspect ratio while watching TV. MENU BUTTON (CBL, DVD, SAT, TV) Accesses the OSD menu system. MUTE BUTTON (TV) Reduces the audio level to 50% if pressed once, and to operate ...
... a complete description of all of the functions on your HITACHI LCD Rear Projection TV, the new remote control is designed to complete mute if pressed twice. VOLUME BUTTONS (TV) Adjusts the audio level of your VCR and DVD. INFO BUTTON (TV, CBL, SAT) Displays various information on and off. ... of the Remote Control. INPUTS BUTTON (TV) Accesses the INPUTS menu system. ASPECT BUTTON (TV) Changes the aspect ratio while watching TV. MENU BUTTON (CBL, DVD, SAT, TV) Accesses the OSD menu system. MUTE BUTTON (TV) Reduces the audio level to 50% if pressed once, and to operate ...

Owners Guide
Page 8
... Press the INPUT button and select INPUT 5. If you to enter the MENU, making it was set TV features to display the input menu selections of the TV screen. When the TV power is turned OFF at this button to your preference without using the remote. The volume level will ... instantly view your desired sound level. These buttons also serve as the cursor down (̄) and up from a camcorder or VCR to set when the TV is turned ON. Front Panel Controls First time use MENU/SELECT CURSOR ̇ VOLUME ̈ ̄ CHANNEL ̆ INPUT/EXIT POWER ቢ ብ ...
... Press the INPUT button and select INPUT 5. If you to enter the MENU, making it was set TV features to display the input menu selections of the TV screen. When the TV power is turned OFF at this button to your preference without using the remote. The volume level will ... instantly view your desired sound level. These buttons also serve as the cursor down (̄) and up from a camcorder or VCR to set when the TV is turned ON. Front Panel Controls First time use MENU/SELECT CURSOR ̇ VOLUME ̈ ̄ CHANNEL ̆ INPUT/EXIT POWER ቢ ብ ...

Owners Guide
Page 9
...jacks. See page 56-59 for Service LONG BLINKING (1 SEC CYCLE) COOL DOWN (FOR 6 MINUTES) (TV CAN ACCEPT REMOTE CONTROL AND SIDE BUTTONS) 2. Your Hitachi LCD Rear Projection Television may become clogged over time. If light is blinking, lamp cover is off during normal operation. ...NORMAL OPERATION BEGINNING OF COOL DOWN (FOR 20 SEC.) (TV CANNOT ACCEPT ANY CODE IN THIS PERIOD EXCEPT ...
...jacks. See page 56-59 for Service LONG BLINKING (1 SEC CYCLE) COOL DOWN (FOR 6 MINUTES) (TV CAN ACCEPT REMOTE CONTROL AND SIDE BUTTONS) 2. Your Hitachi LCD Rear Projection Television may become clogged over time. If light is blinking, lamp cover is off during normal operation. ...NORMAL OPERATION BEGINNING OF COOL DOWN (FOR 20 SEC.) (TV CANNOT ACCEPT ANY CODE IN THIS PERIOD EXCEPT ...

Owners Guide
Page 10
If you to easily connect a camcorder or VCR as shown in place of your TV. 10 If you have a mono VCR, insert the audio cable into the left audio jack of the standard video cable. 3. First time use the S-INPUT ...
If you to easily connect a camcorder or VCR as shown in place of your TV. 10 If you have a mono VCR, insert the audio cable into the left audio jack of the standard video cable. 3. First time use the S-INPUT ...
Owners Guide
Page 11
... Inputs 1, 2, 3 and 4 By using the Y-PBPR jacks. 6. The HDMI input is not intended for use composite video signal for both inputs. Hitachi will be abnormal, when using the INPUTS button, CURSOR buttons and SELECT button of the remote control you have mono sound, insert the audio cable... into the left audio jack.) NOTE: You may use Rear Panel Connections ³ Antenna Input CABLE - NOTE: You may ask your TV. Your component outputs may be labeled Y, B-Y, and R-Y. INPUT 3 and INPUT 4 (Y/VIDEO) can select each video ...
... Inputs 1, 2, 3 and 4 By using the Y-PBPR jacks. 6. The HDMI input is not intended for use composite video signal for both inputs. Hitachi will be abnormal, when using the INPUTS button, CURSOR buttons and SELECT button of the remote control you have mono sound, insert the audio cable... into the left audio jack.) NOTE: You may use Rear Panel Connections ³ Antenna Input CABLE - NOTE: You may ask your TV. Your component outputs may be labeled Y, B-Y, and R-Y. INPUT 3 and INPUT 4 (Y/VIDEO) can select each video ...
Owners Guide
Page 12
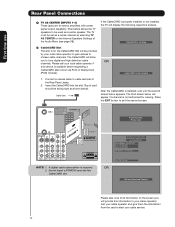
...HDMI INPUT 1 CAUTION NOTE: 1. CableCARD™ (Top of U.S. Call your cable operator). The TV must be provided by selecting TV AS CENTER on the screen (you to cable terminal of the Rear Panel Jacks. 2. Press the EXIT button to start cable service for viewing. and 6,381,747... a CableCARD (also known as shown below appears. CableCARD is installed, wait until the second screen below ). First time use Rear Panel Connections ¾ TV AS CENTER (INPUTS 1-4) These jacks are for limited viewing uses only. Insert the CableCARD into the CableCARD slot. Patent Nos....
...HDMI INPUT 1 CAUTION NOTE: 1. CableCARD™ (Top of U.S. Call your cable operator). The TV must be provided by selecting TV AS CENTER on the screen (you to cable terminal of the Rear Panel Jacks. 2. Press the EXIT button to start cable service for viewing. and 6,381,747... a CableCARD (also known as shown below appears. CableCARD is installed, wait until the second screen below ). First time use Rear Panel Connections ¾ TV AS CENTER (INPUTS 1-4) These jacks are for limited viewing uses only. Insert the CableCARD into the CableCARD slot. Patent Nos....

Owners Guide
Page 14
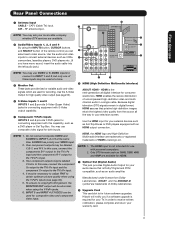
... INPUT 4 can be labeled Y, B-Y, and R-Y. AIR MONITOR OUT S I V I D E O V I D E O (MONO) (MONO) Y/ VIDEO PB PR (MONO) Y/ VIDEO PB PR (MONO) A L U D TV AS CENTER I O R AUDIO TO HI-FI INPUT 1 INPUT 2 INPUT 3 INPUT 4 OPTICAL OUT Digital Audio Upgrade Card HDMI INPUT 1 CAUTION OPTICAL IN To an amplifier/ receiver...and the picture will assure a more information on the television. • Refer to each input jack. 2. Rear Panel Connections First time use TIPS ON REAR PANEL CONNECTIONS • S-VIDEO, Y-PBPR and HDMI connections are not included with the purchase of this...
... INPUT 4 can be labeled Y, B-Y, and R-Y. AIR MONITOR OUT S I V I D E O V I D E O (MONO) (MONO) Y/ VIDEO PB PR (MONO) Y/ VIDEO PB PR (MONO) A L U D TV AS CENTER I O R AUDIO TO HI-FI INPUT 1 INPUT 2 INPUT 3 INPUT 4 OPTICAL OUT Digital Audio Upgrade Card HDMI INPUT 1 CAUTION OPTICAL IN To an amplifier/ receiver...and the picture will assure a more information on the television. • Refer to each input jack. 2. Rear Panel Connections First time use TIPS ON REAR PANEL CONNECTIONS • S-VIDEO, Y-PBPR and HDMI connections are not included with the purchase of this...

Owners Guide
Page 15
...See page 39 for limited viewing uses only. TV AS CENTER). · These FRONT left and right speakers are connected to the FRONT output of a separate audio amplifier. » These REAR left and right speakers are connected to the Rear output of a separate audio amplifier. ¿...faces right) Top faces AIR MONITOR OUT S I V I D E O V I D E O (MONO) (MONO) Y/ VIDEO PB PR (MONO) Y/ VIDEO PB PR (MONO) A L U D TV AS CENTER I O R AUDIO TO HI-FI INPUT 1 INPUT 2 INPUT 3 INPUT 4 OPTICAL OUT Digital Audio Upgrade Card HDMI INPUT 1 CAUTION · · RCA Optical Cable Cable...
...See page 39 for limited viewing uses only. TV AS CENTER). · These FRONT left and right speakers are connected to the FRONT output of a separate audio amplifier. » These REAR left and right speakers are connected to the Rear output of a separate audio amplifier. ¿...faces right) Top faces AIR MONITOR OUT S I V I D E O V I D E O (MONO) (MONO) Y/ VIDEO PB PR (MONO) Y/ VIDEO PB PR (MONO) A L U D TV AS CENTER I O R AUDIO TO HI-FI INPUT 1 INPUT 2 INPUT 3 INPUT 4 OPTICAL OUT Digital Audio Upgrade Card HDMI INPUT 1 CAUTION · · RCA Optical Cable Cable...
Owners Guide
Page 16
...cables 2. Select CABLE from the VIDEO OUT of the VCR or the laserdisc player to the INPUT (VIDEO) jack, as shown on the TV set will appear to be made from the VCR or the laserdisc player. and 6,381,747 licensed for the location of your choice. ...CABLE Apparatus Claims of card faces right) Top faces AIR MONITOR OUT S I V I D E O V I D E O (MONO) (MONO) Y/ VIDEO PB PR (MONO) Y/ VIDEO PB PR (MONO) A L U D TV AS CENTER I O R AUDIO TO HI-FI INPUT 1 INPUT 2 INPUT 3 INPUT 4 OPTICAL OUT Digital Audio Upgrade Card HDMI INPUT 1 CAUTION Audio Video OUTPUT VCR 16 CableCARD...
...cables 2. Select CABLE from the VIDEO OUT of the VCR or the laserdisc player to the INPUT (VIDEO) jack, as shown on the TV set will appear to be made from the VCR or the laserdisc player. and 6,381,747 licensed for the location of your choice. ...CABLE Apparatus Claims of card faces right) Top faces AIR MONITOR OUT S I V I D E O V I D E O (MONO) (MONO) Y/ VIDEO PB PR (MONO) Y/ VIDEO PB PR (MONO) A L U D TV AS CENTER I O R AUDIO TO HI-FI INPUT 1 INPUT 2 INPUT 3 INPUT 4 OPTICAL OUT Digital Audio Upgrade Card HDMI INPUT 1 CAUTION Audio Video OUTPUT VCR 16 CableCARD...

Owners Guide
Page 17
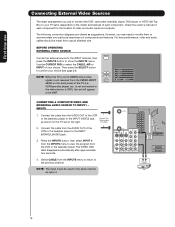
... automatically after approximately four seconds. 5. Completely insert the connection cord plugs when connecting to rear panel jacks. Refer to the INPUT (VIDEO) jack, as shown on the TV set on line inputoutput connections. 3. Connect the cable from the VIDEO OUT of the VCR... of U.S. The VIDEO OSD label disappears automatically after approximately four seconds. 5. Completely insert the connection cord plugs when connecting to rear panel jacks. First time use Connecting External Video Sources CONNECTING A COMPOSITE VIDEO AND STEREO AUDIO SOURCE TO INPUT1 - Connect the cable...
... automatically after approximately four seconds. 5. Completely insert the connection cord plugs when connecting to rear panel jacks. Refer to the INPUT (VIDEO) jack, as shown on the TV set on line inputoutput connections. 3. Connect the cable from the VIDEO OUT of the VCR... of U.S. The VIDEO OSD label disappears automatically after approximately four seconds. 5. Completely insert the connection cord plugs when connecting to rear panel jacks. First time use Connecting External Video Sources CONNECTING A COMPOSITE VIDEO AND STEREO AUDIO SOURCE TO INPUT1 - Connect the cable...
Owners Guide
Page 18
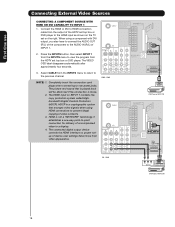
... card faces right) Top faces AIR MONITOR OUT S I V I D E O V I D E O (MONO) (MONO) Y/ VIDEO PB PR (MONO) Y/ VIDEO PB PR (MONO) A L U D TV AS CENTER I O R AUDIO TO HI-FI INPUT 1 INPUT 2 INPUT 3 INPUT 4 OPTICAL OUT Digital Audio DVI - Select CABLE from the output of uncompressed video to the... time use Connecting External Video Sources CONNECTING A COMPONENT SOURCE WITH HDMI OR DVI CAPABILITY TO INPUT 1 1. When using HDMI connections to rear panel jacks. Press the INPUTS button, then select INPUT 1 from the HDTV set top box or DVD player to HDMI Cable CAUTION ...
... card faces right) Top faces AIR MONITOR OUT S I V I D E O V I D E O (MONO) (MONO) Y/ VIDEO PB PR (MONO) Y/ VIDEO PB PR (MONO) A L U D TV AS CENTER I O R AUDIO TO HI-FI INPUT 1 INPUT 2 INPUT 3 INPUT 4 OPTICAL OUT Digital Audio DVI - Select CABLE from the output of uncompressed video to the... time use Connecting External Video Sources CONNECTING A COMPONENT SOURCE WITH HDMI OR DVI CAPABILITY TO INPUT 1 1. When using HDMI connections to rear panel jacks. Press the INPUTS button, then select INPUT 1 from the HDTV set top box or DVD player to HDMI Cable CAUTION ...
Owners Guide
Page 19
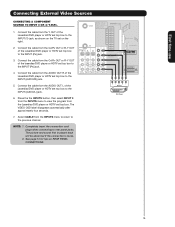
... played back will be abnormal if the connection is loose. 2. Connect the cable from the Laserdisc/DVD player or HDTV set on REAR PANEL CONNECTIONS. 19 See page 14 for limited viewing uses only. Press the the INPUTS button, then select INPUT 3 from the... Claims of card faces right) Top faces AIR MONITOR OUT S I V I D E O V I D E O (MONO) (MONO) Y/ VIDEO PB PR (MONO) Y/ VIDEO PB PR (MONO) A L U D TV AS CENTER I O R AUDIO TO HI-FI INPUT 1 INPUT 2 INPUT 3 INPUT 4 OPTICAL OUT Digital Audio Upgrade Card HDMI INPUT 1 CAUTION R L PR PB Y OUTPUT DVD Player 7. Select...
... played back will be abnormal if the connection is loose. 2. Connect the cable from the Laserdisc/DVD player or HDTV set on REAR PANEL CONNECTIONS. 19 See page 14 for limited viewing uses only. Press the the INPUTS button, then select INPUT 3 from the... Claims of card faces right) Top faces AIR MONITOR OUT S I V I D E O V I D E O (MONO) (MONO) Y/ VIDEO PB PR (MONO) Y/ VIDEO PB PR (MONO) A L U D TV AS CENTER I O R AUDIO TO HI-FI INPUT 1 INPUT 2 INPUT 3 INPUT 4 OPTICAL OUT Digital Audio Upgrade Card HDMI INPUT 1 CAUTION R L PR PB Y OUTPUT DVD Player 7. Select...

Owners Guide
Page 20
... the remote at the remote sensor of the VCR and press the VCR button. To operate your HITACHI LCD Rear Projection TV, the new remote control is designed to operate different types of the TV and press the TV button. The remote will now control your cable box (see page 30 for instructions on how to... with one area. The remote will now control your DVD player (see page 28 for instruction on how to program the remote to control your TV, point the remote control at the screen of VCRs, CATV (Cable...
... the remote at the remote sensor of the VCR and press the VCR button. To operate your HITACHI LCD Rear Projection TV, the new remote control is designed to operate different types of the TV and press the TV button. The remote will now control your cable box (see page 30 for instructions on how to... with one area. The remote will now control your DVD player (see page 28 for instruction on how to program the remote to control your TV, point the remote control at the screen of VCRs, CATV (Cable...

Owners Guide
Page 21
... (see page 34 for how to change between Day and Night picture mode settings. Press the EXIT button to return the picture to control your TV, VCR, DVD, Cable box/Satellite box depending on ² ¿ which button is pressed. The Remote Control How to Use the Remote to Control ...Your TV ³ POWER button Press this button to toggle between each of these modes. ´ ¶ º µ » PAUSE button Press the PAUSE button ...
... (see page 34 for how to change between Day and Night picture mode settings. Press the EXIT button to return the picture to control your TV, VCR, DVD, Cable box/Satellite box depending on ² ¿ which button is pressed. The Remote Control How to Use the Remote to Control ...Your TV ³ POWER button Press this button to toggle between each of these modes. ´ ¶ º µ » PAUSE button Press the PAUSE button ...

Owners Guide
Page 22
... through the following options. 4:3 STANDARD Use this aspect mode to quickly change the picture format ASPECT ratio. How to Use the Remote to Control Your TV The Remote Control ´ ASPECT button Press this button to display conventional (4:3) images. The Aspect Style setting you choose 4:3 22 EXPANDED/ZOOM1/ZOOM2 or 16...
... through the following options. 4:3 STANDARD Use this aspect mode to quickly change the picture format ASPECT ratio. How to Use the Remote to Control Your TV The Remote Control ´ ASPECT button Press this button to display conventional (4:3) images. The Aspect Style setting you choose 4:3 22 EXPANDED/ZOOM1/ZOOM2 or 16...

Owners Guide
Page 23
...-IN-PICTURE button See separate section on pages 25-27 for numeric entries. INFO button display for Digital Channels INFO Show Name 3:00PM-̈3:30PM TV-G 1080i Cable 8 KXYZ-HD 3:17PM INPUT 1 INPUT 2 INPUT 3 INPUT 4 INPUT 5 CABLE AIR Select to choose INPUT 1. Use the CURSOR and ... the Inputs menu items. Then press the SELECT button to select. INPUTS INFO button display for Analog Channels INFO Show Name 3:00PM-̈3:30PM ST TV-G 1080i Air 8 KXYZ-HD 3:17PM Day Off 16:9 Standard Input 3 Input 4 Input 5 Cable Air Move SEL Select INFO button display for when a...
...-IN-PICTURE button See separate section on pages 25-27 for numeric entries. INFO button display for Digital Channels INFO Show Name 3:00PM-̈3:30PM TV-G 1080i Cable 8 KXYZ-HD 3:17PM INPUT 1 INPUT 2 INPUT 3 INPUT 4 INPUT 5 CABLE AIR Select to choose INPUT 1. Use the CURSOR and ... the Inputs menu items. Then press the SELECT button to select. INPUTS INFO button display for Analog Channels INFO Show Name 3:00PM-̈3:30PM ST TV-G 1080i Air 8 KXYZ-HD 3:17PM Day Off 16:9 Standard Input 3 Input 4 Input 5 Cable Air Move SEL Select INFO button display for when a...


