Owners Guide
Page 1
has determined that this product meets the ENERGY STAR® guidelines for 42V710, 50V710, 60V710 42V715, 50V715, 60V715 IMPORTANT SAFETY INSTRUCTIONS 2-3 FIRST TIME USE ...4-20 THE REMOTE CONTROL 21-40 ON-SCREEN DISPLAY...41-68 LAMP REPLACEMENT ...69-72 CARE OF YOUR HITACHI TV & REMOTE CONTROL 73 RECEPTION PROBLEMS ...74 USEFUL INFORMATION / INDEX 75-83 As an ENERGY STAR® Partner, Hitachi, Ltd. LCD REAR PROJECTION TELEVISION Operating Guide for energy efficiency.
has determined that this product meets the ENERGY STAR® guidelines for 42V710, 50V710, 60V710 42V715, 50V715, 60V715 IMPORTANT SAFETY INSTRUCTIONS 2-3 FIRST TIME USE ...4-20 THE REMOTE CONTROL 21-40 ON-SCREEN DISPLAY...41-68 LAMP REPLACEMENT ...69-72 CARE OF YOUR HITACHI TV & REMOTE CONTROL 73 RECEPTION PROBLEMS ...74 USEFUL INFORMATION / INDEX 75-83 As an ENERGY STAR® Partner, Hitachi, Ltd. LCD REAR PROJECTION TELEVISION Operating Guide for energy efficiency.
Owners Guide
Page 3
...information, contact your outlet, consult an electrician for long periods of programs broadcast by TV stations and cable companies, as well as programs from other limited consumer uses only ... or has been dropped. 15. Use of this apparatus during lightning storms or when unused for replacement of the video program material. • This digital television is used, use of a set-...digital programming. For more information call "1-800-HITACHI." Install in any heat sources such as practical. Only use this product and its lamp in particular, specifies that the cable ground shall...
...information, contact your outlet, consult an electrician for long periods of programs broadcast by TV stations and cable companies, as well as programs from other limited consumer uses only ... or has been dropped. 15. Use of this apparatus during lightning storms or when unused for replacement of the video program material. • This digital television is used, use of a set-...digital programming. For more information call "1-800-HITACHI." Install in any heat sources such as practical. Only use this product and its lamp in particular, specifies that the cable ground shall...
Owners Guide
Page 8
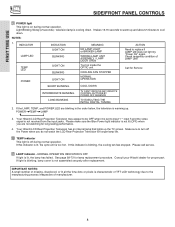
...TV screen. Make sure to replace if LAMP still does not light by "Power On" again. It takes 12-15 seconds to warm up and about 2 minutes to input 1 ~ input 5 and the video signal is not received from the input jacks. Your Hitachi LCD Rear Projection Television has an internal lamp... that lights up . Check assembly condition of manufacturer. 8 Please call service. ቭ LAMP indicator - See page 69-72 for Service INTERMEDIATE BLINKING LONG BLINKING TV CAN'T RECEIVE ANY REMOTE ...
...TV screen. Make sure to replace if LAMP still does not light by "Power On" again. It takes 12-15 seconds to warm up and about 2 minutes to input 1 ~ input 5 and the video signal is not received from the input jacks. Your Hitachi LCD Rear Projection Television has an internal lamp... that lights up . Check assembly condition of manufacturer. 8 Please call service. ቭ LAMP indicator - See page 69-72 for Service INTERMEDIATE BLINKING LONG BLINKING TV CAN'T RECEIVE ANY REMOTE ...
Owners Guide
Page 69
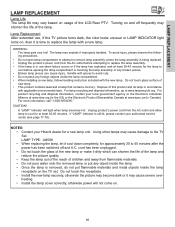
...org (in Canada). For more information, call "1-800-HITACHI." CAUTION! If "LAMP" indicator is still lit, please contact your Hitachi dealer for approximately 30 to the TV Set. Lamp Replacement After extended use when failure occurs or if the lamp has exploded, wait at least 30-45 minutes for ... been switched off frequently may shorten the life of the LCD Rear PTV. LAMP TYPE: LM500 • When replacing the lamp, let it is time to replace the lamp with gloves to remove lamp assembly unless the lamp assembly is being replaced. • Unplug the product's power cord from the AC...
...org (in Canada). For more information, call "1-800-HITACHI." CAUTION! If "LAMP" indicator is still lit, please contact your Hitachi dealer for approximately 30 to the TV Set. Lamp Replacement After extended use when failure occurs or if the lamp has exploded, wait at least 30-45 minutes for ... been switched off frequently may shorten the life of the LCD Rear PTV. LAMP TYPE: LM500 • When replacing the lamp, let it is time to replace the lamp with gloves to remove lamp assembly unless the lamp assembly is being replaced. • Unplug the product's power cord from the AC...
Owners Guide
Page 70
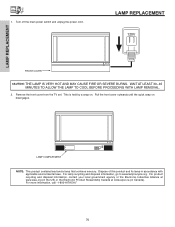
LAMP REPLACEMENT 1. Pull the front cover outwards until the quick snap on . Remove the front cover from the TV set. LAMP COMPARTMENT NOTE: This product contains lead and a lamp that contains mercury. For product recycling and disposal information, contact your local government agency or the ... applicable environmental laws. WAIT AT LEAST 30~45 MINUTES TO ALLOW THE LAMP TO COOL BEFORE PROCEEDING WITH LAMP REMOVAL. 2. For more information, call "1-800-HITACHI." 70 LAMP REPLACEMENT 120V FRONT COVER CAUTION: THE LAMP IS VERY HOT AND MAY CAUSE FIRE OR SEVERE BURNS. Turn off ...
LAMP REPLACEMENT 1. Pull the front cover outwards until the quick snap on . Remove the front cover from the TV set. LAMP COMPARTMENT NOTE: This product contains lead and a lamp that contains mercury. For product recycling and disposal information, contact your local government agency or the ... applicable environmental laws. WAIT AT LEAST 30~45 MINUTES TO ALLOW THE LAMP TO COOL BEFORE PROCEEDING WITH LAMP REMOVAL. 2. For more information, call "1-800-HITACHI." 70 LAMP REPLACEMENT 120V FRONT COVER CAUTION: THE LAMP IS VERY HOT AND MAY CAUSE FIRE OR SEVERE BURNS. Turn off ...
Owners Guide
Page 71
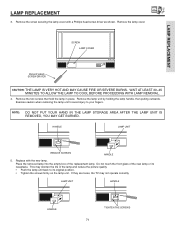
...TV may shorten the life of the new lamp or its original position. • Tighten the screws firmly on the lamp unit. Remove the lamp unit by holding the lamp handle, then pulling outwards. LAMP UNIT HANDLE HANDLE TIGHTEN THE SCREWS 71 HANDLE LAMP UNIT REMOVE SCREWS HANDLE 5. Replace...Remove the two screws that hold the lamp in place. Remove the lamp cover. Place the removed lamp into the empty box of the replacement lamp. LAMP REPLACEMENT LAMP REPLACEMENT 3. WAIT AT LEAST 30~45 MINUTES TO ALLOW THE LAMP TO COOL BEFORE PROCEEDING WITH LAMP REMOVAL. 4. NOTE: DO NOT ...
...TV may shorten the life of the new lamp or its original position. • Tighten the screws firmly on the lamp unit. Remove the lamp unit by holding the lamp handle, then pulling outwards. LAMP UNIT HANDLE HANDLE TIGHTEN THE SCREWS 71 HANDLE LAMP UNIT REMOVE SCREWS HANDLE 5. Replace...Remove the two screws that hold the lamp in place. Remove the lamp cover. Place the removed lamp into the empty box of the replacement lamp. LAMP REPLACEMENT LAMP REPLACEMENT 3. WAIT AT LEAST 30~45 MINUTES TO ALLOW THE LAMP TO COOL BEFORE PROCEEDING WITH LAMP REMOVAL. 4. NOTE: DO NOT ...


