
Owners Guide
Page 2
... promptly in the design of electric shock to operate the television. INSERT THE POWER CORD INTO A 120 VOLT 60Hz OUTLET. NO USER SERVICEABLE PARTS INSIDE. To help you operate these units. NOTE: • There are no user serviceable parts inside the television. • Model and serial numbers are covered in your HITACHI television. IMPORTANT SAFETY INSTRUCTIONS SAFETY POINTS YOU SHOULD KNOW ABOUT YOUR HITACHI LCD REAR PROJECTION TELEVISION Our reputation has been built on this...
... promptly in the design of electric shock to operate the television. INSERT THE POWER CORD INTO A 120 VOLT 60Hz OUTLET. NO USER SERVICEABLE PARTS INSIDE. To help you operate these units. NOTE: • There are no user serviceable parts inside the television. • Model and serial numbers are covered in your HITACHI television. IMPORTANT SAFETY INSTRUCTIONS SAFETY POINTS YOU SHOULD KNOW ABOUT YOUR HITACHI LCD REAR PROJECTION TELEVISION Our reputation has been built on this...
Owners Guide
Page 3
... ART 250 PART H) NEC NATIONAL ELECTRICAL CODE Note to www.lamprecycle.org. Follow all servicing to the receiver be connected to the grounding system of the building, as close to the point of antenna-discharge unit, connection to provide some protection against voltage surges and built up static charges. Only use this television. 1. Refer all instructions. 5. If an outside antenna is used, use caution...
... ART 250 PART H) NEC NATIONAL ELECTRICAL CODE Note to www.lamprecycle.org. Follow all servicing to the receiver be connected to the grounding system of the building, as close to the point of antenna-discharge unit, connection to provide some protection against voltage surges and built up static charges. Only use this television. 1. Refer all instructions. 5. If an outside antenna is used, use caution...
Owners Guide
Page 4
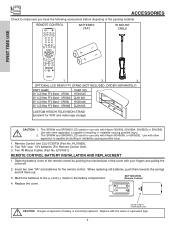
... C.C. CAUTION: 1. Replace the cover. ANT 0 INFO A/V NET ASPECT VIDEO MENU EXIT VOL SELECT CH MUTE LAST CH VID1 VID2 PIP VID3 SURF VID5 VID4 FREEZE PIP MODE PIP ACCESS SWAP DAY/NIGHT BATTERIES ("AA") IR MOUSE CABLE REC CLU-5729TSI 1. 2. 3. Insert two new "AA" size batteries for VCR and video tape storage. SP60WS PART NO. Remote Control Unit CLU-5729TSI (Part No. BOTTOM VIEW (Remote Control) 4. FIRST TIME USE ACCESSORIES Check to remove back cover. Use with your...
... C.C. CAUTION: 1. Replace the cover. ANT 0 INFO A/V NET ASPECT VIDEO MENU EXIT VOL SELECT CH MUTE LAST CH VID1 VID2 PIP VID3 SURF VID5 VID4 FREEZE PIP MODE PIP ACCESS SWAP DAY/NIGHT BATTERIES ("AA") IR MOUSE CABLE REC CLU-5729TSI 1. 2. 3. Insert two new "AA" size batteries for VCR and video tape storage. SP60WS PART NO. Remote Control Unit CLU-5729TSI (Part No. BOTTOM VIEW (Remote Control) 4. FIRST TIME USE ACCESSORIES Check to remove back cover. Use with your...
Owners Guide
Page 5
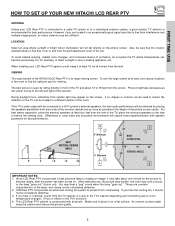
... the picture quality. 5 FIRST TIME USE HOW TO SET UP YOUR NEW HITACHI LCD REAR PTV ANTENNA Unless your LCD Rear PTV against a wall, keep it at least 10 cm (4 inches) from the wall. However, if you hear the cooling fan, it should not be sure that is its best, test various locations in a different section of the room. VIEWING The major benefit of the HITACHI LCD Rear PTV is free...
... the picture quality. 5 FIRST TIME USE HOW TO SET UP YOUR NEW HITACHI LCD REAR PTV ANTENNA Unless your LCD Rear PTV against a wall, keep it at least 10 cm (4 inches) from the wall. However, if you hear the cooling fan, it should not be sure that is its best, test various locations in a different section of the room. VIEWING The major benefit of the HITACHI LCD Rear PTV is free...
Owners Guide
Page 8
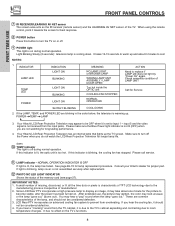
... video signal is off the Power when you hear the cooling fan, it is not assembled securely after the power has been turned on the TV's functions. 8 FRONT PANEL CONTROLS FIRST TIME USE ቨ IR RECEIVER/LEARNING AV NET sensor The screen area acts as the IR receiver (remote sensor) and the LEARNING AV NET sensor of the memory card (see page 27). If light is blinking, lamp cover is set to cool...
... video signal is off the Power when you hear the cooling fan, it is not assembled securely after the power has been turned on the TV's functions. 8 FRONT PANEL CONTROLS FIRST TIME USE ቨ IR RECEIVER/LEARNING AV NET sensor The screen area acts as the IR receiver (remote sensor) and the LEARNING AV NET sensor of the memory card (see page 27). If light is blinking, lamp cover is set to cool...
Owners Guide
Page 13
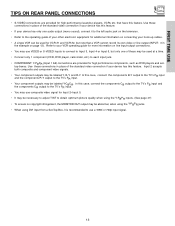
.... FIRST TIME USE TIPS ON REAR PANEL CONNECTIONS • S-VIDEO connections are provided for high performance components, such as DVD players and set- In this feature. Input 2 accepts both composite and component video signals. • Your component outputs may be abnormal, when using the Y-PBPR jacks. • When using DVI input from a Set-Top-Box, it to the left audio jack on the television. • Refer to the operating guide of the standard video connection if your...
.... FIRST TIME USE TIPS ON REAR PANEL CONNECTIONS • S-VIDEO connections are provided for high performance components, such as DVD players and set- In this feature. Input 2 accepts both composite and component video signals. • Your component outputs may be abnormal, when using the Y-PBPR jacks. • When using DVI input from a Set-Top-Box, it to the left audio jack on the television. • Refer to the operating guide of the standard video connection if your...
Owners Guide
Page 15
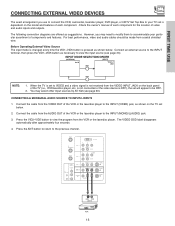
... previous channel. Press the ANT button to return to view the program from the VCR or the laserdisc player. For best performance, video and audio cables should be OFF. 2. CONNECTING A MONAURAL AUDIO SOURCE TO INPUT2~INPUT5 1. FIRST TIME USE CONNECTING EXTERNAL VIDEO DEVICES The exact arrangement you may select other Input sources by AV Net (see page 33). The following connection diagrams are offered as shown on the model and...
... previous channel. Press the ANT button to return to view the program from the VCR or the laserdisc player. For best performance, video and audio cables should be OFF. 2. CONNECTING A MONAURAL AUDIO SOURCE TO INPUT2~INPUT5 1. FIRST TIME USE CONNECTING EXTERNAL VIDEO DEVICES The exact arrangement you may select other Input sources by AV Net (see page 33). The following connection diagrams are offered as shown on the model and...
Owners Guide
Page 18
.... 2. Connect the cable from the AUDIO OUT L of the HDTV set top box or DVD player to a display. 4. Completely insert the connection cord plugs when connecting to the previous channel. It establishes a one-way point-to view the program from the output of video contents. 3. Press the ANT button to return to rear panel jacks. The picture and sound that encrypts video signals when using DVI connections to prevent illegal copying of the HDTV set top box or DVD player to the INPUT (AUDIO...
.... 2. Connect the cable from the AUDIO OUT L of the HDTV set top box or DVD player to a display. 4. Completely insert the connection cord plugs when connecting to the previous channel. It establishes a one-way point-to view the program from the output of video contents. 3. Press the ANT button to return to rear panel jacks. The picture and sound that encrypts video signals when using DVI connections to prevent illegal copying of the HDTV set top box or DVD player to the INPUT (AUDIO...
Owners Guide
Page 19
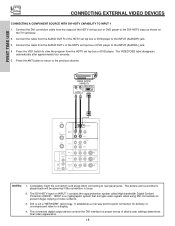
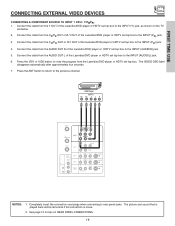
.... 3. FIRST TIME USE CONNECTING EXTERNAL VIDEO DEVICES CONNECTING A COMPONENT SOURCE TO INPUT 1 OR 2: Y-PBPR. 1. Connect the cable from the CB/PB OUT or B-Y OUT of the Laserdisc/DVD player or HDTV set top box to the INPUT (Y) jack, as shown on REAR PANEL CONNECTIONS. 19 DVD Player OUTPUT PR PB Y L R ANT A TO CONVERTER INPUT 1 PR PB DVI-HDTV R (MONO)/L AUDIO ANT B INPUT 2 PR PB Y/VIDEO RR (MONO)/L AUDIO AUDIO TO HI-FI CENTER IN IR BLASTER L R INPUT 3 INPUT 4 MONITOR OUT R (MONO)/L VIDEO R (MONO)/L VIDEO R L VIDEO AUDIO S-VIDEO S-VIDEO S-VIDEO NOTES...
.... 3. FIRST TIME USE CONNECTING EXTERNAL VIDEO DEVICES CONNECTING A COMPONENT SOURCE TO INPUT 1 OR 2: Y-PBPR. 1. Connect the cable from the CB/PB OUT or B-Y OUT of the Laserdisc/DVD player or HDTV set top box to the INPUT (Y) jack, as shown on REAR PANEL CONNECTIONS. 19 DVD Player OUTPUT PR PB Y L R ANT A TO CONVERTER INPUT 1 PR PB DVI-HDTV R (MONO)/L AUDIO ANT B INPUT 2 PR PB Y/VIDEO RR (MONO)/L AUDIO AUDIO TO HI-FI CENTER IN IR BLASTER L R INPUT 3 INPUT 4 MONITOR OUT R (MONO)/L VIDEO R (MONO)/L VIDEO R L VIDEO AUDIO S-VIDEO S-VIDEO S-VIDEO NOTES...
Owners Guide
Page 23
... A/V NET ASPECT VIDEO ቤ MENU EXIT VOL SELECT CH ቢ These buttons allow the remote to control your TV, VCR, cable box, satellite receiver, DVD player, or other audio equipment with one area. The STB button will blink, indicating that the remote will now control your set-top-box. To operate your DVD player, point the remote at the remote sensor of VCRs, CATV (Cable TV) converters, set -top-box and press the SET-TOPBOX (STB) button. The PVR button will blink, indicating...
... A/V NET ASPECT VIDEO ቤ MENU EXIT VOL SELECT CH ቢ These buttons allow the remote to control your TV, VCR, cable box, satellite receiver, DVD player, or other audio equipment with one area. The STB button will blink, indicating that the remote will now control your set-top-box. To operate your DVD player, point the remote at the remote sensor of VCRs, CATV (Cable TV) converters, set -top-box and press the SET-TOPBOX (STB) button. The PVR button will blink, indicating...

Owners Guide
Page 25
... used to select channels, lock access code, etc. The DASH (-) button can also access this button to select channels. Channel selection may not receive some channels if you want to quickly turn the Closed Caption feature on, off and auto. Time Main Picture Source Audio Broadcast Broadcast Rating Signal Format Wide Mode Sleep Timer 3:32 PM S-IN: 3 VID 3 When an S-VIDEO Input is connected to VIDEO: 3. 3:32 PM YPBPR: 1 VID: 1 When a COMPONENT VIDEO: Y-PBPR Input is connected to VIDEO: 1. ቮ ANTENNA button...
... used to select channels, lock access code, etc. The DASH (-) button can also access this button to select channels. Channel selection may not receive some channels if you want to quickly turn the Closed Caption feature on, off and auto. Time Main Picture Source Audio Broadcast Broadcast Rating Signal Format Wide Mode Sleep Timer 3:32 PM S-IN: 3 VID 3 When an S-VIDEO Input is connected to VIDEO: 3. 3:32 PM YPBPR: 1 VID: 1 When a COMPONENT VIDEO: Y-PBPR Input is connected to VIDEO: 1. ቮ ANTENNA button...
Owners Guide
Page 29
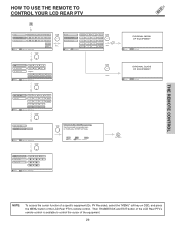
... Setting NOTE: To access the cursor function of the LCD Rear PTV's remote control. PV Recorder), select the "MENU" soft key on OSD, and press the MENU button of a specific equipment (Ex. THE REMOTE CONTROL HOW TO USE THE REMOTE TO CONTROL YOUR LCD REAR PTV B VCR PV Recorder AV Receiver POWER CH ̆ Move INFO Device Setting CH ̄ MENU TV/VCR b INFO GUIDE MORE.. Then THUMBSTICK and EXIT button of the LCD Rear PTV's remote control...
... Setting NOTE: To access the cursor function of the LCD Rear PTV's remote control. PV Recorder), select the "MENU" soft key on OSD, and press the MENU button of a specific equipment (Ex. THE REMOTE CONTROL HOW TO USE THE REMOTE TO CONTROL YOUR LCD REAR PTV B VCR PV Recorder AV Receiver POWER CH ̆ Move INFO Device Setting CH ̄ MENU TV/VCR b INFO GUIDE MORE.. Then THUMBSTICK and EXIT button of the LCD Rear PTV's remote control...
Owners Guide
Page 30
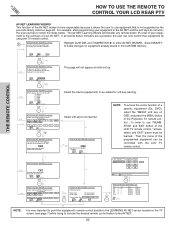
... by the pre-code library, listed on the TV screen (see page 7) while trying to transfer the desired remote control button to the AV NET. 30 For example, after programming your AV NET. Select MODIFY to make changes on OSD, and press the MENU button of the Projection TV remote control. Yes HITACHI AV NET WIZARD (Learning) No Transfer not completed! Set Top Box DVD2 POWER MENU BACK Continue Transfer...
... by the pre-code library, listed on the TV screen (see page 7) while trying to transfer the desired remote control button to the AV NET. 30 For example, after programming your AV NET. Select MODIFY to make changes on OSD, and press the MENU button of the Projection TV remote control. Yes HITACHI AV NET WIZARD (Learning) No Transfer not completed! Set Top Box DVD2 POWER MENU BACK Continue Transfer...
Owners Guide
Page 34
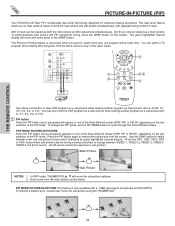
... viewing another program as a sub-picture (Ant A, V:1, V:2, V:3, or V:5). ቢ PIP button Press the PIP button and a sub-picture will move the sub-picture using the THUMBSTICK. PIP MODE PICTURE-IN-PICTURE This feature is convenient when you to change the PIP mode, use the PIP MODE button to remove the sub-picture from the screen. POP MODE PICTURE-IN-PICTURE Press the PIP button and a sub-picture appears in -Picture feature is only available with a 1080i input signal (component and DVI-HDTV). THE REMOTE CONTROL PICTURE-IN-PICTURE (PIP) Your HITACHI LCD Rear...
... viewing another program as a sub-picture (Ant A, V:1, V:2, V:3, or V:5). ቢ PIP button Press the PIP button and a sub-picture will move the sub-picture using the THUMBSTICK. PIP MODE PICTURE-IN-PICTURE This feature is convenient when you to change the PIP mode, use the PIP MODE button to remove the sub-picture from the screen. POP MODE PICTURE-IN-PICTURE Press the PIP button and a sub-picture appears in -Picture feature is only available with a 1080i input signal (component and DVI-HDTV). THE REMOTE CONTROL PICTURE-IN-PICTURE (PIP) Your HITACHI LCD Rear...
Owners Guide
Page 39
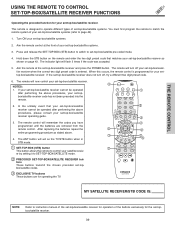
... into the remote. 2. Aim the remote at the front of the buttons exclusively for the set -top-box/satellite receiver does not turn off , try a different two digit preset code. 6. NOTES: 1. If your set-top-box/satellite receiver cannot be operated after performing the above procedures, your set -top-box/satellite receiver and press the POWER button. The remote control will flash 3 times if the code was accepted. 5. ANT 0 INFO A/V NET ASPECT VIDEO MENU EXIT ቤ...
... into the remote. 2. Aim the remote at the front of the buttons exclusively for the set -top-box/satellite receiver does not turn off , try a different two digit preset code. 6. NOTES: 1. If your set-top-box/satellite receiver cannot be operated after performing the above procedures, your set -top-box/satellite receiver and press the POWER button. The remote control will flash 3 times if the code was accepted. 5. ANT 0 INFO A/V NET ASPECT VIDEO MENU EXIT ቤ...
Owners Guide
Page 45
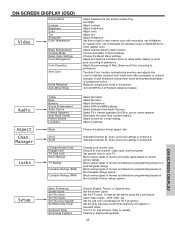
... blue, set to preference. Manager Locks Treble Bass Balance Sound Enhancement Audio Source Internal Speakers Auto Noise Cancel Perfect Volume Loudness Adjust the treble. Eliminates the noise from inactive stations. Ant A Ant B View/edit Channel ID, Scan, and Lock settings in dark screens. Block various types of movies and television programming based on a parental guide ratings. Adjust color. The Auto Color function automatically monitors and adjusts the color to Lock TV. Adjust shadow detail in antenna A. Label Video Inputs , VCR, DVD, etc. Set...
... blue, set to preference. Manager Locks Treble Bass Balance Sound Enhancement Audio Source Internal Speakers Auto Noise Cancel Perfect Volume Loudness Adjust the treble. Eliminates the noise from inactive stations. Ant A Ant B View/edit Channel ID, Scan, and Lock settings in dark screens. Block various types of movies and television programming based on a parental guide ratings. Adjust color. The Auto Color function automatically monitors and adjusts the color to Lock TV. Adjust shadow detail in antenna A. Label Video Inputs , VCR, DVD, etc. Set...
Owners Guide
Page 48
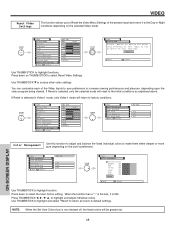
...% Yellow 50% Green 50% Cyan 50% Blue 50% Reset Move SEL Select Use THUMBSTICK to select the User Colors setting. THUMB STICK SELECT Video Picture Mode Contrast Brightness Color Tint Sharpness Color Temperature Black Enhancement Contrast Mode Reset Video Settings Move SEL Select ANT A/B Day 100% 50% 50% Night 50% High High Dynamic THUMB STICK Video Color Management Color Decoding Auto Color Noise Reduction Auto Movie Mode Move SEL Select ANT A/B Off Low Off ON-SCREEN DISPLAY Color Management Use this input to factory conditions. Use...
...% Yellow 50% Green 50% Cyan 50% Blue 50% Reset Move SEL Select Use THUMBSTICK to select the User Colors setting. THUMB STICK SELECT Video Picture Mode Contrast Brightness Color Tint Sharpness Color Temperature Black Enhancement Contrast Mode Reset Video Settings Move SEL Select ANT A/B Day 100% 50% 50% Night 50% High High Dynamic THUMB STICK Video Color Management Color Decoding Auto Color Noise Reduction Auto Movie Mode Move SEL Select ANT A/B Off Low Off ON-SCREEN DISPLAY Color Management Use this input to factory conditions. Use...
Owners Guide
Page 57
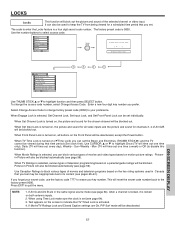
... signal source mode (see page 54), when a channel is locked, it is activated. 4. Use Canadian Ratings to block various types of movies and video tapes based on both antenna inputs. 2. The factory preset code is turned on , the picture and sound for a scheduled time period that time period (Set clock first). Video Audio Aspect Chan. Sun~Weekly - Manager Locks Setup Move SEL Sel THUMB STICK SELECT Please Enter Access Code [ - - - - ] [# Keys] Enter Code Locks Change Access Code Engage Lock TV Time Lock...
... signal source mode (see page 54), when a channel is locked, it is activated. 4. Use Canadian Ratings to block various types of movies and video tapes based on both antenna inputs. 2. The factory preset code is turned on , the picture and sound for a scheduled time period that time period (Set clock first). Video Audio Aspect Chan. Sun~Weekly - Manager Locks Setup Move SEL Sel THUMB STICK SELECT Please Enter Access Code [ - - - - ] [# Keys] Enter Code Locks Change Access Code Engage Lock TV Time Lock...
Owners Guide
Page 69
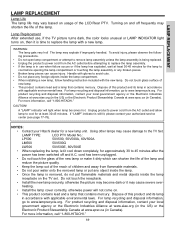
... the picture quality. • Keep the lamp out of the reach of this product and its lamp in use , if the TV picture turns dark, the color looks unusual or LAMP INDICATOR light turns on the TV set. For more information, call "1-800-HITACHI." Dispose of children and away from flammable materials. • Do not pour water onto the removed lamp or put any foreign objects inside the lamp receptacle...
... the picture quality. • Keep the lamp out of the reach of this product and its lamp in use , if the TV picture turns dark, the color looks unusual or LAMP INDICATOR light turns on the TV set. For more information, call "1-800-HITACHI." Dispose of children and away from flammable materials. • Do not pour water onto the removed lamp or put any foreign objects inside the lamp receptacle...
Owners Guide
Page 80
L Lamp Lamp Indicator, 8 Lamp Replacement, 69~72 Language Menu Language, 62 Locks Change Access Code, 57 Channel Lock, 57 Input Lock, 57 Front Panel Lock, 57 TV Time Lock, 57 Movie Ratings, 58 TV Ratings, 59 TV Ratings (Canadian - French), 61 Loudness, 50 M Menu Preference Language, 62 Background, 63 Monitor Out, 10 N Noise Reduction, 49 P Power Button, 8 Power Indicator, 8 Perfect Volume, 50 Photo MC Photo MC Indicator, 8 Photo MC Usage, 27~28 Picture Mode, 46 Picture-in-Picture (PIP), 34 - 36 Picture-outside-Picture (POP...
L Lamp Lamp Indicator, 8 Lamp Replacement, 69~72 Language Menu Language, 62 Locks Change Access Code, 57 Channel Lock, 57 Input Lock, 57 Front Panel Lock, 57 TV Time Lock, 57 Movie Ratings, 58 TV Ratings, 59 TV Ratings (Canadian - French), 61 Loudness, 50 M Menu Preference Language, 62 Background, 63 Monitor Out, 10 N Noise Reduction, 49 P Power Button, 8 Power Indicator, 8 Perfect Volume, 50 Photo MC Photo MC Indicator, 8 Photo MC Usage, 27~28 Picture Mode, 46 Picture-in-Picture (PIP), 34 - 36 Picture-outside-Picture (POP...


