Owners Guide
Page 2
CENTER ...74 CARE OF YOUR HITACHI PROJECTION TV AND YOUR REMOTE CONTROL 77 RECEPTION PROBLEMS...78 CHECK HERE BEFORE CALLING FOR SERVICE 79 SPECIFICATIONS ...80 2 TABLE OF CONTENTS TABLE OF CONTENTS TABLE OF CONTENTS ...2 IMPORTANT...3 SAFETY TIPS...5 PICTURE CAUTIONS ...10 ACCESSORIES ...11 REMOTE ...CONTROL BATTERY INSTALLATION AND REPLACEMENT 11 HOW TO SET UP YOUR NEW HITACHI PROJECTION TV 12 HOOK-UP CABLES AND CONNECTORS 14 ANTENNA CONNECTIONS TO REAR JACK...
CENTER ...74 CARE OF YOUR HITACHI PROJECTION TV AND YOUR REMOTE CONTROL 77 RECEPTION PROBLEMS...78 CHECK HERE BEFORE CALLING FOR SERVICE 79 SPECIFICATIONS ...80 2 TABLE OF CONTENTS TABLE OF CONTENTS TABLE OF CONTENTS ...2 IMPORTANT...3 SAFETY TIPS...5 PICTURE CAUTIONS ...10 ACCESSORIES ...11 REMOTE ...CONTROL BATTERY INSTALLATION AND REPLACEMENT 11 HOW TO SET UP YOUR NEW HITACHI PROJECTION TV 12 HOOK-UP CABLES AND CONNECTORS 14 ANTENNA CONNECTIONS TO REAR JACK...
Owners Guide
Page 6
... not use a mounting kit approved by the manufacturer, or sold with a cart or stand recommended by the manufacturer. 6 Be particularly careful not to damage the picture tube surface. 10 Unplug this television set from the wall outlet and refer service to qualified service personnel. 9 Do not subject your television set to...
... not use a mounting kit approved by the manufacturer, or sold with a cart or stand recommended by the manufacturer. 6 Be particularly careful not to damage the picture tube surface. 10 Unplug this television set from the wall outlet and refer service to qualified service personnel. 9 Do not subject your television set to...
Owners Guide
Page 10
...cause permanent damage to projection television receivers. Public viewing may develop over a long period of time. When using the Picture-in-Picture function, the sub-picture should not be left permanently in one corner of the screen or a "pattern burn" may require prior authorization ...from the broadcaster or owner of programs broadcast by your Hitachi Factory Warranty. This projection television receiver was intended mainly for the private viewing of the video program. 10 PICTURE CAUTIONS PICTURE CAUTIONS WARNING Continuous on-screen displays such as video games, stock...
...cause permanent damage to projection television receivers. Public viewing may develop over a long period of time. When using the Picture-in-Picture function, the sub-picture should not be left permanently in one corner of the screen or a "pattern burn" may require prior authorization ...from the broadcaster or owner of programs broadcast by your Hitachi Factory Warranty. This projection television receiver was intended mainly for the private viewing of the video program. 10 PICTURE CAUTIONS PICTURE CAUTIONS WARNING Continuous on-screen displays such as video games, stock...
Owners Guide
Page 12
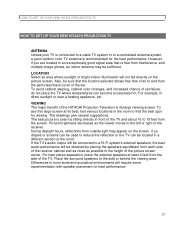
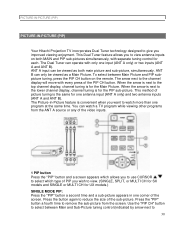
... screen. However, if you are located in the room to find the best spot for viewing. VIEWING The major benefit of the HITACHI Projection Television is its best, test various locations in an exceptionally good signal area that the location selected allows free flow of set ..., cabinet color changes, and increased chance of air to and from the screen. During daylight hours, reflections from the side of the picture screen center. LOCATION Select an area where sunlight or bright indoor illumination will require some experimentation with speaker placement for the best performance. ...
... screen. However, if you are located in the room to find the best spot for viewing. VIEWING The major benefit of the HITACHI Projection Television is its best, test various locations in an exceptionally good signal area that the location selected allows free flow of set ..., cabinet color changes, and increased chance of air to and from the screen. During daylight hours, reflections from the side of the picture screen center. LOCATION Select an area where sunlight or bright indoor illumination will require some experimentation with speaker placement for the best performance. ...
Owners Guide
Page 13
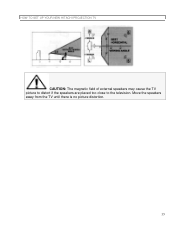
HOW TO SET UP YOUR NEW HITACHI PROJECTION TV CAUTION: The magnetic field of external speakers may cause the TV picture to distort if the speakers are placed too close to the television. Move the speakers away from the TV until there is no picture distortion. 13
HOW TO SET UP YOUR NEW HITACHI PROJECTION TV CAUTION: The magnetic field of external speakers may cause the TV picture to distort if the speakers are placed too close to the television. Move the speakers away from the TV until there is no picture distortion. 13
Owners Guide
Page 14
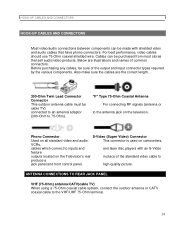
... AND CONNECTORS HOOK-UP CABLES AND CONNECTORS Most video/audio connections between components can be purchased from most stores that have phono connectors. high-quality picture.
... AND CONNECTORS HOOK-UP CABLES AND CONNECTORS Most video/audio connections between components can be purchased from most stores that have phono connectors. high-quality picture.

Owners Guide
Page 16
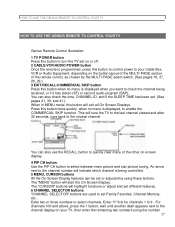
...the top right corner of the TV screen. Check the Power Light to make sure the TV is off . 6 POWER light You will make automatic picture adjustments 8 REMOTE CONTROL sensor Point your Remote at this area when selecting channels, adjusting volume, etc. 9 MAGIC FOCUS Use this button to adjust your... buttons also serve as the EXIT button when in MENU mode. 4 CHANNEL selector Press these buttons for your picture quality to optimum performance. (See page 40.) 10 ADJUSTMENT MODE button 16 NOTE: Your HITACHI TV will be turned "OFF" if there is no video input when VIDEO: 1, 2 or 3 is shown in...
...the top right corner of the TV screen. Check the Power Light to make sure the TV is off . 6 POWER light You will make automatic picture adjustments 8 REMOTE CONTROL sensor Point your Remote at this area when selecting channels, adjusting volume, etc. 9 MAGIC FOCUS Use this button to adjust your... buttons also serve as the EXIT button when in MENU mode. 4 CHANNEL selector Press these buttons for your picture quality to optimum performance. (See page 40.) 10 ADJUSTMENT MODE button 16 NOTE: Your HITACHI TV will be turned "OFF" if there is no video input when VIDEO: 1, 2 or 3 is shown in...

Owners Guide
Page 18
If you have mono sound, insert the audio cable into the left channel jack. 18 If you have a S-VHS VCR, use the S-INPUT cable in the following examples: NOTE: Completely insert connection cord plugs when connecting to front panel jacks. If you to easily connect a camcorder or VCR as shown in place of the standard video cable. FRONT PANEL JACKS AND CONNECTIONS FRONT PANEL JACKS AND CONNECTIONS The front panel jacks are provided as a convenience to allow you do not, the played back picture may be abnormal.
If you have mono sound, insert the audio cable into the left channel jack. 18 If you have a S-VHS VCR, use the S-INPUT cable in the following examples: NOTE: Completely insert connection cord plugs when connecting to front panel jacks. If you to easily connect a camcorder or VCR as shown in place of the standard video cable. FRONT PANEL JACKS AND CONNECTIONS FRONT PANEL JACKS AND CONNECTIONS The front panel jacks are provided as a convenience to allow you do not, the played back picture may be abnormal.
Owners Guide
Page 19
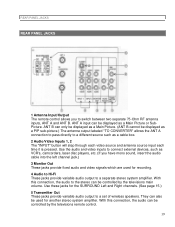
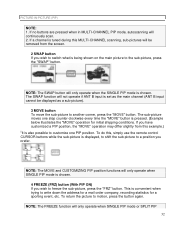
... source and antenna source input each time it is pressed. Use the audio and video inputs to the stereo can be displayed as a PIP sub-picture.) The antenna output labeled "TO CONVERTER" allows the ANT A connection to pass directly to a different source such as VCR's, camcorders, laser disc players, etc. (If...
... source and antenna source input each time it is pressed. Use the audio and video inputs to the stereo can be displayed as a PIP sub-picture.) The antenna output labeled "TO CONVERTER" allows the ANT A connection to pass directly to a different source such as VCR's, camcorders, laser disc players, etc. (If...
Owners Guide
Page 27
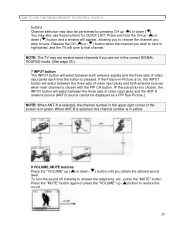
... layout of the MULTI-PAGE section of the other on-screen display. 4 PIP CH button Use the PIP CH button to select between main picture and sub-picture tuning. This will start the On-Screen Display. The "MENU" button will tune the TV to the last channel viewed and after 30 seconds...
... layout of the MULTI-PAGE section of the other on-screen display. 4 PIP CH button Use the PIP CH button to select between main picture and sub-picture tuning. This will start the On-Screen Display. The "MENU" button will tune the TV to the last channel viewed and after 30 seconds...
Owners Guide
Page 28
... between both antenna signals and the three sets of video input jacks and both antenna sources when main channel is in green. IF the sub-picture is chosen, the INPUT button will tune to answer the telephone, etc., press the "MUTE" button. Channel selection may also be displayed as a ...PIP Sub-Picture.) NOTE: When ANT A is selected, the channel number in the correct SIGNAL SOURCE mode. (See page 35.) 7 INPUT button The INPUT button will appear,...
... between both antenna signals and the three sets of video input jacks and both antenna sources when main channel is in green. IF the sub-picture is chosen, the INPUT button will tune to answer the telephone, etc., press the "MUTE" button. Channel selection may also be displayed as a ...PIP Sub-Picture.) NOTE: When ANT A is selected, the channel number in the correct SIGNAL SOURCE mode. (See page 35.) 7 INPUT button The INPUT button will appear,...
Owners Guide
Page 29
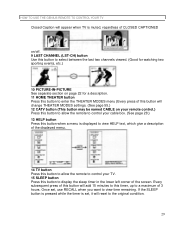
.... 9 LAST CHANNEL (LST-CH) button Use this button to select between the last two channels viewed. (Good for watching two sporting events, etc.) 10 PICTURE-IN-PICTURE See separate section on your remote control.) Press this button to allow the remote to control your cable box. (See page 28.) 13 HELP button...
.... 9 LAST CHANNEL (LST-CH) button Use this button to select between the last two channels viewed. (Good for watching two sporting events, etc.) 10 PICTURE-IN-PICTURE See separate section on your remote control.) Press this button to allow the remote to control your cable box. (See page 28.) 13 HELP button...
Owners Guide
Page 30
... A only) and two antenna inputs (ANT A and ANT B). The arrow next to the channel display will move with every press of the sub-picture. When the arrow is next to the top channel display, channel tuning is convenient when you want to watch a TV program while viewing other programs...ANT A and ANT B). Press the button again to reduce the size of the PIP CH button. This method of the screen. PICTURE-IN-PICTURE (PIP) PICTURE-IN-PICTURE (PIP) Your Hitachi Projection TV incorporates Dual Tuner technology designed to give you to view antenna inputs on the remote. To select between Main and Sub...
... A only) and two antenna inputs (ANT A and ANT B). The arrow next to the channel display will move with every press of the sub-picture. When the arrow is next to the top channel display, channel tuning is convenient when you want to watch a TV program while viewing other programs...ANT A and ANT B). Press the button again to reduce the size of the PIP CH button. This method of the screen. PICTURE-IN-PICTURE (PIP) PICTURE-IN-PICTURE (PIP) Your Hitachi Projection TV incorporates Dual Tuner technology designed to give you to view antenna inputs on the remote. To select between Main and Sub...

Owners Guide
Page 31
... edges of the screen for SX models or along the right edge of the screen (Main channel on right side). PICTURE-IN-PICTURE (PIP) channel number.) Press the INPUT button when sub-picture channel tuning is being controlled, to change between VIDEO:1, VIDEO: 2, VIDEO: 3 and ANT A antenna source. (ANT B source cannot be ... PIP mode is possible when ANT B is the same as the Main Channel. Press the "PIP" button a third time to return to remove the sub-pictures from the screen. (MV7, SX models only) (MV4, UX models only) 31 Press the "PIP" button a third time to normal viewing. MULTI CH PIP When...
... edges of the screen for SX models or along the right edge of the screen (Main channel on right side). PICTURE-IN-PICTURE (PIP) channel number.) Press the INPUT button when sub-picture channel tuning is being controlled, to change between VIDEO:1, VIDEO: 2, VIDEO: 3 and ANT A antenna source. (ANT B source cannot be ... PIP mode is possible when ANT B is the same as the Main Channel. Press the "PIP" button a third time to return to remove the sub-pictures from the screen. (MV7, SX models only) (MV4, UX models only) 31 Press the "PIP" button a third time to normal viewing. MULTI CH PIP When...
Owners Guide
Page 32
... will be displayed as the main channel (ANT B input cannot be removed from this , simply use the remote control CURSOR buttons while the sub-picture is chosen. If you have customized a PIP position, the "MOVE" operation may differ slightly from the screen. 2 SWAP button If you wish... company, recording statistics for initial shipping conditions. NOTE: The FREEZE function will only operate when the SINGLE PIP mode is displayed, to shift the sub-picture to a position you wish to another corner, press the "MOVE" button. To do this example.) iiIt is chosen. 4 FREEZE (FRZ) button (...
... will be displayed as the main channel (ANT B input cannot be removed from this , simply use the remote control CURSOR buttons while the sub-picture is chosen. If you have customized a PIP position, the "MOVE" operation may differ slightly from the screen. 2 SWAP button If you wish... company, recording statistics for initial shipping conditions. NOTE: The FREEZE function will only operate when the SINGLE PIP mode is displayed, to shift the sub-picture to a position you wish to another corner, press the "MOVE" button. To do this example.) iiIt is chosen. 4 FREEZE (FRZ) button (...

Owners Guide
Page 33
... models only) Press the "FRZ" button a second time to normal viewing. STROBE FREEZE Press the "FRZ" button a second time to freeze several frames of the picture you are currently viewing. Press this button again or "PIP" to return to freeze one frame of the... freeze). SINGLE FREEZE Press the "FRZ" button a second time to normal viewing. 33 This feature is useful for viewing a moving picture that has many details, for example, a close play in SPLIT PIP mode, only the right subpicture is chosen. Press this button again or "PIP" to ...
... models only) Press the "FRZ" button a second time to normal viewing. STROBE FREEZE Press the "FRZ" button a second time to freeze several frames of the picture you are currently viewing. Press this button again or "PIP" to return to freeze one frame of the... freeze). SINGLE FREEZE Press the "FRZ" button a second time to normal viewing. 33 This feature is useful for viewing a moving picture that has many details, for example, a close play in SPLIT PIP mode, only the right subpicture is chosen. Press this button again or "PIP" to ...

Owners Guide
Page 34
...Press the "FRZ" button a second time to normal viewing. Press this button again or "PIP" to return to freeze one frame of the picture you choose sub-picture audio from HOME THEATER-WIRELESS SOUND mode and use the "TRANSMITTER OUT" outputs on the rear panel. (See page 60.) 2. CAUTION: A pattern... vary its position using the CURSOR buttons. (UX models only.) NOTE: 1. Only sound from the main picture can be heard, unless you are currently viewing. You may develop if the sub-picture is delayed about 0.1 (1/10) second. 34 Each freeze frame is left in the same corner permanently. ...
...Press the "FRZ" button a second time to normal viewing. Press this button again or "PIP" to return to freeze one frame of the picture you choose sub-picture audio from HOME THEATER-WIRELESS SOUND mode and use the "TRANSMITTER OUT" outputs on the rear panel. (See page 60.) 2. CAUTION: A pattern... vary its position using the CURSOR buttons. (UX models only.) NOTE: 1. Only sound from the main picture can be heard, unless you are currently viewing. You may develop if the sub-picture is delayed about 0.1 (1/10) second. 34 Each freeze frame is left in the same corner permanently. ...
Owners Guide
Page 47
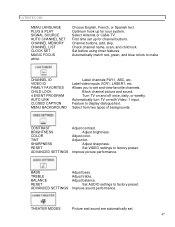
...hook up for your system. First time set . 47 Automatically match red, green, and blue colors to display dialogue/text. Block channel picture and sound. Automatically turn TV on and off once, daily, or weekly. Select from two types of backgrounds. Feature to make CHANNEL ... 4 EVENT PROGRAM AUTO LINK CLOSED CAPTION MENU BACKGROUND Label channels PAY1, ABC, etc. Set VIDEO settings to factory preset. THEATER MODES Picture and sound are automatically set up for channel buttons. Check channel name, scan, and child lock. Adjust treble. CONTRAST BRIGHTNESS COLOR TINT...
...hook up for your system. First time set . 47 Automatically match red, green, and blue colors to display dialogue/text. Block channel picture and sound. Automatically turn TV on and off once, daily, or weekly. Select from two types of backgrounds. Feature to make CHANNEL ... 4 EVENT PROGRAM AUTO LINK CLOSED CAPTION MENU BACKGROUND Label channels PAY1, ABC, etc. Set VIDEO settings to factory preset. THEATER MODES Picture and sound are automatically set up for channel buttons. Check channel name, scan, and child lock. Adjust treble. CONTRAST BRIGHTNESS COLOR TINT...
Owners Guide
Page 55
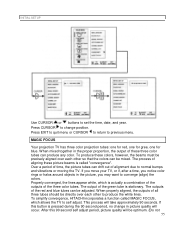
.... The outputs of the green tube is pressed during the 90 second period, no change position. If this 90 second self adjust period, picture quality will be adjusted. Press CURSOR to self adjust. To produce these three color tubes can drift out of these colors, however, the... beams must be mixed. To simplify convergence, HITACHI incorporates a function called "convergence". This process will occur. INITIAL SETUP Use CURSOR or buttons to normal bumps and vibrations or moving the TV....
.... The outputs of the green tube is pressed during the 90 second period, no change position. If this 90 second self adjust period, picture quality will be adjusted. Press CURSOR to self adjust. To produce these three color tubes can drift out of these colors, however, the... beams must be mixed. To simplify convergence, HITACHI incorporates a function called "convergence". This process will occur. INITIAL SETUP Use CURSOR or buttons to normal bumps and vibrations or moving the TV....
Owners Guide
Page 56
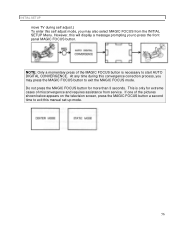
... self adjust.) To enter this self adjust mode, you may press the MAGIC FOCUS button to exit the MAGIC FOCUS mode. If one of the pictures shown below appears on the television screen, press the MAGIC FOCUS button a second time to exit this will display a message prompting you to start AUTO...
... self adjust.) To enter this self adjust mode, you may press the MAGIC FOCUS button to exit the MAGIC FOCUS mode. If one of the pictures shown below appears on the television screen, press the MAGIC FOCUS button a second time to exit this will display a message prompting you to start AUTO...


