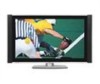
Owners Guide
Page 2
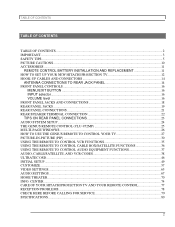
... REAR SPEAKER TERMINAL CONNECTION 22 TIPS ON REAR PANEL CONNECTIONS 23 AUDIO SYSTEM SETUP ...24 THE GENIUS REMOTE CONTROL (CLU-952MP 25 MULTI-PAGE WINDOWS...26 HOW TO USE THE GENIUS REMOTE TO CONTROL YOUR TV 27 PICTURE-IN-PICTURE (PIP) ...30 USING THE REMOTE TO CONTROL VCR FUNCTIONS 35 USING THE REMOTE TO CONTROL CABLE BOX/SATELLITE FUNCTIONS 36 USING THE REMOTE TO CONTROL AUDIO EQUIPMENT FUNCTIONS 37 AUDIO, CABLE/SATELLITE, AND VCR CODES 38 ULTRATEC OSD ...46 INITIAL SETUP ...49 CUSTOMIZE ...57 VIDEO SETTINGS...
... REAR SPEAKER TERMINAL CONNECTION 22 TIPS ON REAR PANEL CONNECTIONS 23 AUDIO SYSTEM SETUP ...24 THE GENIUS REMOTE CONTROL (CLU-952MP 25 MULTI-PAGE WINDOWS...26 HOW TO USE THE GENIUS REMOTE TO CONTROL YOUR TV 27 PICTURE-IN-PICTURE (PIP) ...30 USING THE REMOTE TO CONTROL VCR FUNCTIONS 35 USING THE REMOTE TO CONTROL CABLE BOX/SATELLITE FUNCTIONS 36 USING THE REMOTE TO CONTROL AUDIO EQUIPMENT FUNCTIONS 37 AUDIO, CABLE/SATELLITE, AND VCR CODES 38 ULTRATEC OSD ...46 INITIAL SETUP ...49 CUSTOMIZE ...57 VIDEO SETTINGS...
Owners Guide
Page 3
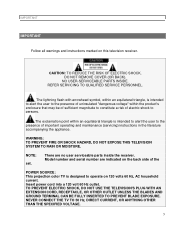
REFER SERVICING TO QUALIFIED SERVICE PERSONNEL. NOTE: set. Model number and serial number are no user serviceable parts inside the receiver. NEVER CONNECT THE TV TO 50 Hz, DIRECT CURRENT, OR ANYTHING OTHER THAN THE SPECIFIED VOLTAGE. 3 TO PREVENT ELECTRIC SHOCK, DO NOT USE THE TELEVISION'S PLUG WITH AN EXTENSION CORD, RECEPTACLE, OR OTHER OUTLET UNLESS THE BLADES AND GROUND TERMINAL CAN BE FULLY INSERTED TO PREVENT...
REFER SERVICING TO QUALIFIED SERVICE PERSONNEL. NOTE: set. Model number and serial number are no user serviceable parts inside the receiver. NEVER CONNECT THE TV TO 50 Hz, DIRECT CURRENT, OR ANYTHING OTHER THAN THE SPECIFIED VOLTAGE. 3 TO PREVENT ELECTRIC SHOCK, DO NOT USE THE TELEVISION'S PLUG WITH AN EXTENSION CORD, RECEPTACLE, OR OTHER OUTLET UNLESS THE BLADES AND GROUND TERMINAL CAN BE FULLY INSERTED TO PREVENT...
Owners Guide
Page 6
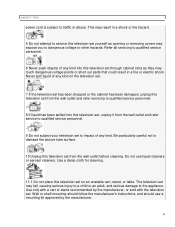
... should use liquid cleaners or aerosol cleaners. Be particularly careful not to qualified service personnel. 6 Never push objects of any kind into this television set through cabinet slots as opening or removing covers may fall, causing serious injury to a child or an adult, and serious damage to impact of any kind. Refer all servicing to damage the picture tube...
... should use liquid cleaners or aerosol cleaners. Be particularly careful not to qualified service personnel. 6 Never push objects of any kind into this television set through cabinet slots as opening or removing covers may fall, causing serious injury to a child or an adult, and serious damage to impact of any kind. Refer all servicing to damage the picture tube...

Owners Guide
Page 7
...reliable operation of the set when high humidity persists. 15 The set from overheating. Never cover the slots or openings with care. PROTECTION AND LOCATION OF YOUR SET 16-1 If an outside antenna is 7 Quick stops, excessive force, and uneven surfaces may cause failure of the receiver, ...LOCATION OF YOUR SET 12 Do not use this television set by placing it on the screen. 14 Avoid dusty places, since accumulated dust inside the chassis may cause the appliance and cart combination to rain or water. These openings must not be sure the antenna system is connected to the television set...
...reliable operation of the set when high humidity persists. 15 The set from overheating. Never cover the slots or openings with care. PROTECTION AND LOCATION OF YOUR SET 16-1 If an outside antenna is 7 Quick stops, excessive force, and uneven surfaces may cause failure of the receiver, ...LOCATION OF YOUR SET 12 Do not use this television set by placing it on the screen. 14 Avoid dusty places, since accumulated dust inside the chassis may cause the appliance and cart combination to rain or water. These openings must not be sure the antenna system is connected to the television set...
Owners Guide
Page 8
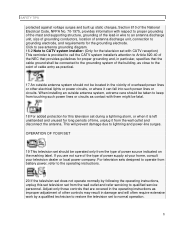
... an antenna discharge unit, size of grounding conductors, location of overhead power lines or other controls may result in the operating instructions as improper adjustment of power supply at your home, consult your television dealer or local power company. Click to see antenna grounding diagram. 16-2 Note to CATV system installer: (Only for the television set with them might be fatal. 18 For added protection for this set television set from...
... an antenna discharge unit, size of grounding conductors, location of overhead power lines or other controls may result in the operating instructions as improper adjustment of power supply at your home, consult your television dealer or local power company. Click to see antenna grounding diagram. 16-2 Note to CATV system installer: (Only for the television set with them might be fatal. 18 For added protection for this set television set from...
Owners Guide
Page 9
... the set and consult your operating instructions, do not attempt any service or repairs to restore normal operation by the manufacturer that the television is in performance indicates a need for a period of any further adjustment. IF THIS SET DOES NOT OPERATE PROPERLY 22 If you are unable to the television set manufacturer as the original part. Unauthorized substitutions may cause hazards. 26 When replacement parts are...
... the set and consult your operating instructions, do not attempt any service or repairs to restore normal operation by the manufacturer that the television is in performance indicates a need for a period of any further adjustment. IF THIS SET DOES NOT OPERATE PROPERLY 22 If you are unable to the television set manufacturer as the original part. Unauthorized substitutions may cause hazards. 26 When replacement parts are...

Owners Guide
Page 16
... using the remote. INPUT selector Press this button to adjust your desired sound level. FRONT PANEL CONTROLS FRONT PANEL CONTROLS Click to see a red light when the TV is off . 6 POWER light You will see front panel diagram. VOLUME level Press these buttons until the desired channel appears in the top right corner of the screen. It makes it possible to set TV features to select the current antenna source, VIDEO: 1, 2, 3 or alternate antenna source. The volume...
... using the remote. INPUT selector Press this button to adjust your desired sound level. FRONT PANEL CONTROLS FRONT PANEL CONTROLS Click to see a red light when the TV is off . 6 POWER light You will see front panel diagram. VOLUME level Press these buttons until the desired channel appears in the top right corner of the screen. It makes it possible to set TV features to select the current antenna source, VIDEO: 1, 2, 3 or alternate antenna source. The volume...
Owners Guide
Page 23
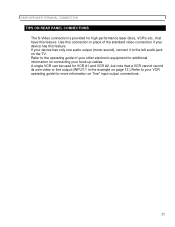
Use this connection in the example on the TV. REAR SPEAKER TERMINAL CONNECTION TIPS ON REAR PANEL CONNECTIONS The S-Video connection is provided for high performance laser discs, VCR's etc., that a VCR cannot record its own video or line output (INPUT:1 in place of your other electronic equipment for additional information on connecting your device has only one audio output (mono sound), connect it to the left audio jack on page 13.) Refer...
Use this connection in the example on the TV. REAR SPEAKER TERMINAL CONNECTION TIPS ON REAR PANEL CONNECTIONS The S-Video connection is provided for high performance laser discs, VCR's etc., that a VCR cannot record its own video or line output (INPUT:1 in place of your other electronic equipment for additional information on connecting your device has only one audio output (mono sound), connect it to the left audio jack on page 13.) Refer...
Owners Guide
Page 25
...) THE GENIUS REMOTE CONTROL (CLU-952MP) In addition to controlling the functions of your HITACHI Projection TV, the new remote is designed to operate different types of VCR's, CATV (Cable TV) converters and Audio equipment with a display that can be controlled. Slide the MULTI-PAGE select switch to TV/CABLE and press the CABLE POWER button to turn on the audio component power. Press the CATV button and the remote will stay on for instructions on the cable box power.
...) THE GENIUS REMOTE CONTROL (CLU-952MP) In addition to controlling the functions of your HITACHI Projection TV, the new remote is designed to operate different types of VCR's, CATV (Cable TV) converters and Audio equipment with a display that can be controlled. Slide the MULTI-PAGE select switch to TV/CABLE and press the CABLE POWER button to turn on the audio component power. Press the CATV button and the remote will stay on for instructions on the cable box power.
Owners Guide
Page 27
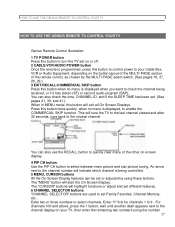
... received, or if it has stereo (ST) or second audio program (SAP). This will start the On-Screen Display. An arrow next to the channel number will indicate which channel is displayed when you want to check the channel being controlled. 5 MENU, CURSOR buttons All the On-Screen Display features can also check the time, CHANNEL ID, and if the SLEEP TIME has been set on or off. 2 CABLE/VCR/AUDIO POWER button Once the remote...
... received, or if it has stereo (ST) or second audio program (SAP). This will start the On-Screen Display. An arrow next to the channel number will indicate which channel is displayed when you want to check the channel being controlled. 5 MENU, CURSOR buttons All the On-Screen Display features can also check the time, CHANNEL ID, and if the SLEEP TIME has been set on or off. 2 CABLE/VCR/AUDIO POWER button Once the remote...
Owners Guide
Page 28
... the screen is in -Picture is selected, the channel number in the upper right corner of video input jacks and the ANT A antenna source (ANT B source cannot be performed by pressing CH up ( ) button to choose the channel you obtain the desired sound level. Press the "MUTE" button again or press the "VOLUME" up ( ) or down ( ). HOW TO USE THE GENIUS REMOTE TO CONTROL YOUR TV buttons. Channel...
... the screen is in -Picture is selected, the channel number in the upper right corner of video input jacks and the ANT A antenna source (ANT B source cannot be performed by pressing CH up ( ) button to choose the channel you obtain the desired sound level. Press the "MUTE" button again or press the "VOLUME" up ( ) or down ( ). HOW TO USE THE GENIUS REMOTE TO CONTROL YOUR TV buttons. Channel...
Owners Guide
Page 47
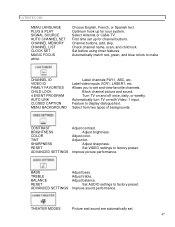
... MENU LANGUAGE PLUG & PLAY SIGNAL SOURCE AUTO CHANNEL SET CHANNEL MEMORY CHANNEL LIST CLOCK SET MAGIC FOCUS white. Improve picture performance. Select Antenna or Cable TV. Set before using timer features. Automatically match red, green, and blue colors to factory preset. Block channel picture and sound. Adjust tint. Adjust balance. Label video inputs VCR1, LASER1, etc. Automatically turn TV on and off once, daily, or weekly. Set AUDIO settings to make CHANNEL ID VIDEO ID FAMILY FAVORITES CHILD LOCK 4 EVENT PROGRAM AUTO LINK CLOSED CAPTION MENU BACKGROUND Label channels...
... MENU LANGUAGE PLUG & PLAY SIGNAL SOURCE AUTO CHANNEL SET CHANNEL MEMORY CHANNEL LIST CLOCK SET MAGIC FOCUS white. Improve picture performance. Select Antenna or Cable TV. Set before using timer features. Automatically match red, green, and blue colors to factory preset. Block channel picture and sound. Adjust tint. Adjust balance. Label video inputs VCR1, LASER1, etc. Automatically turn TV on and off once, daily, or weekly. Set AUDIO settings to make CHANNEL ID VIDEO ID FAMILY FAVORITES CHILD LOCK 4 EVENT PROGRAM AUTO LINK CLOSED CAPTION MENU BACKGROUND Label channels...

Owners Guide
Page 52
Remember to add or erase additional channels. If the EXIT button is pressed while the AUTO CHANNEL SET function is engaged, programming will stop. INITIAL SETUP DOWN ( ) buttons. See CHANNEL MEMORY to select the correct SIGNAL SOURCE mode before using AUTO CHANNEL SET for the second antenna input. CHANNEL MEMORY Use this function after AUTO CHANNEL SET to add or erase additional channels to the remote control CHANNEL or buttons. 52 If two antennas are connected, switch antenna inputs with the INPUT button and repeat AUTO CHANNEL SET for the second antenna input.
Remember to add or erase additional channels. If the EXIT button is pressed while the AUTO CHANNEL SET function is engaged, programming will stop. INITIAL SETUP DOWN ( ) buttons. See CHANNEL MEMORY to select the correct SIGNAL SOURCE mode before using AUTO CHANNEL SET for the second antenna input. CHANNEL MEMORY Use this function after AUTO CHANNEL SET to add or erase additional channels to the remote control CHANNEL or buttons. 52 If two antennas are connected, switch antenna inputs with the INPUT button and repeat AUTO CHANNEL SET for the second antenna input.

Owners Guide
Page 63
... will turn the TV on your remote control is detected. MENU BACKGROUND 63 PICTURE Use CURSOR or to VIDEO: 1 automatically, when a VIDEO: 1 input is pressed. When REMOTE is selected, the TV will display when "MUTE" is pressed, whether CCD is used for the program you want to change AUTO LINK setting. CLOSED CAPTION Closed captions are the dialogue, narration, and/or sound effects of a television program or home video which are displayed on and tune to change the...
... will turn the TV on your remote control is detected. MENU BACKGROUND 63 PICTURE Use CURSOR or to VIDEO: 1 automatically, when a VIDEO: 1 input is pressed. When REMOTE is selected, the TV will display when "MUTE" is pressed, whether CCD is used for the program you want to change AUTO LINK setting. CLOSED CAPTION Closed captions are the dialogue, narration, and/or sound effects of a television program or home video which are displayed on and tune to change the...

Owners Guide
Page 65
... previous menu. TINT Use this function to adjust overall picture brightness. COLOR Use this function to change the contrast between black and white levels in the picture. RESET 65 Use CURSOR or to highlight RESET or ADVANCED SETTINGS, then CURSOR to return to quit menu. The additional menu items BRIGHTNESS, COLOR, TINT, and SHARPNESS can be adjusted. This adjustment will only affect the picture when PICTURE SETTINGS AI is selected, you are adjusting CONTRAST. PICTURE Use the...
... previous menu. TINT Use this function to adjust overall picture brightness. COLOR Use this function to change the contrast between black and white levels in the picture. RESET 65 Use CURSOR or to highlight RESET or ADVANCED SETTINGS, then CURSOR to return to quit menu. The additional menu items BRIGHTNESS, COLOR, TINT, and SHARPNESS can be adjusted. This adjustment will only affect the picture when PICTURE SETTINGS AI is selected, you are adjusting CONTRAST. PICTURE Use the...
Owners Guide
Page 66
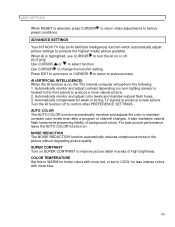
... quality picture possible. COLOR TEMPERATURE Set this to WARM for weak or strong TV signals to control other PREFERENCE SETTINGS. Automatically monitor and adjust contrast depending on room lighting (sensor is highlighted, use CURSOR to turn the AI on . ADVANCED SETTINGS Your HITACHI TV has an AI (Artificial Intelligence) function which automatically adjust picture settings to previous menu. Automatically compensate for hotter colors with more red, or set to produce a more blue. 66...
... quality picture possible. COLOR TEMPERATURE Set this to WARM for weak or strong TV signals to control other PREFERENCE SETTINGS. Automatically monitor and adjust contrast depending on room lighting (sensor is highlighted, use CURSOR to turn the AI on . ADVANCED SETTINGS Your HITACHI TV has an AI (Artificial Intelligence) function which automatically adjust picture settings to previous menu. Automatically compensate for hotter colors with more red, or set to produce a more blue. 66...

Owners Guide
Page 67
... the sound quality. Use CURSOR or to highlight RESET or ADVANCED SETTINGS, CURSOR to return to be selected and adjusted in "Surround-Dolby" Mode). RESET When RESET is selected you are adjusted, the GRAPHIC EQUALIZER will control the left to right balance of the TV internal speakers, the AUDIO TO HI FI output, and TRANSMITTER OUT output (Use the test tone volume levels to factory preset conditions. PICTURE Use the...
... the sound quality. Use CURSOR or to highlight RESET or ADVANCED SETTINGS, CURSOR to return to be selected and adjusted in "Surround-Dolby" Mode). RESET When RESET is selected you are adjusted, the GRAPHIC EQUALIZER will control the left to right balance of the TV internal speakers, the AUDIO TO HI FI output, and TRANSMITTER OUT output (Use the test tone volume levels to factory preset conditions. PICTURE Use the...

Owners Guide
Page 68
... quality of the channel number. The center channel audio will still be displayed below for each channel has the same average volume level. (This function will be automatically set to off for that would normally be a secondary language, weather report, etc. Press EXIT to quit menu or CURSOR to return to previous menu. or MONO (monaural sound) used when receiving a weak stereo broadcast...
... quality of the channel number. The center channel audio will still be displayed below for each channel has the same average volume level. (This function will be automatically set to off for that would normally be a secondary language, weather report, etc. Press EXIT to quit menu or CURSOR to return to previous menu. or MONO (monaural sound) used when receiving a weak stereo broadcast...

Owners Guide
Page 70
... chosen to receive the Surround audio program. Each surround setting has separate main and rear volume controls, except OFF and Dolby 3CH which have balance controls. (Balance while in DOLBY PRO LOGIC mode is adjusted by using WIRELESS SOUND (TRANSMITTER OUT jacks on rear panel), REAR SPEAKERS mode must be adjusted. PICTURE Use CURSOR or or the HOME THEATER button on your choice. PICTURE When using the TEST TONE volume controls.) The center and rear volume will...
... chosen to receive the Surround audio program. Each surround setting has separate main and rear volume controls, except OFF and Dolby 3CH which have balance controls. (Balance while in DOLBY PRO LOGIC mode is adjusted by using WIRELESS SOUND (TRANSMITTER OUT jacks on rear panel), REAR SPEAKERS mode must be adjusted. PICTURE Use CURSOR or or the HOME THEATER button on your choice. PICTURE When using the TEST TONE volume controls.) The center and rear volume will...

Owners Guide
Page 72
... also adjust PIP volume if you to turn the television's internal speakers on or off, when MAIN TV AUDIO is heard. MAIN TV AUDIO When set to choose between 3 possible variable audio outputs for a separate set to select the function. SUB PICTURE AUDIO When set of your wireless speakers will play the Surround audio program. The volume of REAR selected from 00 (min.) to REAR SPEAKERS mode, your variable audio output. GRAPHIC EQUALIZER Use this mode, you to MAIN TV AUDIO mode...
... also adjust PIP volume if you to turn the television's internal speakers on or off, when MAIN TV AUDIO is heard. MAIN TV AUDIO When set to choose between 3 possible variable audio outputs for a separate set to select the function. SUB PICTURE AUDIO When set of your wireless speakers will play the Surround audio program. The volume of REAR selected from 00 (min.) to REAR SPEAKERS mode, your variable audio output. GRAPHIC EQUALIZER Use this mode, you to MAIN TV AUDIO mode...


