
Owners Guide
Page 5
... in a wet basement, or near a swimming pool, etc. • Never expose the television to damage the picture tube surface. 10 Unplug this television on the screen. 14 Avoid dusty places. Use only with a cart or stand recommended by the manufacturer. 11-2 An appliance and cart combination should be moved with the...
... in a wet basement, or near a swimming pool, etc. • Never expose the television to damage the picture tube surface. 10 Unplug this television on the screen. 14 Avoid dusty places. Use only with a cart or stand recommended by the manufacturer. 11-2 An appliance and cart combination should be moved with the...

Owners Guide
Page 8
...batteries (For Remote Control Unit). Public Viewing of Copyrighted Material Public viewing of programs broadcast by pushing the notched part of the cover with your HITACHI Factory Warranty. • When using Picture-in-Picture function, the sub-picture should not be left permanently in one corner of the... screen or a "PATTERN BURN" may require prior authorization from other fixed (non-moving) patterns can cause permanent damage to make sure that you have the ...
...batteries (For Remote Control Unit). Public Viewing of Copyrighted Material Public viewing of programs broadcast by pushing the notched part of the cover with your HITACHI Factory Warranty. • When using Picture-in-Picture function, the sub-picture should not be left permanently in one corner of the... screen or a "PATTERN BURN" may require prior authorization from other fixed (non-moving) patterns can cause permanent damage to make sure that you have the ...
Owners Guide
Page 10
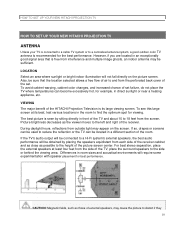
...room to the side or behind the viewing area. VIEWING The major benefit of the HITACHI Projection Television is its best, test various locations in front of the TV and about..., place the external speakers at its large viewing screen. HOW TO SET UP YOUR NEW HITACHI PROJECTION TV HOW TO SET UP YOUR NEW HITACHI PROJECTION TV ANTENNA Unless your TV is connected to... a cable TV system or to the left and right of the receiver. To see this large screen at least four feet from the screen...
...room to the side or behind the viewing area. VIEWING The major benefit of the HITACHI Projection Television is its best, test various locations in front of the TV and about..., place the external speakers at its large viewing screen. HOW TO SET UP YOUR NEW HITACHI PROJECTION TV HOW TO SET UP YOUR NEW HITACHI PROJECTION TV ANTENNA Unless your TV is connected to... a cable TV system or to the left and right of the receiver. To see this large screen at least four feet from the screen...
Owners Guide
Page 14
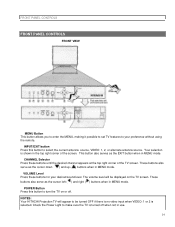
... on or off when not in use. 14 VOLUME Level Press these buttons until the desired channel appears at the top right corner of the screen. CHANNEL Selector Press these buttons for your preference without using the remote. The volume level will appear to make sure the TV is shown in... the cursor left ( ) and right ( ) buttons when in the top right corner of the TV screen. Your selection is turned off . POWER Button Press this button to turn the TV on the TV screen. NOTES: Your HITACHI Projection TV will be turned OFF if there is no video input when VIDEO: 1 or 2 is...
... on or off when not in use. 14 VOLUME Level Press these buttons until the desired channel appears at the top right corner of the screen. CHANNEL Selector Press these buttons for your preference without using the remote. The volume level will appear to make sure the TV is shown in... the cursor left ( ) and right ( ) buttons when in the top right corner of the TV screen. Your selection is turned off . POWER Button Press this button to turn the TV on the TV screen. NOTES: Your HITACHI Projection TV will be turned OFF if there is no video input when VIDEO: 1 or 2 is...
Owners Guide
Page 15
... this button to enter Digital Array mode. FRONT PANEL CONTROLS To see a red light when the TV is turned on the amount of the on-screen displays with HELP text displayed, press and hold the POWER button on the TV again to end the autodemonstration. Press the POWER button on the...
... this button to enter Digital Array mode. FRONT PANEL CONTROLS To see a red light when the TV is turned on the amount of the on-screen displays with HELP text displayed, press and hold the POWER button on the TV again to end the autodemonstration. Press the POWER button on the...

Owners Guide
Page 28
... sound to the channel display on your TV, then enter the remaining two numbers using the number buttons. The HELP text will exit all ON-Screen Displays. 28 Enter "0" first for watching two sporting evens, etc.). (6) VOLUME, MUTE Buttons Press the VOLUME up ( ) or down ( ) button until another dash appears next...
... sound to the channel display on your TV, then enter the remaining two numbers using the number buttons. The HELP text will exit all ON-Screen Displays. 28 Enter "0" first for watching two sporting evens, etc.). (6) VOLUME, MUTE Buttons Press the VOLUME up ( ) or down ( ) button until another dash appears next...

Owners Guide
Page 29
...remaining. When an COMPONENT: YCB-CR Input is connected to the original condition. (11) INPUT Button The INPUT button will start the On-Screen Display. If the SLEEP button is pressed while the timer is pressed. The MENU button will select between the two sets of video input ...10) SLEEP Button Press this button will highlight functions or adjust and set , it will reset to VIDEO: 2. (9) MENU, CURSOR Buttons All the On-Screen Display features can be displayed as a PIP sub-picture and COMPONENT VIDEO: Y-CB-CR INPUT 2 source will select between antenna signals and the two sets...
...remaining. When an COMPONENT: YCB-CR Input is connected to the original condition. (11) INPUT Button The INPUT button will start the On-Screen Display. If the SLEEP button is pressed while the timer is pressed. The MENU button will select between the two sets of video input ...10) SLEEP Button Press this button will highlight functions or adjust and set , it will reset to VIDEO: 2. (9) MENU, CURSOR Buttons All the On-Screen Display features can be displayed as a PIP sub-picture and COMPONENT VIDEO: Y-CB-CR INPUT 2 source will select between antenna signals and the two sets...
Owners Guide
Page 31
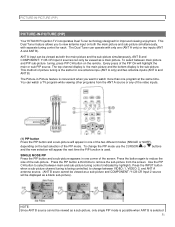
.... Press the INPUT button when a sub-picture channel tuning is being controlled, to watch a TV program while viewing other programs from the screen. The Dual Tuner can only be viewed as a blank sub-picture). This method of picture tuning is the same for improved viewing enjoyment.... sub-picture. To select between main and sub-picture tuning control (indicated by hgihlight). PICTURE-IN-PICTURE (PIP) PICTURE-IN-PICTURE (PIP) Your HITACHI Projection TV incorporates Dual Tuner technology designed for one antenna inpu (ANT A only) and two antenna inputs (ANT A and ANT B) The Picture-...
.... Press the INPUT button when a sub-picture channel tuning is being controlled, to watch a TV program while viewing other programs from the screen. The Dual Tuner can only be viewed as a blank sub-picture). This method of picture tuning is the same for improved viewing enjoyment.... sub-picture. To select between main and sub-picture tuning control (indicated by hgihlight). PICTURE-IN-PICTURE (PIP) PICTURE-IN-PICTURE (PIP) Your HITACHI Projection TV incorporates Dual Tuner technology designed for one antenna inpu (ANT A only) and two antenna inputs (ANT A and ANT B) The Picture-...

Owners Guide
Page 32
... have customized a PIP position, the MOVE operation may differ slightly from the screen. The sub-picture moves one step counterclockwise every time the MOVE button is deactivated. 4. You must be removed... from the screen. 3. If you wish to switch what is also possible to the sub-picture, press...is being shown on the main picture to customize the PIP position. To do htis, wati until the On-Screen Display disappears (about eight seconds) and then use the CURSOR , , , buttons. 32 SURF MODE PIP This...
... have customized a PIP position, the MOVE operation may differ slightly from the screen. The sub-picture moves one step counterclockwise every time the MOVE button is deactivated. 4. You must be removed... from the screen. 3. If you wish to switch what is also possible to the sub-picture, press...is being shown on the main picture to customize the PIP position. To do htis, wati until the On-Screen Display disappears (about eight seconds) and then use the CURSOR , , , buttons. 32 SURF MODE PIP This...

Owners Guide
Page 41
Set before using timer features. Allows you to use. Press HELP on and off once, daily, or weekly. 41 This part of the screen shows which remote control buttons to set up for channel buttons. First time set and view favorite channels. Label video inputs VCR1, DVD1, etc... and blue colors to make white. Turn TV on the remote control when a menu is displayed, and text will appear giving a description of the screen shows what selections are available. MENU LANGUAGE PLUG & PLAY SIGNAL SOURCE AUTO CHANNEL SET CHANNEL MEMORY CHANNEL LIST CLOCK SET DIGITAL ARRAY Choose English, French...
Set before using timer features. Allows you to use. Press HELP on and off once, daily, or weekly. 41 This part of the screen shows which remote control buttons to set up for channel buttons. First time set and view favorite channels. Label video inputs VCR1, DVD1, etc... and blue colors to make white. Turn TV on the remote control when a menu is displayed, and text will appear giving a description of the screen shows what selections are available. MENU LANGUAGE PLUG & PLAY SIGNAL SOURCE AUTO CHANNEL SET CHANNEL MEMORY CHANNEL LIST CLOCK SET DIGITAL ARRAY Choose English, French...

Owners Guide
Page 43
...help you to properly set for approximately five seconds. Use CURSOR or to end the autodemonstration. NOTE: To see an auto-demonstration of the on-screen displays with HELP text displayed, press and hold the POWER button on the TV again to select the MENU LANGUAGE of three different languages for... time. Simply answer two questions and a graphic will allow you the optimum setup for your TV up your choice. Use the CURSOR or on -screen displays. MENU LANGUAGE This feature will be displayed, showing you to select any one of your TV or Home Theater System. Press EXIT to quit...
...help you to properly set for approximately five seconds. Use CURSOR or to end the autodemonstration. NOTE: To see an auto-demonstration of the on-screen displays with HELP text displayed, press and hold the POWER button on the TV again to select the MENU LANGUAGE of three different languages for... time. Simply answer two questions and a graphic will allow you the optimum setup for your TV up your choice. Use the CURSOR or on -screen displays. MENU LANGUAGE This feature will be displayed, showing you to select any one of your TV or Home Theater System. Press EXIT to quit...
Owners Guide
Page 50
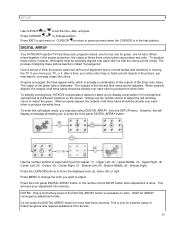
... tube is necessary to converge (align) the colors. The outputs of horizontal and vertical lines at 9 different locations on the screen. To simplify convergence, HITACHI incorporates a feature to display a test pattern of the red and blue tubes can be adjusted. To enter this will save your...properly aligned, the outputs of the DIGITAL ARRAY button is stationary. Upper Middle, (3) - Bottom Middle, (9) - Bottom Right. DIGITAL ARRAY Your HITACHI Projection TV has three color projection tubes: one for red, one for green, one for more than three seconds. If you move the displayed ...
... tube is necessary to converge (align) the colors. The outputs of horizontal and vertical lines at 9 different locations on the screen. To simplify convergence, HITACHI incorporates a feature to display a test pattern of the red and blue tubes can be adjusted. To enter this will save your...properly aligned, the outputs of the DIGITAL ARRAY button is stationary. Upper Middle, (3) - Bottom Middle, (9) - Bottom Right. DIGITAL ARRAY Your HITACHI Projection TV has three color projection tubes: one for red, one for green, one for more than three seconds. If you move the displayed ...

Owners Guide
Page 51
SET UP Four lines surrounding a crosshatch indicate the point being adjusted. When the TV is turned ON again, your adjustment data into memory, press the front panel DIGITAL ARRAY button or the remote control MOVE Button. The color of the screen. 51 If you do NOT wish to save your adjustment data into memory, turn the TV OFF or press the remote control PIP button. When adjusting convergence, always start at the center of these surrounding lines indicates the color being adjusted. To save your old convergence data will be stored.
SET UP Four lines surrounding a crosshatch indicate the point being adjusted. When the TV is turned ON again, your adjustment data into memory, press the front panel DIGITAL ARRAY button or the remote control MOVE Button. The color of the screen. 51 If you do NOT wish to save your adjustment data into memory, turn the TV OFF or press the remote control PIP button. When adjusting convergence, always start at the center of these surrounding lines indicates the color being adjusted. To save your old convergence data will be stored.

Owners Guide
Page 54
... has been set with your favorite channels. To reset categories and channels back to rename. When the setting in the top right corner of the screen. FAMILY FAVORITES (OPERATION) Use this function to display FAMILY FAVORITES selections as sub-pictures or to tune the main picture to enter the desired channel...
... has been set with your favorite channels. To reset categories and channels back to rename. When the setting in the top right corner of the screen. FAMILY FAVORITES (OPERATION) Use this function to display FAMILY FAVORITES selections as sub-pictures or to tune the main picture to enter the desired channel...

Owners Guide
Page 55
... time only), DAILY (TV will time out every day), WEEKLY (TV will time out one time a week) or OFF (to keep the TV from the screen. It can set ON or OFF. When FRONT PANEL LOCK is turned on, all buttons on the front panel will appear as sub-pictures at... the right edge of the screen. When TV TIME OUT is turned on , you set. Use CURSOR , , or to highlight a favorite channel and the TV will be used to disable this...
... time only), DAILY (TV will time out every day), WEEKLY (TV will time out one time a week) or OFF (to keep the TV from the screen. It can set ON or OFF. When FRONT PANEL LOCK is turned on, all buttons on the front panel will appear as sub-pictures at... the right edge of the screen. When TV TIME OUT is turned on , you set. Use CURSOR , , or to highlight a favorite channel and the TV will be used to disable this...

Owners Guide
Page 57
.... Press EXIT to quit menu or CURSOR to return to previous menu. For safety, the TV should be turned off after this function and the screen below will deactivate. 2. The OFF Timer will turn off when you are away from home by using the ON and OFF TIMERS. Use CURSOR or...
.... Press EXIT to quit menu or CURSOR to return to previous menu. For safety, the TV should be turned off after this function and the screen below will deactivate. 2. The OFF Timer will turn off when you are away from home by using the ON and OFF TIMERS. Use CURSOR or...

Owners Guide
Page 58
CUSTOM NOTES: 1. When using the AUTO LINK feature, it must be 58 This information covers the entire screen and viewing the TV program is for your TV as news reports or a TV program guide. However, intended operation is for additional information ...such as described above. 2. MENU BACKGROUND This function allows you are displayed on the TV screen. TEXT is sometimes used again. TEXT may vary by region). Use CURSOR or to change then press CURSOR Press EXIT to quit menu or CURSOR...
CUSTOM NOTES: 1. When using the AUTO LINK feature, it must be 58 This information covers the entire screen and viewing the TV program is for your TV as news reports or a TV program guide. However, intended operation is for additional information ...such as described above. 2. MENU BACKGROUND This function allows you are displayed on the TV screen. TEXT is sometimes used again. TEXT may vary by region). Use CURSOR or to change then press CURSOR Press EXIT to quit menu or CURSOR...

Owners Guide
Page 59
CUSTOM seen behind menu screen), select SHADED and a light background is turned on , the FIRST TIME TOUR will start automatically. NOTE: 1. Press EXIT to quit MENU or CURSOR to return ..., press the MENU button at any time during the FIRST TIME TOUR, press the MENU button. 59 To exit during the tour, and the following screen will be displayed every time your TV or Home Theater System.
CUSTOM seen behind menu screen), select SHADED and a light background is turned on , the FIRST TIME TOUR will start automatically. NOTE: 1. Press EXIT to quit MENU or CURSOR to return ..., press the MENU button at any time during the FIRST TIME TOUR, press the MENU button. 59 To exit during the tour, and the following screen will be displayed every time your TV or Home Theater System.

Owners Guide
Page 65
... is not set up to change position. a special icon appears on , the SPECIAL EVENT REMINDER message will appear. Set Special Day of the screen and 65 Press EXIT to quit menu or CURSOR to return to select a letter. Each special event message can be viewed in CALENDAR mode....6. Press CURSOR to select EVENT 1 to -day schedule. Highlight the day of 20 characters. 3. SPECIAL EVENT REMINDER Use this function and the next screen will automatically appear at the selected time. 2. Press CURSOR to six special events into memory. When the RECALL button is turned on the right bottom...
... is not set up to change position. a special icon appears on , the SPECIAL EVENT REMINDER message will appear. Set Special Day of the screen and 65 Press EXIT to quit menu or CURSOR to return to select a letter. Each special event message can be viewed in CALENDAR mode....6. Press CURSOR to select EVENT 1 to -day schedule. Highlight the day of 20 characters. 3. SPECIAL EVENT REMINDER Use this function and the next screen will automatically appear at the selected time. 2. Press CURSOR to six special events into memory. When the RECALL button is turned on the right bottom...

Owners Guide
Page 66
... be displayed. Press EXIT to quit menu or CURSOR to return to check the day, month, and year. CALENDAR Use this function and the next screen will appear. Press CURSOR or to "CALENDAR" when a Special Event Reminder is set , you can not use this function to previous menu. NOTES: 1. Dates of...
... be displayed. Press EXIT to quit menu or CURSOR to return to check the day, month, and year. CALENDAR Use this function and the next screen will appear. Press CURSOR or to "CALENDAR" when a Special Event Reminder is set , you can not use this function to previous menu. NOTES: 1. Dates of...


