Owners Guide
Page 1
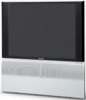
IMPORTANT PROJECTION COLOR TV 46GX01B 50GX20B OPERATING GUIDE TABLE OF CONTENTS IMPORTANT ...2 SAFETY TIPS...4 PICTURE CAUTIONS ...8 ACCESSORIES...8 REMOTE CONTROL BATTERY INSTALLATION AND REPLACEMENT 8 HOW TO SET UP YOUR NEW HITACHI PROJECTION TV 10 HOOK-UP CABLES AND CONNECTORS ...12 FRONT PANEL CONTROLS ...14 FIRST TIME USE ...16 REAR SPEAKER TERMINAL CONNECTIONS... BRAND ...40 DVD BRAND...40 ULTRATEC OSD...40 SET UP...43 CUSTOM ...52 VIDEO...60 THEATER ...64 INFO ...65 CARE OF YOUR HITACHI PROJECTION TV AND YOUR REMOTE CONTROL 67 RECEPTION PROBLEMS...68 USEFUL INFO ...69 NOTES ...72 1
IMPORTANT PROJECTION COLOR TV 46GX01B 50GX20B OPERATING GUIDE TABLE OF CONTENTS IMPORTANT ...2 SAFETY TIPS...4 PICTURE CAUTIONS ...8 ACCESSORIES...8 REMOTE CONTROL BATTERY INSTALLATION AND REPLACEMENT 8 HOW TO SET UP YOUR NEW HITACHI PROJECTION TV 10 HOOK-UP CABLES AND CONNECTORS ...12 FRONT PANEL CONTROLS ...14 FIRST TIME USE ...16 REAR SPEAKER TERMINAL CONNECTIONS... BRAND ...40 DVD BRAND...40 ULTRATEC OSD...40 SET UP...43 CUSTOM ...52 VIDEO...60 THEATER ...64 INFO ...65 CARE OF YOUR HITACHI PROJECTION TV AND YOUR REMOTE CONTROL 67 RECEPTION PROBLEMS...68 USEFUL INFO ...69 NOTES ...72 1

Owners Guide
Page 8
... market quotations, computer generated graphics, and other sources, may require prior authorization from the broadcaster or owner of the cover with your HITACHI Factory Warranty. • When using Picture-in-Picture function, the sub-picture should not be left permanently in one corner of the... BURN" may develop over a long period of the packing material. 1. Remote Control Unit CLU-436UI (Part No. Two "AA" size, 1.5V batteries (For Remote Control Unit). HL00728). 2. Open the battery cover of the remote control by your fingers and 8 pg. 5-17 FIRST TIME USE ACCESSORIES Check...
... market quotations, computer generated graphics, and other sources, may require prior authorization from the broadcaster or owner of the cover with your HITACHI Factory Warranty. • When using Picture-in-Picture function, the sub-picture should not be left permanently in one corner of the... BURN" may develop over a long period of the packing material. 1. Remote Control Unit CLU-436UI (Part No. Two "AA" size, 1.5V batteries (For Remote Control Unit). HL00728). 2. Open the battery cover of the remote control by your fingers and 8 pg. 5-17 FIRST TIME USE ACCESSORIES Check...

Owners Guide
Page 9
When replacing old batteries, push them towards the springs and lift them out. 3. BOTTOM VIEW Slide out to the (+) and (-) marks in the battery compartment. 4. ACCESSORIES pulling the cover off. 2. Replace the cover. Insert two new "AA" size batteries for the remote control. Match the batteries to remove back cover. 9
When replacing old batteries, push them towards the springs and lift them out. 3. BOTTOM VIEW Slide out to the (+) and (-) marks in the battery compartment. 4. ACCESSORIES pulling the cover off. 2. Replace the cover. Insert two new "AA" size batteries for the remote control. Match the batteries to remove back cover. 9
Owners Guide
Page 14
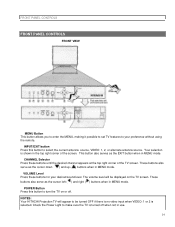
...the EXIT button when in the top right corner of the TV screen. CHANNEL Selector Press these buttons for your preference without using the remote. VOLUME Level Press these buttons until the desired channel appears at the top right corner of the screen. This button also serves as ...) and right ( ) buttons when in MENU mode. These buttons also serve as the cursor down ( ) and up ( ) buttons when in MENU mode. NOTES: Your HITACHI Projection TV will be turned OFF if there is no video input when VIDEO: 1 or 2 is selected. FRONT PANEL CONTROLS FRONT PANEL CONTROLS FRONT VIEW...
...the EXIT button when in the top right corner of the TV screen. CHANNEL Selector Press these buttons for your preference without using the remote. VOLUME Level Press these buttons until the desired channel appears at the top right corner of the screen. This button also serves as ...) and right ( ) buttons when in MENU mode. These buttons also serve as the cursor down ( ) and up ( ) buttons when in MENU mode. NOTES: Your HITACHI Projection TV will be turned OFF if there is no video input when VIDEO: 1 or 2 is selected. FRONT PANEL CONTROLS FRONT PANEL CONTROLS FRONT VIEW...
Owners Guide
Page 15
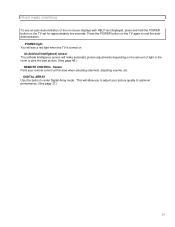
... TV set for approximately five seconds. This will see an auto-demonstration of light in the room to give the best picture. (See page 48.) REMOTE CONTROL Sensor Point your picture quality to end the autodemonstration. FRONT PANEL CONTROLS To see a red light when the TV is turned on. POWER light... You will allow you to adjust your remote control at this button to enter Digital Array mode. Press the POWER button on the TV again to optimum performance. (See page 37.) 15
... TV set for approximately five seconds. This will see an auto-demonstration of light in the room to give the best picture. (See page 48.) REMOTE CONTROL Sensor Point your picture quality to end the autodemonstration. FRONT PANEL CONTROLS To see a red light when the TV is turned on. POWER light... You will allow you to adjust your remote control at this button to enter Digital Array mode. Press the POWER button on the TV again to optimum performance. (See page 37.) 15

Owners Guide
Page 16
.... Monitor Out These jacks provide fixed audio and video signals which are used at a time. FIRST TIME USE FIRST TIME USE Antenna Input/Output The remote control allows you have S-VIDEO , S-VIDEO signal needs to INPUT 2, but note that only one of these may be labeled Y, B-Y, and R-Y. Audio/Video Inputs 1and...
.... Monitor Out These jacks provide fixed audio and video signals which are used at a time. FIRST TIME USE FIRST TIME USE Antenna Input/Output The remote control allows you have S-VIDEO , S-VIDEO signal needs to INPUT 2, but note that only one of these may be labeled Y, B-Y, and R-Y. Audio/Video Inputs 1and...

Owners Guide
Page 19
... page 22) EXTERNAL CONNECTIONS CONNECTING EXTERNAL AUDIO AMPLIFIER To control the audio level of an external audio amplifier with the remote control, connect the system as DVD players. When using the remote control fo the TV set. 19 Use these connections in place of the audio amplifier lower and adjust the sound...
... page 22) EXTERNAL CONNECTIONS CONNECTING EXTERNAL AUDIO AMPLIFIER To control the audio level of an external audio amplifier with the remote control, connect the system as DVD players. When using the remote control fo the TV set. 19 Use these connections in place of the audio amplifier lower and adjust the sound...

Owners Guide
Page 26
.../satellite box.) (1) These buttons allow the remote to control your television. The remote will stay on for instructions on how to program the remote to control your VCR.) To operate your HITACHI Projection TV, the new remote is the TV/VCR button. THE GENIUS REMOTE CONTROL (CLU-436UI) THE GENIUS REMOTE CONTROL (CLU-436UI) In addition to...
.../satellite box.) (1) These buttons allow the remote to control your television. The remote will stay on for instructions on how to program the remote to control your VCR.) To operate your HITACHI Projection TV, the new remote is the TV/VCR button. THE GENIUS REMOTE CONTROL (CLU-436UI) THE GENIUS REMOTE CONTROL (CLU-436UI) In addition to...

Owners Guide
Page 27
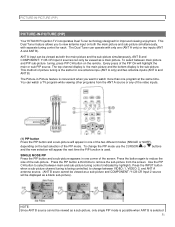
If a Special Event Reminder is set, it will be displayed when the TV is first turned on. (See page 52). (2) PICTURE-IN-PICTURE buttons See separate section on pages 22 for a description. (3) PIP CH Button Use the PIP CH button to turn the TV set on or off when the remote is being controlled. (4) HELP Button 27 HOW TO USE THE GENIUS REMOTE TO CONTROL YOUR TV HOW TO USE THE GENIUS REMOTE TO CONTROL YOUR TV (1) POWER Button Press this button to select between main picture and sub-picture tuning. The channel number which is highlighted indicates which channel is in TV mode.
If a Special Event Reminder is set, it will be displayed when the TV is first turned on. (See page 52). (2) PICTURE-IN-PICTURE buttons See separate section on pages 22 for a description. (3) PIP CH Button Use the PIP CH button to turn the TV set on or off when the remote is being controlled. (4) HELP Button 27 HOW TO USE THE GENIUS REMOTE TO CONTROL YOUR TV HOW TO USE THE GENIUS REMOTE TO CONTROL YOUR TV (1) POWER Button Press this button to select between main picture and sub-picture tuning. The channel number which is highlighted indicates which channel is in TV mode.

Owners Guide
Page 28
....). (6) VOLUME, MUTE Buttons Press the VOLUME up ( ) or down ( ) button until htis button is set FAMILY FAVORITES, CHANNEL MEMORY, etc. HOW TO USE THE GENIUS REMOTE TO CONTROL YOUR TV Press this button when a menu is displayed to view HELP text, which gives a description of normal volume (SOFT MUTE) to select...
....). (6) VOLUME, MUTE Buttons Press the VOLUME up ( ) or down ( ) button until htis button is set FAMILY FAVORITES, CHANNEL MEMORY, etc. HOW TO USE THE GENIUS REMOTE TO CONTROL YOUR TV Press this button when a menu is displayed to view HELP text, which gives a description of normal volume (SOFT MUTE) to select...

Owners Guide
Page 29
... minutes to this timer, up to a maximum of the screen. When an COMPONENT: YCB-CR Input is connected to VIDEO: 1. HOW TO USE THE GENIUS REMOTE TO CONTROL YOUR TV When an S-VIDEO Input is connected to VIDEO: 2. (9) MENU, CURSOR Buttons All the On-Screen Display features can be set or...
... minutes to this timer, up to a maximum of the screen. When an COMPONENT: YCB-CR Input is connected to VIDEO: 1. HOW TO USE THE GENIUS REMOTE TO CONTROL YOUR TV When an S-VIDEO Input is connected to VIDEO: 2. (9) MENU, CURSOR Buttons All the On-Screen Display features can be set or...

Owners Guide
Page 30
HOW TO USE THE GENIUS REMOTE TO CONTROL YOUR TV 30
HOW TO USE THE GENIUS REMOTE TO CONTROL YOUR TV 30
Owners Guide
Page 31
... the CURSOR or buttons and the new selection will highlight the main or sub-PIP source. PICTURE-IN-PICTURE (PIP) PICTURE-IN-PICTURE (PIP) Your HITACHI Projection TV incorporates Dual Tuner technology designed for one antenna inpu (ANT A only) and two antenna inputs (ANT A and ANT B) The Picture-in-Picture feature... main picture and sub-picture simultaneously, with only one program at the same time. Use the PIP CH button to view antenna input on the remote. The Dual Tuner can only be viewed as a main picture. Press the button again to remove the sub-picture from the ANT A source or any...
... the CURSOR or buttons and the new selection will highlight the main or sub-PIP source. PICTURE-IN-PICTURE (PIP) PICTURE-IN-PICTURE (PIP) Your HITACHI Projection TV incorporates Dual Tuner technology designed for one antenna inpu (ANT A only) and two antenna inputs (ANT A and ANT B) The Picture-in-Picture feature... main picture and sub-picture simultaneously, with only one program at the same time. Use the PIP CH button to view antenna input on the remote. The Dual Tuner can only be viewed as a main picture. Press the button again to remove the sub-picture from the ANT A source or any...

Owners Guide
Page 34
... operated after performing the above procedures, please consult your VCR. 3. USING THE REMOTE TO CONTROL VCR FUNCTIONS USING THE REMOTE TO CONTROL VCR FUNCTIONS Operating the precoded function for HITACHI VCRs. 6. Turn ON your VCR's code has not been precoded into the remote. 2. The remote control will remember the codes you have a power function, the...
... operated after performing the above procedures, please consult your VCR. 3. USING THE REMOTE TO CONTROL VCR FUNCTIONS USING THE REMOTE TO CONTROL VCR FUNCTIONS Operating the precoded function for HITACHI VCRs. 6. Turn ON your VCR's code has not been precoded into the remote. 2. The remote control will remember the codes you have a power function, the...

Owners Guide
Page 35
... by setting it to VCR mode. (2) PRECODED VCR Buttons These buttons transmit the chosen precoded VCR codes. USING THE REMOTE TO CONTROL CABLE (1) VCR Button This button allows the remote to control your cable box. 2. NOTE: Refer to record a program. (3) EXCLUSIVE TV Buttons These buttons are for... the VCR. Aim the remote control at the front of the buttons exclusively for operating the TV. For some VCRs, you must first program the remote system cable box. (Refer to operate different types of cable boxes. USING THE...
... by setting it to VCR mode. (2) PRECODED VCR Buttons These buttons transmit the chosen precoded VCR codes. USING THE REMOTE TO CONTROL CABLE (1) VCR Button This button allows the remote to control your cable box. 2. NOTE: Refer to record a program. (3) EXCLUSIVE TV Buttons These buttons are for... the VCR. Aim the remote control at the front of the buttons exclusively for operating the TV. For some VCRs, you must first program the remote system cable box. (Refer to operate different types of cable boxes. USING THE...

Owners Guide
Page 36
...SLEEP button will act as your audio component's ENTER button if required. 6. Press the CABLE button on the remote to switch to control a Satellite system or Audio equipment, you must follow the remote programming procedure shown above . 4. You may use only the CABLE button to program these codes, but note... that your cable box cannot be operated after five seconds, try another two digit preset code. 5. The remote control will remember the codes you wish to cable mode. 4. If your cable box when the correct two digit preset code is programmed for ...
...SLEEP button will act as your audio component's ENTER button if required. 6. Press the CABLE button on the remote to switch to control a Satellite system or Audio equipment, you must follow the remote programming procedure shown above . 4. You may use only the CABLE button to program these codes, but note... that your cable box cannot be operated after five seconds, try another two digit preset code. 5. The remote control will remember the codes you wish to cable mode. 4. If your cable box when the correct two digit preset code is programmed for ...

Owners Guide
Page 37
CABLE/SATELLITE, VCR, AUDIO AND DVD CODES (CLU-436UI) (1) CABLE Button This button allows the remote to control your cable box by setting it to cable. (2 )PRECODED CABLE Box Buttons These buttons transmit the chosen precoded cable codes. (3) EXCLUSIVE TV Buttons .... CABLE/SATELLITE, VCR, AUDIO AND DVD CODES (CLU-436UI) CABLE BRAND ABC Archer Cable Star Cableview Citizen Comtronics Dae Ryung Everquest Garrard Gemini Gold Star Hitachi Jasco Linsay Memorex Novaplex Oak Panther Philips Popular Mechanics RCA Recoton Regency Runco 00,02,04,05,07,08 ,11 44 23,25,43 42...
CABLE/SATELLITE, VCR, AUDIO AND DVD CODES (CLU-436UI) (1) CABLE Button This button allows the remote to control your cable box by setting it to cable. (2 )PRECODED CABLE Box Buttons These buttons transmit the chosen precoded cable codes. (3) EXCLUSIVE TV Buttons .... CABLE/SATELLITE, VCR, AUDIO AND DVD CODES (CLU-436UI) CABLE BRAND ABC Archer Cable Star Cableview Citizen Comtronics Dae Ryung Everquest Garrard Gemini Gold Star Hitachi Jasco Linsay Memorex Novaplex Oak Panther Philips Popular Mechanics RCA Recoton Regency Runco 00,02,04,05,07,08 ,11 44 23,25,43 42...

Owners Guide
Page 40
...64 07 10 SATELLITE BRAND CODES General Instrument Jerrold RCA 30 30 37,56,57 Hitachi Primestar Sony 54,55 30 40 AUDIO BRAND Jerrold 51 Scientific Atlanta 32 DVD BRAND Hitachi 77 Magnavox 72 Panasonic 76 Pioneer 73 RCA 75 Toshiba 69 JVC 74 Mitsubishi 71... Philips 72 Proscan 75 Sony 70 ULTRATEC OSD 1. Press MENU on the remote control to display the different features on the remote control to highlight a different feature....
...64 07 10 SATELLITE BRAND CODES General Instrument Jerrold RCA 30 30 37,56,57 Hitachi Primestar Sony 54,55 30 40 AUDIO BRAND Jerrold 51 Scientific Atlanta 32 DVD BRAND Hitachi 77 Magnavox 72 Panasonic 76 Pioneer 73 RCA 75 Toshiba 69 JVC 74 Mitsubishi 71... Philips 72 Proscan 75 Sony 70 ULTRATEC OSD 1. Press MENU on the remote control to display the different features on the remote control to highlight a different feature....

Owners Guide
Page 41
..., daily, or weekly. 41 This part of the screen shows what selections are available. Check channel name, scan, and child lock. Turn TV on the remote control when a menu is displayed, and text will appear giving a description of the screen shows which...
..., daily, or weekly. 41 This part of the screen shows what selections are available. Check channel name, scan, and child lock. Turn TV on the remote control when a menu is displayed, and text will appear giving a description of the screen shows which...

Owners Guide
Page 43
... TV again to previous menu. PLUG & PLAY This graphic guide function will help you to highlight the function desired. Press the POWER button on the remote to properly set for approximately five seconds. Press EXIT to quit menu or CURSOR to return to end the autodemonstration. Simply answer two questions and...
... TV again to previous menu. PLUG & PLAY This graphic guide function will help you to highlight the function desired. Press the POWER button on the remote to properly set for approximately five seconds. Press EXIT to quit menu or CURSOR to return to end the autodemonstration. Simply answer two questions and...


