Owners Guide
Page 1
has determined that this product meets the ENERGY STAR® guidelines for energy efficiency. 30-60 61-66 PROJECTION COLOR TV 53FDX20B 53SDX20B 53SDX20BB OPERATING GUIDE 43FDX20B 43FDX15B IMPORTANT SAFETY INSTRUCTIONS 2-3 FIRST TIME USE 4-18 REMOTE CONTROL 19-29 SETUP CUSTOMIZE VIDEO SEL AUDIO THEATER ULTRATEC BIT-MAP ON-SCREEN DISPLAY USEFUL INFORMATION INDEX As an ENERGY STAR® Partner, Hitachi, Ltd.
has determined that this product meets the ENERGY STAR® guidelines for energy efficiency. 30-60 61-66 PROJECTION COLOR TV 53FDX20B 53SDX20B 53SDX20BB OPERATING GUIDE 43FDX20B 43FDX15B IMPORTANT SAFETY INSTRUCTIONS 2-3 FIRST TIME USE 4-18 REMOTE CONTROL 19-29 SETUP CUSTOMIZE VIDEO SEL AUDIO THEATER ULTRATEC BIT-MAP ON-SCREEN DISPLAY USEFUL INFORMATION INDEX As an ENERGY STAR® Partner, Hitachi, Ltd.
Owners Guide
Page 4
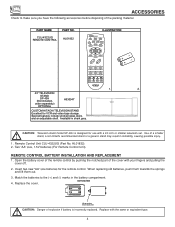
...SP-43H (Not included, order separately) OPTIONAL H530047 CUSTOM HITACHI TELEVISION STAND Excellent for use with the same or equivalent type. 4 HL01832). 2. REMOTE CONTROL BATTERY INSTALLATION AND REPLACEMENT 1. Open the battery cover of the remote control by pushing the notched part of the packing material.... CAUTION: Danger of a smaller stand, a non Hitachi recommended stand or a generic stand may ...
...SP-43H (Not included, order separately) OPTIONAL H530047 CUSTOM HITACHI TELEVISION STAND Excellent for use with the same or equivalent type. 4 HL01832). 2. REMOTE CONTROL BATTERY INSTALLATION AND REPLACEMENT 1. Open the battery cover of the remote control by pushing the notched part of the packing material.... CAUTION: Danger of a smaller stand, a non Hitachi recommended stand or a generic stand may ...
Owners Guide
Page 7
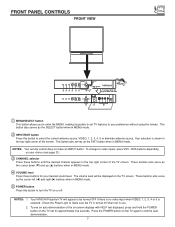
... ባ INPUT/EXIT button Press this button to make sure the TV is selected. Press the POWER button on your preference without using the remote. To change to video inputs, press VID1~VID5 buttons depending on the TV again to your choice (see an auto-demonstration of the screen.... NOTES: 1. Your HITACHI Projection TV will be turned OFF if there is no video input when VIDEO: 1, 2, 3, 4 or 5 is turned off . FRONT PANEL CONTROLS FRONT ...
... ባ INPUT/EXIT button Press this button to make sure the TV is selected. Press the POWER button on your preference without using the remote. To change to video inputs, press VID1~VID5 buttons depending on the TV again to your choice (see an auto-demonstration of the screen.... NOTES: 1. Your HITACHI Projection TV will be turned OFF if there is no video input when VIDEO: 1, 2, 3, 4 or 5 is turned off . FRONT PANEL CONTROLS FRONT ...
Owners Guide
Page 8
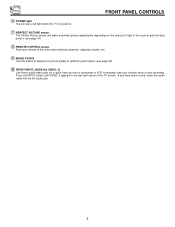
... the left audio jack. 8 Press the INPUT button until VIDEO: 3 appears in the room to give the best picture. (see page 57) ቩ REMOTE CONTROL sensor Point your remote at this area when selecting channels, adjusting volume, etc. ቪ MAGIC FOCUS Use this button to adjust your picture quality to optimum performance...
... the left audio jack. 8 Press the INPUT button until VIDEO: 3 appears in the room to give the best picture. (see page 57) ቩ REMOTE CONTROL sensor Point your remote at this area when selecting channels, adjusting volume, etc. ቪ MAGIC FOCUS Use this button to adjust your picture quality to optimum performance...

Owners Guide
Page 10
...) L L R R AUDIO AUDIO INPUT 1 INPUT 2 PB (MONO) L PR R AUDIO INPUT 4 PB (MONO) L L PR R AUDIO R AUDIO INPUT 5 MONITOR OUT ብ ባ ቤ ቢ Antenna Input/Output The remote control allows you have mono sound, insert the audio cable into the left audio jack.) NOTE: You may use VIDEO or S-VIDEO inputs to connect...
...) L L R R AUDIO AUDIO INPUT 1 INPUT 2 PB (MONO) L PR R AUDIO INPUT 4 PB (MONO) L L PR R AUDIO R AUDIO INPUT 5 MONITOR OUT ብ ባ ቤ ቢ Antenna Input/Output The remote control allows you have mono sound, insert the audio cable into the left audio jack.) NOTE: You may use VIDEO or S-VIDEO inputs to connect...
Owners Guide
Page 14
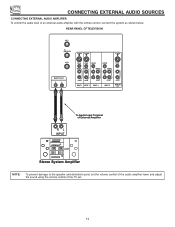
... to the speaker and distorted sound, set the volume control of the audio amplifier lower and adjust the sound using the remote control of an external audio amplifier with the remote control, connect the system as shown below. CONNECTING EXTERNAL AUDIO SOURCES CONNECTING EXTERNAL AUDIO AMPLIFIER To control the audio level of...
... to the speaker and distorted sound, set the volume control of the audio amplifier lower and adjust the sound using the remote control of an external audio amplifier with the remote control, connect the system as shown below. CONNECTING EXTERNAL AUDIO SOURCES CONNECTING EXTERNAL AUDIO AMPLIFIER To control the audio level of...
Owners Guide
Page 19
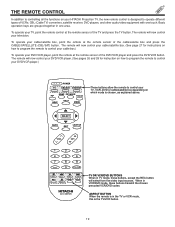
...this is the TV/VCR button. 19 ASPECT BUTTON When the remote is in TV mode, these buttons transmit the chosen precoded VCR/DVD codes. THE REMOTE CONTROL In addition to controlling all the functions on your HITACHI Projection TV, the new remote control is designed to operate different types of VCRs, CBL (Cable... in VCR/DVD mode, these buttons, except the REC button, will now control your TV, point the remote control at the remote sensor of the TV and press the TV button. The remote will now control your DVD/VCR player. (See pages 26 and 28 for instructions on how to program ...
...this is the TV/VCR button. 19 ASPECT BUTTON When the remote is in TV mode, these buttons transmit the chosen precoded VCR/DVD codes. THE REMOTE CONTROL In addition to controlling all the functions on your HITACHI Projection TV, the new remote control is designed to operate different types of VCRs, CBL (Cable... in VCR/DVD mode, these buttons, except the REC button, will now control your TV, point the remote control at the remote sensor of the TV and press the TV button. The remote will now control your DVD/VCR player. (See pages 26 and 28 for instructions on how to program ...
Owners Guide
Page 20
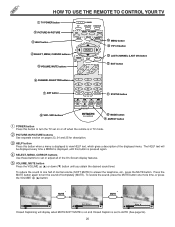
... every time a MENU is displayed, until this button is displayed to view HELP text, which gives a description of the displayed menu. HOW TO USE THE REMOTE TO CONTROL YOUR TV ቢ TV POWER button ባ PICTURE-IN-PICTURE ቤ HELP button ብ SELECT, MENU, CURSOR buttons ቦ VOLUME, MUTE ...; VID1~VID5 buttons CLU-4322UG ቫ MODE button ቪ ASPECT button ᕃ POWER button Press this button to turn the sound off when the remote is in TV mode. ባ PICTURE-IN-PICTURE buttons See separate section on pages 23, 24 and 25 for description. ቤ HELP button Press this...
... every time a MENU is displayed, until this button is displayed to view HELP text, which gives a description of the displayed menu. HOW TO USE THE REMOTE TO CONTROL YOUR TV ቢ TV POWER button ባ PICTURE-IN-PICTURE ቤ HELP button ብ SELECT, MENU, CURSOR buttons ቦ VOLUME, MUTE ...; VID1~VID5 buttons CLU-4322UG ቫ MODE button ቪ ASPECT button ᕃ POWER button Press this button to turn the sound off when the remote is in TV mode. ባ PICTURE-IN-PICTURE buttons See separate section on pages 23, 24 and 25 for description. ቤ HELP button Press this...
Owners Guide
Page 21
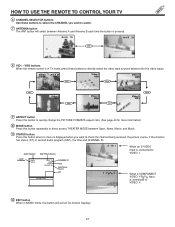
...being received, the picture source, if the channel has stereo (ST) or second audio program (SAP), the time and CHANNEL ID. HOW TO USE THE REMOTE TO CONTROL YOUR TV ቧ CHANNEL SELECTOR buttons Use these buttons to directly select the video input sources between Antenna A and Antenna B each time the... button is pressed. Ant A 10 Ant B 28 ANT ቩ VID1 ~ VID5 buttons When the remote control is in MENU mode, this button when no menu is displayed when you wish to watch. ቨ ANTENNA button The ANT button will exit...
...being received, the picture source, if the channel has stereo (ST) or second audio program (SAP), the time and CHANNEL ID. HOW TO USE THE REMOTE TO CONTROL YOUR TV ቧ CHANNEL SELECTOR buttons Use these buttons to directly select the video input sources between Antenna A and Antenna B each time the... button is pressed. Ant A 10 Ant B 28 ANT ቩ VID1 ~ VID5 buttons When the remote control is in MENU mode, this button when no menu is displayed when you wish to watch. ቨ ANTENNA button The ANT button will exit...
Owners Guide
Page 22
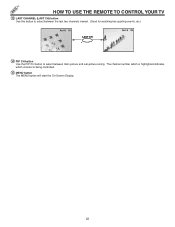
HOW TO USE THE REMOTE TO CONTROL YOUR TV ቯ LAST CHANNEL (LAST CH) button Use this button to select between the last two channels viewed. (Good for watching two sporting events, etc.) Ant A 10 LAST CH Ant A 39 ተ PIP CH button Use the PIP CH button to select between main picture and sub-picture tuning. The channel number which is highlighted indicates which channel is being controlled. ቱ MENU button The MENU button will start the On-Screen Display. 22
HOW TO USE THE REMOTE TO CONTROL YOUR TV ቯ LAST CHANNEL (LAST CH) button Use this button to select between the last two channels viewed. (Good for watching two sporting events, etc.) Ant A 10 LAST CH Ant A 39 ተ PIP CH button Use the PIP CH button to select between main picture and sub-picture tuning. The channel number which is highlighted indicates which channel is being controlled. ቱ MENU button The MENU button will start the On-Screen Display. 22
Owners Guide
Page 23
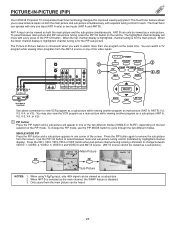
... When using Y-PBPR input, only 480i signal can operate with only one corner of the two different modes (SINGLE or SURF), depending on the remote. You can only be viewed as the main channel, the SWAP feature is convenient when you to view VCR program as a sub-picture while ...5 MONITOR OUT ባ ቢ POWER TV CBL/SAT DVD/VCR SWAP PIP MODE PIP FREEZE HELP PIP CH MENU ቤ ብ,ቦ SELECT VCR Hitachi Model or Similar Model MUTE EXIT LAST CH Use above connection to view antenna inputs on both the main picture and the sub-picture simultaneously...
... When using Y-PBPR input, only 480i signal can operate with only one corner of the two different modes (SINGLE or SURF), depending on the remote. You can only be viewed as the main channel, the SWAP feature is convenient when you to view VCR program as a sub-picture while ...5 MONITOR OUT ባ ቢ POWER TV CBL/SAT DVD/VCR SWAP PIP MODE PIP FREEZE HELP PIP CH MENU ቤ ብ,ቦ SELECT VCR Hitachi Model or Similar Model MUTE EXIT LAST CH Use above connection to view antenna inputs on both the main picture and the sub-picture simultaneously...
Owners Guide
Page 26
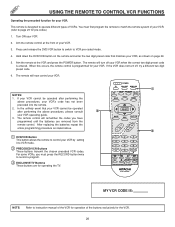
... manual of the VCR for the VCR. 26 Press and release the DVD/VCR button to switch to match the remote system of your VCR's code has not been precoded into the remote. 2. If the VCR does not turn off , try a different two digit preset code. 6. POWER TV CBL/SAT ... VID4 ASPECT MODE CLU-4322UG MY VCR CODE IS: NOTE: Refer to record a program. ቤ EXCLUSIVE TV Buttons These buttons are removed from the remote control. This remote is entered. Turn ON your VCR by setting it to operate different types of the buttons exclusively for operation of VCRs. Aim the...
... manual of the VCR for the VCR. 26 Press and release the DVD/VCR button to switch to match the remote system of your VCR's code has not been precoded into the remote. 2. If the VCR does not turn off , try a different two digit preset code. 6. POWER TV CBL/SAT ... VID4 ASPECT MODE CLU-4322UG MY VCR CODE IS: NOTE: Refer to record a program. ቤ EXCLUSIVE TV Buttons These buttons are removed from the remote control. This remote is entered. Turn ON your VCR by setting it to operate different types of the buttons exclusively for operation of VCRs. Aim the...
Owners Guide
Page 27
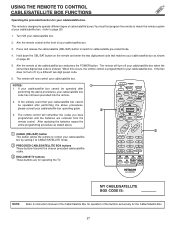
... the TV. In the unlikely event that matches your cable/satellite box as stated above procedures, your cable/satellite box. 3. The remote control will now control your cable/satellite box by setting it to instruction manual of the Cable/Satellite Box for operation of your cable...box when the correct two digit preset code is entered. After replacing the batteries repeat the entire programming procedure as shown on the remote and enter the two digit preset code that your cable/satellite box cannot be operated after performing the above procedures, please consult ...
... the TV. In the unlikely event that matches your cable/satellite box as stated above procedures, your cable/satellite box. 3. The remote control will now control your cable/satellite box by setting it to instruction manual of the Cable/Satellite Box for operation of your cable...box when the correct two digit preset code is entered. After replacing the batteries repeat the entire programming procedure as shown on the remote and enter the two digit preset code that your cable/satellite box cannot be operated after performing the above procedures, please consult ...
Owners Guide
Page 28
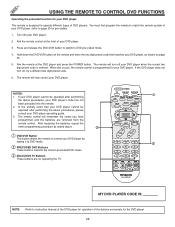
... VID2 VID5 VID3 VID4 ASPECT MODE CLU-4322UG ቢ ባ MY DVD PLAYER CODE IS: NOTE: Refer to match the remote system of your DVD player. Aim the remote control at the DVD player and press the POWER button. Press and release the DVD/VCR button to switch to DVD mode..., your DVD player by setting it to DVD pre-coded mode. 4. After replacing the batteries repeat the entire programming procedure as shown on the remote and enter the two digit preset code that your DVD player cannot be operated after performing the above procedures, please consult your DVD player when...
... VID2 VID5 VID3 VID4 ASPECT MODE CLU-4322UG ቢ ባ MY DVD PLAYER CODE IS: NOTE: Refer to match the remote system of your DVD player. Aim the remote control at the DVD player and press the POWER button. Press and release the DVD/VCR button to switch to DVD mode..., your DVD player by setting it to DVD pre-coded mode. 4. After replacing the batteries repeat the entire programming procedure as shown on the remote and enter the two digit preset code that your DVD player cannot be operated after performing the above procedures, please consult your DVD player when...
Owners Guide
Page 30
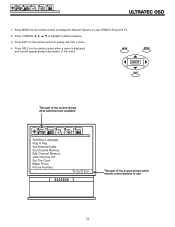
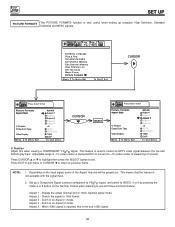
Press HELP on your HITACHI Projection TV. 2. Press CURSOR to quickly exit from a menu. 4. HELP MENU SELECT EXIT This part of the screen shows which remote control buttons to display the different features on the remote control when a menu is displayed, and text will appear giving... a description of that menu. Press MENU on the remote control to use. 30 SETUP CUSTOMIZE VIDEO SEL AUDIO THEATER ULTRATEC OSD 1. Press EXIT on the remote control to highlight a different feature. 3. SETUP CUSTOMIZE VIDEO SEL AUDIO THEATER Set Menu...
Press HELP on your HITACHI Projection TV. 2. Press CURSOR to quickly exit from a menu. 4. HELP MENU SELECT EXIT This part of the screen shows which remote control buttons to display the different features on the remote control when a menu is displayed, and text will appear giving... a description of that menu. Press MENU on the remote control to use. 30 SETUP CUSTOMIZE VIDEO SEL AUDIO THEATER ULTRATEC OSD 1. Press EXIT on the remote control to highlight a different feature. 3. SETUP CUSTOMIZE VIDEO SEL AUDIO THEATER Set Menu...

Owners Guide
Page 32
... ̆ or ̄ to select the sub-menu of the on-screen displays with HELP text displayed, press and hold the POWER button on the remote to select any one of your choice. Press the POWER button on -screen displays. SET MENU LANGUAGE This feature will allow you to highlight the...
... ̆ or ̄ to select the sub-menu of the on-screen displays with HELP text displayed, press and hold the POWER button on the remote to select any one of your choice. Press the POWER button on -screen displays. SET MENU LANGUAGE This feature will allow you to highlight the...
Owners Guide
Page 36
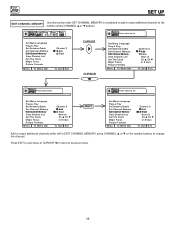
...; or # keys To Q u i t E x i t Add or erase additional channels while still in EDIT CHANNEL MEMORY using CHANNEL ̆ or ̄ or the number buttons to the remote control CHANNEL ̆ or ̄ buttons. SETUP SET UP EDIT CHANNEL MEMORY Use this function after SET CHANNEL MEMORY is completed to add or erase...
...; or # keys To Q u i t E x i t Add or erase additional channels while still in EDIT CHANNEL MEMORY using CHANNEL ̆ or ̄ or the number buttons to the remote control CHANNEL ̆ or ̄ buttons. SETUP SET UP EDIT CHANNEL MEMORY Use this function after SET CHANNEL MEMORY is completed to add or erase...
Owners Guide
Page 40
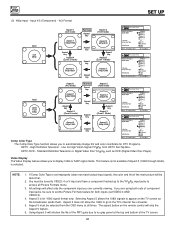
... Type Video Display M e n u To M e n u B a r Ant A 6 Aspect 1 Aspect 2 Aspect 3 Aspect 4 Aspect 5 +5 HDTV SDTV/DVD 1080i 540P To Q u i t E x i t V. Aspect 1 - Zoom in on Aspect 2 mode. Depending on the Remote Control when planning to +10 (video center is the true 1080i signal. 40 SETUP CUSTOMIZE VIDEO SEL AUDIO THEATER Set Menu Language Plug & Play Set...
... Type Video Display M e n u To M e n u B a r Ant A 6 Aspect 1 Aspect 2 Aspect 3 Aspect 4 Aspect 5 +5 HDTV SDTV/DVD 1080i 540P To Q u i t E x i t V. Aspect 1 - Zoom in on Aspect 2 mode. Depending on the Remote Control when planning to +10 (video center is the true 1080i signal. 40 SETUP CUSTOMIZE VIDEO SEL AUDIO THEATER Set Menu Language Plug & Play Set...
Owners Guide
Page 42
... hooked up to the Y-PBPR input jacks to the TV's internal flex converter. 5. Video Display The Video Display feature allows you to appear on the remote control will shorten the life of the TV screen. 42 All settings will be selected from HDTV Set-Top Box. Selecting Aspect 5 allows the 1080i...
... hooked up to the Y-PBPR input jacks to the TV's internal flex converter. 5. Video Display The Video Display feature allows you to appear on the remote control will shorten the life of the TV screen. 42 All settings will be selected from HDTV Set-Top Box. Selecting Aspect 5 allows the 1080i...

Owners Guide
Page 52
... TV On --:-- Use CURSOR ̆ or ̄, CHANNEL (̆) or (̄), or number buttons to turn on or tuned with the ON Timer and no remote control button is pressed after this function and the screen below will tune to when it automatically turns on DAILY, do not need to Set...
... TV On --:-- Use CURSOR ̆ or ̄, CHANNEL (̆) or (̄), or number buttons to turn on or tuned with the ON Timer and no remote control button is pressed after this function and the screen below will tune to when it automatically turns on DAILY, do not need to Set...


