Owners Guide
Page 1
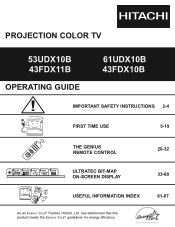
has determined that this product meets the ENERGY STAR¤ guidelines for energy efficiency. 20-32 33-60 61-67 PROJECTION COLOR TV 53UDX10B 43FDX11B OPERATING GUIDE 61UDX10B 43FDX10B IMPORTANT SAFETY INSTRUCTIONS 2-4 FIRST TIME USE 5-19 THE GENIUS REMOTE CONTROL SETUP CUSTOMIZE VIDEO SEL AUDIO THEATER ULTRATEC BIT-MAP ON-SCREEN DISPLAY USEFUL INFORMATION INDEX As an ENERGY STAR¤ Partner, Hitachi, Ltd.
has determined that this product meets the ENERGY STAR¤ guidelines for energy efficiency. 20-32 33-60 61-67 PROJECTION COLOR TV 53UDX10B 43FDX11B OPERATING GUIDE 61UDX10B 43FDX10B IMPORTANT SAFETY INSTRUCTIONS 2-4 FIRST TIME USE 5-19 THE GENIUS REMOTE CONTROL SETUP CUSTOMIZE VIDEO SEL AUDIO THEATER ULTRATEC BIT-MAP ON-SCREEN DISPLAY USEFUL INFORMATION INDEX As an ENERGY STAR¤ Partner, Hitachi, Ltd.
Owners Guide
Page 4
...ANTENNA GROUNDING AS PER NATIONAL ELECTRICAL CODE INSTRUCTIONS. 18. IF THE TELEVISION DOES NOT OPERATE PROPERLY 22. It is provided to call your HITACHI Factory Warranty. ¥ When using Picture-in-Picture function, the sub-picture should not be left permanently in safe operating condition. ...Note to lightning and power-line surges. If the television does not operate normally by TV stations and cable companies, as well as practical. If replacement parts are required, be connected to the grounding system of the ...
...ANTENNA GROUNDING AS PER NATIONAL ELECTRICAL CODE INSTRUCTIONS. 18. IF THE TELEVISION DOES NOT OPERATE PROPERLY 22. It is provided to call your HITACHI Factory Warranty. ¥ When using Picture-in-Picture function, the sub-picture should not be left permanently in safe operating condition. ...Note to lightning and power-line surges. If the television does not operate normally by TV stations and cable companies, as well as practical. If replacement parts are required, be connected to the grounding system of the ...
Owners Guide
Page 5
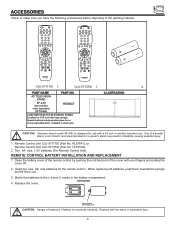
...model SP-43H is incorrectly replaced. Open the battery cover of the remote control by pushing the notched part of a smaller stand, a non Hitachi recommended stand or a generic stand may result in instability, causing possible injury. 1. Match the batteries to the (+) and (-) marks in shark... smoked glass doors and an adjustable shelf. Two AA size, 1.5V batteries (For Remote Control Unit). Replace with a 43 inch or smaller television set. POWER TV DVD VCR CBL SOURCE WIZARD AV1 AV2 STB AV3 1 2 3 4 5 6 7 8 9 SLEEP ANT C.C. 0 LAST CH HELP ASPECT PIX MENU EXIT ...
...model SP-43H is incorrectly replaced. Open the battery cover of the remote control by pushing the notched part of a smaller stand, a non Hitachi recommended stand or a generic stand may result in instability, causing possible injury. 1. Match the batteries to the (+) and (-) marks in shark... smoked glass doors and an adjustable shelf. Two AA size, 1.5V batteries (For Remote Control Unit). Replace with a 43 inch or smaller television set. POWER TV DVD VCR CBL SOURCE WIZARD AV1 AV2 STB AV3 1 2 3 4 5 6 7 8 9 SLEEP ANT C.C. 0 LAST CH HELP ASPECT PIX MENU EXIT ...
Owners Guide
Page 6
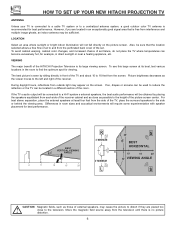
...50 BEST HORIZONTAL 5' 10' 15' 20' 50 VIEWING ANGLE S CAUTION: Magnetic fields, such as the viewer moves to the left and right of the HITACHI Projection Television is its best, test various locations in the room to find the optimum spot for best performance. HOW TO SET UP YOUR NEW... HITACHI PROJECTION TV ANTENNA Unless your TV is connected to a cable TV system or to a centralized antenna system, a good outdoor color TV antenna is recommended for example, in direct sunlight or near a heating appliance, etc. ...
...50 BEST HORIZONTAL 5' 10' 15' 20' 50 VIEWING ANGLE S CAUTION: Magnetic fields, such as the viewer moves to the left and right of the HITACHI Projection Television is its best, test various locations in the room to find the optimum spot for best performance. HOW TO SET UP YOUR NEW... HITACHI PROJECTION TV ANTENNA Unless your TV is connected to a cable TV system or to a centralized antenna system, a good outdoor color TV antenna is recommended for example, in direct sunlight or near a heating appliance, etc. ...
Owners Guide
Page 7
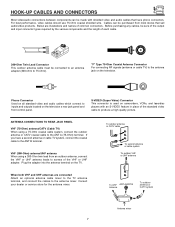
Below are connected Attach an optional antenna cable mixer to the TV antenna terminal, and connect the cables to the antenna mixer. Consult your dealer or...-Ohm Coaxial Antenna Connector For connecting RF signals (antenna or cable TV) to inputs and outputs located on the TV. ANTENNA CONNECTIONS TO REAR JACK PANEL VHF (75-Ohm) antenna/CATV (Cable TV) When using a 300-Ohm twin lead from most stores that have... a second antenna or cable TV system, connect the coaxial cable to the ANT B terminal. VHF (300-Ohm) antenna/UHF antenna ...
Below are connected Attach an optional antenna cable mixer to the TV antenna terminal, and connect the cables to the antenna mixer. Consult your dealer or...-Ohm Coaxial Antenna Connector For connecting RF signals (antenna or cable TV) to inputs and outputs located on the TV. ANTENNA CONNECTIONS TO REAR JACK PANEL VHF (75-Ohm) antenna/CATV (Cable TV) When using a 300-Ohm twin lead from most stores that have... a second antenna or cable TV system, connect the coaxial cable to the ANT B terminal. VHF (300-Ohm) antenna/UHF antenna ...
Owners Guide
Page 8
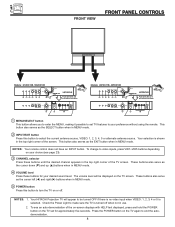
...ቪ Push open door and pull forward and down ቫ Models: 43FDX11B, 43FDX10B CH+ POWER INPUT MENU VOL- NOTES: 1. Check the Power Light to turn the TV on the TV screen. Press the POWER button on the TV again to be displayed on or off when not in the top right...preference without using the remote. Your selection is turned off . FRONT VIEW FRONT PANEL CONTROLS Models: 61UDX10B, 53UDX10B CH+ POWER INPUT MENU VOL- Your HITACHI Projection TV will be turned OFF if there is no video input when VIDEO: 1, 2, 3, 4 or 5 is selected. The volume level will appear to ...
...ቪ Push open door and pull forward and down ቫ Models: 43FDX11B, 43FDX10B CH+ POWER INPUT MENU VOL- NOTES: 1. Check the Power Light to turn the TV on the TV screen. Press the POWER button on the TV again to be displayed on or off when not in the top right...preference without using the remote. Your selection is turned off . FRONT VIEW FRONT PANEL CONTROLS Models: 61UDX10B, 53UDX10B CH+ POWER INPUT MENU VOL- Your HITACHI Projection TV will be turned OFF if there is no video input when VIDEO: 1, 2, 3, 4 or 5 is selected. The volume level will appear to ...
Owners Guide
Page 9
... Point your remote at this area when selecting channels, adjusting volume, etc. ቪ DIGITAL ARRAY (Model: 43FDX10B/43FDX11B) MAGIC FOCUS (Models: 53UDX10/61UDX10B) Use this button to optimum performance. (see a red light when the TV is turned on. ቨ PERFECT PICTURE sensor The Perfect Picture sensor will see pages 42 and 43.... 9 FRONT PANEL CONTROLS ቧ POWER light You will make automatic picture adjustments depending on the amount of light in the top right corner of the TV screen.
... Point your remote at this area when selecting channels, adjusting volume, etc. ቪ DIGITAL ARRAY (Model: 43FDX10B/43FDX11B) MAGIC FOCUS (Models: 53UDX10/61UDX10B) Use this button to optimum performance. (see a red light when the TV is turned on. ቨ PERFECT PICTURE sensor The Perfect Picture sensor will see pages 42 and 43.... 9 FRONT PANEL CONTROLS ቧ POWER light You will make automatic picture adjustments depending on the amount of light in the top right corner of the TV screen.

Owners Guide
Page 10
... do not, the played back picture may be abnormal. 2. If you have a mono VCR, insert the audio cable into the left audio jack of your TV. 10 If you have a S-VHS VCR, use the S-INPUT cable in the following examples: MAGIC FOCUS S-VIDEO VIDEO L/MONO R INPUT 3 AUDIO S-INPUT (Optional, see note...
... do not, the played back picture may be abnormal. 2. If you have a mono VCR, insert the audio cable into the left audio jack of your TV. 10 If you have a S-VHS VCR, use the S-INPUT cable in the following examples: MAGIC FOCUS S-VIDEO VIDEO L/MONO R INPUT 3 AUDIO S-INPUT (Optional, see note...

Owners Guide
Page 12
...obtain optimum picture quality when using the Y-PBPR jacks. 5. NOTES: 1. In this case, connect the components B-Y output to the TV s PB input and the components R-Y output to the TV s PR input. 3. To ensure no copyright infringement, the MONITOR OUT output will be labeled Y-CBCR. In this case, connect... the component CB output to the TV s PB input and the component CR output to the TV s PR input. 2. It may be viewed as a DVD player or Set Top Box. Input 4 and 5 (Y/VIDEO) can...
...obtain optimum picture quality when using the Y-PBPR jacks. 5. NOTES: 1. In this case, connect the components B-Y output to the TV s PB input and the components R-Y output to the TV s PR input. 3. To ensure no copyright infringement, the MONITOR OUT output will be labeled Y-CBCR. In this case, connect... the component CB output to the TV s PB input and the component CR output to the TV s PR input. 2. It may be viewed as a DVD player or Set Top Box. Input 4 and 5 (Y/VIDEO) can...
Owners Guide
Page 13
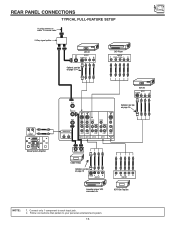
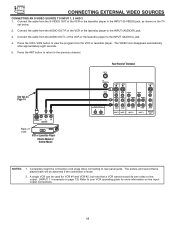
Follow connections that pertain to each input jack. 2. REAR PANEL CONNECTIONS TYPICAL FULL-FEATURE SETUP Outside antenna or cable TV coaxial cable 2-Way signal splitter VCR #1 ANT OUTPUT IN S-VIDEO V L R Optional, see tips on page 15 DVD Player OUTPUT Y PB/CB PR/CR L... 1 INPUT 2 PB (MONO) L PR R AUDIO INPUT 4 PB (MONO) L L PR R AUDIO R AUDIO INPUT 5 MONITOR OUT Optional, see tips on page 15 OUTPUT INPUT Cable TV Box Optional, see tips on page 15 S-VIDEO V L R OUTPUT Y PB PR L R OUTPUT Laserdisc player, VCR, camcorder, etc. HDTV Set-Top Box NOTE: 1. Connect only 1...
Follow connections that pertain to each input jack. 2. REAR PANEL CONNECTIONS TYPICAL FULL-FEATURE SETUP Outside antenna or cable TV coaxial cable 2-Way signal splitter VCR #1 ANT OUTPUT IN S-VIDEO V L R Optional, see tips on page 15 DVD Player OUTPUT Y PB/CB PR/CR L... 1 INPUT 2 PB (MONO) L PR R AUDIO INPUT 4 PB (MONO) L L PR R AUDIO R AUDIO INPUT 5 MONITOR OUT Optional, see tips on page 15 OUTPUT INPUT Cable TV Box Optional, see tips on page 15 S-VIDEO V L R OUTPUT Y PB PR L R OUTPUT Laserdisc player, VCR, camcorder, etc. HDTV Set-Top Box NOTE: 1. Connect only 1...
Owners Guide
Page 14
... at a time. Use these connections in place of the standard video connection if your device has this case, connect the components B-Y output to the TV s PB input and the components R-Y output to each input jack. Your component outputs may use VIDEO or S-VIDEO inputs to connect to the operating ...INPUT: 1 in the example on the television. Use these may be labeled Y-CBCR. In this feature. You may be necessary to adjust TINT to the TV s PR input. It may use standard video signal for VCR #1 and VCR #2, but only one audio output (mono sound), connect it to your VCR ...
... at a time. Use these connections in place of the standard video connection if your device has this case, connect the components B-Y output to the TV s PB input and the components R-Y output to each input jack. Your component outputs may use VIDEO or S-VIDEO inputs to connect to the operating ...INPUT: 1 in the example on the television. Use these may be labeled Y-CBCR. In this feature. You may be necessary to adjust TINT to the TV s PR input. It may use standard video signal for VCR #1 and VCR #2, but only one audio output (mono sound), connect it to your VCR ...

Owners Guide
Page 15
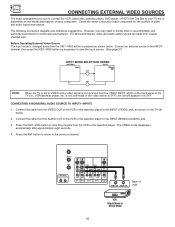
... prevent damage to the speaker and distorted sound, set . 15 CONNECTING EXTERNAL AUDIO SOURCES CONNECTING EXTERNAL AUDIO AMPLIFIER To control the audio level of the TV set the volume control of the audio amplifier lower and adjust the sound using the remote control of an external audio amplifier with the remote...
... prevent damage to the speaker and distorted sound, set . 15 CONNECTING EXTERNAL AUDIO SOURCES CONNECTING EXTERNAL AUDIO AMPLIFIER To control the audio level of the TV set the volume control of the audio amplifier lower and adjust the sound using the remote control of an external audio amplifier with the remote...
Owners Guide
Page 16
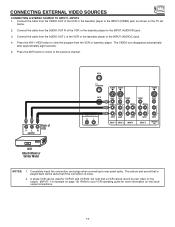
...jack. 3. Connect an external source to the INPUT terminal, then press the VID1~VID5 button as shown on the model and features of VCR VCR Hitachi Model or Similar Model 16 However, you use to connect the VCR, camcorder, laserdisc player, DVD player, or HDTV Set Top Box to your... cables should be OFF. CONNECTING EXTERNAL VIDEO SOURCES The exact arrangement you may need to modify them to accommodate your TV set is not received from the AUDIO OUT of the TV (i.e., VCR/laserdisc player, etc. is not connected or the video device is pressed as suggestions. CONNECTING A MONAURAL AUDIO...
...jack. 3. Connect an external source to the INPUT terminal, then press the VID1~VID5 button as shown on the model and features of VCR VCR Hitachi Model or Similar Model 16 However, you use to connect the VCR, camcorder, laserdisc player, DVD player, or HDTV Set Top Box to your... cables should be OFF. CONNECTING EXTERNAL VIDEO SOURCES The exact arrangement you may need to modify them to accommodate your TV set is not received from the AUDIO OUT of the TV (i.e., VCR/laserdisc player, etc. is not connected or the video device is pressed as suggestions. CONNECTING A MONAURAL AUDIO...
Owners Guide
Page 17
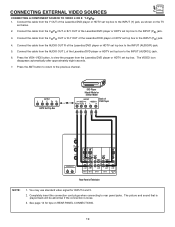
... cannot record its own video or line output. (INPUT: 1 in example on page 13) Refer to your VCR operating guide for more information on the TV set below. 2. Connect the cable from the AUDIO OUT L of VCR V L R OUTPUT ANT A TO CONVERTER S-VIDEO S-VIDEO S-VIDEO ANT B AUDIO TO HI-FI R L VIDEO VIDEO... Y/VIDEO Y/VIDEO VIDEO (MONO) (MONO) L L R R AUDIO AUDIO INPUT 1 INPUT 2 PB (MONO) L PR R AUDIO INPUT 4 PB (MONO) L L PR R AUDIO R AUDIO INPUT 5 MONITOR OUT VCR Hitachi Model or Similar Model NOTES: 1.
... cannot record its own video or line output. (INPUT: 1 in example on page 13) Refer to your VCR operating guide for more information on the TV set below. 2. Connect the cable from the AUDIO OUT L of VCR V L R OUTPUT ANT A TO CONVERTER S-VIDEO S-VIDEO S-VIDEO ANT B AUDIO TO HI-FI R L VIDEO VIDEO... Y/VIDEO Y/VIDEO VIDEO (MONO) (MONO) L L R R AUDIO AUDIO INPUT 1 INPUT 2 PB (MONO) L PR R AUDIO INPUT 4 PB (MONO) L L PR R AUDIO R AUDIO INPUT 5 MONITOR OUT VCR Hitachi Model or Similar Model NOTES: 1.
Owners Guide
Page 18
... INPUT (S-VIDEO) jack, as shown on line inputoutput connections. 18 See tips on Page 14 S-VIDEO V L R OUTPUT Back of VCR VCR or Laserdisc Player Hitachi Model or Similar Model Rear Panel of the VCR or the laserdisc player to your VCR operating guide for VCR #1 and VCR #2, but note that... is played back will be used for more information on the TV set below. 2. Completely insert the connection cord plugs when connecting to the previous channel. Press the ANT button to return to rear panel jacks. A...
... INPUT (S-VIDEO) jack, as shown on line inputoutput connections. 18 See tips on Page 14 S-VIDEO V L R OUTPUT Back of VCR VCR or Laserdisc Player Hitachi Model or Similar Model Rear Panel of the VCR or the laserdisc player to your VCR operating guide for VCR #1 and VCR #2, but note that... is played back will be used for more information on the TV set below. 2. Completely insert the connection cord plugs when connecting to the previous channel. Press the ANT button to return to rear panel jacks. A...
Owners Guide
Page 19
...picture and sound that is played back will be abnormal if the connection is loose. 3. You may use standard video signal for tips on the TV set top box to the INPUT (PR) jack. 4. Completely insert the connection cord plugs when connecting to the previous channel. Connect the cable ... SOURCE TO VIDEO 4 OR 5: Y-PBPR. 1. Press the VID4~VID5 button, to the INPUT (PB) jack. 3. OUTPUT L R Y PB PR HDTV Set-Top Box DVD Player Hitachi Model or Similar Model OUTPUT Back of VIDEO AUDIO DVD Player OR PR/CR PB/CB Y L R ANT A TO CONVERTER S-VIDEO S-VIDEO S-VIDEO ANT B AUDIO TO...
...picture and sound that is played back will be abnormal if the connection is loose. 3. You may use standard video signal for tips on the TV set top box to the INPUT (PR) jack. 4. Completely insert the connection cord plugs when connecting to the previous channel. Connect the cable ... SOURCE TO VIDEO 4 OR 5: Y-PBPR. 1. Press the VID4~VID5 button, to the INPUT (PB) jack. 3. OUTPUT L R Y PB PR HDTV Set-Top Box DVD Player Hitachi Model or Similar Model OUTPUT Back of VIDEO AUDIO DVD Player OR PR/CR PB/CB Y L R ANT A TO CONVERTER S-VIDEO S-VIDEO S-VIDEO ANT B AUDIO TO...
Owners Guide
Page 20
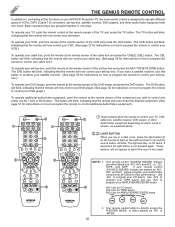
...button will blink, indicating that the remote will blink. Your remote control button to light up the buttons shown in one touch. To operate your TV, point the remote control at the remote sensor of the cable box and press the CABLE (CBL) button. The CBL button will blink, indicating... access the THEATER MODE is chosen, as PIX or MODE . 20 THE GENIUS REMOTE CONTROL In addition to controlling all the functions on your HITACHI Projection TV, the new remote control is designed to control your DVD player.) To operate additional audio/video equipment, point the remote at the remote sensor...
...button will blink, indicating that the remote will blink. Your remote control button to light up the buttons shown in one touch. To operate your TV, point the remote control at the remote sensor of the cable box and press the CABLE (CBL) button. The CBL button will blink, indicating... access the THEATER MODE is chosen, as PIX or MODE . 20 THE GENIUS REMOTE CONTROL In addition to controlling all the functions on your HITACHI Projection TV, the new remote control is designed to control your DVD player.) To operate additional audio/video equipment, point the remote at the remote sensor...
Owners Guide
Page 21
... 0 LAST CH HELP ASPECT MODE MENU EXIT VOL SELECT CH SVCS VID 1 MUTE STATUS VCR PLUS+ INFO GUIDE/TV SCHD VID 5 VID 2 VID 4 VID 3 PIP PIP CH FREEZE PIP MODE PIP ACCESS SWAP PROG TV/VCR SLOW ብ ቦ ቨ 23 1 REC REC CLU-5711TSI CLU-5713TSI ᕃ POWER button Press this... button to turn the TV set on or off when the remote is in TV mode. (See page 22 for instructions on how to set the remote control to TV mode.) ባ TV button When the TV button is pressed, it will blink, to indicate the remote is...
... 0 LAST CH HELP ASPECT MODE MENU EXIT VOL SELECT CH SVCS VID 1 MUTE STATUS VCR PLUS+ INFO GUIDE/TV SCHD VID 5 VID 2 VID 4 VID 3 PIP PIP CH FREEZE PIP MODE PIP ACCESS SWAP PROG TV/VCR SLOW ብ ቦ ቨ 23 1 REC REC CLU-5711TSI CLU-5713TSI ᕃ POWER button Press this... button to turn the TV set on or off when the remote is in TV mode. (See page 22 for instructions on how to set the remote control to TV mode.) ባ TV button When the TV button is pressed, it will blink, to indicate the remote is...
Owners Guide
Page 22
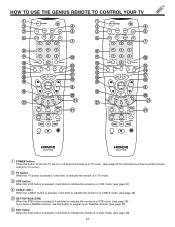
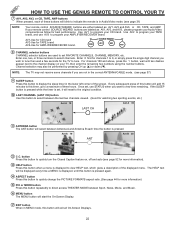
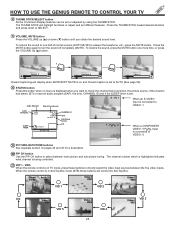
... 37) ቪ SLEEP button Press this timer, up (̆) or down (̄). NOTE: The TV may also be displayed every time a MENU is displayed, until two dashes appear next to the channel display... If your remote control SOURCE WIZARD buttons are labeled as AV1, AV2, and AV3, please program your TV, then enter the remaining two numbers using the number buttons. button Press this button to a maximum of ...screen. Ant A 10 Ant B 28 ANT ቮ C.C. HOW TO USE THE GENIUS REMOTE TO CONTROL YOUR TV ቨ AV1, AV2, AV3, or CD, TAPE, AMP buttons When pressed, each time the button is...
... 37) ቪ SLEEP button Press this timer, up (̆) or down (̄). NOTE: The TV may also be displayed every time a MENU is displayed, until two dashes appear next to the channel display... If your remote control SOURCE WIZARD buttons are labeled as AV1, AV2, and AV3, please program your TV, then enter the remaining two numbers using the number buttons. button Press this button to a maximum of ...screen. Ant A 10 Ant B 28 ANT ቮ C.C. HOW TO USE THE GENIUS REMOTE TO CONTROL YOUR TV ቨ AV1, AV2, AV3, or CD, TAPE, AMP buttons When pressed, each time the button is...
Owners Guide
Page 23
... 8 MUTE Mute 8 ▲ ▲ ▲ ▲ ▲ ▲ Closed Captioning will control the Set-Top-Box. HOW TO USE THE GENIUS REMOTE TO CONTROL YOUR TV ቴ THUMB STICK/SELECT button All the On-Screen Display features can be set different features. IN: 1 When an S-VIDEO Input is in... TV mode, press these buttons will display when MUTE/SOFT MUTE is in Set-Top-Box mode (STB) these buttons to check the channel being controlled. ...
... 8 MUTE Mute 8 ▲ ▲ ▲ ▲ ▲ ▲ Closed Captioning will control the Set-Top-Box. HOW TO USE THE GENIUS REMOTE TO CONTROL YOUR TV ቴ THUMB STICK/SELECT button All the On-Screen Display features can be set different features. IN: 1 When an S-VIDEO Input is in... TV mode, press these buttons will display when MUTE/SOFT MUTE is in Set-Top-Box mode (STB) these buttons to check the channel being controlled. ...


