Owners Guide
Page 2
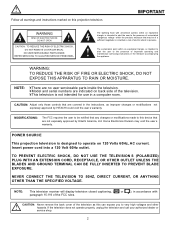
...: This television receiver will display television closed captioning, ( or ), in a computer room. The exclamation point within the product s enclosure that may void the user s warranty. CAUTION: Adjust only those controls that are covered in the literature accompanying the appliance. MODIFICATIONS: The FCC requires the user to be of a sufficient magnitude to constitute a risk of important operating and maintenance (servicing) instructions in the instructions, as this...
...: This television receiver will display television closed captioning, ( or ), in a computer room. The exclamation point within the product s enclosure that may void the user s warranty. CAUTION: Adjust only those controls that are covered in the literature accompanying the appliance. MODIFICATIONS: The FCC requires the user to be of a sufficient magnitude to constitute a risk of important operating and maintenance (servicing) instructions in the instructions, as this...

Owners Guide
Page 3
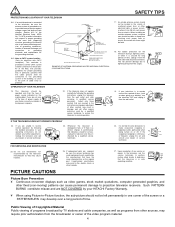
... all instructions. TOOHOT! 3 Protect the power cord from the apparatus. HELP 11-2. To help you to service the television yourself as opening or removing covers may touch dangerous voltage points or short out parts that a safety problem should use this apparatus near any way, such as this section illustrates safety tips which provide reliable operation of HITACHI televisions. Use only with a cart or stand recommended...
... all instructions. TOOHOT! 3 Protect the power cord from the apparatus. HELP 11-2. To help you to service the television yourself as opening or removing covers may touch dangerous voltage points or short out parts that a safety problem should use this apparatus near any way, such as this section illustrates safety tips which provide reliable operation of HITACHI televisions. Use only with a cart or stand recommended...
Owners Guide
Page 4
... installer s attention to projection television receivers. If you are required, be operated only from the wall outlet and refer servicing to lightning and power-line surges. It is in damage and will prevent damage due to qualified service personnel. OPERATION OF YOUR TELEVISION 19. Service 23. If replacement parts are not sure of the type of power supply at your home, consult your HITACHI Factory Warranty. ¥ When using Picture...
... installer s attention to projection television receivers. If you are required, be operated only from the wall outlet and refer servicing to lightning and power-line surges. It is in damage and will prevent damage due to qualified service personnel. OPERATION OF YOUR TELEVISION 19. Service 23. If replacement parts are not sure of the type of power supply at your home, consult your HITACHI Factory Warranty. ¥ When using Picture...
Owners Guide
Page 14
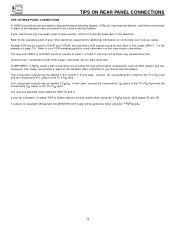
... audio output (mono sound), connect it to your hook-up cables. Connect only 1 component (VCR, DVD player, camcorder, etc.) to obtain optimum picture quality when using the Y-PBPR inputs. (See pages 53 and 54) To ensure no copyright infringement, the MONITOR OUT output will be labeled Y, B-Y, and R-Y. You may use standard video signal for INPUT:4 and 5. It may be labeled Y-CBCR. TIPS ON REAR PANEL CONNECTIONS TIPS ON REAR PANEL CONNECTIONS S-VIDEO connections are provided for high...
... audio output (mono sound), connect it to your hook-up cables. Connect only 1 component (VCR, DVD player, camcorder, etc.) to obtain optimum picture quality when using the Y-PBPR inputs. (See pages 53 and 54) To ensure no copyright infringement, the MONITOR OUT output will be labeled Y, B-Y, and R-Y. You may use standard video signal for INPUT:4 and 5. It may be labeled Y-CBCR. TIPS ON REAR PANEL CONNECTIONS TIPS ON REAR PANEL CONNECTIONS S-VIDEO connections are provided for high...
Owners Guide
Page 16
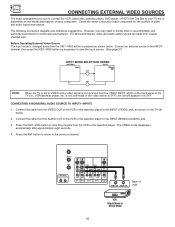
... view the program from coaxial shielded wire. Before Operating External Video Source The input mode is changed every time the VID1~VID5 button is dependent on the TV set below . However, you use to connect the VCR, camcorder, laserdisc player, DVD player, or HDTV Set Top Box to your particular assortment of components and features. ANT A TO CONVERTER S-VIDEO S-VIDEO S-VIDEO ANT B AUDIO TO HI-FI R L VIDEO VIDEO Y/VIDEO Y/VIDEO VIDEO (MONO) (MONO) L L R R AUDIO AUDIO INPUT 1 INPUT 2 PB (MONO) L PR R AUDIO INPUT 4 PB (MONO) L L PR R AUDIO R AUDIO INPUT 5 MONITOR...
... view the program from coaxial shielded wire. Before Operating External Video Source The input mode is changed every time the VID1~VID5 button is dependent on the TV set below . However, you use to connect the VCR, camcorder, laserdisc player, DVD player, or HDTV Set Top Box to your particular assortment of components and features. ANT A TO CONVERTER S-VIDEO S-VIDEO S-VIDEO ANT B AUDIO TO HI-FI R L VIDEO VIDEO Y/VIDEO Y/VIDEO VIDEO (MONO) (MONO) L L R R AUDIO AUDIO INPUT 1 INPUT 2 PB (MONO) L PR R AUDIO INPUT 4 PB (MONO) L L PR R AUDIO R AUDIO INPUT 5 MONITOR...
Owners Guide
Page 19
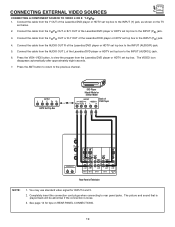
...DVD Player Hitachi Model or Similar Model OUTPUT Back of VIDEO AUDIO DVD Player OR PR/CR PB/CB Y L R ANT A TO CONVERTER S-VIDEO S-VIDEO S-VIDEO ANT B AUDIO TO HI-FI R L VIDEO VIDEO Y/VIDEO Y/VIDEO VIDEO (MONO) (MONO) L L R R AUDIO AUDIO INPUT 1 INPUT 2 PB (MONO) L PR R AUDIO INPUT 4 PB (MONO) L L PR R AUDIO R AUDIO INPUT 5 MONITOR OUT Rear Panel of the Laserdisc/DVD player or HDTV set top box to the INPUT (AUDIO/R) jack. 5. See page 14 for INPUT:4 and 5. 2. Connect the cable from the Y OUT of Television NOTE: 1. You may use standard video signal...
...DVD Player Hitachi Model or Similar Model OUTPUT Back of VIDEO AUDIO DVD Player OR PR/CR PB/CB Y L R ANT A TO CONVERTER S-VIDEO S-VIDEO S-VIDEO ANT B AUDIO TO HI-FI R L VIDEO VIDEO Y/VIDEO Y/VIDEO VIDEO (MONO) (MONO) L L R R AUDIO AUDIO INPUT 1 INPUT 2 PB (MONO) L PR R AUDIO INPUT 4 PB (MONO) L L PR R AUDIO R AUDIO INPUT 5 MONITOR OUT Rear Panel of the Laserdisc/DVD player or HDTV set top box to the INPUT (AUDIO/R) jack. 5. See page 14 for INPUT:4 and 5. 2. Connect the cable from the Y OUT of Television NOTE: 1. You may use standard video signal...
Owners Guide
Page 20
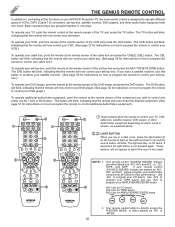
... 3 PIP PIP CH FREEZE PIP MODE PROG PIP ACCESS SWAP TV/VCR SLOW REC ቤ CLU-5711TSI CLU-5713TSI ቢ These buttons allow the remote to control your TV, VCR, cable box, satellite receiver, DVD player, or other audio/video equipment with one area. This button will blink, indicating that the remote will now control your set-top-box. Use AV1 to light up the buttons shown in one touch. The VCR button will blink, indicating that the remote will now control your television...
... 3 PIP PIP CH FREEZE PIP MODE PROG PIP ACCESS SWAP TV/VCR SLOW REC ቤ CLU-5711TSI CLU-5713TSI ቢ These buttons allow the remote to control your TV, VCR, cable box, satellite receiver, DVD player, or other audio/video equipment with one area. This button will blink, indicating that the remote will now control your set-top-box. Use AV1 to light up the buttons shown in one touch. The VCR button will blink, indicating that the remote will now control your television...
Owners Guide
Page 22
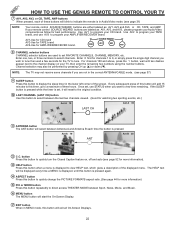
... aspect ratio. (See page 44 for more information) ቱ PIX or MODE button Press this button repeatedly to direct access THEATER MODE between Sport, News, Movie, and Music. ቲ MENU button The MENU button will start the On-Screen Display. ታ EXIT button When in Audio/Video mode. (see page 52 for channels 1 to 9, or simply press the single digit channel you want to view time remaining. Use AV1 to quickly turn the Closed Caption...
... aspect ratio. (See page 44 for more information) ቱ PIX or MODE button Press this button repeatedly to direct access THEATER MODE between Sport, News, Movie, and Music. ቲ MENU button The MENU button will start the On-Screen Display. ታ EXIT button When in Audio/Video mode. (see page 52 for channels 1 to 9, or simply press the single digit channel you want to view time remaining. Use AV1 to quickly turn the Closed Caption...
Owners Guide
Page 23
... button Use the PIP CH button to answer the telephone, etc., press the MUTE button. The channel number which is highlighted indicates what channel is being received, the picture source, if the channel has stereo (ST) or second audio program (SAP), the time, CHANNEL ID and if the SLEEP timer is in Set-Top-Box mode (STB) these buttons to VIDEO: 4. 1 PICTURE-IN-PICTURE buttons See separate section on and Closed Caption is set . To reduce the sound...
... button Use the PIP CH button to answer the telephone, etc., press the MUTE button. The channel number which is highlighted indicates what channel is being received, the picture source, if the channel has stereo (ST) or second audio program (SAP), the time, CHANNEL ID and if the SLEEP timer is in Set-Top-Box mode (STB) these buttons to VIDEO: 4. 1 PICTURE-IN-PICTURE buttons See separate section on and Closed Caption is set . To reduce the sound...
Owners Guide
Page 24
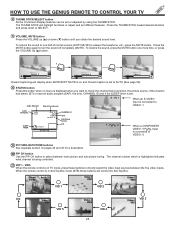
... of the PIP mode. ANT B can be viewed as a sub-picture. 2. When the lower channel display is highlighted, channel tuning is being controlled, to change the PIP mode, use the PIP MODE button to watch a TV program while viewing other programs from the ANT A source or any of the screen. When using Y-PBPR input, only 480i signal can be viewed as a sub-picture.) Ant A 10 Main Picture PIP Video:1 Ant A 10 PIP PIP Sub Picture NOTES: 1. PICTURE-IN-PICTURE (PIP) Your HITACHI Projection TV incorporates Dual Tuner technology...
... of the PIP mode. ANT B can be viewed as a sub-picture. 2. When the lower channel display is highlighted, channel tuning is being controlled, to change the PIP mode, use the PIP MODE button to watch a TV program while viewing other programs from the ANT A source or any of the screen. When using Y-PBPR input, only 480i signal can be viewed as a sub-picture.) Ant A 10 Main Picture PIP Video:1 Ant A 10 PIP PIP Sub Picture NOTES: 1. PICTURE-IN-PICTURE (PIP) Your HITACHI Projection TV incorporates Dual Tuner technology...
Owners Guide
Page 28
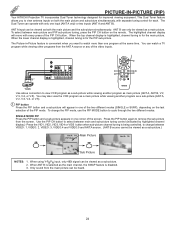
... buttons exclusively for operating the TV. If the cable box does not turn off , try a different two digit preset code. 6. NOTES: 1. The ANT button will flash 3 times if the code was accepted. 5. This remote is designed to operate different types of your cable box. 3. Aim the remote control at the cable box and press the POWER button. REC CLU-5711TSI REC CLU-5713TSI MY CABLE BOX CODE IS: NOTE: Refer to instruction manual of the Cable Box for operation of your cable box by setting...
... buttons exclusively for operating the TV. If the cable box does not turn off , try a different two digit preset code. 6. NOTES: 1. The ANT button will flash 3 times if the code was accepted. 5. This remote is designed to operate different types of your cable box. 3. Aim the remote control at the cable box and press the POWER button. REC CLU-5711TSI REC CLU-5713TSI MY CABLE BOX CODE IS: NOTE: Refer to instruction manual of the Cable Box for operation of your cable box by setting...

Owners Guide
Page 29
... digit preset code that your set-top-box/satellite receiver cannot be operated after performing the above . 4. Turn ON your set -top-box/satellite systems. 2. Aim the remote control at the set -topbox/satellite codes. ቤ EXCLUSIVE TV buttons These buttons are removed from the remote control. When this occurs, the remote control is entered. NOTES: 1. After replacing the batteries repeat the entire programming procedure as shown on page 32. The ANT button will flash 3 times...
... digit preset code that your set-top-box/satellite receiver cannot be operated after performing the above . 4. Turn ON your set -top-box/satellite systems. 2. Aim the remote control at the set -topbox/satellite codes. ቤ EXCLUSIVE TV buttons These buttons are removed from the remote control. When this occurs, the remote control is entered. NOTES: 1. After replacing the batteries repeat the entire programming procedure as shown on page 32. The ANT button will flash 3 times...

Owners Guide
Page 34
... Sharpness Reset Advanced Settings Bass Treble Balance Reset Advanced Theater Modes Surround Adjust contrast. Adjust brightness. Set VIDEO settings to match green manually. (43FDX10B/43FDX11B) Picture Formats Select the Aspect Ratio. Picture and sound are automatically set up for channel buttons. Magic Focus Automatically match red, green, and blue colors to make white. (53UDX10B/61UDX10B) Digital Array Adjust red and blue to factory preset. Automatically turn TV on and off once, daily, or weekly. Set The Clock Set before using timer features. Label video inputs...
... Sharpness Reset Advanced Settings Bass Treble Balance Reset Advanced Theater Modes Surround Adjust contrast. Adjust brightness. Set VIDEO settings to match green manually. (43FDX10B/43FDX11B) Picture Formats Select the Aspect Ratio. Picture and sound are automatically set up for channel buttons. Magic Focus Automatically match red, green, and blue colors to make white. (53UDX10B/61UDX10B) Digital Array Adjust red and blue to factory preset. Automatically turn TV on and off once, daily, or weekly. Set The Clock Set before using timer features. Label video inputs...

Owners Guide
Page 36
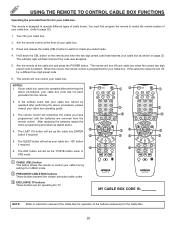
... 3. SETUP CUSTOMIZE VIDEO SEL AUDIO THEATER Set Menu Language Plug & Play Set Antenna/Cable Set Channel Memory Edit Channel Memory View Channel List Set The Clock Magic Focus Picture Formats M e n u To M e n u B a r To E x i t Q u i t THUMB STICK Welcome To Your Plug & Play On Screen Set Up Guide. Press THUMB STICK ̈ to begin SET CHANNEL MEMORY. (see page 38) 36 Press EXIT to quit menu or THUMB STICK ̈ to display the graphic guide. I Want To Connect A Set Top Box To...
... 3. SETUP CUSTOMIZE VIDEO SEL AUDIO THEATER Set Menu Language Plug & Play Set Antenna/Cable Set Channel Memory Edit Channel Memory View Channel List Set The Clock Magic Focus Picture Formats M e n u To M e n u B a r To E x i t Q u i t THUMB STICK Welcome To Your Plug & Play On Screen Set Up Guide. Press THUMB STICK ̈ to begin SET CHANNEL MEMORY. (see page 38) 36 Press EXIT to quit menu or THUMB STICK ̈ to display the graphic guide. I Want To Connect A Set Top Box To...
Owners Guide
Page 43
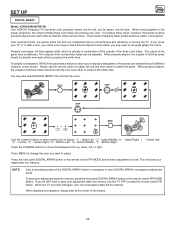
SETUP SET UP DIGITAL ARRAY Model: 43FDX10B/43FDX11B Your HITACHI Projection TV has three color projection tubes: one for red, one for green, one for blue. Over a period of time, the picture tubes can drift out of the red and blue tubes can be adjusted. The outputs of alignment due to produce the white lines. Upper Right, 4 - Center Right, 7 - Bottom Right. NOTE: Only a momentary press of all three tubes should be directly over each other to...
SETUP SET UP DIGITAL ARRAY Model: 43FDX10B/43FDX11B Your HITACHI Projection TV has three color projection tubes: one for red, one for green, one for blue. Over a period of time, the picture tubes can drift out of the red and blue tubes can be adjusted. The outputs of alignment due to produce the white lines. Upper Right, 4 - Center Right, 7 - Bottom Right. NOTE: Only a momentary press of all three tubes should be directly over each other to...
Owners Guide
Page 44
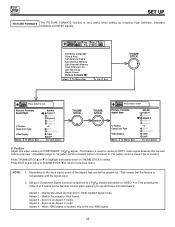
... very useful when setting up a Component Signal (connect component to Y-PBPR inputs) and switch to VIDEO: 4 or 5 by pressing the Video:4 or 5 button on Aspect 1 mode. SETUP CUSTOMIZE VIDEO SEL AUDIO THEATER Set Menu Language Plug & Play Set Antenna/Cable Set Channel Memory Edit Channel Memory View Channel List Set The Clock Magic Focus Picture Formats M e n u To M e n u B a r To Q u i t E x i t THUMB STICK SETUP Press Select To Set SEL Picture Formats Aspect Style V. Adjustable range is -10 (video center is toward bottom of screen) to center an HDTV video signal between...
... very useful when setting up a Component Signal (connect component to Y-PBPR inputs) and switch to VIDEO: 4 or 5 by pressing the Video:4 or 5 button on Aspect 1 mode. SETUP CUSTOMIZE VIDEO SEL AUDIO THEATER Set Menu Language Plug & Play Set Antenna/Cable Set Channel Memory Edit Channel Memory View Channel List Set The Clock Magic Focus Picture Formats M e n u To M e n u B a r To Q u i t E x i t THUMB STICK SETUP Press Select To Set SEL Picture Formats Aspect Style V. Adjustable range is -10 (video center is toward bottom of screen) to center an HDTV video signal between...
Owners Guide
Page 46
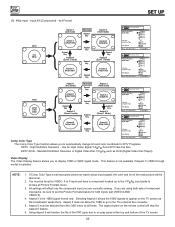
... Set SEL Picture Formats Aspect Style V. Position Comp Color Type Video Display M e n u To M e n u B a r Y-PBPR: 4 Aspect 1 Aspect 2 Aspect 3 Aspect 4 Aspect 5 +5 HDTV SDTV/DVD 1080i 540P To Q u i t E x i t SETUP Press Select To Set SEL Aspect 4 540p/1080i Aspect key Aspect 3 540p/1080i Picture Formats Aspect Style V. High Definition Television - SDTV /DVD - This feature is not available if Aspect 5 (1080i through mode) is set improperly (does not match actual input signal), the color and tint of the TV screen. 46 If you are using both inputs (set the Picture...
... Set SEL Picture Formats Aspect Style V. Position Comp Color Type Video Display M e n u To M e n u B a r Y-PBPR: 4 Aspect 1 Aspect 2 Aspect 3 Aspect 4 Aspect 5 +5 HDTV SDTV/DVD 1080i 540P To Q u i t E x i t SETUP Press Select To Set SEL Aspect 4 540p/1080i Aspect key Aspect 3 540p/1080i Picture Formats Aspect Style V. High Definition Television - SDTV /DVD - This feature is not available if Aspect 5 (1080i through mode) is set improperly (does not match actual input signal), the color and tint of the TV screen. 46 If you are using both inputs (set the Picture...
Owners Guide
Page 51
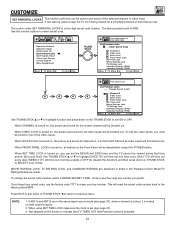
... the Front Panel will be viewed during that time period. (Set clock first.) Use THUMB STICK ̆ or ̄ to set Set Parental Locks ---- MOVIE RATINGS LOCK, TV RATINGS LOCK, and CANADIAN RATINGS are in the Parental Control Movie/TV Ratings Reference Guide. The factory preset code is activated. 51 SETUP CUSTOMIZE VIDEO SEL AUDIO THEATER Name the Channel Name the Inputs Set Favorite Ch. Text appears on , the picture and sound for the...
... the Front Panel will be viewed during that time period. (Set clock first.) Use THUMB STICK ̆ or ̄ to set Set Parental Locks ---- MOVIE RATINGS LOCK, TV RATINGS LOCK, and CANADIAN RATINGS are in the Parental Control Movie/TV Ratings Reference Guide. The factory preset code is activated. 51 SETUP CUSTOMIZE VIDEO SEL AUDIO THEATER Name the Channel Name the Inputs Set Favorite Ch. Text appears on , the picture and sound for the...
Owners Guide
Page 53
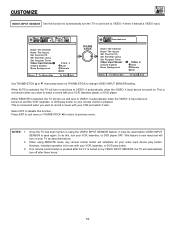
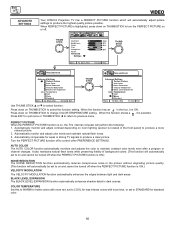
..., the TV will substitute for use with your VCR, laserdisc, or DVD play button. 3. Press EXIT to quit menu or THUMB STICK ̇ to return to change VIDEO INPUT SENSOR setting. When using the VIDEO INPUT SENSOR feature, it must be reset before VIDEO INPUT SENSOR is now reset and will automatically turn your video input device play button on your TV as described above. 2. Set Parental Locks Set Program Timer Video Input Sensor Closed Caption Menu Background Menu To Menu Bar Video: 4 Auto Remote Off...
..., the TV will substitute for use with your VCR, laserdisc, or DVD play button. 3. Press EXIT to quit menu or THUMB STICK ̇ to return to change VIDEO INPUT SENSOR setting. When using the VIDEO INPUT SENSOR feature, it must be reset before VIDEO INPUT SENSOR is now reset and will automatically turn your video input device play button on your TV as described above. 2. Set Parental Locks Set Program Timer Video Input Sensor Closed Caption Menu Background Menu To Menu Bar Video: 4 Auto Remote Off...
Owners Guide
Page 56
... conspicuous noise in the picture without degrading picture quality. (This function will automatically be turned off when the PERFECT PICTURE function is located in dark scenes. Automatically compensate for standard color. 56 AUTO COLOR The AUTO COLOR function automatically monitors and adjusts the color to control other PREFERENCE SETTINGS. When PERFECT PICTURE is highlighted, press down on or off to maintain constant color levels even after a program or channel changes. PERFECT PICTURE When...
... conspicuous noise in the picture without degrading picture quality. (This function will automatically be turned off when the PERFECT PICTURE function is located in dark scenes. Automatically compensate for standard color. 56 AUTO COLOR The AUTO COLOR function automatically monitors and adjusts the color to control other PREFERENCE SETTINGS. When PERFECT PICTURE is highlighted, press down on or off to maintain constant color levels even after a program or channel changes. PERFECT PICTURE When...


