
Owners Guide
Page 1
LCD REAR PROJECTION TELEVISION Operating Guide for energy efficiency. has determined that this product meets the ENERGY STAR® guidelines for 42V525 IMPORTANT SAFETY INSTRUCTIONS 2-3 FIRST TIME USE ...4-19 THE REMOTE CONTROL 20-33 ON-SCREEN DISPLAY...34-61 LAMP REPLACEMENT ...62-65 CARE OF YOUR HITACHI TV & REMOTE CONTROL 66 RECEPTION PROBLEMS ...67 USEFUL INFORMATION / INDEX 68-72 As an ENERGY STAR® Partner, Hitachi, Ltd.
LCD REAR PROJECTION TELEVISION Operating Guide for energy efficiency. has determined that this product meets the ENERGY STAR® guidelines for 42V525 IMPORTANT SAFETY INSTRUCTIONS 2-3 FIRST TIME USE ...4-19 THE REMOTE CONTROL 20-33 ON-SCREEN DISPLAY...34-61 LAMP REPLACEMENT ...62-65 CARE OF YOUR HITACHI TV & REMOTE CONTROL 66 RECEPTION PROBLEMS ...67 USEFUL INFORMATION / INDEX 68-72 As an ENERGY STAR® Partner, Hitachi, Ltd.

Owners Guide
Page 4
... by pushing the notched part of resulting in the battery compartment. 4. REMOTE CONTROL BATTERIES ("AA") OPTIONAL LCD STAND FIRST TIME USE LCD STAND: SP42WB PART NO: QJO1542 1. 2. REMOTE CONTROL BATTERY INSTALLATION AND REPLACEMENT 1. Insert two new "AA" size batteries for ... is incorrectly replaced. HL02071) or Remote Control Unit CLU-4351UG2 (Part No. Remote Control Unit CLU-4341UG2 (Part No. Match the batteries to the (+) and (-) marks in instability causing possible injury. 1. Replace with Hitachi 42V525. Replace the cover. ACCESSORIES Check to...
... by pushing the notched part of resulting in the battery compartment. 4. REMOTE CONTROL BATTERIES ("AA") OPTIONAL LCD STAND FIRST TIME USE LCD STAND: SP42WB PART NO: QJO1542 1. 2. REMOTE CONTROL BATTERY INSTALLATION AND REPLACEMENT 1. Insert two new "AA" size batteries for ... is incorrectly replaced. HL02071) or Remote Control Unit CLU-4351UG2 (Part No. Remote Control Unit CLU-4341UG2 (Part No. Match the batteries to the (+) and (-) marks in instability causing possible injury. 1. Replace with Hitachi 42V525. Replace the cover. ACCESSORIES Check to...
Owners Guide
Page 7
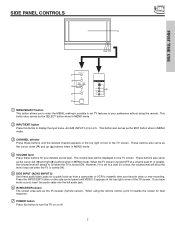
...Press these buttons until VIDEO: 5 appears in the top right corner of the TV screen. This button also serves as the IR receiver (remote sensor). The volume level will default to 30 when the TV is turned ON. When using the remote. VOL+ ̇ CURSOR ̈ CH̄ INPUT/EXIT POWER INPUT ...4710; SIDE INPUT JACKS (INPUT 5) Use these audio/video jacks for best response. ቨ POWER button Press this button to turn the TV on the TV screen. These buttons also serve as the cursor left audio jack. ቧ IR RECEIVER sensor The screen area acts as the SELECT button ...
...Press these buttons until VIDEO: 5 appears in the top right corner of the TV screen. This button also serves as the IR receiver (remote sensor). The volume level will default to 30 when the TV is turned ON. When using the remote. VOL+ ̇ CURSOR ̈ CH̄ INPUT/EXIT POWER INPUT ...4710; SIDE INPUT JACKS (INPUT 5) Use these audio/video jacks for best response. ቨ POWER button Press this button to turn the TV on the TV screen. These buttons also serve as the cursor left audio jack. ቧ IR RECEIVER sensor The screen area acts as the SELECT button ...

Owners Guide
Page 10
... 2 Y/ VIDEO PB INPUT 1 Y/ VIDEO PB HDMI 1 VIDEO L AUDIO R AUDIO TO HI-FI PR PR (MONO) (MONO) (MONO) (MONO) TV AS CENTER ባ ቩቧ RS232C 1 2 345 6 789 ቨ ቢ Antenna Input/Output The remote control allows you have mono sound, insert the audio cable into the left audio jack.) NOTE: You may...
... 2 Y/ VIDEO PB INPUT 1 Y/ VIDEO PB HDMI 1 VIDEO L AUDIO R AUDIO TO HI-FI PR PR (MONO) (MONO) (MONO) (MONO) TV AS CENTER ባ ቩቧ RS232C 1 2 345 6 789 ቨ ቢ Antenna Input/Output The remote control allows you have mono sound, insert the audio cable into the left audio jack.) NOTE: You may...
Owners Guide
Page 20
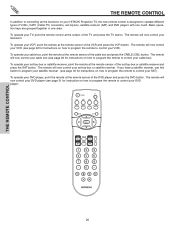
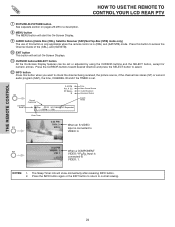
... for instructions on how to program the remote to control your SAT). THE REMOTE CONTROL THE REMOTE CONTROL In addition to controlling all the functions on your HITACHI Projection TV, the new remote control is designed to operate different types of VCRs, CATV (Cable TV) converters, set-top-box, satellite receiver... (SAT) and DVD players with one area. The remote will now control your VCR (see page...
... for instructions on how to program the remote to control your SAT). THE REMOTE CONTROL THE REMOTE CONTROL In addition to controlling all the functions on your HITACHI Projection TV, the new remote control is designed to operate different types of VCRs, CATV (Cable TV) converters, set-top-box, satellite receiver... (SAT) and DVD players with one area. The remote will now control your VCR (see page...

Owners Guide
Page 21
...). Freeze Freeze Freeze Freeze Freeze ብ DAY/NIGHT button Press this button to turn the TV set on which button is in TV mode. (See page 20 for settings changes). 21 HOW TO USE THE REMOTE TO CONTROL YOUR LCD REAR PTV ቢ ባ ቧ ብ ቦ ቨ ቩ ቫ...; ቭ ተ ቱ ቲ ታ ቤ THE REMOTE CONTROL ቢ POWER button ...
...). Freeze Freeze Freeze Freeze Freeze ብ DAY/NIGHT button Press this button to turn the TV set on which button is in TV mode. (See page 20 for settings changes). 21 HOW TO USE THE REMOTE TO CONTROL YOUR LCD REAR PTV ቢ ባ ቧ ብ ቦ ቨ ቩ ቫ...; ቭ ተ ቱ ቲ ታ ቤ THE REMOTE CONTROL ቢ POWER button ...

Owners Guide
Page 22
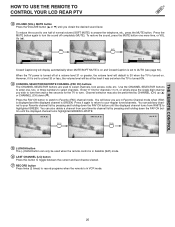
HOW TO USE THE REMOTE TO CONTROL YOUR LCD REAR PTV ቦ ASPECT button Press this button to Zoom-in once while in on the input signal format received, the picture format ratio allows ... area in order to fill it. 4:3 Zoom1/Zoom2 Use these aspect modes to zoom in 16:9 aspect. (1) Antenna Analog Channels 4:3 INPUT 4:3 STANDARD 4:3 EXPANDED 4:3 ZOOM1 THE REMOTE CONTROL (2) 480P Input 16:9 INPUT 16:9 ZOOM 4:3 STANDARD 16:9 STANDARD 4:3 EXPANDED 4:3 ZOOM2 4:3 ZOOM1 16:9 ZOOM (3) HDMI/720P/1080i Input 16:9 INPUT 16:9 STANDARD 16:9 STANDARD...
HOW TO USE THE REMOTE TO CONTROL YOUR LCD REAR PTV ቦ ASPECT button Press this button to Zoom-in once while in on the input signal format received, the picture format ratio allows ... area in order to fill it. 4:3 Zoom1/Zoom2 Use these aspect modes to zoom in 16:9 aspect. (1) Antenna Analog Channels 4:3 INPUT 4:3 STANDARD 4:3 EXPANDED 4:3 ZOOM1 THE REMOTE CONTROL (2) 480P Input 16:9 INPUT 16:9 ZOOM 4:3 STANDARD 16:9 STANDARD 4:3 EXPANDED 4:3 ZOOM2 4:3 ZOOM1 16:9 ZOOM (3) HDMI/720P/1080i Input 16:9 INPUT 16:9 STANDARD 16:9 STANDARD...
Owners Guide
Page 23
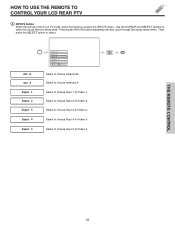
Select to choose Input 2 for Video 2. Select to choose Antenna A. Select to choose Input 3 for Video 3. Select to choose Input 5 for Video 5. THE REMOTE CONTROL 23 Ant B Ant A Input 1 Input 2 Input 3 Input 4 Input 5 Input 5 Ant B Ant A Input 1 Input 2 Move SEL Select Select to choose Input ...1 for Video 1. Select to choose Antenna B. HOW TO USE THE REMOTE TO CONTROL YOUR LCD REAR PTV ቧ INPUTS button When the remote control is in TV mode, press this button to choose Input 4 for Video 4. Select to access the INPUTS menu. Pressing ...
Select to choose Input 2 for Video 2. Select to choose Antenna A. Select to choose Input 3 for Video 3. Select to choose Input 5 for Video 5. THE REMOTE CONTROL 23 Ant B Ant A Input 1 Input 2 Input 3 Input 4 Input 5 Input 5 Ant B Ant A Input 1 Input 2 Move SEL Select Select to choose Input ...1 for Video 1. Select to choose Antenna B. HOW TO USE THE REMOTE TO CONTROL YOUR LCD REAR PTV ቧ INPUTS button When the remote control is in TV mode, press this button to choose Input 4 for Video 4. Select to access the INPUTS menu. Pressing ...
Owners Guide
Page 24
...Ant A 22 ST Stereo R INFO Day/Night Mode Closed Captioning Day CC Off HD 1080i View --:-- AM --:-- NOTES: 1. THE REMOTE CONTROL HOW TO USE THE REMOTE TO CONTROL YOUR LCD REAR PTV ቨ PICTURE-IN-PICTURE button See separate section on pages 26-28 for numeric entries. Press the INFO button...the CURSOR buttons toward desired direction and press the SELECT button to select. ቮ INFO button Press this button is only applicable when the remote control is connected to normal viewing. 24 Press this button to access the Channel Guide of this button when you want to VIDEO: 3. 3:...
...Ant A 22 ST Stereo R INFO Day/Night Mode Closed Captioning Day CC Off HD 1080i View --:-- AM --:-- NOTES: 1. THE REMOTE CONTROL HOW TO USE THE REMOTE TO CONTROL YOUR LCD REAR PTV ቨ PICTURE-IN-PICTURE button See separate section on pages 26-28 for numeric entries. Press the INFO button...the CURSOR buttons toward desired direction and press the SELECT button to select. ቮ INFO button Press this button is only applicable when the remote control is connected to normal viewing. 24 Press this button to access the Channel Guide of this button when you want to VIDEO: 3. 3:...
Owners Guide
Page 25
...) button Press this button to toggle between the current and last channel viewed. ታ RECORD button Press twice (2 times) to record programs when the remote is in Favorite Channel mode when (FAV) is displayed and the displayed channel is on . Use the CHANNEL SELECTOR buttons to enter one, two, or... level 31 or greater, the volume level will default to 30 when the TV is turned on and Closed Caption is set when the TV is turned off completely (MUTE). THE REMOTE CONTROL HOW TO USE THE REMOTE TO CONTROL YOUR LCD REAR PTV ቯ VOLUME (VOL), MUTE button Press the VOLUME button (̆...
...) button Press this button to toggle between the current and last channel viewed. ታ RECORD button Press twice (2 times) to record programs when the remote is in Favorite Channel mode when (FAV) is displayed and the displayed channel is on . Use the CHANNEL SELECTOR buttons to enter one, two, or... level 31 or greater, the volume level will default to 30 when the TV is turned on and Closed Caption is set when the TV is turned off completely (MUTE). THE REMOTE CONTROL HOW TO USE THE REMOTE TO CONTROL YOUR LCD REAR PTV ቯ VOLUME (VOL), MUTE button Press the VOLUME button (̆...
Owners Guide
Page 26
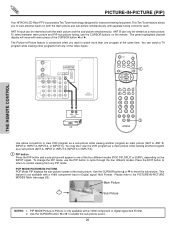
...the same time. The Picture-in -Picture is convenient when you to watch a TV program while viewing other programs from any of the CURSOR button ̇ or ̈. PICTURE-IN-PICTURE (PIP) Your HITACHI LCD Rear PTV incorporates Two Tuner technology designed for each. This Two Tuner feature allows... you want to view antenna inputs on the remote. To select between main picture and PIP sub-picture tuning, use the PIP...
...the same time. The Picture-in -Picture is convenient when you to watch a TV program while viewing other programs from any of the CURSOR button ̇ or ̈. PICTURE-IN-PICTURE (PIP) Your HITACHI LCD Rear PTV incorporates Two Tuner technology designed for each. This Two Tuner feature allows... you want to view antenna inputs on the remote. To select between main picture and PIP sub-picture tuning, use the PIP...

Owners Guide
Page 27
...Ant A/B - 480p Yes Yes Yes Yes Yes - 720p Yes Yes Yes Yes Yes - 1080i Yes Yes Yes Yes Yes Yes Yes Yes - 27 Use the remote CURSOR buttons ̇, ̈, ̆ and ̄ to stop the Surf mode or channel scan. Press the SELECT button to navigate the Thumbnail. Press the... SELECT button again to stop on the screen. THE REMOTE CONTROL PICTURE-IN-PICTURE (PIP) PIP MODE PICTURE-IN-PICTURE This feature is only available with a 1080i component input or Digital signal 16x9 Format. ...
...Ant A/B - 480p Yes Yes Yes Yes Yes - 720p Yes Yes Yes Yes Yes - 1080i Yes Yes Yes Yes Yes Yes Yes Yes - 27 Use the remote CURSOR buttons ̇, ̈, ̆ and ̄ to stop the Surf mode or channel scan. Press the SELECT button to navigate the Thumbnail. Press the... SELECT button again to stop on the screen. THE REMOTE CONTROL PICTURE-IN-PICTURE (PIP) PIP MODE PICTURE-IN-PICTURE This feature is only available with a 1080i component input or Digital signal 16x9 Format. ...

Owners Guide
Page 28
... freeze the sub-picture, press the PAUSE button. Press the EXIT button to return to motion, press the EXIT button. Main Picture Sub Picture THE REMOTE CONTROL STROBE FREEZE Press the PAUSE button to freeze three frames of the picture you are currently viewing and the frozen frame will freeze). The...
... freeze the sub-picture, press the PAUSE button. Press the EXIT button to return to motion, press the EXIT button. Main Picture Sub Picture THE REMOTE CONTROL STROBE FREEZE Press the PAUSE button to freeze three frames of the picture you are currently viewing and the frozen frame will freeze). The...

Owners Guide
Page 29
...codes you have programmed until the batteries are for pre-codes). 1. This remote is designed to operate different types of your cable box operating guide. 3. You must first program the remote to page 33 for operating the TV. To switch to CABLE mode. ባ ባ PRECODED CABLE BOX ...buttons These buttons transmit the chosen precoded cable codes. ቤ EXCLUSIVE TV buttons These buttons are removed from the remote control. If the cable box does not turn off , try a different two digit preset code. 6. Turn ON your cable ...
...codes you have programmed until the batteries are for pre-codes). 1. This remote is designed to operate different types of your cable box operating guide. 3. You must first program the remote to page 33 for operating the TV. To switch to CABLE mode. ባ ባ PRECODED CABLE BOX ...buttons These buttons transmit the chosen precoded cable codes. ቤ EXCLUSIVE TV buttons These buttons are removed from the remote control. If the cable box does not turn off , try a different two digit preset code. 6. Turn ON your cable ...

Owners Guide
Page 30
... not turn off , try a different two digit preset code. 6. If the set -topbox/satellite codes. ቤ EXCLUSIVE TV buttons These buttons are removed from the remote control. In the unlikely event that matches your set-top-box/satellite receiver as stated above. ቢ SAT (Set-Top-...-box/satellite receiver when the correct two digit preset code is designed to match the remote system of the buttons exclusively for operating the TV. Aim the remote at the front of your set -top-box/satellite systems. 3. The remote will turn off your set -top-box/satellite receiver.
... not turn off , try a different two digit preset code. 6. If the set -topbox/satellite codes. ቤ EXCLUSIVE TV buttons These buttons are removed from the remote control. In the unlikely event that matches your set-top-box/satellite receiver as stated above. ቢ SAT (Set-Top-...-box/satellite receiver when the correct two digit preset code is designed to match the remote system of the buttons exclusively for operating the TV. Aim the remote at the front of your set -top-box/satellite systems. 3. The remote will turn off your set -top-box/satellite receiver.

Owners Guide
Page 31
...will now control your DVD player. To switch to control your DVD player operating guide. 3. The remote will remember the codes you have programmed until the batteries are for operating the TV. ባ MY DVD PLAYER CODE IS: NOTE: Refer to instruction manual of the DVD player...ባ These buttons transmit the chosen precoded DVD codes. ቤ EXCLUSIVE TV Buttons These buttons are removed from the remote control. After replacing the batteries repeat the entire programming procedure as shown on the remote and enter the two digit preset code that your DVD player cannot be ...
...will now control your DVD player. To switch to control your DVD player operating guide. 3. The remote will remember the codes you have programmed until the batteries are for operating the TV. ባ MY DVD PLAYER CODE IS: NOTE: Refer to instruction manual of the DVD player...ባ These buttons transmit the chosen precoded DVD codes. ቤ EXCLUSIVE TV Buttons These buttons are removed from the remote control. After replacing the batteries repeat the entire programming procedure as shown on the remote and enter the two digit preset code that your DVD player cannot be ...

Owners Guide
Page 32
... the front of your VCR. In the unlikely event that matches your VCR. The remote control will remember the codes you have ባ programmed until the batteries are for operating the TV. ባ MY VCR CODE IS: NOTE: Refer to operate different types of the buttons ... record. ቢ VCR button This button allows the remote to VCR mode. ቤ ባ ባ PRECODED VCR Buttons These buttons transmit the chosen precoded VCR codes. ቤ EXCLUSIVE TV Buttons ባ These buttons are removed from the remote control. Turn ON your VCR. If the VCR does...
... the front of your VCR. In the unlikely event that matches your VCR. The remote control will remember the codes you have ባ programmed until the batteries are for operating the TV. ባ MY VCR CODE IS: NOTE: Refer to operate different types of the buttons ... record. ቢ VCR button This button allows the remote to VCR mode. ቤ ባ ባ PRECODED VCR Buttons These buttons transmit the chosen precoded VCR codes. ቤ EXCLUSIVE TV Buttons ባ These buttons are removed from the remote control. Turn ON your VCR. If the VCR does...
Owners Guide
Page 34
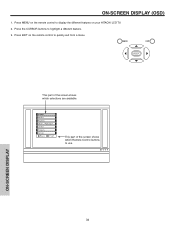
Press MENU on the remote control to display the different features on the remote control to quickly exit from a menu. This part of the screen shows which selections are available. ON-SCREEN DISPLAY (OSD) 1. Video Audio Aspect Chan. Press the CURSOR buttons to use. Manager Locks Timers Setup Move SEL Sel This part of the screen shows which Remote Control buttons to highlight a different feature. 3. Press EXIT on your HITACHI LCD TV. 2. ON-SCREEN DISPLAY 34
Press MENU on the remote control to display the different features on the remote control to quickly exit from a menu. This part of the screen shows which selections are available. ON-SCREEN DISPLAY (OSD) 1. Video Audio Aspect Chan. Press the CURSOR buttons to use. Manager Locks Timers Setup Move SEL Sel This part of the screen shows which Remote Control buttons to highlight a different feature. 3. Press EXIT on your HITACHI LCD TV. 2. ON-SCREEN DISPLAY 34

Owners Guide
Page 46
... Auto Channel Scan is highlighted, press the CURSOR button ̈ to move to the scan column, then press CURSOR button ̆ or ̄ to the remote control channel ̆ or ̄ buttons. A Ch# [2 3 4 5 6 7 8 9 Scan On Off Off Off Off Off Off Off Move Set CH ID ] -------- Manager Ant. Chan. Manager Ant...
... Auto Channel Scan is highlighted, press the CURSOR button ̈ to move to the scan column, then press CURSOR button ̆ or ̄ to the remote control channel ̆ or ̄ buttons. A Ch# [2 3 4 5 6 7 8 9 Scan On Off Off Off Off Off Off Off Move Set CH ID ] -------- Manager Ant. Chan. Manager Ant...
Owners Guide
Page 55
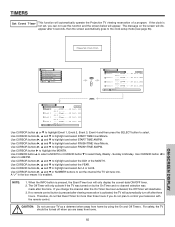
...;, ̆ and ̄ to set , you change the channel after the On Timer has been activated, the Off Timer will automatically operate the Projection TV viewing reservation of the MONTH. Use CURSOR buttons ̈, ̆ and ̄ or NUMBER buttons to highlight and select FINISH TIME Hour/Minute. TIMERS...selection was turned on the screen will disappear after three hours. If you can not use your television with the remote control. If the clock is activated, the TV will appear. Timers Set The Clock Set Sleep Timer Set Day/Night Timer Set Event Timer Set Auto Power ...
...;, ̆ and ̄ to set , you change the channel after the On Timer has been activated, the Off Timer will automatically operate the Projection TV viewing reservation of the MONTH. Use CURSOR buttons ̈, ̆ and ̄ or NUMBER buttons to highlight and select FINISH TIME Hour/Minute. TIMERS...selection was turned on the screen will disappear after three hours. If you can not use your television with the remote control. If the clock is activated, the TV will appear. Timers Set The Clock Set Sleep Timer Set Day/Night Timer Set Event Timer Set Auto Power ...


