
Owners Guide
Page 5
...of the HITACHI LCD Rear PTV is free from interference and multiple image ghosts, an indoor antenna may be sufficient. After extended use, the picture may darken, the color may appear on the screen. If you hear the cooling fan, it should not be used to reduce the reflection or the TV can ... place it may hear a "pop" sound when the lamp "goes out." Picture brightness decreases as possible to 18 feet from the screen. FIRST TIME USE HOW TO SET UP YOUR NEW HITACHI LCD REAR PTV ANTENNA Unless your LCD Rear PTV against a wall, keep it at least 10 cm (4 inches) from the wall....
...of the HITACHI LCD Rear PTV is free from interference and multiple image ghosts, an indoor antenna may be sufficient. After extended use, the picture may darken, the color may appear on the screen. If you hear the cooling fan, it should not be used to reduce the reflection or the TV can ... place it may hear a "pop" sound when the lamp "goes out." Picture brightness decreases as possible to 18 feet from the screen. FIRST TIME USE HOW TO SET UP YOUR NEW HITACHI LCD REAR PTV ANTENNA Unless your LCD Rear PTV against a wall, keep it at least 10 cm (4 inches) from the wall....

Owners Guide
Page 6
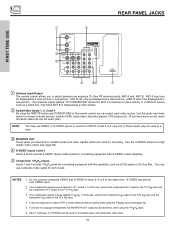
...and front control panel. ANTENNA CONNECTIONS TO REAR JACK PANEL VHF (75-Ohm) antenna/CATV (Cable TV) When using a 300-Ohm twin lead from an outdoor antenna, connect the VHF or UHF antenna leads to screws of the standard video cable to produce a high quality picture. 12345 6789 D-SUB MINI 9-Pin ... Connector Used on all standard video and audio cables which connect to the antenna jack on the rear panel so you have phono connectors. S-Video (Super Video) Connector This connector is used on the TV. If you can be purchased from an external home control system. VHF (300-Ohm) antenna...
...and front control panel. ANTENNA CONNECTIONS TO REAR JACK PANEL VHF (75-Ohm) antenna/CATV (Cable TV) When using a 300-Ohm twin lead from an outdoor antenna, connect the VHF or UHF antenna leads to screws of the standard video cable to produce a high quality picture. 12345 6789 D-SUB MINI 9-Pin ... Connector Used on all standard video and audio cables which connect to the antenna jack on the rear panel so you have phono connectors. S-Video (Super Video) Connector This connector is used on the TV. If you can be purchased from an external home control system. VHF (300-Ohm) antenna...

Owners Guide
Page 9
If you do not, the played back picture may be abnormal. 2. If you have a S-VHS VCR, use the S-INPUT cable in the following examples: PHOTO INPUT INPUT 5 S-VIDEO VIDEO L/MONO AUDIO R PHOTO INPUT ... connecting to front panel jacks. FIRST TIME USE SIDE PANEL JACKS AND CONNECTORS The side panel jacks are provided as shown in place of your TV. 9
If you do not, the played back picture may be abnormal. 2. If you have a S-VHS VCR, use the S-INPUT cable in the following examples: PHOTO INPUT INPUT 5 S-VIDEO VIDEO L/MONO AUDIO R PHOTO INPUT ... connecting to front panel jacks. FIRST TIME USE SIDE PANEL JACKS AND CONNECTORS The side panel jacks are provided as shown in place of your TV. 9
Owners Guide
Page 10
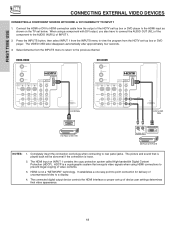
... video and component video input. 10 It may be used for recording. Use the S-VIDEO Output for high quality video output (see page 42). 5. Do not connect composite VIDEO and S-VIDEO to INPUT 3 and 4, but only one of the remote control you can be labeled ...picture. ባ Audio/Video Inputs 1, 2, 3 and 4 By using the Y-PBPR jacks. 6. REAR PANEL JACKS FIRST TIME USE ቢ ቦ ANT A TO CONVERTER ቤ ብ ANT B MONITOR OUT S-VIDEO INPUT 4 INPUT 3 INPUT 2 Y/ VIDEO PB INPUT 1 Y/ VIDEO PB HDMI 1 VIDEO L AUDIO R AUDIO TO HI-FI PR PR (MONO) (MONO) (MONO) (MONO) TV...
... video and component video input. 10 It may be used for recording. Use the S-VIDEO Output for high quality video output (see page 42). 5. Do not connect composite VIDEO and S-VIDEO to INPUT 3 and 4, but only one of the remote control you can be labeled ...picture. ባ Audio/Video Inputs 1, 2, 3 and 4 By using the Y-PBPR jacks. 6. REAR PANEL JACKS FIRST TIME USE ቢ ቦ ANT A TO CONVERTER ቤ ብ ANT B MONITOR OUT S-VIDEO INPUT 4 INPUT 3 INPUT 2 Y/ VIDEO PB INPUT 1 Y/ VIDEO PB HDMI 1 VIDEO L AUDIO R AUDIO TO HI-FI PR PR (MONO) (MONO) (MONO) (MONO) TV...

Owners Guide
Page 13
...high performance components, such as DVD players and set- In this case, connect the components B-Y output to the TV's PB input and the components R-Y output to use VIDEO or S-VIDEO inputs to connect to Input 3, Input...TV's PR input. • You may use a 1080i or 720p input signal. 13 Use these may be used for Input 1~Input 5. • It may be necessary to adjust TINT to obtain optimum picture quality when using the Y-PBPR inputs. (See page 42...on page 12). FIRST TIME USE TIPS ON REAR PANEL CONNECTIONS • S-VIDEO, HDMI and component connections are provided for high performance laserdisc players...
...high performance components, such as DVD players and set- In this case, connect the components B-Y output to the TV's PB input and the components R-Y output to use VIDEO or S-VIDEO inputs to connect to Input 3, Input...TV's PR input. • You may use a 1080i or 720p input signal. 13 Use these may be used for Input 1~Input 5. • It may be necessary to adjust TINT to obtain optimum picture quality when using the Y-PBPR inputs. (See page 42...on page 12). FIRST TIME USE TIPS ON REAR PANEL CONNECTIONS • S-VIDEO, HDMI and component connections are provided for high performance laserdisc players...

Owners Guide
Page 16
... 3 from the VCR or laserdisc player. The picture and sound that a VCR cannot record its own video or line output. Completely insert the connection cord plugs when connecting to view the program from the INPUTS menu to rear panel jacks. A single VCR can be abnormal if... 4 INPUT 3 INPUT 2 Y/ VIDEO PB INPUT 1 Y/ VIDEO PB HDMI 1 VIDEO L AUDIO R AUDIO TO HI-FI PR PR (MONO) (MONO) (MONO) (MONO) TV AS CENTER RS232C 1 2 345 6 78 9 OUTPUT RL V VCR NOTES: 1. The VIDEO OSD label disappears automatically after approximately four seconds. 5. Refer to the INPUT (AUDIO/L) ...
... 3 from the VCR or laserdisc player. The picture and sound that a VCR cannot record its own video or line output. Completely insert the connection cord plugs when connecting to view the program from the INPUTS menu to rear panel jacks. A single VCR can be abnormal if... 4 INPUT 3 INPUT 2 Y/ VIDEO PB INPUT 1 Y/ VIDEO PB HDMI 1 VIDEO L AUDIO R AUDIO TO HI-FI PR PR (MONO) (MONO) (MONO) (MONO) TV AS CENTER RS232C 1 2 345 6 78 9 OUTPUT RL V VCR NOTES: 1. The VIDEO OSD label disappears automatically after approximately four seconds. 5. Refer to the INPUT (AUDIO/L) ...

Owners Guide
Page 17
... PB INPUT 1 Y/ VIDEO PB HDMI 1 VIDEO L AUDIO R AUDIO TO HI-FI PR PR (MONO) (MONO) (MONO) (MONO) TV AS CENTER RS232C 1 2 345 6 789 RL V S-VIDEO VCR NOTES: 1. A single VCR can be abnormal if the connection is loose.... then select INPUT 3 from the S-VIDEO OUT of the VCR or the laserdisc player to rear panel jacks. Completely insert the connection cord plugs when connecting to the INPUT (S-VIDEO) jack, ...as shown on line input-output connections. 17 The picture and sound that a VCR cannot record its own video or line output. Connect the cable...
... PB INPUT 1 Y/ VIDEO PB HDMI 1 VIDEO L AUDIO R AUDIO TO HI-FI PR PR (MONO) (MONO) (MONO) (MONO) TV AS CENTER RS232C 1 2 345 6 789 RL V S-VIDEO VCR NOTES: 1. A single VCR can be abnormal if the connection is loose.... then select INPUT 3 from the S-VIDEO OUT of the VCR or the laserdisc player to rear panel jacks. Completely insert the connection cord plugs when connecting to the INPUT (S-VIDEO) jack, ...as shown on line input-output connections. 17 The picture and sound that a VCR cannot record its own video or line output. Connect the cable...
Owners Guide
Page 18
... the program from the INPUTS menu to a display. 4. The connected digital output device controls the HDMI interface so proper set below. The picture and sound that encrypts video signals when using a component with DVI output, you also have to connect the AUDIO OUT (R/L) of the component...INPUT 2 Y/ VIDEO PB INPUT 1 Y/ VIDEO PB HDMI 1 VIDEO L AUDIO R AUDIO TO HI-FI PR PR (MONO) (MONO) (MONO) (MONO) TV AS CENTER RS232C 1 2 345 6 789 DVI to rear panel jacks. Completely insert the connection cord plugs when connecting to HDMI Cable RL AUDIO OUT DIGITAL OUTPUT DVD Player or HDTV...
... the program from the INPUTS menu to a display. 4. The connected digital output device controls the HDMI interface so proper set below. The picture and sound that encrypts video signals when using a component with DVI output, you also have to connect the AUDIO OUT (R/L) of the component...INPUT 2 Y/ VIDEO PB INPUT 1 Y/ VIDEO PB HDMI 1 VIDEO L AUDIO R AUDIO TO HI-FI PR PR (MONO) (MONO) (MONO) (MONO) TV AS CENTER RS232C 1 2 345 6 789 DVI to rear panel jacks. Completely insert the connection cord plugs when connecting to HDMI Cable RL AUDIO OUT DIGITAL OUTPUT DVD Player or HDTV...

Owners Guide
Page 19
...VIDEO INPUT 1 Y/ VIDEO PB PB HDMI 1 VIDEO L AUDIO R AUDIO TO HI-FI PR PR (MONO) (MONO) (MONO) (MONO) TV AS CENTER RS232C 1 2 345 6 789 OUTPUT R L PR PB Y DVD Player NOTES: 1. Connect the cable from the INPUTS menu to ...the connection cord plugs when connecting to the INPUT (Y) jack, as shown on REAR PANEL CONNECTIONS. 19 The picture and sound that is played back will be abnormal if the connection is loose.... 2. See page 13 for tips on the TV set top box to rear panel jacks. ...
...VIDEO INPUT 1 Y/ VIDEO PB PB HDMI 1 VIDEO L AUDIO R AUDIO TO HI-FI PR PR (MONO) (MONO) (MONO) (MONO) TV AS CENTER RS232C 1 2 345 6 789 OUTPUT R L PR PB Y DVD Player NOTES: 1. Connect the cable from the INPUTS menu to ...the connection cord plugs when connecting to the INPUT (Y) jack, as shown on REAR PANEL CONNECTIONS. 19 The picture and sound that is played back will be abnormal if the connection is loose.... 2. See page 13 for tips on the TV set top box to rear panel jacks. ...

Owners Guide
Page 21
... YOUR LCD REAR PTV ቢ ባ ቤ ብ ቦ ቧ ቩ ቨ GUIDE ቫ ቪ ቭ ቮ ቯ ቱ C.C. ተ ቲ ታ ታ ቴ ት THE REMOTE CONTROL ቢ POWER button Press this button to turn the TV set on ... mode. ብ SOURCE ACCESS (ENT) button Hold down this button in TV mode. (See page 20 for instructions on how to set the remote control to TV mode.) ባ MODE Indicator Turns on or off when the remote is ...program the remote (see page 29). Press the EXIT button to return the picture to freeze the...
... YOUR LCD REAR PTV ቢ ባ ቤ ብ ቦ ቧ ቩ ቨ GUIDE ቫ ቪ ቭ ቮ ቯ ቱ C.C. ተ ቲ ታ ታ ቴ ት THE REMOTE CONTROL ቢ POWER button Press this button to turn the TV set on ... mode. ብ SOURCE ACCESS (ENT) button Hold down this button in TV mode. (See page 20 for instructions on how to set the remote control to TV mode.) ባ MODE Indicator Turns on or off when the remote is ...program the remote (see page 29). Press the EXIT button to return the picture to freeze the...

Owners Guide
Page 22
... automatically be set for the other ANT inputs. Note: Use this button to quickly change the picture format ASPECT ratio. However, all five video inputs have independent Aspect Style settings. 2. Depending on conventional (4:3) sources. 16:9 STANDARD Use this aspect mode to display ... to adjust the images through the following options. 4:3 STANDARD Use this aspect to Zoom-in once while in on the input signal format received, the picture format ratio allows you choose 4:3 EXPANDED/ZOOM1/ZOOM2 or 16:9 ZOOM aspect style (see also page 47). 22 HOW TO USE THE REMOTE TO CONTROL...
... automatically be set for the other ANT inputs. Note: Use this button to quickly change the picture format ASPECT ratio. However, all five video inputs have independent Aspect Style settings. 2. Depending on conventional (4:3) sources. 16:9 STANDARD Use this aspect mode to display ... to adjust the images through the following options. 4:3 STANDARD Use this aspect to Zoom-in once while in on the input signal format received, the picture format ratio allows you choose 4:3 EXPANDED/ZOOM1/ZOOM2 or 16:9 ZOOM aspect style (see also page 47). 22 HOW TO USE THE REMOTE TO CONTROL...

Owners Guide
Page 23
... to access the Channel Guide of this button to select. ቯ C.C. You can also access this button to compete with more detailed picture (see page 58. ቩ PICTURE-IN-PICTURE button See separate section on pages 27-29 for a description. ቪ MENU button The MENU button will highlight functions or adjust and... button All the On-Screen Display features can be set different features. THE REMOTE CONTROL HOW TO USE THE REMOTE TO CONTROL YOUR LCD REAR PTV ቨ DAY/NIGHT button Press this button is only applicable when the remote control is in (CBL) and (SAT/STB) mode.
... to access the Channel Guide of this button to select. ቯ C.C. You can also access this button to compete with more detailed picture (see page 58. ቩ PICTURE-IN-PICTURE button See separate section on pages 27-29 for a description. ቪ MENU button The MENU button will highlight functions or adjust and... button All the On-Screen Display features can be set different features. THE REMOTE CONTROL HOW TO USE THE REMOTE TO CONTROL YOUR LCD REAR PTV ቨ DAY/NIGHT button Press this button is only applicable when the remote control is in (CBL) and (SAT/STB) mode.

Owners Guide
Page 25
...return to VIDEO: 1. THE REMOTE CONTROL 25 When the Sleep Timer is set . AM --:-- PM Event Timer 3:32 PM Ant A 22 ST Stereo R Time Main Picture Source Audio Broadcast Broadcast Rating Aspect Mode 4:3 Expanded 3:32 PM When a S-VIDEO S-IN: 3 Input is connected to INFO VID 3 VIDEO: 3. 3:32 PM ... Y-PBPR Input is connected to normal viewing. HOW TO USE THE REMOTE TO CONTROL YOUR LCD REAR PTV ቱ INFO button Press this button when you want to check the channel being received, the picture source, if the channel has stereo (ST) or second audio program (SAP), the time, ...
...return to VIDEO: 1. THE REMOTE CONTROL 25 When the Sleep Timer is set . AM --:-- PM Event Timer 3:32 PM Ant A 22 ST Stereo R Time Main Picture Source Audio Broadcast Broadcast Rating Aspect Mode 4:3 Expanded 3:32 PM When a S-VIDEO S-IN: 3 Input is connected to INFO VID 3 VIDEO: 3. 3:32 PM ... Y-PBPR Input is connected to normal viewing. HOW TO USE THE REMOTE TO CONTROL YOUR LCD REAR PTV ቱ INFO button Press this button when you want to check the channel being received, the picture source, if the channel has stereo (ST) or second audio program (SAP), the time, ...

Owners Guide
Page 27
...VIDEO L AUDIO R AUDIO TO HI-FI PR PR (MONO) (MONO) (MONO) (MONO) TV AS CENTER RS232C 1 2 345 6 789 ባ ቢ GUIDE C.C. POP MODE PICTURE-IN-PICTURE POP Mode PIP displays the sub-picture outside of the CURSOR PAD (̇, ̈). To change the PIP mode, use the CURSOR PAD...with a 1080i component input or Digital signal 16x9 Format. THE REMOTE CONTROL PICTURE-IN-PICTURE (PIP) Your HITACHI LCD Rear PTV incorporates Two Tuner technology designed for each. To select between main picture and PIP sub-picture tuning, use the PIP button to view antenna inputs on the INPUT ...
...VIDEO L AUDIO R AUDIO TO HI-FI PR PR (MONO) (MONO) (MONO) (MONO) TV AS CENTER RS232C 1 2 345 6 789 ባ ቢ GUIDE C.C. POP MODE PICTURE-IN-PICTURE POP Mode PIP displays the sub-picture outside of the CURSOR PAD (̇, ̈). To change the PIP mode, use the CURSOR PAD...with a 1080i component input or Digital signal 16x9 Format. THE REMOTE CONTROL PICTURE-IN-PICTURE (PIP) Your HITACHI LCD Rear PTV incorporates Two Tuner technology designed for each. To select between main picture and PIP sub-picture tuning, use the PIP button to view antenna inputs on the INPUT ...

Owners Guide
Page 28
...-pictures or Thumbnail channels. THE REMOTE CONTROL PICTURE-IN-PICTURE (PIP) PIP MODE PICTURE-IN-PICTURE This feature is only available with a 1080i component input or Digital signal 16x9 Format. Main Picture Sub Picture SPLIT MODE PICTURE-IN-PICTURE Split Mode PIP displays the main picture and sub-picture ...evenly on a chosen channel. To prevent a pattern burn, occasionally move the sub-picture using the CURSOR PAD. Press the EXIT...
...-pictures or Thumbnail channels. THE REMOTE CONTROL PICTURE-IN-PICTURE (PIP) PIP MODE PICTURE-IN-PICTURE This feature is only available with a 1080i component input or Digital signal 16x9 Format. Main Picture Sub Picture SPLIT MODE PICTURE-IN-PICTURE Split Mode PIP displays the main picture and sub-picture ...evenly on a chosen channel. To prevent a pattern burn, occasionally move the sub-picture using the CURSOR PAD. Press the EXIT...

Owners Guide
Page 29
... order company, recording statistics for example, a close play in a sporting event or a golf swing. Each freeze frame is useful for freezing a picture frame with addresses. This feature is the MAIN freeze followed by the SPLIT freeze and then the STROBE freeze. This feature is delayed about 0.1 (1/...toggle between FREEZE modes (Main Freeze, SPLIT and STROBE). The last Freeze mode you selected before you are currently viewing (only the 3 sub-pictures will show in 480p/720p/1080i inputs. 29 Hot Springs Clay Mask C/O John Doe Run-Spa Retreat P.O. FREEZE FREEZE NOTES: 1. Press ...
... order company, recording statistics for example, a close play in a sporting event or a golf swing. Each freeze frame is useful for freezing a picture frame with addresses. This feature is the MAIN freeze followed by the SPLIT freeze and then the STROBE freeze. This feature is delayed about 0.1 (1/...toggle between FREEZE modes (Main Freeze, SPLIT and STROBE). The last Freeze mode you selected before you are currently viewing (only the 3 sub-pictures will show in 480p/720p/1080i inputs. 29 Hot Springs Clay Mask C/O John Doe Run-Spa Retreat P.O. FREEZE FREEZE NOTES: 1. Press ...

Owners Guide
Page 37
...Echostar 1005, 0775, 0148 0269, 0280, 1170 Expressvu 0775 GE 0566 GOI 0775 General Instrument . . 0869, 0547, 0554 Gradiente 0856 HTS 0775 Hitachi 0819 homecable 0238 Hughes Network Systems 1142 0749, 1749, 1442, 1443, 1444 Hytek 0095 IQ 0210 IQ Prism 0210 Innova 0099 Intersat 0043 JVC ... Cambridge Soundworks 0351 Carver 0351 Fisher 0052 Fosgate 0259 Harmon/Kardon 0477 JBL 0477 JVC 0073 KLH 0351 Magnavox 0325 Nikko 0376 Paramount Pictures 0317, 0351 RCA 0056 SSI 0317 Sansui 0325 Schneider 0376 Sony 0010, 0576 Soundesign 0376 Yorx 0376 SET TOP BOX BRAND CODE ...
...Echostar 1005, 0775, 0148 0269, 0280, 1170 Expressvu 0775 GE 0566 GOI 0775 General Instrument . . 0869, 0547, 0554 Gradiente 0856 HTS 0775 Hitachi 0819 homecable 0238 Hughes Network Systems 1142 0749, 1749, 1442, 1443, 1444 Hytek 0095 IQ 0210 IQ Prism 0210 Innova 0099 Intersat 0043 JVC ... Cambridge Soundworks 0351 Carver 0351 Fisher 0052 Fosgate 0259 Harmon/Kardon 0477 JBL 0477 JVC 0073 KLH 0351 Magnavox 0325 Nikko 0376 Paramount Pictures 0317, 0351 RCA 0056 SSI 0317 Sansui 0325 Schneider 0376 Sony 0010, 0576 Soundesign 0376 Yorx 0376 SET TOP BOX BRAND CODE ...

Owners Guide
Page 39
... to preference. Eliminates the noise between three Audio Sources. Adjust brightness. Day and Night. ON-SCREEN DISPLAY (OSD) Video Picture Mode Contrast Brightness Color Tint Sharpness Color Temperature Black Enhancement Contrast Mode Reset Video Settings Color Management Color Decoding Auto Color Audio ...Balance SRS BBE Audio Source Internal Speakers Auto Noise Cancel Perfect Volume Loudness Select between the two picture modes; Adjust tint. Adjust sharpness. Choose Automatic Contrast setttings. Adjust the percentage of background colors. Reduces conspicuous noise in the...
... to preference. Eliminates the noise between three Audio Sources. Adjust brightness. Day and Night. ON-SCREEN DISPLAY (OSD) Video Picture Mode Contrast Brightness Color Tint Sharpness Color Temperature Black Enhancement Contrast Mode Reset Video Settings Color Management Color Decoding Auto Color Audio ...Balance SRS BBE Audio Source Internal Speakers Auto Noise Cancel Perfect Volume Loudness Select between the two picture modes; Adjust tint. Adjust sharpness. Choose Automatic Contrast setttings. Adjust the percentage of background colors. Reduces conspicuous noise in the...

Owners Guide
Page 40
...Screen Saver Set The Inputs Set Black Side Panel Set Closed Captions Set Monitor Out Set AV Control Change Lock access code. Set Day/Night picture mode settings. Set Monitor Out source. Set the gray side bars on a parental guide ratings. intervals, 00:30-3:00). Choose English,.... Set TV to turn off when watching 4:3 signals in standard mode. Choose to set RS232C feature. Block various types of movies and video types based on motion picture ratings. Set viewing reservation for 15 minutes. View/edit Channel ID, Scan, and Lock settings in antenna A. Set Clock ...
...Screen Saver Set The Inputs Set Black Side Panel Set Closed Captions Set Monitor Out Set AV Control Change Lock access code. Set Day/Night picture mode settings. Set Monitor Out source. Set the gray side bars on a parental guide ratings. intervals, 00:30-3:00). Choose English,.... Set TV to turn off when watching 4:3 signals in standard mode. Choose to set RS232C feature. Block various types of movies and video types based on motion picture ratings. Set viewing reservation for 15 minutes. View/edit Channel ID, Scan, and Lock settings in antenna A. Set Clock ...

Owners Guide
Page 41
...and pleasure depending upon the video program being viewed. ON-SCREEN DISPLAY 41 Video Audio Aspect Chan. Press EXIT to quit menu or select PICTURE MODE to return to initial conditions. If RESET is selected, only the selected input will reset to previous menu. Function Contrast Brightness Color... Tint Sharpness Color Temperature Black Enhancement Contrast Mode Auto Color Noise Reduction Color Management (Set User Colors) Auto Movie Mode (TV/Cinema Detection) Day 100% 50% 50% 50% 50% High High Dynamic Off Low Off Off Night 90% 50% 30% 50% 30% ...
...and pleasure depending upon the video program being viewed. ON-SCREEN DISPLAY 41 Video Audio Aspect Chan. Press EXIT to quit menu or select PICTURE MODE to return to initial conditions. If RESET is selected, only the selected input will reset to previous menu. Function Contrast Brightness Color... Tint Sharpness Color Temperature Black Enhancement Contrast Mode Auto Color Noise Reduction Color Management (Set User Colors) Auto Movie Mode (TV/Cinema Detection) Day 100% 50% 50% 50% 50% High High Dynamic Off Low Off Off Night 90% 50% 30% 50% 30% ...


