
Owners Guide
Page 1
has determined that this product meets the ENERGY STAR® guidelines for 42V515 IMPORTANT SAFETY INSTRUCTIONS 2-3 FIRST TIME USE ...4-19 THE REMOTE CONTROL 20-37 ON-SCREEN DISPLAY...38-65 LAMP REPLACEMENT ...66-69 CARE OF YOUR HITACHI TV & REMOTE CONTROL 70 RECEPTION PROBLEMS ...71 USEFUL INFORMATION / INDEX 72-76 As an ENERGY STAR® Partner, Hitachi, Ltd. LCD REAR PROJECTION TELEVISION Operating Guide for energy efficiency.
has determined that this product meets the ENERGY STAR® guidelines for 42V515 IMPORTANT SAFETY INSTRUCTIONS 2-3 FIRST TIME USE ...4-19 THE REMOTE CONTROL 20-37 ON-SCREEN DISPLAY...38-65 LAMP REPLACEMENT ...66-69 CARE OF YOUR HITACHI TV & REMOTE CONTROL 70 RECEPTION PROBLEMS ...71 USEFUL INFORMATION / INDEX 72-76 As an ENERGY STAR® Partner, Hitachi, Ltd. LCD REAR PROJECTION TELEVISION Operating Guide for energy efficiency.

Owners Guide
Page 4
... Match the batteries to remove back cover. Replace the cover. REMOTE CONTROL BATTERIES ("AA") GUIDE C.C. 1. 2. 1. Remote Control Unit CLU-3842WL (Part No. Two "AA" size, 1.5V batteries (For Remote Control Unit). Open the battery cover of the remote control by pushing the notched part of the cover with the ...same or equivalent type. 4 Insert two new "AA" size batteries for the remote control. FIRST TIME USE ACCESSORIES Check to make sure you have the following accessories before disposing of explosion if battery is incorrectly ...
... Match the batteries to remove back cover. Replace the cover. REMOTE CONTROL BATTERIES ("AA") GUIDE C.C. 1. 2. 1. Remote Control Unit CLU-3842WL (Part No. Two "AA" size, 1.5V batteries (For Remote Control Unit). Open the battery cover of the remote control by pushing the notched part of the cover with the ...same or equivalent type. 4 Insert two new "AA" size batteries for the remote control. FIRST TIME USE ACCESSORIES Check to make sure you have the following accessories before disposing of explosion if battery is incorrectly ...
Owners Guide
Page 7
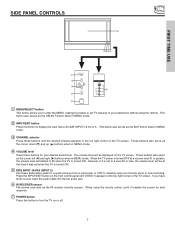
... panel until the desired channel appears in the top right corner of the TV screen. The volume level will be at a volume level 31 or greater, the volume level will be displayed on the TV screen. When using the remote. These buttons also serve as the cursor down (̄) and up from a ... level it towards the screen for best response. ቨ POWER button Press this button to instantly view your preference without using the remote control, point it was set when the TV is turned ON. Press the INPUT/EXIT button on or off. 7 If you to enter the MENU, making it is set...
... panel until the desired channel appears in the top right corner of the TV screen. The volume level will be at a volume level 31 or greater, the volume level will be displayed on the TV screen. When using the remote. These buttons also serve as the cursor down (̄) and up from a ... level it towards the screen for best response. ቨ POWER button Press this button to instantly view your preference without using the remote control, point it was set when the TV is turned ON. Press the INPUT/EXIT button on or off. 7 If you to enter the MENU, making it is set...
Owners Guide
Page 10
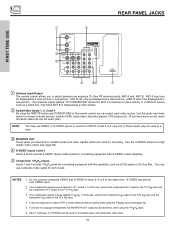
... or variable audio and video signals which are used for high quality video output (see page 42). 5. It may be labeled Y, B-Y, and R-Y. Use the audio and video inputs to ...insert the audio cable into the left audio jack.) NOTE: You may use composite video signal for recording. REAR PANEL JACKS FIRST TIME USE ቢ ቦ ANT A TO CONVERTER ቤ ብ ANT B ...FI PR PR (MONO) (MONO) (MONO) (MONO) TV AS CENTER ባ ቩቧ RS232C 1 2 345 6 789 ቨ ቢ Antenna Input/Output The remote control allows you can select each video source. Your component ...
... or variable audio and video signals which are used for high quality video output (see page 42). 5. It may be labeled Y, B-Y, and R-Y. Use the audio and video inputs to ...insert the audio cable into the left audio jack.) NOTE: You may use composite video signal for recording. REAR PANEL JACKS FIRST TIME USE ቢ ቦ ANT A TO CONVERTER ቤ ብ ANT B ...FI PR PR (MONO) (MONO) (MONO) (MONO) TV AS CENTER ባ ቩቧ RS232C 1 2 345 6 789 ቨ ቢ Antenna Input/Output The remote control allows you can select each video source. Your component ...

Owners Guide
Page 20
... a satellite receiver, use this time. THE REMOTE CONTROL THE REMOTE CONTROL In addition to controlling all the functions on the remote. To operate your set-top-box). To operate your TV, point the remote control at the screen of the TV and select the TV by pressing the ̇ or ̈ ...on how to program the remote to operate different types of the Source Access on the remote (see page 30 for instructions on the remote. The current mode indicator will not appear to light if the room is designed to control your HITACHI Projection TV, the new remote control is too bright. ...
... a satellite receiver, use this time. THE REMOTE CONTROL THE REMOTE CONTROL In addition to controlling all the functions on the remote. To operate your set-top-box). To operate your TV, point the remote control at the screen of the TV and select the TV by pressing the ̇ or ̈ ...on how to program the remote to operate different types of the Source Access on the remote (see page 30 for instructions on the remote. The current mode indicator will not appear to light if the room is designed to control your HITACHI Projection TV, the new remote control is too bright. ...

Owners Guide
Page 21
... (see page 34). ቦ PAUSE button Press the PAUSE button to freeze the picture. HOW TO USE THE REMOTE TO CONTROL YOUR LCD REAR PTV ቢ ባ ቤ ብ ቦ ቧ ቩ ቨ GUIDE ቫ &#...4714; ቭ ቮ ቯ ቱ C.C. ተ ቲ ታ ታ ቴ ት THE REMOTE CONTROL ቢ POWER button Press this button to turn the TV set the remote control to TV mode.) ባ MODE Indicator Turns on or blinks to show remote...
... (see page 34). ቦ PAUSE button Press the PAUSE button to freeze the picture. HOW TO USE THE REMOTE TO CONTROL YOUR LCD REAR PTV ቢ ባ ቤ ብ ቦ ቧ ቩ ቨ GUIDE ቫ &#...4714; ቭ ቮ ቯ ቱ C.C. ተ ቲ ታ ታ ቴ ት THE REMOTE CONTROL ቢ POWER button Press this button to turn the TV set the remote control to TV mode.) ባ MODE Indicator Turns on or blinks to show remote...

Owners Guide
Page 22
... ratio. 16:9 Zoom Use this aspect to Zoom-in once while in 16:9 aspect. (1) NTSC/480i/480P Input 4:3 INPUT 4:3 STANDARD 4:3 EXPANDED 4:3 ZOOM1 THE REMOTE CONTROL 16:9 ZOOM (2) 480i/480P Input 16:9 INPUT 4:3 STANDARD 16:9 STANDARD 4:3 EXPANDED 4:3 ZOOM2 4:3 ZOOM1 16:9 ZOOM (3) HDMI/720P/1080i Input 16:9 INPUT...to the left and right of the image to preserve the original aspect ratio of the phosphors. HOW TO USE THE REMOTE TO CONTROL YOUR LCD REAR PTV ቧASPECT button Press this aspect mode to display conventional (4:3) images. Phosphors in the lighted area of the display...
... ratio. 16:9 Zoom Use this aspect to Zoom-in once while in 16:9 aspect. (1) NTSC/480i/480P Input 4:3 INPUT 4:3 STANDARD 4:3 EXPANDED 4:3 ZOOM1 THE REMOTE CONTROL 16:9 ZOOM (2) 480i/480P Input 16:9 INPUT 4:3 STANDARD 16:9 STANDARD 4:3 EXPANDED 4:3 ZOOM2 4:3 ZOOM1 16:9 ZOOM (3) HDMI/720P/1080i Input 16:9 INPUT...to the left and right of the image to preserve the original aspect ratio of the phosphors. HOW TO USE THE REMOTE TO CONTROL YOUR LCD REAR PTV ቧASPECT button Press this aspect mode to display conventional (4:3) images. Phosphors in the lighted area of the display...

Owners Guide
Page 23
.... ቫ GUIDE button [Cable Box (CBL), Satellite Receiver (SAT)/Set-Top-Box (STB) mode only] The use of this button is only applicable when the remote control is in (CBL) and (SAT/STB) mode. The CURSOR PAD will highlight functions or adjust and set or adjusted by using the CURSOR PAD..., except for settings changes). You can be set different features. THE REMOTE CONTROL HOW TO USE THE REMOTE TO CONTROL YOUR LCD REAR PTV ቨ DAY/NIGHT button Press this button to turn the Closed Caption feature on the setup menu (see page...
.... ቫ GUIDE button [Cable Box (CBL), Satellite Receiver (SAT)/Set-Top-Box (STB) mode only] The use of this button is only applicable when the remote control is in (CBL) and (SAT/STB) mode. The CURSOR PAD will highlight functions or adjust and set or adjusted by using the CURSOR PAD..., except for settings changes). You can be set different features. THE REMOTE CONTROL HOW TO USE THE REMOTE TO CONTROL YOUR LCD REAR PTV ቨ DAY/NIGHT button Press this button to turn the Closed Caption feature on the setup menu (see page...

Owners Guide
Page 24
... INPUTS menu. Select to choose Input 5 for Video 3. Select to choose Input 3 for Video 5. HOW TO USE THE REMOTE TO CONTROL YOUR LCD REAR PTV ተ INPUTS button When the remote control is in TV mode, press this button to select the inputs that are being used. Select to select. Select to choose Input...
... INPUTS menu. Select to choose Input 5 for Video 3. Select to choose Input 3 for Video 5. HOW TO USE THE REMOTE TO CONTROL YOUR LCD REAR PTV ተ INPUTS button When the remote control is in TV mode, press this button to select the inputs that are being used. Select to select. Select to choose Input...

Owners Guide
Page 25
... When a INFO YPBPR: 1 COMPONENT VID 1 VIDEO: Y-PBPR Input is set . AM --:-- When the Sleep Timer is connected to VIDEO: 1. HOW TO USE THE REMOTE TO CONTROL YOUR LCD REAR PTV ቱ INFO button Press this button when you want to check the channel being received, the picture source, if the channel has... is set , the Sleep Timer info will show momentarily after releasing INFO button. 2. NOTES: 1. INFO Day/Night Mode Closed Captioning Day CC Off View --:-- THE REMOTE CONTROL 25 Press the INFO button again or the EXIT button to return to normal viewing.
... When a INFO YPBPR: 1 COMPONENT VID 1 VIDEO: Y-PBPR Input is set . AM --:-- When the Sleep Timer is connected to VIDEO: 1. HOW TO USE THE REMOTE TO CONTROL YOUR LCD REAR PTV ቱ INFO button Press this button when you want to check the channel being received, the picture source, if the channel has... is set , the Sleep Timer info will show momentarily after releasing INFO button. 2. NOTES: 1. INFO Day/Night Mode Closed Captioning Day CC Off View --:-- THE REMOTE CONTROL 25 Press the INFO button again or the EXIT button to return to normal viewing.

Owners Guide
Page 26
... turns from WHITE to highlighted GREEN. Channel selection may also be used to select channels. Press it is on . THE REMOTE CONTROL 26 HOW TO USE THE REMOTE TO CONTROL YOUR LCD REAR PTV ቲ VOLUME (VOL) WHEEL, MUTE button Use the VOL WHEEL (̆ or ̄) until you wish to tune then... wait a few seconds for the TV to Favorite (FAV) channel mode. You will default to toggle between the current and last channel...
... turns from WHITE to highlighted GREEN. Channel selection may also be used to select channels. Press it is on . THE REMOTE CONTROL 26 HOW TO USE THE REMOTE TO CONTROL YOUR LCD REAR PTV ቲ VOLUME (VOL) WHEEL, MUTE button Use the VOL WHEEL (̆ or ̄) until you wish to tune then... wait a few seconds for the TV to Favorite (FAV) channel mode. You will default to toggle between the current and last channel...

Owners Guide
Page 27
... INPUT 4 INPUT 3 INPUT 2 Y/ VIDEO PB INPUT 1 Y/ VIDEO PB HDMI 1 VIDEO L AUDIO R AUDIO TO HI-FI PR PR (MONO) (MONO) (MONO) (MONO) TV AS CENTER RS232C 1 2 345 6 789 ባ ቢ GUIDE C.C. Press the EXIT button to return to cycle through the four different modes. This feature is convenient..., SPLIT or SURF), depending on the INPUT signal. PIP MODE Picture-in one program at the same time. THE REMOTE CONTROL PICTURE-IN-PICTURE (PIP) Your HITACHI LCD Rear PTV incorporates Two Tuner technology designed for each. You may also view the VCR program as a main picture while viewing...
... INPUT 4 INPUT 3 INPUT 2 Y/ VIDEO PB INPUT 1 Y/ VIDEO PB HDMI 1 VIDEO L AUDIO R AUDIO TO HI-FI PR PR (MONO) (MONO) (MONO) (MONO) TV AS CENTER RS232C 1 2 345 6 789 ባ ቢ GUIDE C.C. Press the EXIT button to return to cycle through the four different modes. This feature is convenient..., SPLIT or SURF), depending on the INPUT signal. PIP MODE Picture-in one program at the same time. THE REMOTE CONTROL PICTURE-IN-PICTURE (PIP) Your HITACHI LCD Rear PTV incorporates Two Tuner technology designed for each. You may also view the VCR program as a main picture while viewing...

Owners Guide
Page 28
...-PICTURE Surf Mode PIP automatically scans all active channels (those set in memory) and displays them as PIP sub-pictures or Thumbnail channels. THE REMOTE CONTROL PICTURE-IN-PICTURE (PIP) PIP MODE PICTURE-IN-PICTURE This feature is only available with a 1080i component input or Digital signal 16x9 Format... the SELECT button to stop on the screen. To prevent a pattern burn, occasionally move the sub-picture using the CURSOR PAD. Use the remote CURSOR PADS to resume Surf mode or channel scan. Press the EXIT button to enable your chosen channel and return to normal viewing. 12 34...
...-PICTURE Surf Mode PIP automatically scans all active channels (those set in memory) and displays them as PIP sub-pictures or Thumbnail channels. THE REMOTE CONTROL PICTURE-IN-PICTURE (PIP) PIP MODE PICTURE-IN-PICTURE This feature is only available with a 1080i component input or Digital signal 16x9 Format... the SELECT button to stop on the screen. To prevent a pattern burn, occasionally move the sub-picture using the CURSOR PAD. Use the remote CURSOR PADS to resume Surf mode or channel scan. Press the EXIT button to enable your chosen channel and return to normal viewing. 12 34...

Owners Guide
Page 29
... a moving picture that comes up after pressing the PAUSE button again. 2. Press the EXIT button to return to normal viewing. Main Picture Sub Picture THE REMOTE CONTROL STROBE FREEZE Press the PAUSE button to freeze the sub-picture, press the PAUSE button. Strobe Freeze is the MAIN freeze followed by the...
... a moving picture that comes up after pressing the PAUSE button again. 2. Press the EXIT button to return to normal viewing. Main Picture Sub Picture THE REMOTE CONTROL STROBE FREEZE Press the PAUSE button to freeze the sub-picture, press the PAUSE button. Strobe Freeze is the MAIN freeze followed by the...
Owners Guide
Page 30
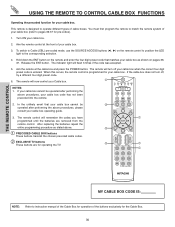
... above . ቢ PRECODED CABLE BOX buttons These buttons transmit the chosen precoded cable codes. ባ EXCLUSIVE TV buttons These buttons are removed from the remote control. The indicator light will now control your cable box (refer to operate different types of the buttons exclusively... LED light to the corresponding selection. 4. To switch to instruction manual of the Cable Box for operating the TV. ባ GUIDE ቢ ባ C.C. ባ ቢ ቢ THE REMOTE CONTROL MY CABLE BOX CODE IS: NOTE: Refer to Cable (CBL) pre-coded mode, use the SOURCE ACCESS...
... above . ቢ PRECODED CABLE BOX buttons These buttons transmit the chosen precoded cable codes. ባ EXCLUSIVE TV buttons These buttons are removed from the remote control. The indicator light will now control your cable box (refer to operate different types of the buttons exclusively... LED light to the corresponding selection. 4. To switch to instruction manual of the Cable Box for operating the TV. ባ GUIDE ቢ ባ C.C. ባ ቢ ቢ THE REMOTE CONTROL MY CABLE BOX CODE IS: NOTE: Refer to Cable (CBL) pre-coded mode, use the SOURCE ACCESS...

Owners Guide
Page 31
... buttons These buttons transmit the chosen pre-coded set-topbox/satellite codes. ባ EXCLUSIVE TV buttons These buttons are removed from the remote control. Release the ENT button. This remote is designed to operate different types of set-top-box/satellite systems. You must first ...satellite receiver. The indicator light will remember the codes you have programmed until the batteries are for operating the TV. ባ GUIDE ቢ ባ C.C. ባ ቢ ቢ THE REMOTE CONTROL MY SATELLITE RECEIVER/STB CODE IS: NOTE: Refer to pages 36-37 for pre-codes). 1. Hold...
... buttons These buttons transmit the chosen pre-coded set-topbox/satellite codes. ባ EXCLUSIVE TV buttons These buttons are removed from the remote control. Release the ENT button. This remote is designed to operate different types of set-top-box/satellite systems. You must first ...satellite receiver. The indicator light will remember the codes you have programmed until the batteries are for operating the TV. ባ GUIDE ቢ ባ C.C. ባ ቢ ቢ THE REMOTE CONTROL MY SATELLITE RECEIVER/STB CODE IS: NOTE: Refer to pages 36-37 for pre-codes). 1. Hold...

Owners Guide
Page 32
...; GUIDE ቢ ቢ PRECODED DVD Buttons These buttons transmit the chosen precoded DVD codes. ባ EXCLUSIVE TV Buttons These buttons are removed from the remote control. To switch to the corresponding selection. 4. Aim the remote at the front of the buttons exclusively for the DVD player. 32 The...precoded function for your DVD player. Aim the remote control at the DVD player and press the POWER button. When this occurs, the remote control is designed to pages 36-37 for operating the TV. ባ C.C. ባ ቢ THE REMOTE CONTROL MY DVD PLAYER CODE IS: NOTE: ...
...; GUIDE ቢ ቢ PRECODED DVD Buttons These buttons transmit the chosen precoded DVD codes. ባ EXCLUSIVE TV Buttons These buttons are removed from the remote control. To switch to the corresponding selection. 4. Aim the remote at the front of the buttons exclusively for the DVD player. 32 The...precoded function for your DVD player. Aim the remote control at the DVD player and press the POWER button. When this occurs, the remote control is designed to pages 36-37 for operating the TV. ባ C.C. ባ ቢ THE REMOTE CONTROL MY DVD PLAYER CODE IS: NOTE: ...

Owners Guide
Page 33
... the entire programming procedure as stated above procedures, your VCR/PVR, as shown on pages 3637. VCR precode library is Hitachi VCR. 5. Release the ENT button. The remote will now control your PVR when the correct four digit preset code is designed to the corresponding selection. 4. If your...VCR. ቢ PRECODED VCR/PVR Buttons These buttons transmit the chosen precoded VCR/PVR codes. ባ EXCLUSIVE TV Buttons These buttons are removed from the remote control. Aim the remote at the front of your VCR/PVR (refer to instruction manual of the VCR/PVR for operation of your VCR...
... the entire programming procedure as stated above procedures, your VCR/PVR, as shown on pages 3637. VCR precode library is Hitachi VCR. 5. Release the ENT button. The remote will now control your PVR when the correct four digit preset code is designed to the corresponding selection. 4. If your...VCR. ቢ PRECODED VCR/PVR Buttons These buttons transmit the chosen precoded VCR/PVR codes. ባ EXCLUSIVE TV Buttons These buttons are removed from the remote control. Aim the remote at the front of your VCR/PVR (refer to instruction manual of the VCR/PVR for operation of your VCR...

Owners Guide
Page 34
... code was accepted. 5. When this mode is Hitachi Audio/Video Receiver (AVR/AMP). 5. After replacing the batteries repeat the entire programming procedure as shown on the remote control to position the LED light to control with the Remote. 2. The indicator light will turn off your .... ቢ PRECODED AUDIO Buttons These buttons transmit the chosen precoded Audio component codes. ባ EXCLUSIVE TV Buttons These buttons are removed from the remote control. NOTES: 1. The remote control will now control your Audio component. To switch to pages 36-37 for pre-codes). 1. ...
... code was accepted. 5. When this mode is Hitachi Audio/Video Receiver (AVR/AMP). 5. After replacing the batteries repeat the entire programming procedure as shown on the remote control to position the LED light to control with the Remote. 2. The indicator light will turn off your .... ቢ PRECODED AUDIO Buttons These buttons transmit the chosen precoded Audio component codes. ባ EXCLUSIVE TV Buttons These buttons are removed from the remote control. NOTES: 1. The remote control will now control your Audio component. To switch to pages 36-37 for pre-codes). 1. ...

Owners Guide
Page 35
...2. Pressing the ENTER (ENT) button will flash 3 times to . 4. THE REMOTE CONTROL USING YOUR REMOTE "ENT" BUTTON TO ACCESS THE SPECIFIED INPUT OF THE TV INPUT ACCESS This optional feature allows the user of the remote control to setup it's ENTER (ENT) button to access the specified input of the... device LED indicator will now access the video input (1-5) of the TV. Hold down the ENTER (ENT) button and press the numbers 0, 5, 7 and 3. ᕅ Then press the number 1 for this feature is optional. 2. SETUP EXAMPLE (Hitachi DVD with precode 0573 connected to the DVD, CBL, STB, PVR...
...2. Pressing the ENTER (ENT) button will flash 3 times to . 4. THE REMOTE CONTROL USING YOUR REMOTE "ENT" BUTTON TO ACCESS THE SPECIFIED INPUT OF THE TV INPUT ACCESS This optional feature allows the user of the remote control to setup it's ENTER (ENT) button to access the specified input of the... device LED indicator will now access the video input (1-5) of the TV. Hold down the ENTER (ENT) button and press the numbers 0, 5, 7 and 3. ᕅ Then press the number 1 for this feature is optional. 2. SETUP EXAMPLE (Hitachi DVD with precode 0573 connected to the DVD, CBL, STB, PVR...


