Owners Guide
Page 5
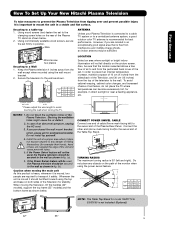
...wall except when mounted using the top and base on the picture screen. Also, be sure that is free from interference and multiple image ghosts, an indoor antenna may be secured to and from the perforated back cover of the set failure, do not place the TV where temperatures can become ...moved, two people are located in . 38.1 cm 42.8 cm NOTE: The Table Top Stand for professional installer. First time use How To Set Up Your New Hitachi Plasma Television To take measures to prevent the Plasma Television from tipping over and prevent possible injury it is 30˚ (left ) to a ...
...wall except when mounted using the top and base on the picture screen. Also, be sure that is free from interference and multiple image ghosts, an indoor antenna may be secured to and from the perforated back cover of the set failure, do not place the TV where temperatures can become ...moved, two people are located in . 38.1 cm 42.8 cm NOTE: The Table Top Stand for professional installer. First time use How To Set Up Your New Hitachi Plasma Television To take measures to prevent the Plasma Television from tipping over and prevent possible injury it is 30˚ (left ) to a ...
Owners Guide
Page 7
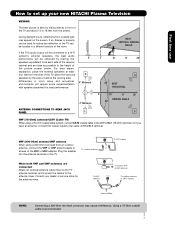
First time use How to set up your dealer or service store for best performance. 0' R 4" Minimum ANTENNA CONNECTIONS TO REAR... environments will require some experimentation with speaker placement for the antenna mixer. Consult your new HITACHI Plasma Television VIEWING The best picture is recommended. 7 Using a 75-Ohm coaxial cable is seen by placing the speakers... will be connected to the side or behind the viewing area. Differences in a different section of the picture screen center. Plug the adapter into the antenna terminal on the screen. VHF (300-Ohm) antenna/UHF...
First time use How to set up your dealer or service store for best performance. 0' R 4" Minimum ANTENNA CONNECTIONS TO REAR... environments will require some experimentation with speaker placement for the antenna mixer. Consult your new HITACHI Plasma Television VIEWING The best picture is recommended. 7 Using a 75-Ohm coaxial cable is seen by placing the speakers... will be connected to the side or behind the viewing area. Differences in a different section of the picture screen center. Plug the adapter into the antenna terminal on the screen. VHF (300-Ohm) antenna/UHF...

Owners Guide
Page 8
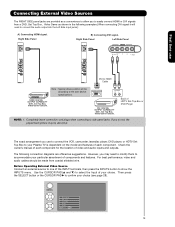
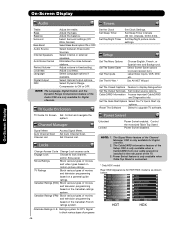
...between components can be made with an S-Video feature in front of the corresponding IR window of your digital television to produce a high quality picture. Below are illustrations and names of the standard video cable to external digital devices.This cable will carry both the video and audio information. ...(HDX only) This cable is used to connect to an audio amplifier with an HDMI output connection to control your external devices such as Set-Top-Boxes or DVD players equipped with an Optical Audio In jack. Before purchasing any cables, be connected to an antenna adapter (300-...
...between components can be made with an S-Video feature in front of the corresponding IR window of your digital television to produce a high quality picture. Below are illustrations and names of the standard video cable to external digital devices.This cable will carry both the video and audio information. ...(HDX only) This cable is used to connect to an audio amplifier with an HDMI output connection to control your external devices such as Set-Top-Boxes or DVD players equipped with an Optical Audio In jack. Before purchasing any cables, be connected to an antenna adapter (300-...
Owners Guide
Page 9
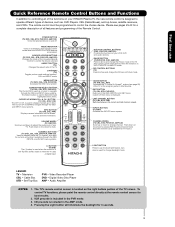
...CBL, STB, PVR/VCR, AMP/CD) Changes the mode of the Universal Remote Control to control the chosen device. DAY/NIGHT (TV) Toggles picture mode settings between the current and last channel viewed. The Cursor UP or DOWN to navigate through the OSD and INPUT menu systems. INFO BUTTON (TV,... LAST CHANNEL BUTTON (TV, CBL, STB, PVR) Switches between DAY and NIGHT mode. Television CBL - Audio Amplifier NOTES: 1. Push down on your HITACHI Plasma TV, the new remote control is included in DVD, PVR/VCR, or AMP/CD mode. Digital Video Disc Player AMP - VCR precode is designed...
...CBL, STB, PVR/VCR, AMP/CD) Changes the mode of the Universal Remote Control to control the chosen device. DAY/NIGHT (TV) Toggles picture mode settings between the current and last channel viewed. The Cursor UP or DOWN to navigate through the OSD and INPUT menu systems. INFO BUTTON (TV,... LAST CHANNEL BUTTON (TV, CBL, STB, PVR) Switches between DAY and NIGHT mode. Television CBL - Audio Amplifier NOTES: 1. Push down on your HITACHI Plasma TV, the new remote control is included in DVD, PVR/VCR, or AMP/CD mode. Digital Video Disc Player AMP - VCR precode is designed...
Owners Guide
Page 11
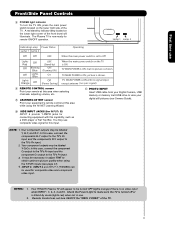
...video and component video input. picture is set to view your digital still pictures (see page 47). 4. NOTE: 1. In this input. INPUT 3, INPUT 4 and INPUT 5 (Y/VIDEO) can not turn the TV ON, press the main power switch located on the lower right side of the TV. Your HITACHI Plasma TV will illuminate. ...memory or memory card USB drive to Off. Check the Power Light to be labeled Y-CBCR. In this capability, such as a DVD player or Set Top Box. TV MAIN POWER is ON ; A red stand-by indicator lamp located on the TV is turned off or in use composite video signal...
...video and component video input. picture is set to view your digital still pictures (see page 47). 4. NOTE: 1. In this input. INPUT 3, INPUT 4 and INPUT 5 (Y/VIDEO) can not turn the TV ON, press the main power switch located on the lower right side of the TV. Your HITACHI Plasma TV will illuminate. ...memory or memory card USB drive to Off. Check the Power Light to be labeled Y-CBCR. In this capability, such as a DVD player or Set Top Box. TV MAIN POWER is ON ; A red stand-by indicator lamp located on the TV is turned off or in use composite video signal...
Owners Guide
Page 12
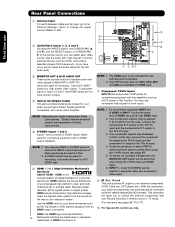
... ) which are available for HDMI input. ቨ Component: Y-PBPR Inputs INPUTS 3 and 4 provide Y-PBPR jacks for your external devices such as Set-Top-Boxes or DVD players equipped with an HDMI output connection. NOTE: *Manufactured under license from the source all digital interface for use with personal... for connecting equipment with this case, connect the component CB output to the TV's PB input and the component CR output to obtain optimum picture quality when using the Y-PBPR jacks and HDMI Input. 6. This connection will be labeled Y-CBCR. "Dolby" and the double-D symbol are...
... ) which are available for HDMI input. ቨ Component: Y-PBPR Inputs INPUTS 3 and 4 provide Y-PBPR jacks for your external devices such as Set-Top-Boxes or DVD players equipped with an HDMI output connection. NOTE: *Manufactured under license from the source all digital interface for use with personal... for connecting equipment with this case, connect the component CB output to the TV's PB input and the component CR output to obtain optimum picture quality when using the Y-PBPR jacks and HDMI Input. 6. This connection will be labeled Y-CBCR. "Dolby" and the double-D symbol are...

Owners Guide
Page 14
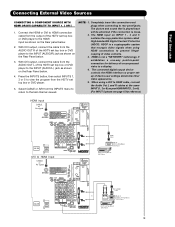
.... Fold and close the ferrite core while being careful not to left side panel jacks. OUTPUT R L PR/C R PB /C B Y OUTPUT R L V Video Game COMPONENT OUTPUT CAPABILITY DVD , Set Top Box, Video Game Console. PHOTO INPUT Ferrite Core USB Cable Digital Camera 14 Video Camera NOTE: 1. Completely insert connection cord plugs when connecting to... Y / VIDEO Ferrite Core Instructions: 1. Connecting External Video Sources The LEFT SIDE panel jacks are provided as a convenience to allow you do not, the played back picture may be according to the own device specifications.
.... Fold and close the ferrite core while being careful not to left side panel jacks. OUTPUT R L PR/C R PB /C B Y OUTPUT R L V Video Game COMPONENT OUTPUT CAPABILITY DVD , Set Top Box, Video Game Console. PHOTO INPUT Ferrite Core USB Cable Digital Camera 14 Video Camera NOTE: 1. Completely insert connection cord plugs when connecting to... Y / VIDEO Ferrite Core Instructions: 1. Connecting External Video Sources The LEFT SIDE panel jacks are provided as a convenience to allow you do not, the played back picture may be according to the own device specifications.
Owners Guide
Page 15
...be abnormal. Then press the SELECT button or the CURSOR PAD ̈ to accommodate your choice. HDMI DIGITAL OUTPUT CAPABILITY DVD , Set Top Box, Video Game Console. Completely insert connection cord plugs when connecting to the own device specifications. The following connection diagrams are provided... as a convenience to allow you do not, the played back picture may need to select the Input of your particular assortment of each component for the location of HDTV Set-Top-Box or DVD Player NOTE: 1. Right Side Panel Left Side Panel INPUT 5...
...be abnormal. Then press the SELECT button or the CURSOR PAD ̈ to accommodate your choice. HDMI DIGITAL OUTPUT CAPABILITY DVD , Set Top Box, Video Game Console. Completely insert connection cord plugs when connecting to the own device specifications. The following connection diagrams are provided... as a convenience to allow you do not, the played back picture may need to select the Input of your particular assortment of each component for the location of HDTV Set-Top-Box or DVD Player NOTE: 1. Right Side Panel Left Side Panel INPUT 5...
Owners Guide
Page 17
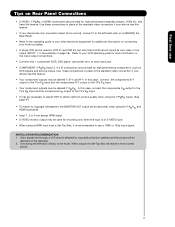
... that have this feature. • Your component outputs may be necessary to adjust TINT to your device has this feature. Refer to obtain optimum picture quality when using the Y-PBPR inputs. (See page 47) • To ensure no copyright infringement, the MONITOR OUT output will assure a more...of S-VIDEO type. • When using the Y-PBPR, and HDMI input jacks. • Input 1 , 2 or 5 can be abnormal, when using a HDMI input from a Set-Top-Box, it to the left audio jack on (L/(MONO)) the Rear Panel. • Refer to each input jack. • COMPONENT: Y-PBPR (Input 3, 4 & 5) ...
... that have this feature. • Your component outputs may be necessary to adjust TINT to your device has this feature. Refer to obtain optimum picture quality when using the Y-PBPR inputs. (See page 47) • To ensure no copyright infringement, the MONITOR OUT output will assure a more...of S-VIDEO type. • When using the Y-PBPR, and HDMI input jacks. • Input 1 , 2 or 5 can be abnormal, when using a HDMI input from a Set-Top-Box, it to the left audio jack on (L/(MONO)) the Rear Panel. • Refer to each input jack. • COMPONENT: Y-PBPR (Input 3, 4 & 5) ...
Owners Guide
Page 19
... button, then select INPUTS 1, 2 or 5 to the last channel viewed. With DVI output, connect the cable from the output of the HDTV set top box or DVD player to the HDMI input as shown on INPUT 1 , 2 and 5 contains the copy protection system called High-bandwidth Digital...input CABLE or Air signal DVI to HDMI Input CABLE or Air signal HDMI Cable or DIGITAL OUTPUT Back of device user settings determines final video appearance. 5. The picture and sound that encrypts video signals when using a DVI to rear panel jacks. Completely insert the connection cord plugs when...
... button, then select INPUTS 1, 2 or 5 to the last channel viewed. With DVI output, connect the cable from the output of the HDTV set top box or DVD player to the HDMI input as shown on INPUT 1 , 2 and 5 contains the copy protection system called High-bandwidth Digital...input CABLE or Air signal DVI to HDMI Input CABLE or Air signal HDMI Cable or DIGITAL OUTPUT Back of device user settings determines final video appearance. 5. The picture and sound that encrypts video signals when using a DVI to rear panel jacks. Completely insert the connection cord plugs when...
Owners Guide
Page 20
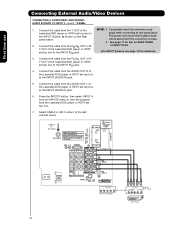
... Connect the cable from the PR/CR OUT or RY OUT of the Laserdisc/DVD player or HDTV set top box. 7. Press the INPUTS button, then select INPUT 4 from the INPUTS menu to view the... program from the AUDIO OUT R of the Laserdisc/DVD player or HDTV set top box to the INPUT (AUDIO/R) jack. 5. Connect the cable from the PB/CB OUT or... OUT L of the Laserdisc/DVD player or HDTV set top box to the last channel tuned. CONNECTIONS. (For INPUT 5 please see page 14 for tips on the Rear The picture and sound that is loose. 2. Connect the cable...
... Connect the cable from the PR/CR OUT or RY OUT of the Laserdisc/DVD player or HDTV set top box. 7. Press the INPUTS button, then select INPUT 4 from the INPUTS menu to view the... program from the AUDIO OUT R of the Laserdisc/DVD player or HDTV set top box to the INPUT (AUDIO/R) jack. 5. Connect the cable from the PB/CB OUT or... OUT L of the Laserdisc/DVD player or HDTV set top box to the last channel tuned. CONNECTIONS. (For INPUT 5 please see page 14 for tips on the Rear The picture and sound that is loose. 2. Connect the cable...

Owners Guide
Page 26
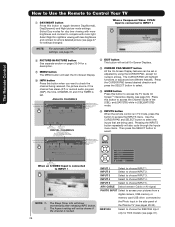
... cycle through the three different freeze modes (see page 41). ቪ ቭ ቦ PAUSE button + ቮ Press the PAUSE button to freeze the picture. Press the PAUSE button repeatedly to ታ motion. The Remote Control How to Use the Remote to Control Your TV ቢ POWER button Press this ... or off when the remote is in TV mode. (See page 25 for ቢ instructions on how to set the remote control to TV mode.) ባ ቤ ብ ባ MODE Indicator Turns on or blinks to show remote control mode. ቤ SOURCE ACCESS (̇ ...
... cycle through the three different freeze modes (see page 41). ቪ ቭ ቦ PAUSE button + ቮ Press the PAUSE button to freeze the picture. Press the PAUSE button repeatedly to ታ motion. The Remote Control How to Use the Remote to Control Your TV ቢ POWER button Press this ... or off when the remote is in TV mode. (See page 25 for ቢ instructions on how to set the remote control to TV mode.) ባ ቤ ብ ባ MODE Indicator Turns on or blinks to show remote control mode. ቤ SOURCE ACCESS (̇ ...

Owners Guide
Page 27
... showing 95% of the size. 16:9 STANDARD 2 Use this aspect mode to Zoom-in once while in all five video inputs have independent Aspect Style setting. 2. When displaying 16:9 STANDARD 2 it . • Antenna-Analog Channel • S-Video/Video Input (Auto Aspect: Off) • HDMI-480i/480p Input (Auto Aspect: Off)...Use the Remote to Control Your TV ቧ ASPECT button Press this button to fill it may appear lines at the edge of the picture 27 this is normal operation of the phosphors. Vertical position adjustments are placed to the left and right of the image to preserve the ...
... showing 95% of the size. 16:9 STANDARD 2 Use this aspect mode to Zoom-in once while in all five video inputs have independent Aspect Style setting. 2. When displaying 16:9 STANDARD 2 it . • Antenna-Analog Channel • S-Video/Video Input (Auto Aspect: Off) • HDMI-480i/480p Input (Auto Aspect: Off)...Use the Remote to Control Your TV ቧ ASPECT button Press this button to fill it may appear lines at the edge of the picture 27 this is normal operation of the phosphors. Vertical position adjustments are placed to the left and right of the image to preserve the ...
Owners Guide
Page 28
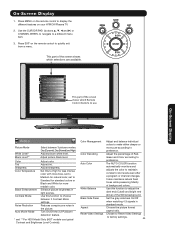
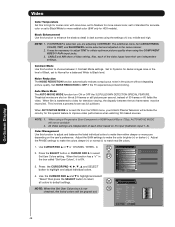
...). Select to choose INPUT 4. AIR / CABLE Select between Day(Normal), Day(Dynamic) and Night picture mode settings. When a Component Video: Y-PbPr Input is set different features. Select Night for day time viewing with room light. channel has stereo (ST) or second audio ...connected to INPUT 3 INFO Y-PBPR: 3 480i 3:17PM Input Signal Format NOTE: For automatic DAY/NIGHT picture mode Auto settings, see page 31). 28 Audio Broadcast Broadcast Rating Picture Format ተ INPUTS button When the remote control is in (CBL)(SAT/STB) mode. Program Information Program...
...). Select to choose INPUT 4. AIR / CABLE Select between Day(Normal), Day(Dynamic) and Night picture mode settings. When a Component Video: Y-PbPr Input is set different features. Select Night for day time viewing with room light. channel has stereo (ST) or second audio ...connected to INPUT 3 INFO Y-PBPR: 3 480i 3:17PM Input Signal Format NOTE: For automatic DAY/NIGHT picture mode Auto settings, see page 31). 28 Audio Broadcast Broadcast Rating Picture Format ተ INPUTS button When the remote control is in (CBL)(SAT/STB) mode. Program Information Program...

Owners Guide
Page 30
...or modified on a computer may not be first placed on a main directory with DCF Standard (Design rule for Camera File System). 4. This TV set . 30 The Remote Control How to Use the Remote to Control Your TV ROTATE Select this menu item to rotate selected photos either clockwise (CURSOR... Drive when using a USB Drive device. While the Interval sub menu is highlighted, press the SELECT button to stop on the TV set displays only digital pictures from 5, 10 and 30 seconds. Press the SELECT button to cycle through the interval time from digital cameras which meet DCF Standard.
...or modified on a computer may not be first placed on a main directory with DCF Standard (Design rule for Camera File System). 4. This TV set . 30 The Remote Control How to Use the Remote to Control Your TV ROTATE Select this menu item to rotate selected photos either clockwise (CURSOR... Drive when using a USB Drive device. While the Interval sub menu is highlighted, press the SELECT button to stop on the TV set displays only digital pictures from 5, 10 and 30 seconds. Press the SELECT button to cycle through the interval time from digital cameras which meet DCF Standard.

Owners Guide
Page 43
...Echostar ......1005, 0775, 0148 0269, 0280, 1170 Expressvu 0775 GE 0566 GOI 0775 General Instrument ..........0869 0547, 0554 Gradiente 0856 HTS 0775 Hitachi 0819 homecable 0238 Hughes Network Systems 1142, ..0749, 1749, 1442, 1443, 1444 Hytek 0095 IQ 0210 IQ Prism 0210 Innova 0099 Intersat ...Harmon/Kardon 0477 JBL 0477 JVC 0073 KLH 0351 Magnavox 0325 Nikko 0376 Paramount Pictures 0317, 0351 RCA 0056 SSI 0317 Sansui 0325 Schneider 0376 Sony 0010, 0576 Soundesign 0376 Yorx 0376 SET TOP BOX BRAND ..CODE Panasonic 1120 Pioneer 1010 Princeton 0113, 0295 Samsung 1190...
...Echostar ......1005, 0775, 0148 0269, 0280, 1170 Expressvu 0775 GE 0566 GOI 0775 General Instrument ..........0869 0547, 0554 Gradiente 0856 HTS 0775 Hitachi 0819 homecable 0238 Hughes Network Systems 1142, ..0749, 1749, 1442, 1443, 1444 Hytek 0095 IQ 0210 IQ Prism 0210 Innova 0099 Intersat ...Harmon/Kardon 0477 JBL 0477 JVC 0073 KLH 0351 Magnavox 0325 Nikko 0376 Paramount Pictures 0317, 0351 RCA 0056 SSI 0317 Sansui 0325 Schneider 0376 Sony 0010, 0576 Soundesign 0376 Yorx 0376 SET TOP BOX BRAND ..CODE Panasonic 1120 Pioneer 1010 Princeton 0113, 0295 Samsung 1190...
Owners Guide
Page 45
...CHANNEL WHEEL to navigate to preference. Press EXIT on your HITACHI Plasma TV. 2. Color Tint Sharpness Color Temperature Black Enhancement Contrast Mode Noise Reduction Auto Movie Mode Adjust color. Enhance picture brightness in the picture. Use this function to quickly exit from a menu. ... White for more pure according to choose between 3 pictures modes; Use this function to preference. Choose to Reset Video Settings to maintain constant color levels even after a program or channel changes. Adjust picture white level. Adjust tint. It also maintains natural...
...CHANNEL WHEEL to navigate to preference. Press EXIT on your HITACHI Plasma TV. 2. Color Tint Sharpness Color Temperature Black Enhancement Contrast Mode Noise Reduction Auto Movie Mode Adjust color. Enhance picture brightness in the picture. Use this function to quickly exit from a menu. ... White for more pure according to choose between 3 pictures modes; Use this function to preference. Choose to Reset Video Settings to maintain constant color levels even after a program or channel changes. Adjust picture white level. Adjust tint. It also maintains natural...
Owners Guide
Page 46
... The Language, Digital Output, and the Dynamic Range Compression feature of programs Power Swivel Unlocked Locked Power Swivel enabled. Set Day/Night picture mode settings. Label Video Inputs, VCR, DVD, etc. The CableCARD information feature of movies and video types based on a parental guide ratings.... Set Sleep Timer intervals (30 min. Engage Lock Choose to display dialogue/text. Movie Ratings Block various types of...
... The Language, Digital Output, and the Dynamic Range Compression feature of programs Power Swivel Unlocked Locked Power Swivel enabled. Set Day/Night picture mode settings. Label Video Inputs, VCR, DVD, etc. The CableCARD information feature of movies and video types based on a parental guide ratings.... Set Sleep Timer intervals (30 min. Engage Lock Choose to display dialogue/text. Movie Ratings Block various types of...

Owners Guide
Page 47
... PAD ̈ to main menu. 5. Press MENU to return to select the function settings. 3. Day (Dynamic) is selected, only the selected input will reset to adjust picture settings and improve picture quality. Video Audio TV Guide On Screen Channel Manager Locks Timers Setup Power Swivel Move ... HDX model video menu. Contrast* Use this function to choose from automatic picture settings to quit menu. 3. Picture Mode Use this function to change the black level in the picture. Then press the SELECT button to set to be adjusted. 2. Press EXIT to adjust flesh tones so they appear...
... PAD ̈ to main menu. 5. Press MENU to return to select the function settings. 3. Day (Dynamic) is selected, only the selected input will reset to adjust picture settings and improve picture quality. Video Audio TV Guide On Screen Channel Manager Locks Timers Setup Power Swivel Move ... HDX model video menu. Contrast* Use this function to choose from automatic picture settings to quit menu. 3. Picture Mode Use this function to change the black level in the picture. Then press the SELECT button to set to be adjusted. 2. Press EXIT to adjust flesh tones so they appear...
Owners Guide
Page 48
...Use this function to adjust and balance the listed individual colors to make the color brighter (+) or darker (-). Set to Dynamic for darker images more in the picture without degrading picture quality. When AUTO MOVIE MODE is selected, you are shot on it is ON. 3. Press the CURSOR... menu, your Hitachi Plasma Television will be necessary to adjust TINT to obtain optimum picture quality when using the COMPONENT VIDEO Y-PBPR input jacks. 3. Video Color Temperature Set this to High for cooler color with more blue, set to Medium for more natural color, set to Standard for...
...Use this function to adjust and balance the listed individual colors to make the color brighter (+) or darker (-). Set to Dynamic for darker images more in the picture without degrading picture quality. When AUTO MOVIE MODE is selected, you are shot on it is ON. 3. Press the CURSOR... menu, your Hitachi Plasma Television will be necessary to adjust TINT to obtain optimum picture quality when using the COMPONENT VIDEO Y-PBPR input jacks. 3. Video Color Temperature Set this to High for cooler color with more blue, set to Medium for more natural color, set to Standard for...


