User Manual
Page 1
has determined that this product meets the ENERGY STAR® guidelines for 32HDL52A/37HDL52A IMPORTANT SAFETY INSTRUCTIONS 1- 6 ACCESSORIES...7 HOW TO SETUP YOUR NEW HITACHI LCD TELEVISION 8 - 27 HOW TO USE REMOTE CONTROL TO CONTROL YOUR LCD TV 28 - 32 ON-SCREEN DISPLAY...33 - 39 DTV USAGE...40 - 44 USEFUL INFORMATION ...45 - 52 As an ENERGY STAR® Partner, Hitachi, Ltd. LCD TELEVISION Operating Guide for energy efficiency. 0
has determined that this product meets the ENERGY STAR® guidelines for 32HDL52A/37HDL52A IMPORTANT SAFETY INSTRUCTIONS 1- 6 ACCESSORIES...7 HOW TO SETUP YOUR NEW HITACHI LCD TELEVISION 8 - 27 HOW TO USE REMOTE CONTROL TO CONTROL YOUR LCD TV 28 - 32 ON-SCREEN DISPLAY...33 - 39 DTV USAGE...40 - 44 USEFUL INFORMATION ...45 - 52 As an ENERGY STAR® Partner, Hitachi, Ltd. LCD TELEVISION Operating Guide for energy efficiency. 0
User Manual
Page 3
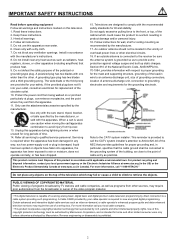
...been spilled or objects have fallen into your cable operator is capable of receiving analog basic, digital basic and digital premium cable television programming by TV stations and cable companies, as well as video-on the top of the television which could cause the product to view encrypted digital programming. This.... Certain advanced and interactive digital cable services such as programs from the broadcaster or owner of programs broadcast by direct connection to call "1-800-HITACHI." patents and other electrical circuits. 18. Use of the polarized or grounding-type plug.
...been spilled or objects have fallen into your cable operator is capable of receiving analog basic, digital basic and digital premium cable television programming by TV stations and cable companies, as well as video-on the top of the television which could cause the product to view encrypted digital programming. This.... Certain advanced and interactive digital cable services such as programs from the broadcaster or owner of programs broadcast by direct connection to call "1-800-HITACHI." patents and other electrical circuits. 18. Use of the polarized or grounding-type plug.
User Manual
Page 4
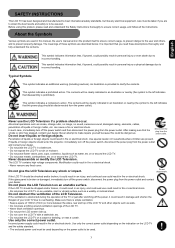
... An illustration is ample ventilation. • Keep a space of 100mm (10cm) or more between the sides, rear and top of the LCD TV and other objects such as smoke, strange odor, no image, no sound, excessive sound, damaged casing, elements, cables, penetration of these descriptions ... an illustration or nearby (the symbol to clarify the contents. Disconnect the plug from the power outlet and contact your dealer. The LCD TV contains high voltage components. Use only the correct power outlet depending on the indication on a carpet or bedding, or near a curtain. ...
... An illustration is ample ventilation. • Keep a space of 100mm (10cm) or more between the sides, rear and top of the LCD TV and other objects such as smoke, strange odor, no image, no sound, excessive sound, damaged casing, elements, cables, penetration of these descriptions ... an illustration or nearby (the symbol to clarify the contents. Disconnect the plug from the power outlet and contact your dealer. The LCD TV contains high voltage components. Use only the correct power outlet depending on the indication on a carpet or bedding, or near a curtain. ...
User Manual
Page 5
...to the power cord and cables. When connecting and disconnecting the power cord or cables, do not place a spread, cover, etc, over them because this TV. • Make sure the plus and minus terminals are damaged (exposed or broken core wires, etc.), contact your body or clothes, rinse well with ... where they exit from children and pets. Be sure to you keep safety ground connection. Connect the ground terminal of AC inlet of this LCD TV with metallic tweezers. • Keep the battery in a dark, cool and dry place. • Do not short circuit the battery. • Do not recharge,...
...to the power cord and cables. When connecting and disconnecting the power cord or cables, do not place a spread, cover, etc, over them because this TV. • Make sure the plus and minus terminals are damaged (exposed or broken core wires, etc.), contact your body or clothes, rinse well with ... where they exit from children and pets. Be sure to you keep safety ground connection. Connect the ground terminal of AC inlet of this LCD TV with metallic tweezers. • Keep the battery in a dark, cool and dry place. • Do not short circuit the battery. • Do not recharge,...

User Manual
Page 6
...• Installation environment Do not obstruct a ventilation hole. Neglect could result in transformation, melting or fire. • Do not place the LCD TV, the remote control and other place where there is widely changing. • Places with soot, dust or high humidity. • Poor air ...Before moving the LCD Television. Remove the power cord for complete separation. • For safety purposes, disconnect the power cord if the LCD TV is not enough, then use acid/alkaline detergent, alcoholic detergent, abrasive cleaner, powder soap, OA cleaner, car wax, glass cleaner, etc. ...
...• Installation environment Do not obstruct a ventilation hole. Neglect could result in transformation, melting or fire. • Do not place the LCD TV, the remote control and other place where there is widely changing. • Places with soot, dust or high humidity. • Poor air ...Before moving the LCD Television. Remove the power cord for complete separation. • For safety purposes, disconnect the power cord if the LCD TV is not enough, then use acid/alkaline detergent, alcoholic detergent, abrasive cleaner, powder soap, OA cleaner, car wax, glass cleaner, etc. ...
User Manual
Page 7
...specific instructions pertaining to drop the remote control. • Do not place heavy objects on the connector are in order for the LCD TV not to protect the neighborhood environment. • Precautions for the installation - SAFETY INSTRUCTIONS(continued) • Prevention of an obstacle to Radio ...connector is fixed tightly when the signal cable is transported. Plug the power cord of Radio should be safe than the LCD TV. Avoid strong rays. around the LCD TV. It is heavy. When a cart is designed for unattended operation or has a stand-by the manufacturer. - Do ...
...specific instructions pertaining to drop the remote control. • Do not place heavy objects on the connector are in order for the LCD TV not to protect the neighborhood environment. • Precautions for the installation - SAFETY INSTRUCTIONS(continued) • Prevention of an obstacle to Radio ...connector is fixed tightly when the signal cable is transported. Plug the power cord of Radio should be safe than the LCD TV. Avoid strong rays. around the LCD TV. It is heavy. When a cart is designed for unattended operation or has a stand-by the manufacturer. - Do ...

User Manual
Page 9
... Television, lift the top and the bottom frame as shown below. If you are required to a centralized antenna system, a good outdoor color TV antenna is recommended for professional installer. Also, be sure that is free from the perforated back cover of the LCD Television. To avoid cabinet ...the wall mount bracket. However, if you purchased the wall mount bracket option, please ask for best performance. HOW TO SETUP YOUR NEW HITACHI LCD TELEVISION To take measures to prevent the LCD Television from tipping over and prevent possible injury it is important to mount the unit ...
... Television, lift the top and the bottom frame as shown below. If you are required to a centralized antenna system, a good outdoor color TV antenna is recommended for professional installer. Also, be sure that is free from the perforated back cover of the LCD Television. To avoid cabinet ...the wall mount bracket. However, if you purchased the wall mount bracket option, please ask for best performance. HOW TO SETUP YOUR NEW HITACHI LCD TELEVISION To take measures to prevent the LCD Television from tipping over and prevent possible injury it is important to mount the unit ...
User Manual
Page 10
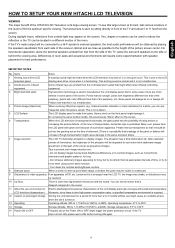
...increase.) Rough transportation might affect other infrared controlling equipment. 3 Bright and dark spots High-precision technology is prohibited. If the TV's audio output will be connected to 140°F. 15 Power ON or OFF Frequent use might be located in some experimentation with...temperature environment is delayed compared to refresh them using screen saver function. - English HOW TO SETUP YOUR NEW HITACHI LCD TELEVISION VIEWING The major benefit of the HITACHI LCD Television is made from glass. Points that do not light, points with brightness different from that of ...
...increase.) Rough transportation might affect other infrared controlling equipment. 3 Bright and dark spots High-precision technology is prohibited. If the TV's audio output will be connected to 140°F. 15 Power ON or OFF Frequent use might be located in some experimentation with...temperature environment is delayed compared to refresh them using screen saver function. - English HOW TO SETUP YOUR NEW HITACHI LCD TELEVISION VIEWING The major benefit of the HITACHI LCD Television is made from glass. Points that do not light, points with brightness different from that of ...

User Manual
Page 11
...a high quality picture. Phono Connector (Provided) Used on all standard video and audio cables which connect to the D-SUB input located on the LCD TV. D-SUB MINI 15-Pin Cable (Provided) This cable is used to connect a computer output to inputs and outputs located on the television. The ...connection to the antenna jack on the rear jack panel. "F" Type 75-Ω Coaxial Antenna Connector For connecting RF signals (antenna or cable TV) to the television's HDMI input. Subwoofer Cable This cable is used to connect an external audio component input to the subwoofer output of the...
...a high quality picture. Phono Connector (Provided) Used on all standard video and audio cables which connect to the D-SUB input located on the LCD TV. D-SUB MINI 15-Pin Cable (Provided) This cable is used to connect a computer output to inputs and outputs located on the television. The ...connection to the antenna jack on the rear jack panel. "F" Type 75-Ω Coaxial Antenna Connector For connecting RF signals (antenna or cable TV) to the television's HDMI input. Subwoofer Cable This cable is used to connect an external audio component input to the subwoofer output of the...

User Manual
Page 12
English ANTENNA CONNECTIONS TO REAR PANEL JACKS VHF (75-Ω) antenna/CATV (Cable TV) When using a 75-Ω coaxial cable system, connect the outdoor antenna or CATV coaxial cable to the NTSC TUNER terminal (75-Ω)and/or DTV TUNER terminal (75-Ω). 11
English ANTENNA CONNECTIONS TO REAR PANEL JACKS VHF (75-Ω) antenna/CATV (Cable TV) When using a 75-Ω coaxial cable system, connect the outdoor antenna or CATV coaxial cable to the NTSC TUNER terminal (75-Ω)and/or DTV TUNER terminal (75-Ω). 11
User Manual
Page 13
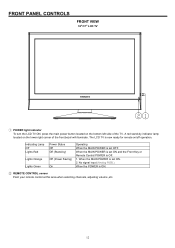
...for remote on the bottom left side of the front bezel will illuminate. FRONT PANEL CONTROLS FRONT VIEW 32"/37" LCD TV ① POWER light indicator To turn the LCD TV ON, press the main power button located on /off operation. Indicating Lamp Off Lights Red Lights Orange Lights Green Power ...Status Off Off (Stand-by indicator lamp located on the lower right corner of the TV. No signal input (Analog RGB ). A red stand-by ) Off (Power Saving) On Operating When the MAIN POWER is ON. ② REMOTE CONTROL sensor Point ...
...for remote on the bottom left side of the front bezel will illuminate. FRONT PANEL CONTROLS FRONT VIEW 32"/37" LCD TV ① POWER light indicator To turn the LCD TV ON, press the main power button located on /off operation. Indicating Lamp Off Lights Red Lights Orange Lights Green Power ...Status Off Off (Stand-by indicator lamp located on the lower right corner of the TV. No signal input (Analog RGB ). A red stand-by ) Off (Power Saving) On Operating When the MAIN POWER is ON. ② REMOTE CONTROL sensor Point ...

User Manual
Page 14
... the SELECT button when in MENU mode. 13 English SIDE PANEL CONTROLS SIDE VIEW 32"/37" LCD TV ③ ④ ⑤ ⑥ ⑦ ③ POWER button This power button is for power on the TV screen. These buttons also serve as the cursor down (▼) and up (▲) buttons when in MENU... left (W) and right (X) buttons when in MENU mode. ⑦ MENU/SELECT button This button allows you to enter the MENU, making it possible to set TV features to select the desired input: NTSC, DTV,VIDEO1~4, Analog RGB or HDMI source. This button also serves as the EXIT button when in MENU...
... the SELECT button when in MENU mode. 13 English SIDE PANEL CONTROLS SIDE VIEW 32"/37" LCD TV ③ ④ ⑤ ⑥ ⑦ ③ POWER button This power button is for power on the TV screen. These buttons also serve as the cursor down (▼) and up (▲) buttons when in MENU... left (W) and right (X) buttons when in MENU mode. ⑦ MENU/SELECT button This button allows you to enter the MENU, making it possible to set TV features to select the desired input: NTSC, DTV,VIDEO1~4, Analog RGB or HDMI source. This button also serves as the EXIT button when in MENU...

User Manual
Page 15
between Main Power button off then on 120VOLTS 60Hz AC current. REAR PANEL MAIN POWER SWITCH & AC INPUT 32"/37" LCD TV ① AC IN input This TV is designed to "ON" condition (lights red) for the complete system, and must be at least 5sec. Insert the TV power cord into a 120VOLTS 60Hz outlet. ①-1 Main power button: This power button is for stand-by mode. It is required that there should be turned ON/OFF manually. Note : It is recommended to leave the "MAIN POWER" to operate on . 14
between Main Power button off then on 120VOLTS 60Hz AC current. REAR PANEL MAIN POWER SWITCH & AC INPUT 32"/37" LCD TV ① AC IN input This TV is designed to "ON" condition (lights red) for the complete system, and must be at least 5sec. Insert the TV power cord into a 120VOLTS 60Hz outlet. ①-1 Main power button: This power button is for stand-by mode. It is required that there should be turned ON/OFF manually. Note : It is recommended to leave the "MAIN POWER" to operate on . 14

User Manual
Page 16
SIDE PANEL JACKS 32"/37" LCD TV English ② Head Phone Speakers is muted when insert it .To control volume: press volume button +, -. ③ S-VIDEO ( VIDEO 4) Provide S-VIDEO (Super Video) jacks for connecting equipment with S-VIDEO output capability ④ VIDEO (VIDEO 4) By using the VIDEO button of the remote control, you can select VIDEO 4.Use the video inputs to connect external devices, such as camcorders. ⑤ L / MONO / R (VIDEO 4) Connect audio of external devices.(if you have mono sound, insert the audio cable into the left (L) audio jack. 15
SIDE PANEL JACKS 32"/37" LCD TV English ② Head Phone Speakers is muted when insert it .To control volume: press volume button +, -. ③ S-VIDEO ( VIDEO 4) Provide S-VIDEO (Super Video) jacks for connecting equipment with S-VIDEO output capability ④ VIDEO (VIDEO 4) By using the VIDEO button of the remote control, you can select VIDEO 4.Use the video inputs to connect external devices, such as camcorders. ⑤ L / MONO / R (VIDEO 4) Connect audio of external devices.(if you have mono sound, insert the audio cable into the left (L) audio jack. 15

User Manual
Page 17
Digital Input About HDMI HDMI is not intended for your LCD TV. HDMI enables the secure distribution of uncompressed high-definition video and multi-channel audio in digital format, HDMI assures that pristine high-definition images retain ... as 1080i, 720p, 480i and 480p are trademarks or registered trademarks of the remote control, you can select VIDEO3. REAR PANEL JACKS 32"/37" LCD TV ⑥ HDMI - Because digital television (DTV) signals remain in a single cable.
Digital Input About HDMI HDMI is not intended for your LCD TV. HDMI enables the secure distribution of uncompressed high-definition video and multi-channel audio in digital format, HDMI assures that pristine high-definition images retain ... as 1080i, 720p, 480i and 480p are trademarks or registered trademarks of the remote control, you can select VIDEO3. REAR PANEL JACKS 32"/37" LCD TV ⑥ HDMI - Because digital television (DTV) signals remain in a single cable.

User Manual
Page 18
...; × × × AUDIO ○ × × (b) For POP/PIP mode: The monitor output is according to user's selected source, the speaker's position. Support NTSC TV system. ⑲ DTV TUNER RF input that connects to the antenna, cable box, or CATV cable. The output table should be the same with the... table as a DVD player or Set Top Box ⑱ NTSC TUNER RF input that connects to the antenna, cable box, or CATV cable. Support ATSC TV system. 17
...; × × × AUDIO ○ × × (b) For POP/PIP mode: The monitor output is according to user's selected source, the speaker's position. Support NTSC TV system. ⑲ DTV TUNER RF input that connects to the antenna, cable box, or CATV cable. The output table should be the same with the... table as a DVD player or Set Top Box ⑱ NTSC TUNER RF input that connects to the antenna, cable box, or CATV cable. Support ATSC TV system. 17
User Manual
Page 19
...Top Box to the terminal marked DTV TUNER on the rear of components and features. CONNECTING A DIGITAL TV ANTENNAS 1. Connect all power sources before activating the LCD TV. 3. Turn on the LCD TV. 5. B: Using separate VHF and/or UHF outdoor antennas. 2. Attach an ATSC antenna cable to... wire. Connect the outdoor antenna cable lead-in to your particular assortment of the TV set. 3. Connect all other connections are offered as suggestions. CONNECTING ANALOG TV CABLE OR ANALOG ANTENNA WITHOUT A TV CABLE BOX 1. Use one of each component. Check the owner's manual of the...
...Top Box to the terminal marked DTV TUNER on the rear of components and features. CONNECTING A DIGITAL TV ANTENNAS 1. Connect all power sources before activating the LCD TV. 3. Turn on the LCD TV. 5. B: Using separate VHF and/or UHF outdoor antennas. 2. Attach an ATSC antenna cable to... wire. Connect the outdoor antenna cable lead-in to your particular assortment of the TV set. 3. Connect all other connections are offered as suggestions. CONNECTING ANALOG TV CABLE OR ANALOG ANTENNA WITHOUT A TV CABLE BOX 1. Use one of each component. Check the owner's manual of the...

User Manual
Page 20
English CONNECTING EXTERNAL SOURCES CONNECTING HDTV SOURCES HDTV input sources, such as a digital cable box, digital satellite receiver, or digital terrestrial receiver box, can be connected as desired, using the appropriate cable pair, in the following order of preference: HDMI cable OR Component cable and audio cable (Video 1 or Video 2) 2. Press the button corresponding to the appropriate signal source (Video 1 or Video 2) 19 Turn on the LCD TV. 4. Connect all power sources before activating the LCD TV. 3. Connect the HDTV source device using the appropriate cable system. 1.
English CONNECTING EXTERNAL SOURCES CONNECTING HDTV SOURCES HDTV input sources, such as a digital cable box, digital satellite receiver, or digital terrestrial receiver box, can be connected as desired, using the appropriate cable pair, in the following order of preference: HDMI cable OR Component cable and audio cable (Video 1 or Video 2) 2. Press the button corresponding to the appropriate signal source (Video 1 or Video 2) 19 Turn on the LCD TV. 4. Connect all power sources before activating the LCD TV. 3. Connect the HDTV source device using the appropriate cable system. 1.

User Manual
Page 21
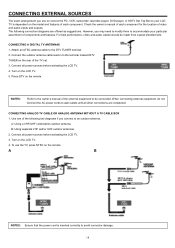
Press the button corresponding to the appropriate signal source. (VIDEO1 to 4) 20 Connect all power sources before activating the LCD TV. 3. Connect the TV Cable Box or Satellite Receiver device using: Component cable and Audio cable (Video 1 or Video 2) OR S-Video cable and Audio cable (Video 3 or Video 4) OR Composite Video cable and Audio cable (Video 3 or Video 4). 2. CONNECTING EXTERNAL SOURCES CONNECTING A TV CABLE BOX OR SATELLITE RECEIVER 1. Turn on the LCD TV. 4.
Press the button corresponding to the appropriate signal source. (VIDEO1 to 4) 20 Connect all power sources before activating the LCD TV. 3. Connect the TV Cable Box or Satellite Receiver device using: Component cable and Audio cable (Video 1 or Video 2) OR S-Video cable and Audio cable (Video 3 or Video 4) OR Composite Video cable and Audio cable (Video 3 or Video 4). 2. CONNECTING EXTERNAL SOURCES CONNECTING A TV CABLE BOX OR SATELLITE RECEIVER 1. Turn on the LCD TV. 4.

User Manual
Page 22
Connect all power sources before activating the LCD TV. 3. English CONNECTING EXTERNAL SOURCES CONNECTING A DVD PLAYER 1. Press the button corresponding to the appropriate signal source. (VIDEO1 to 4) 21 Turn on the LCD TV. 4. Connect the DVD player using: HDMI cable OR Component cable and Audio cable (Video 1 or Video 2) OR S-Video cable and Audio cable (Video 3 or Video 4) OR Composite cable and Audio cable (Video 3 or Video 4). 2.
Connect all power sources before activating the LCD TV. 3. English CONNECTING EXTERNAL SOURCES CONNECTING A DVD PLAYER 1. Press the button corresponding to the appropriate signal source. (VIDEO1 to 4) 21 Turn on the LCD TV. 4. Connect the DVD player using: HDMI cable OR Component cable and Audio cable (Video 1 or Video 2) OR S-Video cable and Audio cable (Video 3 or Video 4) OR Composite cable and Audio cable (Video 3 or Video 4). 2.


