User Manual
Page 1
LCD TELEVISION Operating Guide for energy efficiency. 0 has determined that this product meets the ENERGY STAR® guidelines for 32HDL52A/37HDL52A IMPORTANT SAFETY INSTRUCTIONS 1- 6 ACCESSORIES...7 HOW TO SETUP YOUR NEW HITACHI LCD TELEVISION 8 - 27 HOW TO USE REMOTE CONTROL TO CONTROL YOUR LCD TV 28 - 32 ON-SCREEN DISPLAY...33 - 39 DTV USAGE...40 - 44 USEFUL INFORMATION ...45 - 52 As an ENERGY STAR® Partner, Hitachi, Ltd.
LCD TELEVISION Operating Guide for energy efficiency. 0 has determined that this product meets the ENERGY STAR® guidelines for 32HDL52A/37HDL52A IMPORTANT SAFETY INSTRUCTIONS 1- 6 ACCESSORIES...7 HOW TO SETUP YOUR NEW HITACHI LCD TELEVISION 8 - 27 HOW TO USE REMOTE CONTROL TO CONTROL YOUR LCD TV 28 - 32 ON-SCREEN DISPLAY...33 - 39 DTV USAGE...40 - 44 USEFUL INFORMATION ...45 - 52 As an ENERGY STAR® Partner, Hitachi, Ltd.
User Manual
Page 5
... is close to clean the power plug. • Insert the power plug into a power outlet firmly. If swallowed consult a physician immediately for replacement of the remote control. Use a soft and dry cloth to you observe a leakage of the power cord connection.
... is close to clean the power plug. • Insert the power plug into a power outlet firmly. If swallowed consult a physician immediately for replacement of the remote control. Use a soft and dry cloth to you observe a leakage of the power cord connection.

User Manual
Page 6
...8226; Installation environment Do not obstruct a ventilation hole. Avoid direct rays of the sun to the screen in order to clean the cabinet and control panel of the LCD TV. The phosphor has a finite illumination life. Tips to prevent such image retention are present. Clean the screen with ... afterward wipe with a dry soft cloth. Neglect could result in transformation, melting or fire. • Do not place the LCD TV, the remote control and other place where there is widely changing. • Places with sharp or hard objects. Neglect could result in an injury or damage. •...
...8226; Installation environment Do not obstruct a ventilation hole. Avoid direct rays of the sun to the screen in order to clean the cabinet and control panel of the LCD TV. The phosphor has a finite illumination life. Tips to prevent such image retention are present. Clean the screen with ... afterward wipe with a dry soft cloth. Neglect could result in transformation, melting or fire. • Do not place the LCD TV, the remote control and other place where there is widely changing. • Places with sharp or hard objects. Neglect could result in an injury or damage. •...
User Manual
Page 7
... materials when the LCD TV is used, use caution when moving the cart/apparatus combination to avoid injury from that could invalidate the remote control. A physical impact could cause distorted images or noises. • Avoid radio generator such as recommended by the manufacturer. - Never... level. Save the original carton box and all other equipment other equipment, such as direct sun rays or room lighting) onto the remote control sensors could cause the product to protect the neighborhood environment. • Precautions for other than sorry! 6 Any strong rays (such as...
... materials when the LCD TV is used, use caution when moving the cart/apparatus combination to avoid injury from that could invalidate the remote control. A physical impact could cause distorted images or noises. • Avoid radio generator such as recommended by the manufacturer. - Never... level. Save the original carton box and all other equipment other equipment, such as direct sun rays or room lighting) onto the remote control sensors could cause the product to protect the neighborhood environment. • Precautions for other than sorry! 6 Any strong rays (such as...

User Manual
Page 8
... 1. 7. 8. 9. 10. 11. Mounting the panel on the ceiling does not provide adequate ventilation for the electronics or proper support for the remote control. This LCD television product is incorrectly replaced. Power Cord 3. Two "AAA" size, 1.5V batteries 7. Easy Graphic Guide 9. Replace with your ...fingers and pulling the cover off. 2. Open the battery cover of the remote control by pressing the notched part of the cover with the same or equivalent type. 7 When replacing old batteries, push them towards the ...
... 1. 7. 8. 9. 10. 11. Mounting the panel on the ceiling does not provide adequate ventilation for the electronics or proper support for the remote control. This LCD television product is incorrectly replaced. Power Cord 3. Two "AAA" size, 1.5V batteries 7. Easy Graphic Guide 9. Replace with your ...fingers and pulling the cover off. 2. Open the battery cover of the remote control by pressing the notched part of the cover with the same or equivalent type. 7 When replacing old batteries, push them towards the ...
User Manual
Page 13
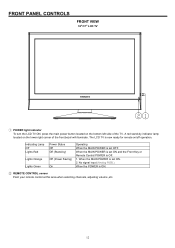
...bottom left side of the front bezel will illuminate. When the MAIN POWER is set ON and the Front Key or Remote Control POWER is ON. ② REMOTE CONTROL sensor Point your remote control at this area when selecting channels, adjusting volume ,etc. 12 When the POWER is Off. 1. When the MAIN... POWER is now ready for remote on the lower right corner of the TV. The LCD TV is set OFF. Indicating Lamp...
...bottom left side of the front bezel will illuminate. When the MAIN POWER is set ON and the Front Key or Remote Control POWER is ON. ② REMOTE CONTROL sensor Point your remote control at this area when selecting channels, adjusting volume ,etc. 12 When the POWER is Off. 1. When the MAIN... POWER is now ready for remote on the lower right corner of the TV. The LCD TV is set OFF. Indicating Lamp...

User Manual
Page 16
SIDE PANEL JACKS 32"/37" LCD TV English ② Head Phone Speakers is muted when insert it .To control volume: press volume button +, -. ③ S-VIDEO ( VIDEO 4) Provide S-VIDEO (Super Video) jacks for connecting equipment with S-VIDEO output capability ④ VIDEO (VIDEO 4) By using the VIDEO button of the remote control, you can select VIDEO 4.Use the video inputs to connect external devices, such as camcorders. ⑤ L / MONO / R (VIDEO 4) Connect audio of external devices.(if you have mono sound, insert the audio cable into the left (L) audio jack. 15
SIDE PANEL JACKS 32"/37" LCD TV English ② Head Phone Speakers is muted when insert it .To control volume: press volume button +, -. ③ S-VIDEO ( VIDEO 4) Provide S-VIDEO (Super Video) jacks for connecting equipment with S-VIDEO output capability ④ VIDEO (VIDEO 4) By using the VIDEO button of the remote control, you can select VIDEO 4.Use the video inputs to connect external devices, such as camcorders. ⑤ L / MONO / R (VIDEO 4) Connect audio of external devices.(if you have mono sound, insert the audio cable into the left (L) audio jack. 15

User Manual
Page 17
... are trademarks or registered trademarks of HDMI Licensing LLC. REAR PANEL JACKS 32"/37" LCD TV ⑥ HDMI - HDMI enables the secure distribution of the remote control, you can select VIDEO3. Because digital television (DTV) signals remain in a single cable. HDMI, the HDMI logo and High-Definition Multimedia Interface are available for...
... are trademarks or registered trademarks of HDMI Licensing LLC. REAR PANEL JACKS 32"/37" LCD TV ⑥ HDMI - HDMI enables the secure distribution of the remote control, you can select VIDEO3. Because digital television (DTV) signals remain in a single cable. HDMI, the HDMI logo and High-Definition Multimedia Interface are available for...
User Manual
Page 28
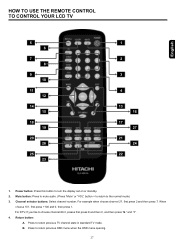
... channel number. When choose 101, first press +100 and 0, then press 1. Press to turn the display set on or standby. 2. English HOW TO USE THE REMOTE CONTROL TO CONTROL YOUR LCD TV 5 6 7 8 9 10 11 12 14 15 18 19 20 26 25 23 1 1 2 2 3 3 4 4 13 13 16 16 17 17 27 27 21 21...
... channel number. When choose 101, first press +100 and 0, then press 1. Press to turn the display set on or standby. 2. English HOW TO USE THE REMOTE CONTROL TO CONTROL YOUR LCD TV 5 6 7 8 9 10 11 12 14 15 18 19 20 26 25 23 1 1 2 2 3 3 4 4 13 13 16 16 17 17 27 27 21 21...

User Manual
Page 29
... / SV2). NTSC Source button: Set up the input source of the display area in DTV Mode. 16. Phosphors in on selected display window by pressing remote control source keys. Use this aspect mode to display 16:9 sources like HDTV and DVD's preserving the original 16:9 aspect ratio. Aspect button: Press repeatedly to...) menu. 12. SLEEP button: Press to fill it will age more rapidly than the gray areas. Menu button: Turn on selected display window by pressing remote control source keys. 5.
... / SV2). NTSC Source button: Set up the input source of the display area in DTV Mode. 16. Phosphors in on selected display window by pressing remote control source keys. Use this aspect mode to display 16:9 sources like HDTV and DVD's preserving the original 16:9 aspect ratio. Aspect button: Press repeatedly to...) menu. 12. SLEEP button: Press to fill it will age more rapidly than the gray areas. Menu button: Turn on selected display window by pressing remote control source keys. 5.
User Manual
Page 30
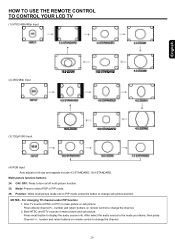
...select POP or PIP mode. 26. Both NTSC and DTV sources in main picture or sub picture: Press directly channel+/-, number and return buttons on remote control to change the channel. 29 Mode: Press to display the audio source info. ON / OFF: Press to full size and aspects include 4:3 ...STANDARD, 16:9 STANDARD. English HOW TO USE THE REMOTE CONTROL TO CONTROL YOUR LCD TV (1) NTSC/480i/480p Input (2) 480i/480p Input (3) 720p/1080i Input (4) RGB Input Auto adjust to turn on/off multi picture function...
...select POP or PIP mode. 26. Both NTSC and DTV sources in main picture or sub picture: Press directly channel+/-, number and return buttons on remote control to change the channel. 29 Mode: Press to display the audio source info. ON / OFF: Press to full size and aspects include 4:3 ...STANDARD, 16:9 STANDARD. English HOW TO USE THE REMOTE CONTROL TO CONTROL YOUR LCD TV (1) NTSC/480i/480p Input (2) 480i/480p Input (3) 720p/1080i Input (4) RGB Input Auto adjust to turn on/off multi picture function...

User Manual
Page 31
picture source selection table: Please note Main(Left)-picture and Sub(Right)- HOW TO USE THE REMOTE CONTROL TO CONTROL YOUR LCD TV POP Mode Main-picture and Sub- picture source can't be the same Main(Left) Sub(Right) NTSC TUNER DTV TUNER ANALOG VIDEO1 ...
picture source selection table: Please note Main(Left)-picture and Sub(Right)- HOW TO USE THE REMOTE CONTROL TO CONTROL YOUR LCD TV POP Mode Main-picture and Sub- picture source can't be the same Main(Left) Sub(Right) NTSC TUNER DTV TUNER ANALOG VIDEO1 ...
User Manual
Page 33
Press SEL on the remote control to adjust functions. 4. THERE ARE TWO DIFFERENT MODES FOR THE OSD AS FOLLOWS: NTSC TV/DTV/Video/HDMI Mode: Display when the NTSC, DTV, VIDEO1 ... Use the W X to quickly exit from a menu. Press EXIT on the remote control to 4 or HDMI is selected. PC Mode: Display when the Analog RGB input is selected. OSD (On-Screen Display) USING THE ON-SCREEN DISPLAY (OSD) CONTROLS 1. Press MENU on your HITACHI LCD TV. 2. Use the ▲▼W X to navigate to display...
Press SEL on the remote control to adjust functions. 4. THERE ARE TWO DIFFERENT MODES FOR THE OSD AS FOLLOWS: NTSC TV/DTV/Video/HDMI Mode: Display when the NTSC, DTV, VIDEO1 ... Use the W X to quickly exit from a menu. Press EXIT on the remote control to 4 or HDMI is selected. PC Mode: Display when the Analog RGB input is selected. OSD (On-Screen Display) USING THE ON-SCREEN DISPLAY (OSD) CONTROLS 1. Press MENU on your HITACHI LCD TV. 2. Use the ▲▼W X to navigate to display...
User Manual
Page 36
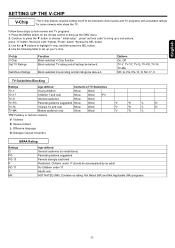
English SETTING UP THE V-CHIP V-Chip The V-chip feature requires setting on the remote control to set up your V-chip. Follow these steps to view movies and TV programs with unsuitable ratings for some viewers who share the TV. Block ...
English SETTING UP THE V-CHIP V-Chip The V-chip feature requires setting on the remote control to set up your V-chip. Follow these steps to view movies and TV programs with unsuitable ratings for some viewers who share the TV. Block ...
User Manual
Page 37
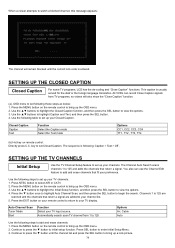
...once to highlight Auto Channel Scan, and then press the SEL button to bring up the OSD menu. 3. Press the EXIT button on the remote control to bring up the OSD menu. 2. When a viewer attempts to watch a blocked channel, this message appears: The channel will also show ...the "Close Caption" function. (a). Press the MENU button on your remote control to return to your TV channels: 1. Closed Caption Caption Text Function Select the Caption mode Select the Text mode Options CC1, CC2, CC3, CC4...
...once to highlight Auto Channel Scan, and then press the SEL button to bring up the OSD menu. 3. Press the EXIT button on the remote control to bring up the OSD menu. 2. When a viewer attempts to watch a blocked channel, this message appears: The channel will also show ...the "Close Caption" function. (a). Press the MENU button on your remote control to return to your TV channels: 1. Closed Caption Caption Text Function Select the Caption mode Select the Text mode Options CC1, CC2, CC3, CC4...

User Manual
Page 38
.... 5. Press the ▼ button once to highlight Manual Tuning, and then press the SEL button to manual adjust: 1. Press the EXIT button on your remote control to return to your TV display. 37 Press channel selector button to add or erase the current channel. 6. Press the SEL button to select channel...until the correct lock code is enter SETTING UP THE MANUAL TUNING Manual Tuning Due to select a channel. 5. Press the EXIT button on the remote control to your TV display. English 4. Press the MENU button on your remote control to return to bring up the OSD menu. 3.
.... 5. Press the ▼ button once to highlight Manual Tuning, and then press the SEL button to manual adjust: 1. Press the EXIT button on your remote control to return to your TV display. 37 Press channel selector button to add or erase the current channel. 6. Press the SEL button to select channel...until the correct lock code is enter SETTING UP THE MANUAL TUNING Manual Tuning Due to select a channel. 5. Press the EXIT button on the remote control to your TV display. English 4. Press the MENU button on your remote control to return to bring up the OSD menu. 3.
User Manual
Page 41
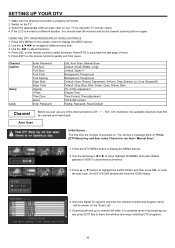
... scanning all over again. Use the W X to lunch the auto scan. CH, Numbers), the available channels must first be shown on the remote control to quickly exit from menu. Press ▲ or ▼ buttons to highlight the AUTO SCAN, and then press SEL to adjust functions. 4....enjoy watching DTV programs. 40 If the LCD is properly connected. 2. USING THE DTV ON-SCREEN DISPLAY (OSD) CONTROLS 1. Once the digital TV signal is powered on the remote control to a different location. Press SEL on . You will show three sub-menus 3. The first time the receiver ...
... scanning all over again. Use the W X to lunch the auto scan. CH, Numbers), the available channels must first be shown on the remote control to quickly exit from menu. Press ▲ or ▼ buttons to highlight the AUTO SCAN, and then press SEL to adjust functions. 4....enjoy watching DTV programs. 40 If the LCD is properly connected. 2. USING THE DTV ON-SCREEN DISPLAY (OSD) CONTROLS 1. Once the digital TV signal is powered on the remote control to a different location. Press SEL on . You will show three sub-menus 3. The first time the receiver ...
User Manual
Page 44
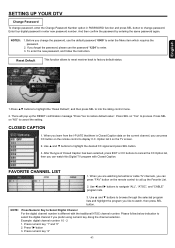
... "0000" to display C.C. After the type of Closed Caption has been selected, press EXIT or CC buttons to into the rating control menu. 2. When you are watching terrestrial or cable TV channels, you learn from the I-PLATE that there is different with Closed ...process. Press "X"button 3. There will pop up the Favorite List. 2. Press SEL on the remote control to navigate "ALL", "ATSC", and "CABLE" program lists. 3. When you can press CC button on the remote control to enter the Menu item which requires the password. 2. CLOSED CAPTION 1. Example: digital channel ...
... "0000" to display C.C. After the type of Closed Caption has been selected, press EXIT or CC buttons to into the rating control menu. 2. When you are watching terrestrial or cable TV channels, you learn from the I-PLATE that there is different with Closed ...process. Press "X"button 3. There will pop up the Favorite List. 2. Press SEL on the remote control to navigate "ALL", "ATSC", and "CABLE" program lists. 3. When you can press CC button on the remote control to enter the Menu item which requires the password. 2. CLOSED CAPTION 1. Example: digital channel ...

User Manual
Page 45
...outlet if your LCD Television for instance, when you go on the floor, etc. Do not subject the remote control to shock such as dropping it wet. When the batteries run out, remote control operation will not be used for a long period of time or heat may be used if the screen is...sunlight for a long period of time, for away from the accessories pack. This way may cause the remote control unit to the precision parts. USEFUL INFORMATION CARE OF YOUR HITACHI LCD TELEVISION AND YOUR REMOTE CONTROL DO Dust the screen and frame with a new battery at the same time. Do not leave it on...
...outlet if your LCD Television for instance, when you go on the floor, etc. Do not subject the remote control to shock such as dropping it wet. When the batteries run out, remote control operation will not be used for a long period of time or heat may be used if the screen is...sunlight for a long period of time, for away from the accessories pack. This way may cause the remote control unit to the precision parts. USEFUL INFORMATION CARE OF YOUR HITACHI LCD TELEVISION AND YOUR REMOTE CONTROL DO Dust the screen and frame with a new battery at the same time. Do not leave it on...
User Manual
Page 50
...937; • Head phone Audio: • Mono / Stereo / SAP • SRS WOW •10W+10W • Mute Supplied Accessories: • Remote control • Batteries • Power Cable • User's Guide • Easy Graphic Guide • Warranty Card • D-Sub Cable • S-Video ... A-1 A-I Super Band J-W Hyper Band W+1 - Please access www.hitachi.com/tv for detailed specifications and dimensions for Consumer Use • Power Input AC 120V, 60Hz • Power Consumption 32HDL52A:150W 37HDL52A:170W at standby 1W •Operating temperature 35゚C max DIMENSIONS ...
...937; • Head phone Audio: • Mono / Stereo / SAP • SRS WOW •10W+10W • Mute Supplied Accessories: • Remote control • Batteries • Power Cable • User's Guide • Easy Graphic Guide • Warranty Card • D-Sub Cable • S-Video ... A-1 A-I Super Band J-W Hyper Band W+1 - Please access www.hitachi.com/tv for detailed specifications and dimensions for Consumer Use • Power Input AC 120V, 60Hz • Power Consumption 32HDL52A:150W 37HDL52A:170W at standby 1W •Operating temperature 35゚C max DIMENSIONS ...


