Owners Guide
Page 2
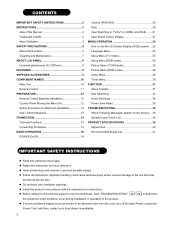
... LCD Panel 8 FEATURES 9 SUPPLIED ACCESSORIES 9 COMPONENT NAMES 10 Main Unit 10 Remote Control 11 PREPARATION 12 Remote Control Batteries Installation 12 Caution When Moving the Main Unit 12 Safety Precaution on Main Unit Installation 13 Anti-Tumble Measures 13 CONNECTION 14 Terminal Positions 14 Connecting Procedure 14 BASIC OPERATION 19 POWER On/Off 19 Volume UP/DOWN 20 Mute 20 Input Switching to TV/AV1~4, HDMI, and RGB......... 21 Input Signal Screen Display...
... LCD Panel 8 FEATURES 9 SUPPLIED ACCESSORIES 9 COMPONENT NAMES 10 Main Unit 10 Remote Control 11 PREPARATION 12 Remote Control Batteries Installation 12 Caution When Moving the Main Unit 12 Safety Precaution on Main Unit Installation 13 Anti-Tumble Measures 13 CONNECTION 14 Terminal Positions 14 Connecting Procedure 14 BASIC OPERATION 19 POWER On/Off 19 Volume UP/DOWN 20 Mute 20 Input Switching to TV/AV1~4, HDMI, and RGB......... 21 Input Signal Screen Display...
Owners Guide
Page 3
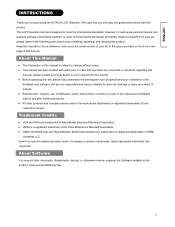
..., copying, use, modification, and/or transmission in whole or in part of this manual are prohibited without notice. Ɣ This manual has been created with this product. We are not responsible and have been fully respected. We hope that you for future reference, and record the serial number of your set, please observe the following instructions when installing, operating, and...
..., copying, use, modification, and/or transmission in whole or in part of this manual are prohibited without notice. Ɣ This manual has been created with this product. We are not responsible and have been fully respected. We hope that you for future reference, and record the serial number of your set, please observe the following instructions when installing, operating, and...

Owners Guide
Page 4
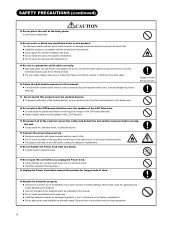
..., abnormal odor or sound comes out from the power outlet. z In case it happens, turn off the Main Power, unplug the Power Cord, and contact your dealer immediately. Removing covers can expose you to repair the product by yourself. „ Do not insert liquids or any foreign objects (such as inspection, adjustment, or repair work. WARNING Never ignore the instruction. Other Symbols...
..., abnormal odor or sound comes out from the power outlet. z In case it happens, turn off the Main Power, unplug the Power Cord, and contact your dealer immediately. Removing covers can expose you to repair the product by yourself. „ Do not insert liquids or any foreign objects (such as inspection, adjustment, or repair work. WARNING Never ignore the instruction. Other Symbols...
Owners Guide
Page 6
... or blurring of time. „ Handle the batteries properly. Ɣ Improper or incorrect use Power Cord adapter, be sure to connect the earth cable to the wall socket. The television would damage the product seriously. „ Do not install this product near the speaker of the LCD Television. Ɣ It could result in this manual. Ɣ Do not install new batteries with used batteries as domestic...
... or blurring of time. „ Handle the batteries properly. Ɣ Improper or incorrect use Power Cord adapter, be sure to connect the earth cable to the wall socket. The television would damage the product seriously. „ Do not install this product near the speaker of the LCD Television. Ɣ It could result in this manual. Ɣ Do not install new batteries with used batteries as domestic...

Owners Guide
Page 7
...; When the product needs to be transported due to moving or repair, use this product, keep this product at your eyes occasionally. Ɣ When you use the following actions. Ɣ Adjust the direction of direct sunlight. Cleaning and Maintenance Please make sure to unplug the power cord before cleaning the television. „ How to clean the LCD panel of the television. Ɣ The...
...; When the product needs to be transported due to moving or repair, use this product, keep this product at your eyes occasionally. Ɣ When you use the following actions. Ɣ Adjust the direction of direct sunlight. Cleaning and Maintenance Please make sure to unplug the power cord before cleaning the television. „ How to clean the LCD panel of the television. Ɣ The...
Owners Guide
Page 9
User Manual Remote Control AA size batteries X2 Power Cord (BS Type)* *The type of power plug provided may be different from this drawing for some countries. 9 SUPPLIED ACCESSORIES Check the supplied accessories before using. Remove the protection film from the Remote Control before installation. In case of missing or damaged, please contact with Power Saving feature. ENGLISH FEATURES Enjoy not only beautiful and high quality pictures on the display, but also...
User Manual Remote Control AA size batteries X2 Power Cord (BS Type)* *The type of power plug provided may be different from this drawing for some countries. 9 SUPPLIED ACCESSORIES Check the supplied accessories before using. Remove the protection film from the Remote Control before installation. In case of missing or damaged, please contact with Power Saving feature. ENGLISH FEATURES Enjoy not only beautiful and high quality pictures on the display, but also...

Owners Guide
Page 10
...4 5 Rear Panel 1. Main Power Switch (on the top. 5, 6 2 3 2 1 ! 1. Control Panel (see below for details) Please refer to 14 ~ 18 for the detailed information for the connections. 26LD9000TA 4 32LD9000TA 4 3 2 1 ! Menu button 3. Input/OK button ! 7 10 3, 4 1 COMPONENT NAMES Main Unit Front Panel 7 6! 1. Side Input 2. Power Cord Socket 3. Speaker 6. Terminal Board (External Device Connection) 4. Desktop Stand 7. Volume DOWN /ebutton 7. Volume UP /f button 6. Cabinet 1 2. Panel 3. Remote Control Receiver 5. Sub Power button 2. Program UP...
...4 5 Rear Panel 1. Main Power Switch (on the top. 5, 6 2 3 2 1 ! 1. Control Panel (see below for details) Please refer to 14 ~ 18 for the detailed information for the connections. 26LD9000TA 4 32LD9000TA 4 3 2 1 ! Menu button 3. Input/OK button ! 7 10 3, 4 1 COMPONENT NAMES Main Unit Front Panel 7 6! 1. Side Input 2. Power Cord Socket 3. Speaker 6. Terminal Board (External Device Connection) 4. Desktop Stand 7. Volume DOWN /ebutton 7. Volume UP /f button 6. Cabinet 1 2. Panel 3. Remote Control Receiver 5. Sub Power button 2. Program UP...

Owners Guide
Page 11
... use this button to change picture size. 8 13. Recall 17 Pressing this button to change input mode. 5. Channel Up/Down[P+/ P-] 19. DynamicШNaturalШ Cinema 18. CHI/II This is exclusively for Teletext mode, and other buttons have different functions in the 22 following sequence. ENGLISH COMPONENT NAMES (Continued) Remote Control 1. Power ON/OFF 2. [Color (Red, Green, Yellow, Blue)] 1 13 3. Cursor 9. Refer to select a TV program directly. 6. Input Select (AV1/AV2/AV3/AV4/HDMI...
... use this button to change picture size. 8 13. Recall 17 Pressing this button to change input mode. 5. Channel Up/Down[P+/ P-] 19. DynamicШNaturalШ Cinema 18. CHI/II This is exclusively for Teletext mode, and other buttons have different functions in the 22 following sequence. ENGLISH COMPONENT NAMES (Continued) Remote Control 1. Power ON/OFF 2. [Color (Red, Green, Yellow, Blue)] 1 13 3. Cursor 9. Refer to select a TV program directly. 6. Input Select (AV1/AV2/AV3/AV4/HDMI...
Owners Guide
Page 13
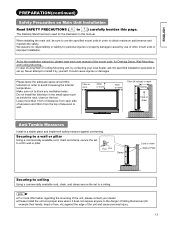
... holes. As for Desktop Setup, Wall Mounting, and Ceiling Mounting. Make sure not to 7 ) carefully besides this page. Do not install the television in order to a ceiling. In case of using Wall or Ceiling Mounting unit, by yourself. Chain Hook Clamp Cord or chain Wall or Pillar Securing to ceiling Using a commercially available cord, chain, and clamp secure the set to the danger of the...
... holes. As for Desktop Setup, Wall Mounting, and Ceiling Mounting. Make sure not to 7 ) carefully besides this page. Do not install the television in order to a ceiling. In case of using Wall or Ceiling Mounting unit, by yourself. Chain Hook Clamp Cord or chain Wall or Pillar Securing to ceiling Using a commercially available cord, chain, and clamp secure the set to the danger of the...

Owners Guide
Page 14
... 6. Connect Power Cord to connect between each equipment and Antenna. 2. Use RF cable to Rear Panel. Connect the Aerial Lead to turn off the Main Power first when connecting external equipments. 1. Please use CATV net or outdoor aerial. Ɣ For safety, install an external aerial conforming to "ANT" on the LCD screen Socket on the screen. Ɣ Avoid using indoor aerial as this may be affected by interference. HDMI Side 9. Headphone output Connecting Procedure...
... 6. Connect Power Cord to connect between each equipment and Antenna. 2. Use RF cable to Rear Panel. Connect the Aerial Lead to turn off the Main Power first when connecting external equipments. 1. Please use CATV net or outdoor aerial. Ɣ For safety, install an external aerial conforming to "ANT" on the LCD screen Socket on the screen. Ɣ Avoid using indoor aerial as this may be affected by interference. HDMI Side 9. Headphone output Connecting Procedure...

Owners Guide
Page 17
... Camcorder DVD Player Home video game system If your external device has a HDMI terminal, HDMI connection is very convenient to use the extra device on a temporary basis after done the connections on the rear panel. CONNECTION (continued) Connecting Procedure (continued) HDMI terminals can be connected to the equipment with HDMI output. Moreover, those digital signals can produce high quality data without any degradation. ENGLISH (Example) VCR IN OUT DVD player Set-Top Box Information HDMI...
... Camcorder DVD Player Home video game system If your external device has a HDMI terminal, HDMI connection is very convenient to use the extra device on a temporary basis after done the connections on the rear panel. CONNECTION (continued) Connecting Procedure (continued) HDMI terminals can be connected to the equipment with HDMI output. Moreover, those digital signals can produce high quality data without any degradation. ENGLISH (Example) VCR IN OUT DVD player Set-Top Box Information HDMI...

Owners Guide
Page 18
... you use a power source converter plug, use an outlet with a ground terminal and screw down the ground line. Ɣ Ensure that both ends of power cord are easily accessible. Ɣ If you secure the cables, please be muted when connecting the headphone to this terminal. 4. CONNECTION (continued) Connecting Procedure (continued) Headphone The detail settings can be adjusted from Audio Menu on page 29 . (Mini Stereo Plug) The audio from...
... you use a power source converter plug, use an outlet with a ground terminal and screw down the ground line. Ɣ Ensure that both ends of power cord are easily accessible. Ɣ If you secure the cables, please be muted when connecting the headphone to this terminal. 4. CONNECTION (continued) Connecting Procedure (continued) Headphone The detail settings can be adjusted from Audio Menu on page 29 . (Mini Stereo Plug) The audio from...

Owners Guide
Page 19
... disappears from the screen and the Indicating Lamp turns into Red (Standby mode). 2. Press Main Power switch to solve the problems. Ɣ You can turn ON the power only by pressing the Sub Power button during use of the television: 1. Press Sub Power button either on the control panel or on the remote control. Ɣ The color of the television: 1. The Indicating Lamp Status Check Sub Power button Indicating Lamp Status Power Status Power Switch Status Off...
... disappears from the screen and the Indicating Lamp turns into Red (Standby mode). 2. Press Main Power switch to solve the problems. Ɣ You can turn ON the power only by pressing the Sub Power button during use of the television: 1. Press Sub Power button either on the control panel or on the remote control. Ɣ The color of the television: 1. The Indicating Lamp Status Check Sub Power button Indicating Lamp Status Power Status Power Switch Status Off...
Owners Guide
Page 23
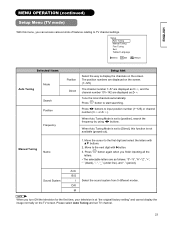
... digit with Ÿź buttons. 2. OK !button to input position number (1~125) or channel number (C or Z ). Move to TV channel settings. Selected Items Auto Tuning Mode Search Position Frequency Position Direct Setup hint Select the way to [position], search the frequency by using WX buttons. Sound System Auto B/G I D/K M Select the sound system from 5 different modes. Setup Auto Tuning Manual Tuning Fine Tuning Sort Teletext Language Select OK Set Return ! Move the cursor to [Direct], this menu...
... digit with Ÿź buttons. 2. OK !button to input position number (1~125) or channel number (C or Z ). Move to TV channel settings. Selected Items Auto Tuning Mode Search Position Frequency Position Direct Setup hint Select the way to [position], search the frequency by using WX buttons. Sound System Auto B/G I D/K M Select the sound system from 5 different modes. Setup Auto Tuning Manual Tuning Fine Tuning Sort Teletext Language Select OK Set Return ! Move the cursor to [Direct], this menu...

Owners Guide
Page 25
Image Position on this menu screen can adjust the display condition of the image which is inputting from the RGB terminals. Setup Auto Adjust Image Position Horizontal Clock Clock Phase Reset Select ŻŹSet Ź Ź 41 34 Reset Return Selected Items Auto Adjust Image Position* Horizontal Clock* Clock Phase* Reset Setup hint Adjust Horizontal Position, Vertical Position, Horizontal Clock, and Clock Phase automatically. • Press...
Image Position on this menu screen can adjust the display condition of the image which is inputting from the RGB terminals. Setup Auto Adjust Image Position Horizontal Clock Clock Phase Reset Select ŻŹSet Ź Ź 41 34 Reset Return Selected Items Auto Adjust Image Position* Horizontal Clock* Clock Phase* Reset Setup hint Adjust Horizontal Position, Vertical Position, Horizontal Clock, and Clock Phase automatically. • Press...
Owners Guide
Page 26
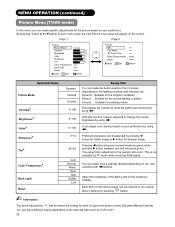
... Back Light High Reset Reset Select OK Set Return Picture NR Film Mode 3D Comb Filter Black Enhancement Reset Select OK Set On On On Middle Reset Return Selected Items Picture Mode Contrast* Brightness* Color* Sharpness* Tint* Color Temperature* Back Light Reset Dynamic Natural Cinema 0~100 0~100 0~100 0~12 -45~45 Cool Normal Warm User High Middle Low Setup hint You can make specific adjustments for each menu page, the next Picture menu...
... Back Light High Reset Reset Select OK Set Return Picture NR Film Mode 3D Comb Filter Black Enhancement Reset Select OK Set On On On Middle Reset Return Selected Items Picture Mode Contrast* Brightness* Color* Sharpness* Tint* Color Temperature* Back Light Reset Dynamic Natural Cinema 0~100 0~100 0~100 0~12 -45~45 Cool Normal Warm User High Middle Low Setup hint You can make specific adjustments for each menu page, the next Picture menu...
Owners Guide
Page 31
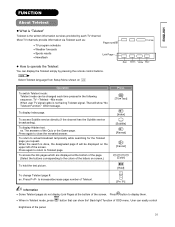
... number of the screen. Press [TV Text] [Index] [Subtitle] ? [Reveal] X [Cancel] [Color] [Hold] P+ P [P+/ P-] Information z Some Teletext pages do not display Link Pages at the bottom of the page. (Select the buttons corresponding to the colors of the panel. 31 Press P+/P- That will be changed each TV channel. To access Subtitle service directly (if the channel has the Subtitle service broadcasting). to operate the Teletext You can easily control...
... number of the screen. Press [TV Text] [Index] [Subtitle] ? [Reveal] X [Cancel] [Color] [Hold] P+ P [P+/ P-] Information z Some Teletext pages do not display Link Pages at the bottom of the page. (Select the buttons corresponding to the colors of the panel. 31 Press P+/P- That will be changed each TV channel. To access Subtitle service directly (if the channel has the Subtitle service broadcasting). to operate the Teletext You can easily control...
Owners Guide
Page 36
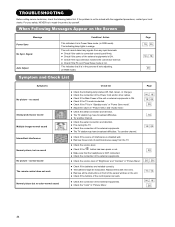
... is in Power Save mode. (in RGB mode) The indicating lamp lights in "Standby mode" or "Power Save mode". normal sound The remote control does not work . z Check the connection of the external equipments. z Check if the TV mode is connected correctly and firmly. z Adjust the values in front of the control panel can work . z Check the aerial connection and direction. z Try another channel. z The TV station may have broadcast difficulties. z Remove those kinds of auto adjusting. (in...
... is in Power Save mode. (in RGB mode) The indicating lamp lights in "Standby mode" or "Power Save mode". normal sound The remote control does not work . z Check the connection of the external equipments. z Check if the TV mode is connected correctly and firmly. z Adjust the values in front of the control panel can work . z Check the aerial connection and direction. z Try another channel. z The TV station may have broadcast difficulties. z Remove those kinds of auto adjusting. (in...

Owners Guide
Page 37
.../60Hz, or 720p/50Hz. z The display size is plugged into the socket firmly. z Check the signal status by pressing the control. z Check the output format of the panel heat up. Check list z Check if the Power Cord is fixed at all the cables of the television. z Check if the TV/AV mode has been selected correctly. z Press button to "Connecting Procedure" and "Recommended Signal List".) Page 14 , 19 35 14...
.../60Hz, or 720p/50Hz. z The display size is plugged into the socket firmly. z Check the signal status by pressing the control. z Check the output format of the panel heat up. Check list z Check if the Power Cord is fixed at all the cables of the television. z Check if the TV/AV mode has been selected correctly. z Press button to "Connecting Procedure" and "Recommended Signal List".) Page 14 , 19 35 14...

Owners Guide
Page 39
ENGLISH PRODUCT SPECIFICATIONS SPECIFICATION Panel Display dimensions Resolution Net dimensions Net weight Ambient conditions Temperature Relative Humidity 26LD9000TA Approx. 26 inches (576 (H) ×324 (V)mm, diagonal 660.5mm) 32LD9000TA Approx. 32inches (698 (H) x 392 (V) mm, diagonal 801mm) 1366 (H) x 768 (V) pixels 1366 (H) x 768 (V) pixels including Stand: 664(W)x508(H)x262(D) mm excluding Stand: 664(W)x471(H)x118.5(D) mm including Stand:14kg excluding Stand:12.5kg including Stand: 790(W)x585.5(H)x308...
ENGLISH PRODUCT SPECIFICATIONS SPECIFICATION Panel Display dimensions Resolution Net dimensions Net weight Ambient conditions Temperature Relative Humidity 26LD9000TA Approx. 26 inches (576 (H) ×324 (V)mm, diagonal 660.5mm) 32LD9000TA Approx. 32inches (698 (H) x 392 (V) mm, diagonal 801mm) 1366 (H) x 768 (V) pixels 1366 (H) x 768 (V) pixels including Stand: 664(W)x508(H)x262(D) mm excluding Stand: 664(W)x471(H)x118.5(D) mm including Stand:14kg excluding Stand:12.5kg including Stand: 790(W)x585.5(H)x308...


