User Manual
Page 1
LCD TELEVISION Operating Guide for energy efficiency. 0 has determined that this product meets the ENERGY STAR® guidelines for 32HDL52A/37HDL52A IMPORTANT SAFETY INSTRUCTIONS 1- 6 ACCESSORIES...7 HOW TO SETUP YOUR NEW HITACHI LCD TELEVISION 8 - 27 HOW TO USE REMOTE CONTROL TO CONTROL YOUR LCD TV 28 - 32 ON-SCREEN DISPLAY...33 - 39 DTV USAGE...40 - 44 USEFUL INFORMATION ...45 - 52 As an ENERGY STAR® Partner, Hitachi, Ltd.
LCD TELEVISION Operating Guide for energy efficiency. 0 has determined that this product meets the ENERGY STAR® guidelines for 32HDL52A/37HDL52A IMPORTANT SAFETY INSTRUCTIONS 1- 6 ACCESSORIES...7 HOW TO SETUP YOUR NEW HITACHI LCD TELEVISION 8 - 27 HOW TO USE REMOTE CONTROL TO CONTROL YOUR LCD TV 28 - 32 ON-SCREEN DISPLAY...33 - 39 DTV USAGE...40 - 44 USEFUL INFORMATION ...45 - 52 As an ENERGY STAR® Partner, Hitachi, Ltd.
User Manual
Page 5
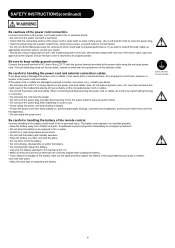
... or cables, do not place a spread, cover, etc, over them because this LCD TV with a wet hand. • Check that the connecting portion of the remote control. If the liquid adheres your body or clothes, rinse well with your dealer. • Do not place the LCD TV or heavy objects on...
... or cables, do not place a spread, cover, etc, over them because this LCD TV with a wet hand. • Check that the connecting portion of the remote control. If the liquid adheres your body or clothes, rinse well with your dealer. • Do not place the LCD TV or heavy objects on...

User Manual
Page 6
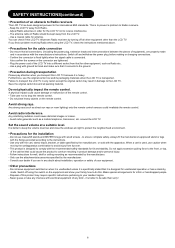
... adverse influence on the LCD TV and other parts, and could result in transformation, melting or fire. • Do not place the LCD TV, the remote control and other place where there is oil, smoke or humidity. Please use . Relax your eyes may become tired. Tips to clean the cabinet and...
... adverse influence on the LCD TV and other parts, and could result in transformation, melting or fire. • Do not place the LCD TV, the remote control and other place where there is oil, smoke or humidity. Please use . Relax your eyes may become tired. Tips to clean the cabinet and...
User Manual
Page 7
... operation or has a stand-by turning off and withdraw the power plug before making or changing connections. - Also confirm the screws on the remote control. A physical impact could cause damage or malfunction of equipment), are tightened. - Any interfering radiation could cause distorted images or noises. &#... is used, use makeshift stands and NEVER fix legs with the fixings provided according to the instructions. - Do not physically impact the remote control. It is better to be kept away from tip-over. - Only use the original carton box and its packaging materials when...
... operation or has a stand-by turning off and withdraw the power plug before making or changing connections. - Also confirm the screws on the remote control. A physical impact could cause damage or malfunction of equipment), are tightened. - Any interfering radiation could cause distorted images or noises. &#... is used, use makeshift stands and NEVER fix legs with the fixings provided according to the instructions. - Do not physically impact the remote control. It is better to be kept away from tip-over. - Only use the original carton box and its packaging materials when...

User Manual
Page 8
...is designed for a maximum tilting angle of explosion if battery is not recommended. Warranty Card 10.Cleaning Cloth 11.Cable Tie REMOTE CONTROL BATTERY INSTALLATION AND REPLACEMENT 1. Match the batteries to make sure you have the following accessories before disposing of the cover with... for the front glass panel. Mounting the panel on the ceiling does not provide adequate ventilation for the electronics or proper support for the remote control. Two "AAA" size, 1.5V batteries 7. Replace with your fingers and pulling the cover off. 2. Power Cord 3. Easy Graphic...
...is designed for a maximum tilting angle of explosion if battery is not recommended. Warranty Card 10.Cleaning Cloth 11.Cable Tie REMOTE CONTROL BATTERY INSTALLATION AND REPLACEMENT 1. Match the batteries to make sure you have the following accessories before disposing of the cover with... for the front glass panel. Mounting the panel on the ceiling does not provide adequate ventilation for the electronics or proper support for the remote control. Two "AAA" size, 1.5V batteries 7. Replace with your fingers and pulling the cover off. 2. Power Cord 3. Easy Graphic...
User Manual
Page 13
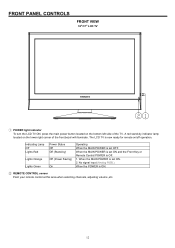
The LCD TV is now ready for remote on the lower right corner of the TV. Indicating Lamp Off Lights Red Lights Orange Lights Green Power.... 2. A red stand-by ) Off (Power Saving) On Operating When the MAIN POWER is set ON and the Front Key or Remote Control POWER is set OFF. FRONT PANEL CONTROLS FRONT VIEW 32"/37" LCD TV ① POWER light indicator To turn the LCD TV... front bezel will illuminate. When the MAIN POWER is Off. 1. When the MAIN POWER is ON. ② REMOTE CONTROL sensor Point your remote control at this area when selecting channels, adjusting volume ,etc. 12
The LCD TV is now ready for remote on the lower right corner of the TV. Indicating Lamp Off Lights Red Lights Orange Lights Green Power.... 2. A red stand-by ) Off (Power Saving) On Operating When the MAIN POWER is set ON and the Front Key or Remote Control POWER is set OFF. FRONT PANEL CONTROLS FRONT VIEW 32"/37" LCD TV ① POWER light indicator To turn the LCD TV... front bezel will illuminate. When the MAIN POWER is Off. 1. When the MAIN POWER is ON. ② REMOTE CONTROL sensor Point your remote control at this area when selecting channels, adjusting volume ,etc. 12

User Manual
Page 14
... This button also serves as the EXIT button when in MENU mode. ⑥ INPUT/EXIT button Press this button to your preference without using the remote. English SIDE PANEL CONTROLS SIDE VIEW 32"/37" LCD TV ③ ④ ⑤ ⑥ ⑦ ③ POWER button This power button is for power on...
... This button also serves as the EXIT button when in MENU mode. ⑥ INPUT/EXIT button Press this button to your preference without using the remote. English SIDE PANEL CONTROLS SIDE VIEW 32"/37" LCD TV ③ ④ ⑤ ⑥ ⑦ ③ POWER button This power button is for power on...

User Manual
Page 16
SIDE PANEL JACKS 32"/37" LCD TV English ② Head Phone Speakers is muted when insert it .To control volume: press volume button +, -. ③ S-VIDEO ( VIDEO 4) Provide S-VIDEO (Super Video) jacks for connecting equipment with S-VIDEO output capability ④ VIDEO (VIDEO 4) By using the VIDEO button of the remote control, you can select VIDEO 4.Use the video inputs to connect external devices, such as camcorders. ⑤ L / MONO / R (VIDEO 4) Connect audio of external devices.(if you have mono sound, insert the audio cable into the left (L) audio jack. 15
SIDE PANEL JACKS 32"/37" LCD TV English ② Head Phone Speakers is muted when insert it .To control volume: press volume button +, -. ③ S-VIDEO ( VIDEO 4) Provide S-VIDEO (Super Video) jacks for connecting equipment with S-VIDEO output capability ④ VIDEO (VIDEO 4) By using the VIDEO button of the remote control, you can select VIDEO 4.Use the video inputs to connect external devices, such as camcorders. ⑤ L / MONO / R (VIDEO 4) Connect audio of external devices.(if you have mono sound, insert the audio cable into the left (L) audio jack. 15

User Manual
Page 17
... using the VIDEO button of HDMI Licensing LLC. Only DTV formats such as 1080i, 720p, 480i and 480p are trademarks or registered trademarks of the remote control, you can select VIDEO3. Because digital television (DTV) signals remain in a single cable. REAR PANEL JACKS 32"/37" LCD TV ⑥ HDMI - NOTES...
... using the VIDEO button of HDMI Licensing LLC. Only DTV formats such as 1080i, 720p, 480i and 480p are trademarks or registered trademarks of the remote control, you can select VIDEO3. Because digital television (DTV) signals remain in a single cable. REAR PANEL JACKS 32"/37" LCD TV ⑥ HDMI - NOTES...
User Manual
Page 19
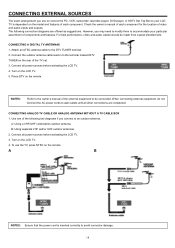
Connect the outdoor antenna cable lead-in to an outdoor antenna. Turn on the remote. Press DTV on the LCD TV. 5. Use one of the following connection diagrams are completed. To use to connect the PC, VCR, camcorder, laserdisc player, ... outdoor antennas. 2. Connect all power sources before activating the LCD TV. 3. CONNECTING EXTERNAL SOURCES The exact arrangement you use the TV, press NTSC on the remote. The following two diagrams if you connect to the terminal marked DTV TUNER on the rear of the TV set. 3. CONNECTING A DIGITAL TV ANTENNAS 1. Connect...
Connect the outdoor antenna cable lead-in to an outdoor antenna. Turn on the remote. Press DTV on the LCD TV. 5. Use one of the following connection diagrams are completed. To use to connect the PC, VCR, camcorder, laserdisc player, ... outdoor antennas. 2. Connect all power sources before activating the LCD TV. 3. CONNECTING EXTERNAL SOURCES The exact arrangement you use the TV, press NTSC on the remote. The following two diagrams if you connect to the terminal marked DTV TUNER on the rear of the TV set. 3. CONNECTING A DIGITAL TV ANTENNAS 1. Connect...
User Manual
Page 28
... previous OSD menu when the OSD menu opening. 27 Press to return previous TV channel state in standard TV mode. B. English HOW TO USE THE REMOTE CONTROL TO CONTROL YOUR LCD TV 5 6 7 8 9 10 11 12 14 15 18 19 20 26 25 23 1 1 2 2 3 3 4 4 13 13 16 16 17 17 27 27...
... previous OSD menu when the OSD menu opening. 27 Press to return previous TV channel state in standard TV mode. B. English HOW TO USE THE REMOTE CONTROL TO CONTROL YOUR LCD TV 5 6 7 8 9 10 11 12 14 15 18 19 20 26 25 23 1 1 2 2 3 3 4 4 13 13 16 16 17 17 27 27...

User Manual
Page 29
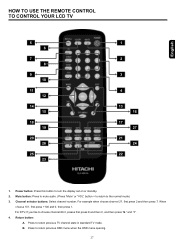
... or HDMI mode. 8. DTV Menu: Turn on selected display window by using these buttons; FAV.CH: Switch to set or adjusted by pressing remote control source keys. Mode button: Select picture status, there are placed to the left and press "►" button to select the desired channel. ...Mode: Channel Banner, time, Closed Caption status, and resolution Mode. 19. Note: Use this aspect mode to display conventional (4:3) sources by pressing remote control source keys. Freeze button: Pause the image in order to fill it to toward desired direction and press the SEL button to select. (...
... or HDMI mode. 8. DTV Menu: Turn on selected display window by using these buttons; FAV.CH: Switch to set or adjusted by pressing remote control source keys. Mode button: Select picture status, there are placed to the left and press "►" button to select the desired channel. ...Mode: Channel Banner, time, Closed Caption status, and resolution Mode. 19. Note: Use this aspect mode to display conventional (4:3) sources by pressing remote control source keys. Freeze button: Pause the image in order to fill it to toward desired direction and press the SEL button to select. (...
User Manual
Page 30
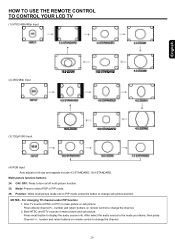
...to change the channel. 29 After select the audio source to the mode you desire, then press Channel +/-, number and return buttons on remote control to turn on remote control to full size and aspects include 4:3 STANDARD, 16:9 STANDARD. Mode: Press to display the audio source info. Multi picture function...source (NTSC or DTV) in main picture and sub picture: Press recall button to select POP or PIP mode. 26. English HOW TO USE THE REMOTE CONTROL TO CONTROL YOUR LCD TV (1) NTSC/480i/480p Input (2) 480i/480p Input (3) 720p/1080i Input (4) RGB Input Auto adjust to change the channel...
...to change the channel. 29 After select the audio source to the mode you desire, then press Channel +/-, number and return buttons on remote control to turn on remote control to full size and aspects include 4:3 STANDARD, 16:9 STANDARD. Mode: Press to display the audio source info. Multi picture function...source (NTSC or DTV) in main picture and sub picture: Press recall button to select POP or PIP mode. 26. English HOW TO USE THE REMOTE CONTROL TO CONTROL YOUR LCD TV (1) NTSC/480i/480p Input (2) 480i/480p Input (3) 720p/1080i Input (4) RGB Input Auto adjust to change the channel...

User Manual
Page 31
...; × PIP Mode Main(Large)-picture and Sub(Small)- picture source selection table: Please note Main(Left)-picture and Sub(Right)- HOW TO USE THE REMOTE CONTROL TO CONTROL YOUR LCD TV POP Mode Main-picture and Sub- picture source selection table: Sub(Small) Main(Large) NTSC TUNER DTV TUNER VIDEO1...
...; × PIP Mode Main(Large)-picture and Sub(Small)- picture source selection table: Please note Main(Left)-picture and Sub(Right)- HOW TO USE THE REMOTE CONTROL TO CONTROL YOUR LCD TV POP Mode Main-picture and Sub- picture source selection table: Sub(Small) Main(Large) NTSC TUNER DTV TUNER VIDEO1...

User Manual
Page 32
... pressing direction button Press left and press right button to the TV while operating the swivel function. The rotation will stop manipulating remote in households where children are two different type of using the swivel function. Do not swing the TV back and forth and around...either. Use special caution in 15 seconds. 2. It would not operate correctly. English 27. Press swivel button After pressing swivel button on the remote, OSD indicator will disappear, if stop if the direction button is ± 30 degree. 3. The OSD indicator will display on the stable ...
... pressing direction button Press left and press right button to the TV while operating the swivel function. The rotation will stop manipulating remote in households where children are two different type of using the swivel function. Do not swing the TV back and forth and around...either. Use special caution in 15 seconds. 2. It would not operate correctly. English 27. Press swivel button After pressing swivel button on the remote, OSD indicator will disappear, if stop if the direction button is ± 30 degree. 3. The OSD indicator will display on the stable ...
User Manual
Page 33
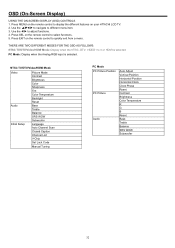
Use the W X to different menu item. 3. Press SEL on your HITACHI LCD TV. 2. NTSC TV/DTV/Video/HDMI Mode Video Audio Initial Setup Picture Mode Contrast Brightness Color Sharpness Tint Color Temperature Backlight Reset Bass ...Vertical Position Horizontal Position Horizontal Clock Clock Phase Reset Contrast Brightness Color Temperature R G B Reset Bass Treble Balance SRS WOW Subwoofer 32 Press MENU on the remote control to display the different features on the remote control to select functions. 5. Use the ▲▼W X to navigate to adjust functions. 4. Press EXIT on the...
Use the W X to different menu item. 3. Press SEL on your HITACHI LCD TV. 2. NTSC TV/DTV/Video/HDMI Mode Video Audio Initial Setup Picture Mode Contrast Brightness Color Sharpness Tint Color Temperature Backlight Reset Bass ...Vertical Position Horizontal Position Horizontal Clock Clock Phase Reset Contrast Brightness Color Temperature R G B Reset Bass Treble Balance SRS WOW Subwoofer 32 Press MENU on the remote control to display the different features on the remote control to select functions. 5. Use the ▲▼W X to navigate to adjust functions. 4. Press EXIT on the...
User Manual
Page 36
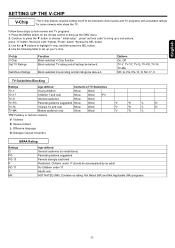
... be below it . Not Rated (NR) and Not Applicable (NA) programs. 35 English SETTING UP THE V-CHIP V-Chip The V-chip feature requires setting on the remote control to set up a lock picture. Use the following table to bring up your V-chip. Contains no restrictions) Parental guidance suggested Parents strongly cautioned Restricted...
... be below it . Not Rated (NR) and Not Applicable (NA) programs. 35 English SETTING UP THE V-CHIP V-Chip The V-chip feature requires setting on the remote control to set up a lock picture. Use the following table to bring up your V-chip. Contains no restrictions) Parental guidance suggested Parents strongly cautioned Restricted...
User Manual
Page 37
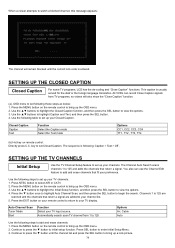
... to bring up the OSD menu. 2. This caption is following steps to add and erase channels: 1. Press the MENU button on the remote control to bring up the OSD menu. 2. The sequence is usually served for the deaf or the foreign language translation. Auto Channel Scan ... options. 4. OSD menu to initial setup function. Use the following table to set following steps to select AIR or CATV 2. Press the MENU button on remote control: Directly press C.C. Channels 1 to 125 are scanned and the channels that return a signal are added to your TV channels: 1. Continue to press the...
... to bring up the OSD menu. 2. This caption is following steps to add and erase channels: 1. Press the MENU button on the remote control to bring up the OSD menu. 2. The sequence is usually served for the deaf or the foreign language translation. Auto Channel Scan ... options. 4. OSD menu to initial setup function. Use the following table to set following steps to select AIR or CATV 2. Press the MENU button on remote control: Directly press C.C. Channels 1 to 125 are scanned and the channels that return a signal are added to your TV channels: 1. Continue to press the...

User Manual
Page 38
... , some of the channels may not be tuned correctly. Use the W X buttons to select channel number. 2. English 4. Press the EXIT button on your remote control to return to bring up the OSD menu. 3. Press channel selector button to fine tune the program. 6. Use the▲▼ W X buttons to... select a channel. 5. Use the ▲▼ buttons to highlight Add or Erase. Press the EXIT button on the remote control to your TV display. 37 Press the ▼ button once to highlight Manual Tuning, and then press the SEL button to show channel list...
... , some of the channels may not be tuned correctly. Use the W X buttons to select channel number. 2. English 4. Press the EXIT button on your remote control to return to bring up the OSD menu. 3. Press channel selector button to fine tune the program. 6. Use the▲▼ W X buttons to... select a channel. 5. Use the ▲▼ buttons to highlight Add or Erase. Press the EXIT button on the remote control to your TV display. 37 Press the ▼ button once to highlight Manual Tuning, and then press the SEL button to show channel list...
User Manual
Page 41
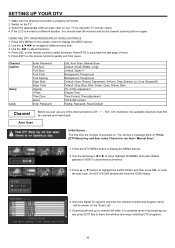
... available channels must first be shown on channel 69 when it is moved to different menu item. 3. Select the appropriate external video input on the remote control to jump back the last page of the channel buttons (CH+/-, FAV. Press SEL on your TV by using the TV... remote control. 4. If the LCD is complete (even in processing) you can press EXIT key to run Auto / Manual Scan". 1. Press DTV MENU on . Use the W X ...
... available channels must first be shown on channel 69 when it is moved to different menu item. 3. Select the appropriate external video input on the remote control to jump back the last page of the channel buttons (CH+/-, FAV. Press SEL on your TV by using the TV... remote control. 4. If the LCD is complete (even in processing) you can press EXIT key to run Auto / Manual Scan". 1. Press DTV MENU on . Use the W X ...


