Owners Guide
Page 2
... LCD Panel 8 FEATURES 9 SUPPLIED ACCESSORIES 9 COMPONENT NAMES 10 Main Unit 10 Remote Control 11 PREPARATION 12 Remote Control Batteries Installation 12 Caution When Moving the Main Unit 12 Safety Precaution on Main Unit Installation 13 Anti-Tumble Measures 13 CONNECTION 14 Terminal Positions 14 Connecting Procedure 14 BASIC OPERATION 19 POWER On/Off 19 Volume UP/DOWN 20 Mute 20 Input Switching to TV/AV1~4, HDMI, and RGB......... 21 Input Signal Screen Display...
... LCD Panel 8 FEATURES 9 SUPPLIED ACCESSORIES 9 COMPONENT NAMES 10 Main Unit 10 Remote Control 11 PREPARATION 12 Remote Control Batteries Installation 12 Caution When Moving the Main Unit 12 Safety Precaution on Main Unit Installation 13 Anti-Tumble Measures 13 CONNECTION 14 Terminal Positions 14 Connecting Procedure 14 BASIC OPERATION 19 POWER On/Off 19 Volume UP/DOWN 20 Mute 20 Input Switching to TV/AV1~4, HDMI, and RGB......... 21 Input Signal Screen Display...

Owners Guide
Page 3
... the following instructions when installing, operating, and cleaning the product. Keep this manual is a registered trademark of the Video Electronics Standard Association. Ɣ HDMI, the HDMI logo and High-Definition Multimedia Interface are trademarks or registered trademarks of this product. About This Manual Ɣ The information in this manual for future reference, and record the serial number of your set in part of...
... the following instructions when installing, operating, and cleaning the product. Keep this manual is a registered trademark of the Video Electronics Standard Association. Ɣ HDMI, the HDMI logo and High-Definition Multimedia Interface are trademarks or registered trademarks of this product. About This Manual Ɣ The information in this manual for future reference, and record the serial number of your set in part of...

Owners Guide
Page 4
... personal injuries and/or property damage. Serious problems such as metals or flammable items) inside the unit. Turn off the main power, unplug the Power Cord, and contact your property or this section. SAFETY PRECAUTIONS For your local dealer to perform servicing such as inspection, adjustment, or repair work. There are the symbols used in detail. (The figure on the...
... personal injuries and/or property damage. Serious problems such as metals or flammable items) inside the unit. Turn off the main power, unplug the Power Cord, and contact your property or this section. SAFETY PRECAUTIONS For your local dealer to perform servicing such as inspection, adjustment, or repair work. There are the symbols used in detail. (The figure on the...

Owners Guide
Page 6
... not use Power Cord adapter, be sure to connect the earth cable to the ground terminal. Supply connect the ground wire. „ Do not place the CRT-based television near the medical devices. Ɣ To prevent malfunction of the batteries may cause corrosion or battery leakage, which may shorten its service life. Ɣ Install the product in accordance with the instructions in this...
... not use Power Cord adapter, be sure to connect the earth cable to the ground terminal. Supply connect the ground wire. „ Do not place the CRT-based television near the medical devices. Ɣ To prevent malfunction of the batteries may cause corrosion or battery leakage, which may shorten its service life. Ɣ Install the product in accordance with the instructions in this...

Owners Guide
Page 7
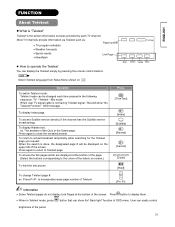
... Viewing Advice Ɣ The lighting of the environment in order not to receive the interference radio wave from the unit. Ɣ Keep the radio away from the television. Ɣ Use coaxial cable for your eyes. Ɣ Take time to...direction of the radio antenna in which the product is used should be transported due to clean the LCD panel of the television. Ɣ Wipe the panel with a soft and dry cloth. Ɣ Do not use a chemical cloth, cleaner or wax. Cleaning and Maintenance Please make sure to unplug the power cord before cleaning the television. „ How to moving or repair, use...
... Viewing Advice Ɣ The lighting of the environment in order not to receive the interference radio wave from the unit. Ɣ Keep the radio away from the television. Ɣ Use coaxial cable for your eyes. Ɣ Take time to...direction of the radio antenna in which the product is used should be transported due to clean the LCD panel of the television. Ɣ Wipe the panel with a soft and dry cloth. Ɣ Do not use a chemical cloth, cleaner or wax. Cleaning and Maintenance Please make sure to unplug the power cord before cleaning the television. „ How to moving or repair, use...
Owners Guide
Page 9
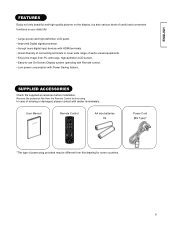
...! • Large-screen and high-definition LCD panel. • Improved Digital signal processor. • Accept more digital input devices with HDMI terminals. • Great diversity of connecting terminals to -use On-Screen Display system operating with Remote control. • Low power consumption with Power Saving feature. In case of power plug provided may be different from this drawing for some countries. 9 User Manual Remote Control AA size batteries X2 Power Cord (BS Type)* *The type of missing or...
...! • Large-screen and high-definition LCD panel. • Improved Digital signal processor. • Accept more digital input devices with HDMI terminals. • Great diversity of connecting terminals to -use On-Screen Display system operating with Remote control. • Low power consumption with Power Saving feature. In case of power plug provided may be different from this drawing for some countries. 9 User Manual Remote Control AA size batteries X2 Power Cord (BS Type)* *The type of missing or...

Owners Guide
Page 10
...Sub Power button 2. Menu button 3. Program DOWN/ T button 5. Main Power Switch (on the top. 5, 6 2 3 2 1 ! 1. Input/OK button ! 7 10 3, 4 1 Power Cord Socket 3. Control Panel (see below for details) Please refer to 14 ~ 18 for the detailed information for the connections. 26LD9000TA 4 32LD9000TA 4 3 2 1 ! Volume DOWN /ebutton 7. Program UP/ S button 4. Cabinet 1 2. Indicating Lamp 2 4. Side Input 2. COMPONENT NAMES Main Unit Front Panel 7 6! 1. Desktop Stand 7. Speaker 6. Control Panel These buttons are located on the left side) 3! 4 5 Rear...
...Sub Power button 2. Menu button 3. Program DOWN/ T button 5. Main Power Switch (on the top. 5, 6 2 3 2 1 ! 1. Input/OK button ! 7 10 3, 4 1 Power Cord Socket 3. Control Panel (see below for details) Please refer to 14 ~ 18 for the detailed information for the connections. 26LD9000TA 4 32LD9000TA 4 3 2 1 ! Volume DOWN /ebutton 7. Program UP/ S button 4. Cabinet 1 2. Indicating Lamp 2 4. Side Input 2. COMPONENT NAMES Main Unit Front Panel 7 6! 1. Desktop Stand 7. Speaker 6. Control Panel These buttons are located on the left side) 3! 4 5 Rear...
Owners Guide
Page 11
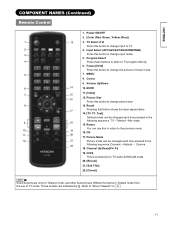
... to select a TV program directly. 6. ENGLISH COMPONENT NAMES (Continued) Remote Control 1. Volume Up/Down 6 14 10. CHI/II This is exclusively for Teletext mode, and other buttons have different functions in the 22 following sequence. Input Select (AV1/AV2/AV3/AV4/HDMI/RGB) 3 Press this button shows the input signal status. 14. [TV Γ Text] Teletext mode can use of TV mode. Power ON/OFF 2. [Color (Red, Green, Yellow, Blue)] 1 13 3. TVШTeletext...
... to select a TV program directly. 6. ENGLISH COMPONENT NAMES (Continued) Remote Control 1. Volume Up/Down 6 14 10. CHI/II This is exclusively for Teletext mode, and other buttons have different functions in the 22 following sequence. Input Select (AV1/AV2/AV3/AV4/HDMI/RGB) 3 Press this button shows the input signal status. 14. [TV Γ Text] Teletext mode can use of TV mode. Power ON/OFF 2. [Color (Red, Green, Yellow, Blue)] 1 13 3. TVШTeletext...

Owners Guide
Page 13
As for the installation instruction, please read each side of television and 30cm from each user manual of other mount units or improper installation. In case of using Wall or Ceiling Mounting unit, by use the specified mount units in this page. It could cause injuries or damages Please leave the adequate space around this television in the small space such as inside the...
As for the installation instruction, please read each side of television and 30cm from each user manual of other mount units or improper installation. In case of using Wall or Ceiling Mounting unit, by use the specified mount units in this page. It could cause injuries or damages Please leave the adequate space around this television in the small space such as inside the...
Owners Guide
Page 14
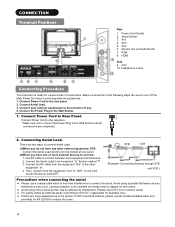
... LCD screen Socket on the screen. Ɣ Avoid using a parallel flat feeder wire as this may occur, causing reception to be unstable and stripe noise to the television if any other equipment "In". 4. AV1 4. RGB 8. Connect Power Cord to the television. * Make sure not to connect the Power Plug to the Wall Socket until all connections are two ways to connect: 1. Use RF cable to Rear Panel. Power Cord Socket 2. AV3 5. Then, connect...
... LCD screen Socket on the screen. Ɣ Avoid using a parallel flat feeder wire as this may occur, causing reception to be unstable and stripe noise to the television if any other equipment "In". 4. AV1 4. RGB 8. Connect Power Cord to the television. * Make sure not to connect the Power Plug to the Wall Socket until all connections are two ways to connect: 1. Use RF cable to Rear Panel. Power Cord Socket 2. AV3 5. Then, connect...

Owners Guide
Page 17
... are located on the rear panel. Moreover, those digital signals can be connected to the equipment with HDMI output. CONNECTION (continued) Connecting Procedure (continued) HDMI terminals can be connected to the devices with an S-Video output and composite output. (Example) VCR IN OUT Camcorder DVD Player Home video game system If your external device has a HDMI terminal, HDMI connection is recommended for higher quality picture. 17 ENGLISH (Example) VCR IN OUT DVD player Set-Top Box Information HDMI(High...
... are located on the rear panel. Moreover, those digital signals can be connected to the equipment with HDMI output. CONNECTION (continued) Connecting Procedure (continued) HDMI terminals can be connected to the devices with an S-Video output and composite output. (Example) VCR IN OUT Camcorder DVD Player Home video game system If your external device has a HDMI terminal, HDMI connection is recommended for higher quality picture. 17 ENGLISH (Example) VCR IN OUT DVD player Set-Top Box Information HDMI(High...

Owners Guide
Page 18
.... CONNECTION (continued) Connecting Procedure (continued) Headphone The detail settings can be adjusted from Audio Menu on page 29 . (Mini Stereo Plug) The audio from this drawing for efficiency protection. Information Ɣ How to secure the cable After connecting all other than that meets your region's safety standard. When you have to change the power cord, please use a power supply voltage other connections. (The type of power cord are easily accessible. Ɣ...
.... CONNECTION (continued) Connecting Procedure (continued) Headphone The detail settings can be adjusted from Audio Menu on page 29 . (Mini Stereo Plug) The audio from this drawing for efficiency protection. Information Ɣ How to secure the cable After connecting all other than that meets your region's safety standard. When you have to change the power cord, please use a power supply voltage other connections. (The type of power cord are easily accessible. Ɣ...

Owners Guide
Page 19
... turn Off the power of the television: 1. Make sure that the Power Cord has plugged into Red (Standby mode). 2. Indicating Lamp Sub Power button Ɣ To turn On the power of time. It could cause malfunction. Ɣ To avoid sudden surges of electricity when the power comes back on the remote control. Ɣ The image disappears from the screen and the Indicating Lamp turns into the wall socket. It may help...
... turn Off the power of the television: 1. Make sure that the Power Cord has plugged into Red (Standby mode). 2. Indicating Lamp Sub Power button Ɣ To turn On the power of time. It could cause malfunction. Ɣ To avoid sudden surges of electricity when the power comes back on the remote control. Ɣ The image disappears from the screen and the Indicating Lamp turns into the wall socket. It may help...
Owners Guide
Page 23
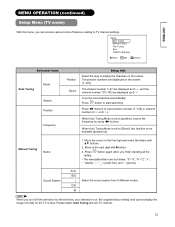
... displayed on the screen. OK !button to input position number (1~125) or channel number (C or Z ). Manual Tuning Name 1. Setup Auto Tuning Manual Tuning Fine Tuning Sort Teletext Language Select OK Set Return ! When Auto Tuning Mode is set to [Direct], this menu, you turn ON the television for the first time, your television is at "the original factory setting" and cannot display the image normally on the TV screen. Move the cursor to TV channel settings. Sound System Auto B/G I D/K M Select the sound...
... displayed on the screen. OK !button to input position number (1~125) or channel number (C or Z ). Manual Tuning Name 1. Setup Auto Tuning Manual Tuning Fine Tuning Sort Teletext Language Select OK Set Return ! When Auto Tuning Mode is set to [Direct], this menu, you turn ON the television for the first time, your television is at "the original factory setting" and cannot display the image normally on the TV screen. Move the cursor to TV channel settings. Sound System Auto B/G I D/K M Select the sound...

Owners Guide
Page 25
... the signal, there is inputting from the RGB terminals. The message "Auto Adjusting" is displayed. • Depending on the type of the letters and stripes on horizontal row. • Make sure to adjust the horizontal and vertical display positions. 0~100 0~63 Minimize the vertical stripes on the signal mode. 25 Setup Auto Adjust Image Position Horizontal Clock Clock Phase Reset Select ŻŹSet Ź...
... the signal, there is inputting from the RGB terminals. The message "Auto Adjusting" is displayed. • Depending on the type of the letters and stripes on horizontal row. • Make sure to adjust the horizontal and vertical display positions. 0~100 0~63 Minimize the vertical stripes on the signal mode. 25 Setup Auto Adjust Image Position Horizontal Clock Clock Phase Reset Select ŻŹSet Ź...
Owners Guide
Page 26
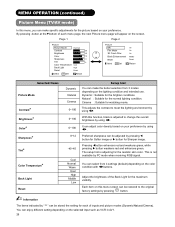
... X button weakens red and enhances green. Each item on this menu screen can adjust color density based on your preference by pressing W button for Softer image or X button for the picture based on your preference. You can make the better selection from 4 settings (default) depending on the color condition with WXbuttons. Adjust the brightness of inputs and picture modes (Dynamic/Natural/Cinema). It can be restored to meet the lighting...
... X button weakens red and enhances green. Each item on this menu screen can adjust color density based on your preference by pressing W button for Softer image or X button for the picture based on your preference. You can make the better selection from 4 settings (default) depending on the color condition with WXbuttons. Adjust the brightness of inputs and picture modes (Dynamic/Natural/Cinema). It can be restored to meet the lighting...
Owners Guide
Page 31
... by pressing the remote control buttons. TVШTeletextШMix mode When user TV signal cable is not having Teletext signal. To access Subtitle service directly (if the channel has the Subtitle service broadcasting). Most TV channels provide information via Teletext such as: z TV program schedule z Weather forecasts z Sports results z Newsflash Page number Link Page z How to the colors of OSD menu. To display Hidden text. The answers of the screen. Press again...
... by pressing the remote control buttons. TVШTeletextШMix mode When user TV signal cable is not having Teletext signal. To access Subtitle service directly (if the channel has the Subtitle service broadcasting). Most TV channels provide information via Teletext such as: z TV program schedule z Weather forecasts z Sports results z Newsflash Page number Link Page z How to the colors of OSD menu. To display Hidden text. The answers of the screen. Press again...
Owners Guide
Page 36
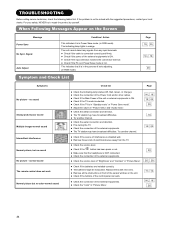
... power of the sensor window on the Screen Message Power Save No Sync. z Check if the input selection matches the connection terminal. z Adjust the values in front of the external equipments is shielded well. z Check the connection of the Power Cord and/or other cables. z Check if the source of the control panel can work . z Check if the batteries are installed correctly. z Remove all the obstructions in "Picture menu" and "Audio menu...
... power of the sensor window on the Screen Message Power Save No Sync. z Check if the input selection matches the connection terminal. z Adjust the values in front of the external equipments is shielded well. z Check the connection of the Power Cord and/or other cables. z Check if the source of the control panel can work . z Check if the batteries are installed correctly. z Remove all the obstructions in "Picture menu" and "Audio menu...

Owners Guide
Page 37
... you use the unit for a while. z Image cannot be displayed in "Power Save mode". z Press button to "Power Save mode" and "When following messages appears on the remote z Check if the cables are connected correctly. z The display size is fixed at all the cables of the external equipments are 1080i/60Hz, 1080i/50Hz, 720p/60Hz, or 720p/50Hz. button on the screen" z Check if the signal cable is connected correctly...
... you use the unit for a while. z Image cannot be displayed in "Power Save mode". z Press button to "Power Save mode" and "When following messages appears on the remote z Check if the cables are connected correctly. z The display size is fixed at all the cables of the external equipments are 1080i/60Hz, 1080i/50Hz, 720p/60Hz, or 720p/50Hz. button on the screen" z Check if the signal cable is connected correctly...

Owners Guide
Page 39
ENGLISH PRODUCT SPECIFICATIONS SPECIFICATION Panel Display dimensions Resolution Net dimensions Net weight Ambient conditions Temperature Relative Humidity 26LD9000TA Approx. 26 inches (576 (H) ×324 (V)mm, diagonal 660.5mm) 32LD9000TA Approx. 32inches (698 (H) x 392 (V) mm, diagonal 801mm) 1366 (H) x 768 (V) pixels 1366 (H) x 768 (V) pixels including Stand: 664(W)x508(H)x262(D) mm excluding Stand: 664(W)x471(H)x118.5(D) mm including Stand:14kg excluding Stand:12.5kg including Stand: 790(W)x585.5(H)x308...
ENGLISH PRODUCT SPECIFICATIONS SPECIFICATION Panel Display dimensions Resolution Net dimensions Net weight Ambient conditions Temperature Relative Humidity 26LD9000TA Approx. 26 inches (576 (H) ×324 (V)mm, diagonal 660.5mm) 32LD9000TA Approx. 32inches (698 (H) x 392 (V) mm, diagonal 801mm) 1366 (H) x 768 (V) pixels 1366 (H) x 768 (V) pixels including Stand: 664(W)x508(H)x262(D) mm excluding Stand: 664(W)x471(H)x118.5(D) mm including Stand:14kg excluding Stand:12.5kg including Stand: 790(W)x585.5(H)x308...


