Warranty Guide
Page 2
... parts & labor warranty HP Digital Projector Lamp Module (included with the projector) 90 days Limited hardware warranty HP Digital Projector Lamp Module (purchased separately) 90 days Limited hardware warranty HP Digital Projector Cables, Remote Control, and other parts (included with the projector) Same period as projector Limited hardware warranty HP Digital Projector Cables, Remote Control, and other parts (purchased separately) 1 year Limited hardware warranty HP Digital Projector Limited Warranty Statement...
... parts & labor warranty HP Digital Projector Lamp Module (included with the projector) 90 days Limited hardware warranty HP Digital Projector Lamp Module (purchased separately) 90 days Limited hardware warranty HP Digital Projector Cables, Remote Control, and other parts (included with the projector) Same period as projector Limited hardware warranty HP Digital Projector Cables, Remote Control, and other parts (purchased separately) 1 year Limited hardware warranty HP Digital Projector Limited Warranty Statement...
User Guide
Page 3
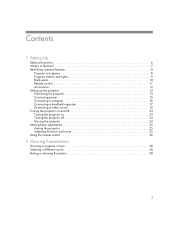
... Connecting a handheld organizer 17 Connecting a video source 18 Turning the projector on and off 23 Turning the projector on 23 Turning the projector off 24 Moving the projector 24 Making basic adjustments 25 Aiming the projector 25 Adjusting the focus and zoom 25 Using the remote control 26 2 Showing Presentations Showing a computer screen 28 Selecting a different...
... Connecting a handheld organizer 17 Connecting a video source 18 Turning the projector on and off 23 Turning the projector on 23 Turning the projector off 24 Moving the projector 24 Making basic adjustments 25 Aiming the projector 25 Adjusting the focus and zoom 25 Using the remote control 26 2 Showing Presentations Showing a computer screen 28 Selecting a different...

User Guide
Page 4
... Source menu 38 Help menu 38 4 Maintaining the Projector Performing routine maintenance 39 Getting the projector status 39 Cleaning the projector lens 39 Replacing the lamp module 40 Replacing the battery in the remote control 42 Upgrading the projector 43 Updating the firmware 43 5 Installing Permanently Installing the projector 44 Choosing cables 44 Installing on a table...
... Source menu 38 Help menu 38 4 Maintaining the Projector Performing routine maintenance 39 Getting the projector status 39 Cleaning the projector lens 39 Replacing the lamp module 40 Replacing the battery in the remote control 42 Upgrading the projector 43 Updating the firmware 43 5 Installing Permanently Installing the projector 44 Choosing cables 44 Installing on a table...
User Guide
Page 5
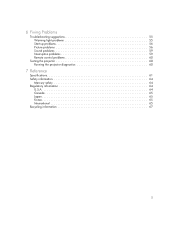
6 Fixing Problems Troubleshooting suggestions 55 Warning light problems 55 Start-up problems 56 Picture problems 56 Sound problems 59 Interruption problems 59 Remote control problems 60 Testing the projector 60 Running the projector diagnostics 60 7 Reference Specifications 61 Safety information 64 Mercury safety 64 Regulatory information 64 U.S.A 64 Canada 65 Japan 65 Korea 65 International 65 Recycling information 67 5
6 Fixing Problems Troubleshooting suggestions 55 Warning light problems 55 Start-up problems 56 Picture problems 56 Sound problems 59 Interruption problems 59 Remote control problems 60 Testing the projector 60 Running the projector diagnostics 60 7 Reference Specifications 61 Safety information 64 Mercury safety 64 Regulatory information 64 U.S.A 64 Canada 65 Japan 65 Korea 65 International 65 Recycling information 67 5
User Guide
Page 7
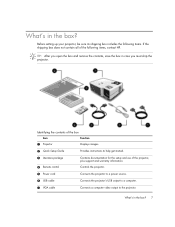
... and warranty information. Controls the projector. 5 Power cord Connects the projector to a power source. 6 USB cable Connects the projector's USB output to a computer. 7 VGA cable Connects a computer video output to help get started. 3 Literature package 4 Remote control Contains documentation for the setup and use of the following items, contact HP. What's in the box? 7 TIP...
... and warranty information. Controls the projector. 5 Power cord Connects the projector to a power source. 6 USB cable Connects the projector's USB output to a computer. 7 VGA cable Connects a computer video output to help get started. 3 Literature package 4 Remote control Contains documentation for the setup and use of the following items, contact HP. What's in the box? 7 TIP...
User Guide
Page 8
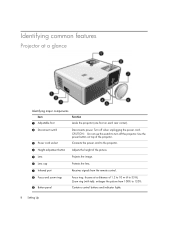
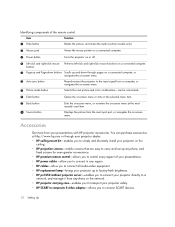
... off when unplugging the power cord. Zoom ring (with tab): enlarges the picture from the remote control. 8 Focus and zoom rings 9 Button panel Focus ring: focuses at a glance Identifying major components Item Function 1 Adjustable foot Levels the projector (one foot on top of 1.2 to 10 m (4 to 33 ft). Contains control buttons and...
... off when unplugging the power cord. Zoom ring (with tab): enlarges the picture from the remote control. 8 Focus and zoom rings 9 Button panel Focus ring: focuses at a glance Identifying major components Item Function 1 Adjustable foot Levels the projector (one foot on top of 1.2 to 10 m (4 to 33 ft). Contains control buttons and...
User Guide
Page 10
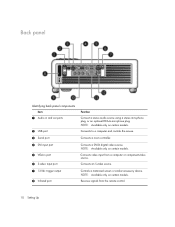
Connects a DVI-D digital video source. NOTE: Available only on certain models. Connects a room controller. Connects an S-video source. Receives signals from a computer or component-video source. Controls a motorized ... Function Connect a stereo audio source using a stereo mini-phone plug, or an optional RCA-to a computer and controls the mouse. Connects video input from the remote control. 10 Setting Up Connects to -mini-phone plug. NOTE: Available only on certain models.
Connects a DVI-D digital video source. NOTE: Available only on certain models. Connects a room controller. Connects an S-video source. Receives signals from a computer or component-video source. Controls a motorized ... Function Connect a stereo audio source using a stereo mini-phone plug, or an optional RCA-to a computer and controls the mouse. Connects video input from the remote control. 10 Setting Up Connects to -mini-phone plug. NOTE: Available only on certain models.
User Guide
Page 11
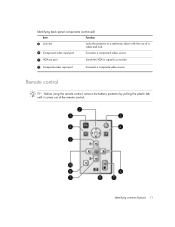
Remote control TIP: Before using the remote control, remove the battery protector by pulling the plastic tab until it comes out of a cable and lock. : Component video input port Connects a component video source. ; Identifying common features 11 Identifying back panel components (continued) Item Function 9 Lock slot Locks the projector to a monitor. < Composite-video input port Connects a composite-video source. VGA-out port Sends the VGA-in signal to a stationary object with the use of the remote control.
Remote control TIP: Before using the remote control, remove the battery protector by pulling the plastic tab until it comes out of a cable and lock. : Component video input port Connects a component video source. ; Identifying common features 11 Identifying back panel components (continued) Item Function 9 Lock slot Locks the projector to a monitor. < Composite-video input port Connects a composite-video source. VGA-out port Sends the VGA-in signal to a stationary object with the use of the remote control.
User Guide
Page 12
... your projector dealer. • HP ceiling mount kit-enables you to simply and discreetly install your projector on the ceiling. • HP projection screens-mobile screens that are easy to carry and set up anywhere, and fixed screens for even greater convenience. • HP premium remote control...-allows you to control every aspect of the remote control Item Function ...
... your projector dealer. • HP ceiling mount kit-enables you to simply and discreetly install your projector on the ceiling. • HP projection screens-mobile screens that are easy to carry and set up anywhere, and fixed screens for even greater convenience. • HP premium remote control...-allows you to control every aspect of the remote control Item Function ...

User Guide
Page 16
... screen" on the computer's VGA output. TIP: If the computer display does not appear on the projector, you might have to press a combination of keys on the computer to use the mouse and page up/down features on the remote control. For instructions, refer to the VGA-in port-even if the... projector is turned off or showing a different input. 16 Setting Up For example, on the projector. TIP: You can connect an external computer monitor to the VGA-out...
... screen" on the computer's VGA output. TIP: If the computer display does not appear on the projector, you might have to press a combination of keys on the computer to use the mouse and page up/down features on the remote control. For instructions, refer to the VGA-in port-even if the... projector is turned off or showing a different input. 16 Setting Up For example, on the projector. TIP: You can connect an external computer monitor to the VGA-out...
User Guide
Page 23
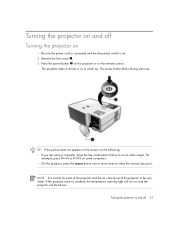
...the screen, try the following: • If you are using a computer, press the key combination that turns on the remote control. Press the power button 2 on the projector or on its video output. Be sure the power cord is connected and the disconnect switch is normal for parts of ...the projector and the air coming out of the projector to overheat, the temperature warning light will turn on 1. Turning the projector on and off Turning the projector on and the projector will shut down. The power button blinks during warm-up ....
...the screen, try the following: • If you are using a computer, press the key combination that turns on the remote control. Press the power button 2 on the projector or on its video output. Be sure the power cord is connected and the disconnect switch is normal for parts of ...the projector and the air coming out of the projector to overheat, the temperature warning light will turn on 1. Turning the projector on and off Turning the projector on and the projector will shut down. The power button blinks during warm-up ....

User Guide
Page 24
... or padded container when possible. • Observe temperature and humidity limits (see "Specifications" on the projector or remote control to avoid condensation. 24 Setting Up If the projector is off, it to warm gradually to turn on the projector again during the cool-down (the fan stops) and the power button stops blinking. Do...
... or padded container when possible. • Observe temperature and humidity limits (see "Specifications" on the projector or remote control to avoid condensation. 24 Setting Up If the projector is off, it to warm gradually to turn on the projector again during the cool-down (the fan stops) and the power button stops blinking. Do...
User Guide
Page 26
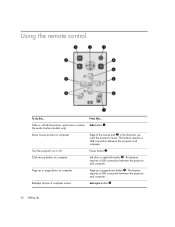
... computer. Hide or unhide the picture, and mute or unmute the audio (certain models only) Move mouse pointer on computer Turn the projector on or off Click mouse button on computer Page up or page-down on computer Readjust picture of the mouse pad 2 in the direction ...you want the pointer to move. auto sync button 6. 26 Setting Up Using the remote control To do this ... Edge of computer screen Press this ... Left-click or right-click button 4. hide button 1. Power button 3. This feature requires a USB ...
... computer. Hide or unhide the picture, and mute or unmute the audio (certain models only) Move mouse pointer on computer Turn the projector on or off Click mouse button on computer Page up or page-down on computer Readjust picture of the mouse pad 2 in the direction ...you want the pointer to move. auto sync button 6. 26 Setting Up Using the remote control To do this ... Edge of computer screen Press this ... Left-click or right-click button 4. hide button 1. Power button 3. This feature requires a USB ...
User Guide
Page 27
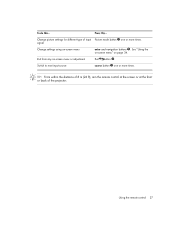
Change picture settings for different type of the projector. Switch to next input source source button 9 one or more times. signal Change settings using on -screen menu or adjustment Exit button 8. TIP: From within the distance of 8 m (26 ft), aim the remote control at the screen or at the front or back of input Picture mode button 7 one or more times. Using the remote control 27 To do this ... Exit from any on -screen menu enter and navigation buttons 8. See "Using the on-screen menu" on page 34. Press this ...
Change picture settings for different type of the projector. Switch to next input source source button 9 one or more times. signal Change settings using on -screen menu or adjustment Exit button 8. TIP: From within the distance of 8 m (26 ft), aim the remote control at the screen or at the front or back of input Picture mode button 7 one or more times. Using the remote control 27 To do this ... Exit from any on -screen menu enter and navigation buttons 8. See "Using the on-screen menu" on page 34. Press this ...
User Guide
Page 28
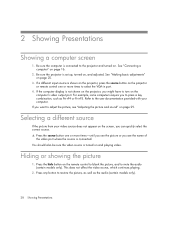
..., and adjusted. This does not affect the video source, which continues playing. 2. If a different input source is set up, turned on the projector or remote control one or more times to select the VGA-in port. 4. If the computer display is turned on page 25. 3. For example, some ...models only). 28 Showing Presentations Be sure the computer is connected. Press the hide button on page 16. 2. See "Connecting a computer" on the remote control to blank the picture, and to adjust the picture, see the picture or you want to mute the audio (certain models only). S Press...
..., and adjusted. This does not affect the video source, which continues playing. 2. If a different input source is set up, turned on the projector or remote control one or more times to select the VGA-in port. 4. If the computer display is turned on page 25. 3. For example, some ...models only). 28 Showing Presentations Be sure the computer is connected. Press the hide button on page 16. 2. See "Connecting a computer" on the remote control to blank the picture, and to adjust the picture, see the picture or you want to mute the audio (certain models only). S Press...

User Guide
Page 29
...press enter on page 38. Adjusting the picture and sound 29 Picture modes can change the projector's settings through its built-in on-screen menu system, using the buttons on the projector or the remote control. They let you easily choose the best settings for ambient lighting and the type of ...to make adjustments to select the picture mode that gives the best picture. 3 Adjusting the Projector You can control properties such as color and size. S Press the picture mode button one or more times to the picture. For details, see "Using the on-screen menu" on the projector or remote control.
...press enter on page 38. Adjusting the picture and sound 29 Picture modes can change the projector's settings through its built-in on-screen menu system, using the buttons on the projector or the remote control. They let you easily choose the best settings for ambient lighting and the type of ...to make adjustments to select the picture mode that gives the best picture. 3 Adjusting the Projector You can control properties such as color and size. S Press the picture mode button one or more times to the picture. For details, see "Using the on-screen menu" on the projector or remote control.
User Guide
Page 34
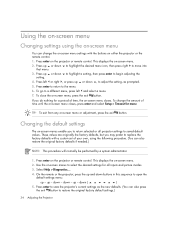
... originally the factory defaults, but you may prefer to replace the factory defaults with the buttons on either the projector or the remote control. 1. down - To close the on the projector or remote control. Press enter on -screen menu, press the exit button. down - Select Help > Diagnostics.... 4. Press...go to a different menu, press left or right , or press up or down ( ) 5. This displays the on the projector or remote control. up - Using the on-screen menu Changing settings using the following procedure. (You can also restore the original factory defaults ...
... originally the factory defaults, but you may prefer to replace the factory defaults with the buttons on either the projector or the remote control. 1. down - To close the on the projector or remote control. Press enter on -screen menu, press the exit button. down - Select Help > Diagnostics.... 4. Press...go to a different menu, press left or right , or press up or down ( ) 5. This displays the on the projector or remote control. up - Using the on-screen menu Changing settings using the following procedure. (You can also restore the original factory defaults ...
User Guide
Page 38
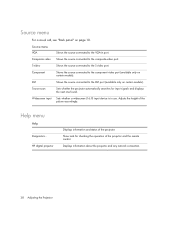
... in port. Help menu Help Diagnostics... Adjusts the height of the projector. Displays information about the projector and any network connection. 38 Adjusting the Projector Source scan Sets whether the projector automatically searches for checking the operation of the projector and the remote control. HP digital projector Displays information and status of the picture accordingly. Source menu For a visual...
... in port. Help menu Help Diagnostics... Adjusts the height of the projector. Displays information about the projector and any network connection. 38 Adjusting the Projector Source scan Sets whether the projector automatically searches for checking the operation of the projector and the remote control. HP digital projector Displays information and status of the picture accordingly. Source menu For a visual...

User Guide
Page 39
... method does not work, use fabric softener when washing a cleaning cloth or softener sheets when drying the cloth. You cannot clean any type of the projector using the following method: a. Do not wipe back and forth across the lens. If the cloth is still dirty after washing it . This screen shows... the cloth. Cleaners might damage the surface of damaging or scratching the lens surface, blow dust particles off the lens with the lens for the projector. The cloth can clean the front lens of fluid or cleaner directly on the projector or remote control and go to Help.
... method does not work, use fabric softener when washing a cleaning cloth or softener sheets when drying the cloth. You cannot clean any type of the projector using the following method: a. Do not wipe back and forth across the lens. If the cloth is still dirty after washing it . This screen shows... the cloth. Cleaners might damage the surface of damaging or scratching the lens surface, blow dust particles off the lens with the lens for the projector. The cloth can clean the front lens of fluid or cleaner directly on the projector or remote control and go to Help.

User Guide
Page 42
When discarding old batteries, contact your local waste-disposal provider regarding local restrictions on the disposal or recycling of batteries. 42 Maintaining the Projector Replacing the battery in the holder. 3. Push the holder 3 into the remote control. Insert the new battery 2 in the remote control 1. Use a ballpoint pen to hold the battery latch toward the center, then pull out the battery holder 1. 2.
When discarding old batteries, contact your local waste-disposal provider regarding local restrictions on the disposal or recycling of batteries. 42 Maintaining the Projector Replacing the battery in the holder. 3. Push the holder 3 into the remote control. Insert the new battery 2 in the remote control 1. Use a ballpoint pen to hold the battery latch toward the center, then pull out the battery holder 1. 2.
