Start Here Guide
Page 3
... or Video 8 Connecting Other Devices 9 Storing Documentation and Recovery Discs 10 Adjusting the Monitor 10 Setting Up a Local Area Network 10 Setting Up a Wired (Ethernet) Connection 12 Integrated Wireless Devices 12 Connecting the Wireless LAN Device 13 Checking the wireless LAN device installation 14 Using wireless security features 14 Connecting a Modem 15 Connecting Speakers or Microphone 17 Using Speakers ...17 Sound Connector Types 18 Connecting a Microphone 20 Speaker Configurations 20 Speaker types 21 Connecting 2/2.1 (Two Speakers and a Subwoofer) Audio Speakers 22...
... or Video 8 Connecting Other Devices 9 Storing Documentation and Recovery Discs 10 Adjusting the Monitor 10 Setting Up a Local Area Network 10 Setting Up a Wired (Ethernet) Connection 12 Integrated Wireless Devices 12 Connecting the Wireless LAN Device 13 Checking the wireless LAN device installation 14 Using wireless security features 14 Connecting a Modem 15 Connecting Speakers or Microphone 17 Using Speakers ...17 Sound Connector Types 18 Connecting a Microphone 20 Speaker Configurations 20 Speaker types 21 Connecting 2/2.1 (Two Speakers and a Subwoofer) Audio Speakers 22...
Start Here Guide
Page 4
... Audio System 28 Y adapter cables 28 2.1 home stereo installation 29 5.1 home audio installation 30 5.1 home audio installation procedure 30 7.1 home audio installation 32 7.1 home audio installation procedure 33 Connecting Digital Audio 34 Connecting Speakers Using the Creative Sound Blaster X-Fi Sound Card 36 Connecting the speakers 36 Connecting the FlexiJack connector 37 Connecting the Television Signal and Video Cables 39 Using TV Cables 39 Audio and Video Cables 39 Connecting the TV Signal Source 41 Connecting a dual tuner 42 Connecting the Remote Sensor 43 Connecting...
... Audio System 28 Y adapter cables 28 2.1 home stereo installation 29 5.1 home audio installation 30 5.1 home audio installation procedure 30 7.1 home audio installation 32 7.1 home audio installation procedure 33 Connecting Digital Audio 34 Connecting Speakers Using the Creative Sound Blaster X-Fi Sound Card 36 Connecting the speakers 36 Connecting the FlexiJack connector 37 Connecting the Television Signal and Video Cables 39 Using TV Cables 39 Audio and Video Cables 39 Connecting the TV Signal Source 41 Connecting a dual tuner 42 Connecting the Remote Sensor 43 Connecting...

Start Here Guide
Page 11
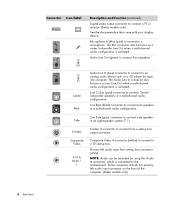
... Serial Bus (USB) 2.0 connector to connect a mouse, keyboard, digital camera, or another device with this 6-pin connector. NOTE: You must use a 6-pin FireWire (IEEE 1394) transfer cable with this adapter in your computer to an Ethernet (10BaseT) or Fast Ethernet (100BaseT) network hub. Power connector Mouse connector to connect a keyboard. NOTE: You must use a 6-pin FireWire (IEEE 1394) transfer cable with a USB connector. Ethernet LAN connector is a network interface adapter (also called a network interface card, or NIC) which connects to your local area network (LAN...
... Serial Bus (USB) 2.0 connector to connect a mouse, keyboard, digital camera, or another device with this 6-pin connector. NOTE: You must use a 6-pin FireWire (IEEE 1394) transfer cable with this adapter in your computer to an Ethernet (10BaseT) or Fast Ethernet (100BaseT) network hub. Power connector Mouse connector to connect a keyboard. NOTE: You must use a 6-pin FireWire (IEEE 1394) transfer cable with a USB connector. Ethernet LAN connector is a network interface adapter (also called a network interface card, or NIC) which connects to your local area network (LAN...
Start Here Guide
Page 12
... connector (yellow) to connect to connect from set-top box connector (white). S-Video Composite Video A/V In Audio 1 L S-video In connector to a TV set -top box output connector. Primary left audio input connector on the front of the computer. (Select models only.) 6 Start Here Connector Icon/label Description and function (continued) Digital video output connector to connect Center/ Subwoofer speakers in a multichannel audio configuration. Center Rear Audio Line In (blue) connector to connect to connect front speakers. NOTE: Audio can be recorded by using...
... connector (yellow) to connect to connect from set-top box connector (white). S-Video Composite Video A/V In Audio 1 L S-video In connector to a TV set -top box output connector. Primary left audio input connector on the front of the computer. (Select models only.) 6 Start Here Connector Icon/label Description and function (continued) Digital video output connector to connect Center/ Subwoofer speakers in a multichannel audio configuration. Center Rear Audio Line In (blue) connector to connect to connect front speakers. NOTE: Audio can be recorded by using...

Start Here Guide
Page 13
....) FM In (radio antenna input) connects to the motherboard. Modem (Line In RJ-11) (select models only). VGA Monitor/VGA (blue) display output connector connects to a TV. Digital Audio Out Digital audio input (white) connects to a digital audio device with no set -top box connector (red). Analog Video Out: S-video or composite video (select models only) connects to a VGA monitor. Connector Icon/label A/V In Audio 1 R TV/Cable Ant FM Ant Analog Video Description and function (continued) Primary...
....) FM In (radio antenna input) connects to the motherboard. Modem (Line In RJ-11) (select models only). VGA Monitor/VGA (blue) display output connector connects to a TV. Digital Audio Out Digital audio input (white) connects to a digital audio device with no set -top box connector (red). Analog Video Out: S-video or composite video (select models only) connects to a VGA monitor. Connector Icon/label A/V In Audio 1 R TV/Cable Ant FM Ant Analog Video Description and function (continued) Primary...
Start Here Guide
Page 14
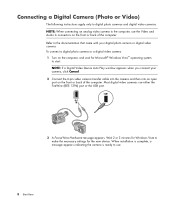
.... Most digital video cameras use the Video and Audio In connectors on the computer, and wait for the new device. When installation is complete, a message appears indicating the camera is ready to make the necessary settings for Microsoft® Windows Vista™ operating system to start. NOTE: When connecting an analog video camera to the computer, use either the FireWire (IEEE 1394) port or the USB port. 3 A Found New Hardware message appears.
.... Most digital video cameras use the Video and Audio In connectors on the computer, and wait for the new device. When installation is complete, a message appears indicating the camera is ready to make the necessary settings for Microsoft® Windows Vista™ operating system to start. NOTE: When connecting an analog video camera to the computer, use either the FireWire (IEEE 1394) port or the USB port. 3 A Found New Hardware message appears.
Start Here Guide
Page 15
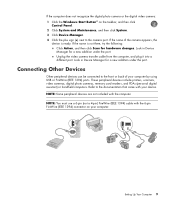
... computer, and plug it into a different port. NOTE: You must use a 6-pin (not a 4-pin) FireWire (IEEE 1394) cable with the computer. If the name of your device. If the computer does not recognize the digital photo camera or the digital video camera: 1 Click the Windows Start Button® on your computer. These peripheral devices include printers, scanners, video cameras, digital photo cameras, memory card readers, and...
... computer, and plug it into a different port. NOTE: You must use a 6-pin (not a 4-pin) FireWire (IEEE 1394) cable with the computer. If the name of your device. If the computer does not recognize the digital photo camera or the digital video camera: 1 Click the Windows Start Button® on your computer. These peripheral devices include printers, scanners, video cameras, digital photo cameras, memory card readers, and...
Start Here Guide
Page 16
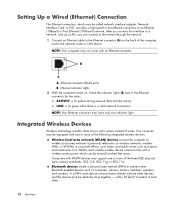
... one display device (CRT monitor, flat panel monitor, TV, and so on the network. Setting Up a Local Area Network Your home local area network (LAN) may include a hub or a switch, which can quickly change the screen resolution: 1 Right-click an empty area of a wired or a wireless network that use to connect your computer to store your system recovery discs with your computer network interface adapter and the router. A wireless network uses radio waves to connect the devices...
... one display device (CRT monitor, flat panel monitor, TV, and so on the network. Setting Up a Local Area Network Your home local area network (LAN) may include a hub or a switch, which can quickly change the screen resolution: 1 Right-click an empty area of a wired or a wireless network that use to connect your computer to store your system recovery discs with your computer network interface adapter and the router. A wireless network uses radio waves to connect the devices...
Start Here Guide
Page 18
... the computer, and to the network router or LAN device. After you can be several hundred feet away. A Ethernet connector (RJ-45 port) B Ethernet indicator lights 2 With the computer turned on the back of each other. 12 Start Here In a WLAN, each device communicates directly with the other Bluetooth-enabled devices such as a LAN, you connect this interface to as wireless networks, wireless LANs, or WLANs) in corporate offices...
... the computer, and to the network router or LAN device. After you can be several hundred feet away. A Ethernet connector (RJ-45 port) B Ethernet indicator lights 2 With the computer turned on the back of each other. 12 Start Here In a WLAN, each device communicates directly with the other Bluetooth-enabled devices such as a LAN, you connect this interface to as wireless networks, wireless LANs, or WLANs) in corporate offices...
Start Here Guide
Page 19
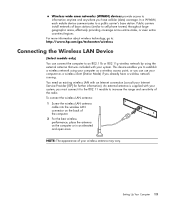
.../wireless Connecting the Wireless LAN Device (Select models only) You can connect the computer to establish a wireless network using the external antenna that was included with your wireless antenna may vary. This device enables you to an 802.11b or 802.11g wireless network by using your computer as a wireless access point, or you can use your computer as a wireless client (Station Mode) if you already have cellular (data) coverage. you have a wireless network running. Setting...
.../wireless Connecting the Wireless LAN Device (Select models only) You can connect the computer to establish a wireless network using the external antenna that was included with your wireless antenna may vary. This device enables you to an 802.11b or 802.11g wireless network by using your computer as a wireless access point, or you can use your computer as a wireless client (Station Mode) if you already have cellular (data) coverage. you have a wireless network running. Setting...
Start Here Guide
Page 20
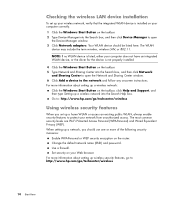
....hp.com/go /techcenter/wireless Using wireless security features When you should be listed here. For more information about setting up a wireless network: Click the Windows Start Button on the taskbar. 5 Type Network and Sharing Center into the Search box, and then click Network and Sharing Center to open the Device Manager window. 3 Click Network adapters. Go to: http://www.hp.com/go /techcenter/wireless 14 Start Here Checking the wireless LAN device installation To set up a home WLAN or access...
....hp.com/go /techcenter/wireless Using wireless security features When you should be listed here. For more information about setting up a wireless network: Click the Windows Start Button on the taskbar. 5 Type Network and Sharing Center into the Search box, and then click Network and Sharing Center to open the Device Manager window. 3 Click Network adapters. Go to: http://www.hp.com/go /techcenter/wireless 14 Start Here Checking the wireless LAN device installation To set up a home WLAN or access...

Start Here Guide
Page 23
...), a center speaker, and a subwoofer. If your speaker system to the computer and then configure the audio software for 5.1 speaker output. Connecting Speakers or Microphone NOTE: For cross-references, see "Configuring Speaker and Sound Options" in your product information on connecting stereo speakers to the computer, see the setup poster. the speaker system must have its own power cord. Connecting Speakers or Microphone 17 A stereo speaker set is a system with the monitor (select models only...
...), a center speaker, and a subwoofer. If your speaker system to the computer and then configure the audio software for 5.1 speaker output. Connecting Speakers or Microphone NOTE: For cross-references, see "Configuring Speaker and Sound Options" in your product information on connecting stereo speakers to the computer, see the setup poster. the speaker system must have its own power cord. Connecting Speakers or Microphone 17 A stereo speaker set is a system with the monitor (select models only...
Start Here Guide
Page 26
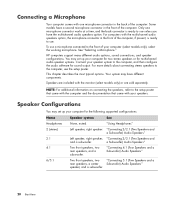
...the computer. "Connecting 4.1 (Four Speakers and a Subwoofer) Audio Speakers" Two front speakers, two "Connecting 5.1 (Five Speakers and a rear speakers, a center Subwoofer) Audio Speakers" speaker, and a subwoofer. 20 Start Here This chapter describes the most typical options. Speaker Configurations You may set up your computer for two stereo speakers or for sound output. "Connecting 2/2.1 (Two Speakers and a Subwoofer) Audio Speakers" Left speaker, right speaker, "Connecting 2/2.1 (Two Speakers and and a subwoofer. To use a microphone connected to the setup poster that...
...the computer. "Connecting 4.1 (Four Speakers and a Subwoofer) Audio Speakers" Two front speakers, two "Connecting 5.1 (Five Speakers and a rear speakers, a center Subwoofer) Audio Speakers" speaker, and a subwoofer. 20 Start Here This chapter describes the most typical options. Speaker Configurations You may set up your computer for two stereo speakers or for sound output. "Connecting 2/2.1 (Two Speakers and a Subwoofer) Audio Speakers" Left speaker, right speaker, "Connecting 2/2.1 (Two Speakers and and a subwoofer. To use a microphone connected to the setup poster that...
Start Here Guide
Page 28
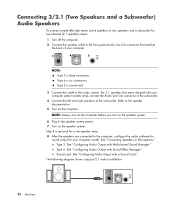
...diagram shows a typical 2.1 audio installation: OUT 22 Start Here Sound card: See "Configuring Audio Ouput with Multichannel Sound Manager." See "Connecting Speakers or Microphone." Type 6: See "Configuring Audio Output with your computer (select models only), connect the Audio Line Out connector to the subwoofer. 4 Connect the left /right stereo active speakers or two speakers and a subwoofer for your computer. 3 6 S NOTE: Type 3 is six connectors. Type S is optional for a two-speaker setup. 8 After the speakers are connected to the computer, configure the audio software...
...diagram shows a typical 2.1 audio installation: OUT 22 Start Here Sound card: See "Configuring Audio Ouput with Multichannel Sound Manager." See "Connecting Speakers or Microphone." Type 6: See "Configuring Audio Output with your computer (select models only), connect the Audio Line Out connector to the subwoofer. 4 Connect the left /right stereo active speakers or two speakers and a subwoofer for your computer. 3 6 S NOTE: Type 3 is six connectors. Type S is optional for a two-speaker setup. 8 After the speakers are connected to the computer, configure the audio software...
Start Here Guide
Page 42
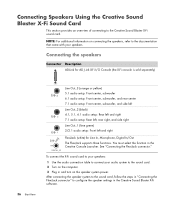
... sound card to your speakers: 1 Use the audio connection table to the sound card. 2 Turn on the computer. 3 Plug in and turn on the speaker system power. Connecting the speakers Connector Description AD-Link for AD_Link X-Fi I/O Console (the X-Fi console is sold separately) 36 Start Here Line Out_3 (orange or yellow) 5.1 audio setup: Front center, subwoofer 6.1 audio setup: Front center, subwoofer, and rear center 7.1 audio setup: Front center, subwoofer, and side left Line Out_2 (black) 4.1, 5.1, 6.1 audio setup: Rear left and right 7.1 audio setup: Rear left, rear...
... sound card to your speakers: 1 Use the audio connection table to the sound card. 2 Turn on the computer. 3 Plug in and turn on the speaker system power. Connecting the speakers Connector Description AD-Link for AD_Link X-Fi I/O Console (the X-Fi console is sold separately) 36 Start Here Line Out_3 (orange or yellow) 5.1 audio setup: Front center, subwoofer 6.1 audio setup: Front center, subwoofer, and rear center 7.1 audio setup: Front center, subwoofer, and side left Line Out_2 (black) 4.1, 5.1, 6.1 audio setup: Rear left and right 7.1 audio setup: Rear left, rear...

Start Here Guide
Page 46
... model. Analog video cable/ Used with dual-tuner option. Used for your computer setup, and the cables included may need to your computer. Your computer may not include all the cables you may want to use an S-video cable to TV. adapter (select models only) Provides S-video and composite video output. For example, if your TV has an S-video input connector, you need for TV signal source Audio In and Audio Out connectors to connect...
... model. Analog video cable/ Used with dual-tuner option. Used for your computer setup, and the cables included may need to your computer. Your computer may not include all the cables you may want to use an S-video cable to TV. adapter (select models only) Provides S-video and composite video output. For example, if your TV has an S-video input connector, you need for TV signal source Audio In and Audio Out connectors to connect...
Start Here Guide
Page 49
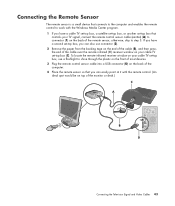
... of the cable (B), and then press the end of the cable over the remote infrared (IR) receiver window on your cable TV set -top box that controls your cable TV set-top box, use a flashlight to shine through the plastic on the front of most devices. 3 Plug the remote control sensor cable into a USB connector (D) on top of the monitor or desk.) C 21 A B D Connecting the Television Signal and Video Cables 43
... of the cable (B), and then press the end of the cable over the remote infrared (IR) receiver window on your cable TV set -top box that controls your cable TV set-top box, use a flashlight to shine through the plastic on the front of most devices. 3 Plug the remote control sensor cable into a USB connector (D) on top of the monitor or desk.) C 21 A B D Connecting the Television Signal and Video Cables 43
Start Here Guide
Page 56
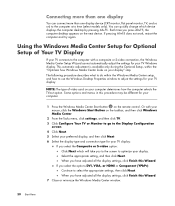
... with your mouse, click the Windows Start Button on the taskbar, and then click Windows Media Center. 2 From the Tasks menu, click settings, and then click TV. 3 Click Configure Your TV or Monitor to go to the Display Configuration screen. 4 Click Next. 5 Select your preferred display, and then click Next. 6 Select the display type and connection type for Optional Setup of video card on the remote control. When you have adjusted all the display settings, click Finish...
... with your mouse, click the Windows Start Button on the taskbar, and then click Windows Media Center. 2 From the Tasks menu, click settings, and then click TV. 3 Click Configure Your TV or Monitor to go to the Display Configuration screen. 4 Click Next. 5 Select your preferred display, and then click Next. 6 Select the display type and connection type for Optional Setup of video card on the remote control. When you have adjusted all the display settings, click Finish...
Start Here Guide
Page 57
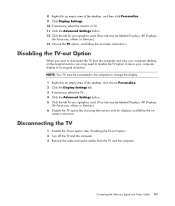
... computer. See "Disabling the TV-out Option." 2 Turn off the TV and the computer. 3 Remove the video and audio cables from the computer and view your computer desktop on the original monitor, you may need to disable the TV option to return your graphics card. (Your tab may be labeled Displays, ATI Displays, Ge Force xxx, nView, or Devices.) 6 Disable the TV option (by choosing the monitor only for your...
... computer. See "Disabling the TV-out Option." 2 Turn off the TV and the computer. 3 Remove the video and audio cables from the computer and view your computer desktop on the original monitor, you may need to disable the TV option to return your graphics card. (Your tab may be labeled Displays, ATI Displays, Ge Force xxx, nView, or Devices.) 6 Disable the TV option (by choosing the monitor only for your...

Start Here Guide
Page 58
...-to-VGA converter included in the box (select models only). For best results, choose the best-quality connection type that provides the best-quality playback image. Connecting to a Monitor or High-Definition TV Choosing the AV connection to use When connecting optional equipment as signal sources, the connectors on the computer graphic card, and then connect the VGA cable to the converter and to the monitor. 52 Start Here...
...-to-VGA converter included in the box (select models only). For best results, choose the best-quality connection type that provides the best-quality playback image. Connecting to a Monitor or High-Definition TV Choosing the AV connection to use When connecting optional equipment as signal sources, the connectors on the computer graphic card, and then connect the VGA cable to the converter and to the monitor. 52 Start Here...


