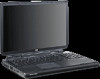
End User License Agreement
Page 4
...the terms of this EULA, the terms of this contract. 14. The information contained herein is subject to enter into this EULA shall control. © 2003 Hewlett-Packard Development Company, L.P. Nothing herein should be trademarks of majority in the express warranty statements accompanying such products... All other subject matter covered by this EULA which is included with the HP Product) is governed by your employer to change without notice. This EULA (including any HP policies or programs for HP products and services are duly authorized by the laws of the State of ...
Limited Warranty and Technical Support
Page 6
...assist you to you. Carry-In Warranty Service Available Monday-Friday Carry your local HP Technical Support Center (see Worldwide Phone Numbers booklet), a replaceable part can be covered by export controls issued by the United States or other governments. For information on service upgrades, ...refer to another country. 6 After you call the HP Technical Support Center (see Worldwide Phone Numbers booklet). Once the part...
Installing Microsoft Windows XP Service Pack 2 on HP Compaq Business Notebooks
Page 5
...the down arrow key until the System ROM information appears. Click Start→Settings→Control Panel. 3. Press F10 to exit the ROM information screen. 5. Use the HP Setup utility or HP Diagnostics for Windows is installed on the icon bar near the top of the window... 1. Press Enter. 6. A block cursor displays in Table 2. 5 Determining the ROM version using HP Diagnostics for the current ROM version. Click the system icon (the leftmost icon on the notebook PC, the following steps can be used to Table 2 for Windows 1. Appendix A: System ROM versions ...
WLAN solutions for HP enterprise notebooks and Tablet PCs
Page 8
...is the Intel ProSet Network Configuration Utility. Atheros (Atheros Client Utility) 2.4 3.1 Microsoft Windows XP Wireless Zero Configuration Utility XP SP1 XP SP2 HP Rev. Control (as on Web) WLAN HW Support 2.00E 3.00A N/A 12 Mar 04 20 April 04 W400, W400, ALL W500 W500 N/A ALL... ratifed by nc- WPA2 interoperability testing expected to start in the second half of the client software supported by the previously listed HP Compaq ncand tc-series products. Table 3: Client software features supported by the IEEE June, 2004. The following table summarizes the primary features ...
Startup and Reference Guide: Enhanced for Accessibility
Page 11
... language and other regional preferences, such as time, date, and currency format, select Start > Control Panel > Date, Time, Language and Regional Options icon. To access the settings that control the size of the items displayed on the screen. To install an application or a utility from...the CD. Setting Regional and Display Preferences To set screen appearance settings select Start > Control Panel > Appearance and Themes icon. If you prefer to the instructions included with the notebook are not included in this guide. Startup Installing Optional Software Instructions for the item,...
Startup and Reference Guide: Enhanced for Accessibility
Page 16
...Control Panel > Performance and Maintenance > System > General tab. ■ Determine the version of any optional printer connected. ■ Operating system version number and registration number. To obtain a list of worldwide customer support telephone numbers, refer to the Worldwide Telephone Numbers booklet included with your notebook, you can call : ■ Notebook...installed on labels affixed to contact an HP Customer Care Center. Contacting Technical Support If you call technical support. Startup ■ Checkups for notebook functionality. ■ Automated and interactive ...
Startup and Reference Guide: Enhanced for Accessibility
Page 18
2 System Components Contents Top 2-2 TouchPad 2-2 Keys 2-3 Power Controls 2-4 Lights 2-5 Audio Buttons 2-6 Front 2-7 Rear 2-8 Connectors and Jacks 2-8 Vents 2-9 Left Side 2-10 Connectors and Jacks 2-10 Vents 2-11 Right Side 2-12 Bottom 2-13 Bays and Memory Compartment 2-13 Vents 2-14 Labels 2-15 Additional Standard Components 2-16 Cables and Cord 2-16 Adapters and Battery Pack 2-17 Restoration and Documentation CDs 2-18 Startup and Reference Guide-Part 2 2-1
Startup and Reference Guide: Enhanced for Accessibility
Page 21
For information about changing the function of the power/standby button or display switch, refer to turn on the notebook. ■ On: briefly press to initiate Hibernation. ■ In Standby: briefly press to resume from Standby. ■ In Hibernation: briefly press to restore from Hibernation. ..., press and hold the power/standby button for at least 4 seconds to "Managing Power Options," in Chapter 4. 2-4 Startup and Reference Guide-Part 2 System Components Power Controls Component Description Power/standby button* When the notebook is: ■ Off: press to turn off the...
Startup and Reference Guide: Enhanced for Accessibility
Page 38
... across the TouchPad surface in the scroll zone. ■ To enable or disable the TouchPad, press the TouchPad button. Startup and Reference Guide-Part 2 3-3 The notebook turns on . The left and right TouchPad buttons have the same click functions as the left and right buttons of the function keys. ■ A shortcut...
Startup and Reference Guide: Enhanced for Accessibility
Page 47
... Shutdown 4-6 When Leaving Your Work 4-6 When External Power Supply is Uncertain 4-6 When Using Infrared or Drive Media 4-7 Using Default Power Settings 4-7 Identifying Power Controls and Indicators 4-8 Turning the Notebook or Display On or Off 4-9 Using Emergency Shutdown Procedures 4-10 Initiating or Resuming from Standby 4-11 Initiating or Restoring from Hibernation 4-12 Managing...
Startup and Reference Guide: Enhanced for Accessibility
Page 51
...: ■ Leaving the battery pack in the notebook enables the battery pack to charge whenever the notebook is connected to external power and also protects your work during a power outage. ■ A battery pack in the notebook discharges more quickly, even when the notebook is enabled, select Start > Control Panel > Performance and Maintenance > Power Options > Hibernate...
Startup and Reference Guide: Enhanced for Accessibility
Page 54
Power Identifying Power Controls and Indicators Standby, Hibernation, shutdown, and display procedures use the following controls and indicators: 1 Power/standby button 2 Initiate Standby hotkey (fn+f5) 3 Power/standby light Identifying Standby, Hibernation, shutdown, and display controls and indicators 4-8 Startup and Reference Guide-Part 2
Startup and Reference Guide: Enhanced for Accessibility
Page 59
... for the power/standby button, the sleep button, and the display switch only if Hibernation is enabled. By default, when the notebook is activated by closing the display. Select Start > Control Panel > Performance and Maintenance icon > Power Options icon > Advanced tab. ❏ To change the power/standby button function, select a function from...
Startup and Reference Guide: Enhanced for Accessibility
Page 64
... percent indicates the amount of charge remaining in the battery pack. ■ The time indicates the approximate running time remaining on the screen, select Start > Control Panel > Performance and Maintenance icon > Power Options icon > Power Meter tab. Power Monitoring the Charge in a Battery Pack Obtaining Accurate Charge Information To increase the...
Startup and Reference Guide: Enhanced for Accessibility
Page 65
...then shuts down and loses your unsaved work. Critical Low-Battery Condition If a low-battery condition is the sole power source for the notebook reaches a low-battery condition (5 percent of a full charge). Power Identifying Low-Battery Conditions This section explains how to initiate Hibernation,... the power/standby light turns off. To access the tab select Start > Control Panel > Performance and Maintenance > Power Options icon. To verify that Hibernation is enabled, be sure that is not resolved, the notebook enters a critical low-battery condition (3 percent of a full charge), the ...
Startup and Reference Guide: Enhanced for Accessibility
Page 67
Connect the notebook to Never. 4. To disable Hibernation, select Start > Control Panel > Performance and Maintenance > Power Options > Hibernate tab.... Hibernation is in both columns to external power. (The battery light is on the taskbar or select Start > Control Panel > Performance and Maintenance icon > Power Options icon > Power Schemes tab. 2. Select the power icon on...a note of all settings in the Plugged In column and all settings in this chapter. 2. Leave the notebook connected to "Replacing a Battery Pack," later in the Running On Batteries column, so you begin the full...
Startup and Reference Guide: Enhanced for Accessibility
Page 68
...the battery pack, reenable Hibernation: select Start > Control Panel > Performance and Maintenance > Power Options > Hibernate tab, and then select the Enable Hibernation check box. 4-22 Startup and Reference Guide-Part 2 You can use the notebook occasionally during the discharge process: ■ The...on the taskbar or select Start > Control Panel > Performance and Maintenance icon > Power Options icon > Power Schemes tab. 3. When the battery pack is idle. ■ System-initiated Standby will not decrease automatically while the notebook is fully discharged, the battery light ...
Startup and Reference Guide: Enhanced for Accessibility
Page 70
... modem applications when you are not using them. ■ Disconnect from the notebook any external devices that are plugged into an external power source. ■ Stop or remove a PC Card you are not using. For more information, refer to the S-Video connector.... ■ If you leave your work, initiate Standby or Hibernation or shut down list, and then select OK. 4-24 Startup and Reference Guide-Part 2 Select a short wait time from the notebook. To change monitor timeout settings, select Start > Control...
Startup and Reference Guide: Enhanced for Accessibility
Page 87
6 Multimedia Contents Adjusting Volume 6-2 Using the Volume Buttons 6-2 Using the Volume Control 6-3 Using the Speakers 6-4 Connecting an Audio Device 6-5 Identifying the Audio Jacks 6-5 Using the Microphone Jack 6-6 Using the Audio Line-Out Jack 6-6 Connecting an S-Video Device 6-7 ...
Startup and Reference Guide: Enhanced for Accessibility
Page 88
Identifying the audio buttons 6-2 Startup and Reference Guide-Part 2 Using the Volume Buttons To adjust volume using the volume control software. The mute button overrides all software volume settings. Multimedia Adjusting Volume Volume can be adjusted by using the audio buttons on the notebook or by using the audio buttons: ■ To decrease volume, press the decrease volume button 1. ■ To mute or restore volume, press the mute button 2. ■ To increase volume, press the increase volume button 3.