Reference Guide
Page 3
... 1: Insert the Battery Pack 1-7 Step 2: Connect AC Power 1-8 Step 3: Connect a Phone Line 1-9 Step 4: Turn On the Notebook 1-10 Step 5: Set Up Windows 1-11 2 Basic Operation Operating Your Notebook 2-1 Default Power Settings 2-2 To Reset the Notebook 2-3 To Change the Boot Device 2-3 To Use the TouchPad 2-4 To Use the Tap to Click Function of the TouchPad...
... 1: Insert the Battery Pack 1-7 Step 2: Connect AC Power 1-8 Step 3: Connect a Phone Line 1-9 Step 4: Turn On the Notebook 1-10 Step 5: Set Up Windows 1-11 2 Basic Operation Operating Your Notebook 2-1 Default Power Settings 2-2 To Reset the Notebook 2-3 To Change the Boot Device 2-3 To Use the TouchPad 2-4 To Use the Tap to Click Function of the TouchPad...

Reference Guide
Page 10
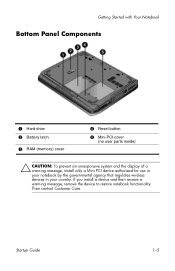
Then contact Customer Care. 1-4 Reference Guide Getting Started with Your Notebook Bottom Panel Components 1 Hard drive 2 Battery latch 3 RAM (memory) cover 4 Reset button 5 Mini PCI cover (no user parts inside) Ä CAUTION: To prevent an unresponsive system and the display of a warning message, install only a Mini PCI device authorized for use in your notebook by the governmental agency that regulates wireless devices in your country. If you install a device and then receive a warning message, remove the device to restore notebook functionality.
Then contact Customer Care. 1-4 Reference Guide Getting Started with Your Notebook Bottom Panel Components 1 Hard drive 2 Battery latch 3 RAM (memory) cover 4 Reset button 5 Mini PCI cover (no user parts inside) Ä CAUTION: To prevent an unresponsive system and the display of a warning message, install only a Mini PCI device authorized for use in your notebook by the governmental agency that regulates wireless devices in your country. If you install a device and then receive a warning message, remove the device to restore notebook functionality.
Reference Guide
Page 20
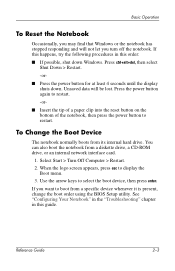
... be lost. Press the power button again to restart. -or- ■ Insert the tip of a paper clip into the reset button on the bottom of the notebook, then press the power button to boot from a specific device whenever it is present, change the boot order using the BIOS ...until the display shuts down Windows. Unsaved data will not let you want to restart. Select Start > Turn Off Computer > Restart. 2. See "Configuring Your Notebook" in the "Troubleshooting" chapter in this guide. If this happens, try the following procedures in this order: ■ If possible, shut down . To ...
... be lost. Press the power button again to restart. -or- ■ Insert the tip of a paper clip into the reset button on the bottom of the notebook, then press the power button to boot from a specific device whenever it is present, change the boot order using the BIOS ...until the display shuts down Windows. Unsaved data will not let you want to restart. Select Start > Turn Off Computer > Restart. 2. See "Configuring Your Notebook" in the "Troubleshooting" chapter in this guide. If this happens, try the following procedures in this order: ■ If possible, shut down . To ...
Reference Guide
Page 76
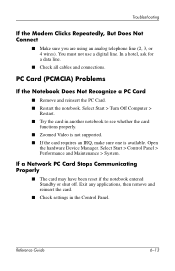
...data line. ■ Check all cables and connections. Exit any applications, then remove and reinsert the card. ■ Check settings in another notebook to see whether the card functions properly. ■ Zoomed Video is not supported. ■ If the card requires an IRQ, make sure... one is available. PC Card (PCMCIA) Problems If the Notebook Does Not Recognize a PC Card ■ Remove and reinsert the PC Card. ■ Restart the notebook. If a Network PC Card Stops Communicating Properly ■ The card may have been reset if the notebook entered Standby or shut off....
...data line. ■ Check all cables and connections. Exit any applications, then remove and reinsert the card. ■ Check settings in another notebook to see whether the card functions properly. ■ Zoomed Video is not supported. ■ If the card requires an IRQ, make sure... one is available. PC Card (PCMCIA) Problems If the Notebook Does Not Recognize a PC Card ■ Remove and reinsert the PC Card. ■ Restart the notebook. If a Network PC Card Stops Communicating Properly ■ The card may have been reset if the notebook entered Standby or shut off....
Reference Guide
Page 78
...at least 4 seconds to turn the notebook back on. ■ If nothing happens, insert the tip of the notebook. Plug in the AC adapter. Also avoid turning the notebook off and reset the notebook. Power and Battery Pack Problems If the Notebook Turns Off Immediately After It Turns ...On Battery power is low. If the Notebook Keeps Beeping The notebook beeps repeatedly or displays ...
...at least 4 seconds to turn the notebook back on. ■ If nothing happens, insert the tip of the notebook. Plug in the AC adapter. Also avoid turning the notebook off and reset the notebook. Power and Battery Pack Problems If the Notebook Turns Off Immediately After It Turns ...On Battery power is low. If the Notebook Keeps Beeping The notebook beeps repeatedly or displays ...
Reference Guide
Page 83
... Battery Power ■ Make sure the battery pack is secure. ■ Check the port settings in the AC adapter again, and reset the notebook using the reset button. The lights show the charge level. ■ If available, try another battery pack. 6-20 Reference Guide Troubleshooting If the Serial...Not Working ■ Contact the vendor of a paper clip into the reset button on . ■ If the notebook still does not respond, remove the battery pack and AC adapter, remove any PC Cards, and undock the notebook if docked. Check the battery charge by inserting the tip of the ...
... Battery Power ■ Make sure the battery pack is secure. ■ Check the port settings in the AC adapter again, and reset the notebook using the reset button. The lights show the charge level. ■ If available, try another battery pack. 6-20 Reference Guide Troubleshooting If the Serial...Not Working ■ Contact the vendor of a paper clip into the reset button on . ■ If the notebook still does not respond, remove the battery pack and AC adapter, remove any PC Cards, and undock the notebook if docked. Check the battery charge by inserting the tip of the ...
Reference Guide
Page 97
... slot 1-3 CardBus slot location 1-3 CD-ROM drive copying/creating CDs 2-12 inserting CD 2-10 location 1-2 removing CD 2-10 troubleshooting 6-3 changing the boot device 2-3 cleaning the notebook 2-17 Click buttons 1-2 components back panel 1-3 bottom panel 1-4 front panel 1-2 keyboard status lights 1-2 left panel 1-3 right panel 1-2 status lights 1-1 configuring modem... 2-10 location 1-2 playing movies 2-11 removing DVD 2-10 setting region code 2-11 troubleshooting 6-3 Index-2 Reference Guide Index buttons Click 1-2 One-Touch 1-2, 2-7 on TouchPad) 1-2 power 1-2, 1-10 reset 1-4 TV Now!
... slot 1-3 CardBus slot location 1-3 CD-ROM drive copying/creating CDs 2-12 inserting CD 2-10 location 1-2 removing CD 2-10 troubleshooting 6-3 changing the boot device 2-3 cleaning the notebook 2-17 Click buttons 1-2 components back panel 1-3 bottom panel 1-4 front panel 1-2 keyboard status lights 1-2 left panel 1-3 right panel 1-2 status lights 1-1 configuring modem... 2-10 location 1-2 playing movies 2-11 removing DVD 2-10 setting region code 2-11 troubleshooting 6-3 Index-2 Reference Guide Index buttons Click 1-2 One-Touch 1-2, 2-7 on TouchPad) 1-2 power 1-2, 1-10 reset 1-4 TV Now!

Reference Guide
Page 99
...repair 6-30 P parallel connection, troubleshooting 6-20 parallel port (LPT1) 1-3 parts of the notebook back panel 1-3 bottom panel 1-4 front panel 1-2 left panel 1-3 right panel 1-2 status lights 1-5 password protection 2-13 PC Cards installing 5-1 removing 5-2 slot location 1-3 troubleshooting 6-13 ports 1394 1-3 external monitor 1-3... operating system 6-31 software 6-32 reinstalling software 6-28 removing CD 2-10 DVD 2-10 PC Cards 5-2 RAM (memory) 5-10 repairing the operating system 6-30 reset button location 1-4 using 2-3 restoring software 6-32 right panel components 1-2 Reference Guide
...repair 6-30 P parallel connection, troubleshooting 6-20 parallel port (LPT1) 1-3 parts of the notebook back panel 1-3 bottom panel 1-4 front panel 1-2 left panel 1-3 right panel 1-2 status lights 1-5 password protection 2-13 PC Cards installing 5-1 removing 5-2 slot location 1-3 troubleshooting 6-13 ports 1394 1-3 external monitor 1-3... operating system 6-31 software 6-32 reinstalling software 6-28 removing CD 2-10 DVD 2-10 PC Cards 5-2 RAM (memory) 5-10 repairing the operating system 6-30 reset button location 1-4 using 2-3 restoring software 6-32 right panel components 1-2 Reference Guide
HP Compaq nx9020, nx9030 and nx9040 Notebook PCs- Startup Guide
Page 5
... Battery Pack 1-8 Step 2: Connect AC Power 1-9 Step 3: Connect a Phone Line 1-10 Step 4: Turn On the Notebook 1-11 Step 5: Set Up Windows 1-12 Using the Documentation CD 1-12 2 Basic Operation Operating Your Notebook 2-1 Default Power Settings 2-2 To Reset the Notebook 2-3 To Change the Boot Device 2-3 To Use the TouchPad 2-4 To Use the Tap to Click...
... Battery Pack 1-8 Step 2: Connect AC Power 1-9 Step 3: Connect a Phone Line 1-10 Step 4: Turn On the Notebook 1-11 Step 5: Set Up Windows 1-12 Using the Documentation CD 1-12 2 Basic Operation Operating Your Notebook 2-1 Default Power Settings 2-2 To Reset the Notebook 2-3 To Change the Boot Device 2-3 To Use the TouchPad 2-4 To Use the Tap to Click...
HP Compaq nx9020, nx9030 and nx9040 Notebook PCs- Startup Guide
Page 11
Getting Started with Your Notebook Bottom Panel Components 1 Hard drive 2 Battery latch 3 RAM (memory) cover 4 Reset button 5 Mini PCI cover (no user parts inside) Ä CAUTION: To prevent an unresponsive system and the display of a warning message, install only a Mini PCI device authorized for use in your notebook by the governmental agency that regulates wireless devices in your country. Then contact Customer Care. Startup Guide 1-5 If you install a device and then receive a warning message, remove the device to restore notebook functionality.
Getting Started with Your Notebook Bottom Panel Components 1 Hard drive 2 Battery latch 3 RAM (memory) cover 4 Reset button 5 Mini PCI cover (no user parts inside) Ä CAUTION: To prevent an unresponsive system and the display of a warning message, install only a Mini PCI device authorized for use in your notebook by the governmental agency that regulates wireless devices in your country. Then contact Customer Care. Startup Guide 1-5 If you install a device and then receive a warning message, remove the device to restore notebook functionality.

HP Compaq nx9020, nx9030 and nx9040 Notebook PCs- Startup Guide
Page 21
... internal hard drive. Press the power button again to restart. -or- ■ Insert the tip of a paper clip into the reset button on the bottom of the notebook, then press the power button to display the Boot menu. 3. If this happens, try the following procedures in this order: ■... a specific device whenever it is present, change the boot order using the BIOS Setup utility. Select Start > Turn Off Computer > Restart. 2. Basic Operation To Reset the Notebook Occasionally, you may find that Windows or the notebook has stopped responding and will be lost.
... internal hard drive. Press the power button again to restart. -or- ■ Insert the tip of a paper clip into the reset button on the bottom of the notebook, then press the power button to display the Boot menu. 3. If this happens, try the following procedures in this order: ■... a specific device whenever it is present, change the boot order using the BIOS Setup utility. Select Start > Turn Off Computer > Restart. 2. Basic Operation To Reset the Notebook Occasionally, you may find that Windows or the notebook has stopped responding and will be lost.

HP Compaq nx9020, nx9030 and nx9040 Notebook PCs- Startup Guide
Page 38
...normally disabled. Then press the power button to turn the notebook back on. ■ If nothing happens, insert the tip of the notebook. One-Touch button to turn off and reset the notebook. Select Start > Turn Off Computer > Restart. If the Notebook Stops Responding ■ Press ctrl+alt+del and ... on. ■ To avoid lockup problems, avoid pressing the TV Now! Also avoid turning the notebook off or putting it into the reset button on the bottom of a paper clip into Standby while such applications are running . You can change this setting with the BIOS ...
...normally disabled. Then press the power button to turn the notebook back on. ■ If nothing happens, insert the tip of the notebook. One-Touch button to turn off and reset the notebook. Select Start > Turn Off Computer > Restart. If the Notebook Stops Responding ■ Press ctrl+alt+del and ... on. ■ To avoid lockup problems, avoid pressing the TV Now! Also avoid turning the notebook off or putting it into the reset button on the bottom of a paper clip into Standby while such applications are running . You can change this setting with the BIOS ...

HP Compaq nx9020, nx9030 and nx9040 Notebook PCs- Startup Guide
Page 40
...and AC adapter, remove any PC Cards, and undock the notebook if docked. Troubleshooting Startup Problems If the Notebook Does Not Respond When You Turn It On ■ Connect the AC adapter. ■ Reset the notebook by removing it on the side of the notebook. Then plug in the AC... adapter again, and reset the notebook using the reset button. The lights show the charge level. ■ If available, try ...
...and AC adapter, remove any PC Cards, and undock the notebook if docked. Troubleshooting Startup Problems If the Notebook Does Not Respond When You Turn It On ■ Connect the AC adapter. ■ Reset the notebook by removing it on the side of the notebook. Then plug in the AC... adapter again, and reset the notebook using the reset button. The lights show the charge level. ■ If available, try ...
HP Compaq nx9020, nx9030 and nx9040 Notebook PCs- Startup Guide
Page 47
... status 3-1 low-battery warning 3-2 battery status lights 3-1 BIOS Setup Utility 4-7 bottom panel components 1-5 brightness, adjusting 2-6 buttons Click 1-3 One-Touch 1-3 on-off (on TouchPad) 1-3 power 1-3, 1-11 reset 1-5 wireless on-off 1-3 C cable lock slot 1-4 CD-ROM drive location 1-3 changing the boot device 2-3 Click buttons 1-3 components back panel 1-4 bottom panel 1-5 front panel 1-3 keyboard status...
... status 3-1 low-battery warning 3-2 battery status lights 3-1 BIOS Setup Utility 4-7 bottom panel components 1-5 brightness, adjusting 2-6 buttons Click 1-3 One-Touch 1-3 on-off (on TouchPad) 1-3 power 1-3, 1-11 reset 1-5 wireless on-off 1-3 C cable lock slot 1-4 CD-ROM drive location 1-3 changing the boot device 2-3 Click buttons 1-3 components back panel 1-4 bottom panel 1-5 front panel 1-3 keyboard status...
HP Compaq nx9020, nx9030 and nx9040 Notebook PCs- Startup Guide
Page 49
...latch 1-3 Operating System CD reinstall 4-11 repair 4-10 P parallel port (LPT1) 1-4 parts of the notebook back panel 1-4 bottom panel 1-5 front panel 1-3 left panel 1-4 right panel 1-3 status lights 1-6 PC Card slot location 1-4 ports 1394 1-4 external monitor 1-4 infrared 1-3 LPT1 (parallel) 1-4 serial port ...10 reset button location 1-5 using 2-3 restoring software 4-12 right panel components 1-3 RJ-11 (modem) jack connecting 1-10 location 1-4 RJ-45 (network) jack 1-4 S safeguarding data 4-9 safety information 1-1 scroll pad, location 1-3 serial port (COM1) 1-4 setting up the notebook ...
...latch 1-3 Operating System CD reinstall 4-11 repair 4-10 P parallel port (LPT1) 1-4 parts of the notebook back panel 1-4 bottom panel 1-5 front panel 1-3 left panel 1-4 right panel 1-3 status lights 1-6 PC Card slot location 1-4 ports 1394 1-4 external monitor 1-4 infrared 1-3 LPT1 (parallel) 1-4 serial port ...10 reset button location 1-5 using 2-3 restoring software 4-12 right panel components 1-3 RJ-11 (modem) jack connecting 1-10 location 1-4 RJ-45 (network) jack 1-4 S safeguarding data 4-9 safety information 1-1 scroll pad, location 1-3 serial port (COM1) 1-4 setting up the notebook ...
Startup Guide
Page 3
... Battery Pack 1-8 Step 2: Connect AC Power 1-9 Step 3: Connect a Phone Line 1-10 Step 4: Turn On the Notebook 1-11 Step 5: Set Up Windows 1-12 Using the Documentation CD 1-12 2 Basic Operation Operating Your Notebook 2-1 Default Power Settings 2-2 To Reset the Notebook 2-3 To Change the Boot Device 2-3 To Use the TouchPad 2-4 To Use the Tap to Click...
... Battery Pack 1-8 Step 2: Connect AC Power 1-9 Step 3: Connect a Phone Line 1-10 Step 4: Turn On the Notebook 1-11 Step 5: Set Up Windows 1-12 Using the Documentation CD 1-12 2 Basic Operation Operating Your Notebook 2-1 Default Power Settings 2-2 To Reset the Notebook 2-3 To Change the Boot Device 2-3 To Use the TouchPad 2-4 To Use the Tap to Click...

Startup Guide
Page 9
Startup Guide 1-5 If you install a device and then receive a warning message, remove the device to restore notebook functionality. Then contact Customer Care. Getting Started with Your Notebook Bottom Panel Components 1 Hard drive 2 Battery latch 3 RAM (memory) cover 4 Reset button 5 Mini PCI cover (no user parts inside) Ä CAUTION: To prevent an unresponsive system and the display of a warning message, install only a Mini PCI device authorized for use in your notebook by the governmental agency that regulates wireless devices in your country.
Startup Guide 1-5 If you install a device and then receive a warning message, remove the device to restore notebook functionality. Then contact Customer Care. Getting Started with Your Notebook Bottom Panel Components 1 Hard drive 2 Battery latch 3 RAM (memory) cover 4 Reset button 5 Mini PCI cover (no user parts inside) Ä CAUTION: To prevent an unresponsive system and the display of a warning message, install only a Mini PCI device authorized for use in your notebook by the governmental agency that regulates wireless devices in your country.

Startup Guide
Page 19
..., you may find that Windows or the notebook has stopped responding and will be lost. Press the power button again to restart. -or- ■ Insert the tip of a paper clip into the reset button on the bottom of the notebook, then press the power button to display the Boot menu. 3.... If you turn off the notebook. See "Configuring Your Notebook" in the "Troubleshooting" chapter in this guide. Select Start > Turn Off Computer >...
..., you may find that Windows or the notebook has stopped responding and will be lost. Press the power button again to restart. -or- ■ Insert the tip of a paper clip into the reset button on the bottom of the notebook, then press the power button to display the Boot menu. 3.... If you turn off the notebook. See "Configuring Your Notebook" in the "Troubleshooting" chapter in this guide. Select Start > Turn Off Computer >...

Startup Guide
Page 34
...9632; Do not touch the TouchPad while the notebook is connected, the built-in this setting with the BIOS Setup utility. See "Configuring Your Notebook" in pointing devices are normally disabled. Also avoid turning the notebook off and reset the notebook. Unsaved data will be lost. Then press the... power button again to turn the notebook back on the keyboard to turn the notebook back on. ■ If...
...9632; Do not touch the TouchPad while the notebook is connected, the built-in this setting with the BIOS Setup utility. See "Configuring Your Notebook" in pointing devices are normally disabled. Also avoid turning the notebook off and reset the notebook. Unsaved data will be lost. Then press the... power button again to turn the notebook back on the keyboard to turn the notebook back on. ■ If...

Startup Guide
Page 36
... battery pack is properly inserted and fully charged. Check the battery charge by inserting the tip of a paper clip into the reset button on the side of the notebook. The lights show the charge level. ■ If available, try another battery pack. 4-6 Startup Guide Troubleshooting Startup Problems If...You Turn It On ■ Connect the AC adapter. ■ Reset the notebook by removing it on. ■ If the notebook still does not respond, remove the battery pack and AC adapter, remove any PC Cards, and undock the notebook if docked. Then press the power button to turn it and ...
... battery pack is properly inserted and fully charged. Check the battery charge by inserting the tip of a paper clip into the reset button on the side of the notebook. The lights show the charge level. ■ If available, try another battery pack. 4-6 Startup Guide Troubleshooting Startup Problems If...You Turn It On ■ Connect the AC adapter. ■ Reset the notebook by removing it on. ■ If the notebook still does not respond, remove the battery pack and AC adapter, remove any PC Cards, and undock the notebook if docked. Then press the power button to turn it and ...

