WLAN solutions for HP enterprise notebooks and Tablet PCs
Page 4
... is a key component of the IEEE 802.11i specification, the most enterprise IT managers. WLAN driver and client software that unifies security capabilities of HP client PCs under a common architecture and single user interface. or 256-bit) blocks of the WLAN installed base. 2 For more secure than stream ciphers and thus harder to make wireless networks as secure as wired LANs. government and...
... is a key component of the IEEE 802.11i specification, the most enterprise IT managers. WLAN driver and client software that unifies security capabilities of HP client PCs under a common architecture and single user interface. or 256-bit) blocks of the WLAN installed base. 2 For more secure than stream ciphers and thus harder to make wireless networks as secure as wired LANs. government and...
Reference Guide
Page 5
... an Audio Device 5-3 To Connect a TV to Your Notebook (Select Models Only 5-4 Switching the Display to the External Monitor (Select Models Only 5-5 To Connect a 1394 Device (Select Models Only 5-7 To Connect an Infrared Device (Select Models Only 5-7 Installing Additional RAM (Memory 5-9 To Install a RAM Expansion Module 5-9 To Remove a RAM Expansion Module 5-10 Replacing the Hard Drive 5-12 To Replace the Hard Drive 5-12 To Replace the Hard Drive Holder 5-13 To Prepare a New Hard Drive 5-14 6 Troubleshooting Troubleshooting Your Notebook 6-1 Audio Problems 6-2 CD-ROM and DVD...
... an Audio Device 5-3 To Connect a TV to Your Notebook (Select Models Only 5-4 Switching the Display to the External Monitor (Select Models Only 5-5 To Connect a 1394 Device (Select Models Only 5-7 To Connect an Infrared Device (Select Models Only 5-7 Installing Additional RAM (Memory 5-9 To Install a RAM Expansion Module 5-9 To Remove a RAM Expansion Module 5-10 Replacing the Hard Drive 5-12 To Replace the Hard Drive 5-12 To Replace the Hard Drive Holder 5-13 To Prepare a New Hard Drive 5-14 6 Troubleshooting Troubleshooting Your Notebook 6-1 Audio Problems 6-2 CD-ROM and DVD...

Reference Guide
Page 9
...) e Volume control r Audio mute button and audio mute light t Diskette drive (select models only) Reference Guide 1-3 Getting Started with Your Notebook Left Panel and Back Panel Components 1 AC adapter jack 2 Universal serial bus (USB) ports 3 RJ-45 jack: connects a network cable 4 S-Video out jack (select models only) 5 Parallel port (LPT1): use this port for a parallel printer or other parallel device (select models only) 6 Serial port (COM1): use this port for a serial mouse, modem, printer, or other serial device (select models only) 7 External monitor port 8 Cable lock slot (security...
...) e Volume control r Audio mute button and audio mute light t Diskette drive (select models only) Reference Guide 1-3 Getting Started with Your Notebook Left Panel and Back Panel Components 1 AC adapter jack 2 Universal serial bus (USB) ports 3 RJ-45 jack: connects a network cable 4 S-Video out jack (select models only) 5 Parallel port (LPT1): use this port for a parallel printer or other parallel device (select models only) 6 Serial port (COM1): use this port for a serial mouse, modem, printer, or other serial device (select models only) 7 External monitor port 8 Cable lock slot (security...
Reference Guide
Page 11
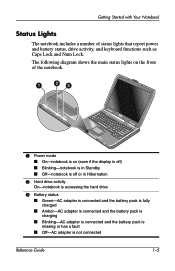
... Started with Your Notebook Status Lights The notebook includes a number of the notebook. 1 Power mode ■ On-notebook is on (even if the display is off) ■ Blinking-notebook is in Standby ■ Off-notebook is off or in Hibernation 2 Hard drive activity On-notebook is accessing the hard drive 3 Battery status ■ Green-AC adapter is connected and the battery pack is fully charged ■ Amber-AC adapter is connected and the battery pack is charging ■ Blinking-AC adapter...
... Started with Your Notebook Status Lights The notebook includes a number of the notebook. 1 Power mode ■ On-notebook is on (even if the display is off) ■ Blinking-notebook is in Standby ■ Off-notebook is off or in Hibernation 2 Hard drive activity On-notebook is accessing the hard drive 3 Battery status ■ Green-AC adapter is connected and the battery pack is fully charged ■ Amber-AC adapter is connected and the battery pack is charging ■ Blinking-AC adapter...
Reference Guide
Page 20
... press enter. If you turn off the notebook. To Change the Boot Device The notebook normally boots from a diskette drive, a CD-ROM drive, or an internal network interface card. 1. You can also boot the notebook from its internal hard drive. Use the arrow keys to restart. Select Start > Turn Off Computer > Restart. 2. Press ctrl+alt+del, then select Shut Down > Restart. -or- ■ Press the power button for at least 4 seconds until the display shuts down Windows...
... press enter. If you turn off the notebook. To Change the Boot Device The notebook normally boots from a diskette drive, a CD-ROM drive, or an internal network interface card. 1. You can also boot the notebook from its internal hard drive. Use the arrow keys to restart. Select Start > Turn Off Computer > Restart. 2. Press ctrl+alt+del, then select Shut Down > Restart. -or- ■ Press the power button for at least 4 seconds until the display shuts down Windows...

Reference Guide
Page 34
... display. Reference Guide 2-17 If you use a screen saver, enable the option to shut off the display after a time delay. ■ Do not disable Display-off or Standby timeouts. ■ If you are using a screen saver or other software that prevents the notebook from changing to Display-off or Standby mode after a timeout period. One-Touch button at your desk, connect an external monitor and turn off monitor timeouts (for both AC and battery...
... display. Reference Guide 2-17 If you use a screen saver, enable the option to shut off the display after a time delay. ■ Do not disable Display-off or Standby timeouts. ■ If you are using a screen saver or other software that prevents the notebook from changing to Display-off or Standby mode after a timeout period. One-Touch button at your desk, connect an external monitor and turn off monitor timeouts (for both AC and battery...
Reference Guide
Page 68
.... Select Start > Control Panel > Appearance and Themes > Display. ■ Try adjusting the size of 1024 × 768 or higher, depending on your model. In the BIOS Setup utility, try setting Video Display Device to Both in the System Devices menu. ■ If you must activate the TV. If an External Display Does Not Work ■ Check the connections. ■ The external monitor may not be detected. If necessary, connect the AC adapter, and make sure...
.... Select Start > Control Panel > Appearance and Themes > Display. ■ Try adjusting the size of 1024 × 768 or higher, depending on your model. In the BIOS Setup utility, try setting Video Display Device to Both in the System Devices menu. ■ If you must activate the TV. If an External Display Does Not Work ■ Check the connections. ■ The external monitor may not be detected. If necessary, connect the AC adapter, and make sure...

Reference Guide
Page 70
.... 2. Keyboard and Pointing Device Problems ✎ Use these suggestions for built-in the Device Manager: 1. You can change this chapter. ■ Restart the notebook. Select Start > Control Panel > Printers and Other Hardware > Mouse. If the Pointer Is Difficult to restore normal operation. ■ If an external mouse is connected, the built-in this setting with the BIOS Setup utility. If this happens, try the following: press a key on the light. ■ Do not touch the TouchPad...
.... 2. Keyboard and Pointing Device Problems ✎ Use these suggestions for built-in the Device Manager: 1. You can change this chapter. ■ Restart the notebook. Select Start > Control Panel > Printers and Other Hardware > Mouse. If the Pointer Is Difficult to restore normal operation. ■ If an external mouse is connected, the built-in this setting with the BIOS Setup utility. If this happens, try the following: press a key on the light. ■ Do not touch the TouchPad...
Reference Guide
Page 71
... server frame type. Try connecting at a different network station, if available. ■ Make sure the LAN cable is disabled, try disabling another device. If it . If You Cannot Log In to enable it has a conflict, try to Netware Servers If a Netware server is 330 feet (100 meters). ■ Select Start > Help and Support > and use the Networking troubleshooter. ■ Open the hardware Device Manager. Select Start > Control Panel > Performance and Maintenance > System. Check...
... server frame type. Try connecting at a different network station, if available. ■ Make sure the LAN cable is disabled, try disabling another device. If it . If You Cannot Log In to enable it has a conflict, try to Netware Servers If a Netware server is 330 feet (100 meters). ■ Select Start > Help and Support > and use the Networking troubleshooter. ■ Open the hardware Device Manager. Select Start > Control Panel > Performance and Maintenance > System. Check...
Reference Guide
Page 76
... Recognize a PC Card ■ Remove and reinsert the PC Card. ■ Restart the notebook. Reference Guide 6-13 If a Network PC Card Stops Communicating Properly ■ The card may have been reset if the notebook entered Standby or shut off. Select Start > Turn Off Computer > Restart. ■ Try the card in the Control Panel. In a hotel, ask for a data line. ■ Check all cables and connections. You must not use a digital line. Open the hardware Device Manager.
... Recognize a PC Card ■ Remove and reinsert the PC Card. ■ Restart the notebook. Reference Guide 6-13 If a Network PC Card Stops Communicating Properly ■ The card may have been reset if the notebook entered Standby or shut off. Select Start > Turn Off Computer > Restart. ■ Try the card in the Control Panel. In a hotel, ask for a data line. ■ Check all cables and connections. You must not use a digital line. Open the hardware Device Manager.

Reference Guide
Page 94
.... Reference Guide 6-31 After a few minutes, the Welcome to continue. Press enter to Setup screen opens. 6. Press C to start the notebook. 5. Press the power button again to continue setup using this partition. Troubleshooting OS CD Reinstall If other recovery efforts do not successfully repair the notebook, you can reinstall the operating system. Å WARNING: Personal data and software you have installed on the notebook. 2. Press and hold the power button for 5 seconds...
.... Reference Guide 6-31 After a few minutes, the Welcome to continue. Press enter to Setup screen opens. 6. Press C to start the notebook. 5. Press the power button again to continue setup using this partition. Troubleshooting OS CD Reinstall If other recovery efforts do not successfully repair the notebook, you can reinstall the operating system. Å WARNING: Personal data and software you have installed on the notebook. 2. Press and hold the power button for 5 seconds...
Reference Guide
Page 98
... port connecting a device 5-7 location 1-2 transferring files 5-8 troubleshooting 6-6 using the port 5-8 inserting battery pack 1-7 CD 2-10 DVD 2-10 PC Card 5-1 RAM (memory) 5-9 K keyboard status lights 1-2, 1-6 troubleshooting 6-7 keys ALT GR 2-9 Applications 2-8 Fn (Function) 2-6 Windows 2-8 L LAN connection 4-5 troubleshooting 6-8 left panel components 1-3 locking the hard drive 2-15 low-battery warning 3-4 M maintenance and care 2-15, 2-16, 2-17 mini PCI cover 1-4 modem AT commands 4-4 blackout periods 4-3 settings 4-4 troubleshooting 6-10 monitor resolution 5-5 N network jack, location...
... port connecting a device 5-7 location 1-2 transferring files 5-8 troubleshooting 6-6 using the port 5-8 inserting battery pack 1-7 CD 2-10 DVD 2-10 PC Card 5-1 RAM (memory) 5-9 K keyboard status lights 1-2, 1-6 troubleshooting 6-7 keys ALT GR 2-9 Applications 2-8 Fn (Function) 2-6 Windows 2-8 L LAN connection 4-5 troubleshooting 6-8 left panel components 1-3 locking the hard drive 2-15 low-battery warning 3-4 M maintenance and care 2-15, 2-16, 2-17 mini PCI cover 1-4 modem AT commands 4-4 blackout periods 4-3 settings 4-4 troubleshooting 6-10 monitor resolution 5-5 N network jack, location...
Reference Guide
Page 100
..., BIOS 6-24 setup utility 6-23 slot location cable lock 1-3 PC Card and CardBus 1-3 software, restoring 6-32 software, updating 6-28 Standby mode 2-2 status lights battery charge 1-5 hard drive 1-5 keyboard 1-2, 1-6 location 1-2 main 1-2, 1-5 meanings 1-5 wireless indicator 1-2 S-Video out jack location 1-3 using 5-4 switching the display, external monitor 5-5 system recovery 6-28 T telephone line connection 1-9 1394 port connecting 5-7 location 1-3 toggling built-in keypad 2-6 TouchPad 1-2, 2-4 functions 2-5 troubleshooting audio 6-2 battery packs 6-15 CD-ROM drive 6-3 display 6-4 DVD drive...
..., BIOS 6-24 setup utility 6-23 slot location cable lock 1-3 PC Card and CardBus 1-3 software, restoring 6-32 software, updating 6-28 Standby mode 2-2 status lights battery charge 1-5 hard drive 1-5 keyboard 1-2, 1-6 location 1-2 main 1-2, 1-5 meanings 1-5 wireless indicator 1-2 S-Video out jack location 1-3 using 5-4 switching the display, external monitor 5-5 system recovery 6-28 T telephone line connection 1-9 1394 port connecting 5-7 location 1-3 toggling built-in keypad 2-6 TouchPad 1-2, 2-4 functions 2-5 troubleshooting audio 6-2 battery packs 6-15 CD-ROM drive 6-3 display 6-4 DVD drive...

HP Compaq nx9020, nx9030 and nx9040 Notebook PCs- Startup Guide
Page 21
... Down > Restart. -or- ■ Press the power button for at least 4 seconds until the display shuts down Windows. See "Configuring Your Notebook" in the "Troubleshooting" chapter in this guide. Use the arrow keys to boot from a diskette drive, a CD-ROM drive, or an internal network interface card. 1. You can also boot the notebook from a specific device whenever it is present, change the boot order using the BIOS Setup utility. If this happens, try the following procedures in...
... Down > Restart. -or- ■ Press the power button for at least 4 seconds until the display shuts down Windows. See "Configuring Your Notebook" in the "Troubleshooting" chapter in this guide. Use the arrow keys to boot from a diskette drive, a CD-ROM drive, or an internal network interface card. 1. You can also boot the notebook from a specific device whenever it is present, change the boot order using the BIOS Setup utility. If this happens, try the following procedures in...
HP Compaq nx9020, nx9030 and nx9040 Notebook PCs- Startup Guide
Page 36
... BIOS Setup utility, try setting Video Display Device to Both in the System Devices menu. ■ If you are using a TV connected to its default setting of 1024 × 768 or higher, depending on your model. Select Start > Control Panel > Appearance and Themes > Display. ■ Try adjusting the size of the notebook. ■ Remove and reinsert the hard drive. 4-2 Startup Guide Hard Drive Problems If the Notebook Hard Drive Does Not Spin ■ Make sure the notebook has power...
... BIOS Setup utility, try setting Video Display Device to Both in the System Devices menu. ■ If you are using a TV connected to its default setting of 1024 × 768 or higher, depending on your model. Select Start > Control Panel > Appearance and Themes > Display. ■ Try adjusting the size of the notebook. ■ Remove and reinsert the hard drive. 4-2 Startup Guide Hard Drive Problems If the Notebook Hard Drive Does Not Spin ■ Make sure the notebook has power...

HP Compaq nx9020, nx9030 and nx9040 Notebook PCs- Startup Guide
Page 45
... setup using this partition. Press and hold the power button for 5 seconds to external power and turn off the notebook. 4. Press esc to learn more about backing up the operating system. 10. The Setup window is displayed. 7. Troubleshooting OS CD Reinstall If other recovery efforts do not successfully repair the notebook, you can reinstall the operating system. Å WARNING: Personal data and software you have installed on the notebook. 2. Press C to boot...
... setup using this partition. Press and hold the power button for 5 seconds to external power and turn off the notebook. 4. Press esc to learn more about backing up the operating system. 10. The Setup window is displayed. 7. Troubleshooting OS CD Reinstall If other recovery efforts do not successfully repair the notebook, you can reinstall the operating system. Å WARNING: Personal data and software you have installed on the notebook. 2. Press C to boot...
HP Compaq nx9020, nx9030 and nx9040 Notebook PCs- Startup Guide
Page 48
... Library CD 1-12 drivers reinstalling 4-12 DVD drive creating data disc 2-7 creating movie disc 2-7 location 1-3 playing movies 2-7 setting region code 2-7 E external monitor connecting 2-8 port location 1-4 F front panel components 1-3 function hot keys 2-6 H hard drive activity status light 1-6 location 1-3, 1-5 troubleshooting 4-2 Hibernation mode 2-2 hot keys 2-6 I identifying components 1-2 increasing display brightness 2-6 infrared port connecting a device 2-8 location 1-3 printing 2-9 transferring files 2-9 using the port 2-9 inserting the battery pack 1-8 K keyboard status lights...
... Library CD 1-12 drivers reinstalling 4-12 DVD drive creating data disc 2-7 creating movie disc 2-7 location 1-3 playing movies 2-7 setting region code 2-7 E external monitor connecting 2-8 port location 1-4 F front panel components 1-3 function hot keys 2-6 H hard drive activity status light 1-6 location 1-3, 1-5 troubleshooting 4-2 Hibernation mode 2-2 hot keys 2-6 I identifying components 1-2 increasing display brightness 2-6 infrared port connecting a device 2-8 location 1-3 printing 2-9 transferring files 2-9 using the port 2-9 inserting the battery pack 1-8 K keyboard status lights...
Startup Guide
Page 32
... BIOS Setup utility, try setting Video Display Device to Both in Display-off mode. ■ If the notebook is cold, allow it to the optional S-Video port, you are using a TV connected to warm up. Troubleshooting Display Problems If the Notebook Is On, But the Screen Is Blank ■ Move the mouse or tap the TouchPad. This will wake the display if it is in the System Devices menu. ■ If you must activate the TV. 4-2 Startup Guide...
... BIOS Setup utility, try setting Video Display Device to Both in Display-off mode. ■ If the notebook is cold, allow it to the optional S-Video port, you are using a TV connected to warm up. Troubleshooting Display Problems If the Notebook Is On, But the Screen Is Blank ■ Move the mouse or tap the TouchPad. This will wake the display if it is in the System Devices menu. ■ If you must activate the TV. 4-2 Startup Guide...

Startup Guide
Page 41
... and software you have installed on the notebook. 2. Connect the notebook to continue. Press enter to external power and turn off the notebook. 4. Press F8 to Setup screen opens. 6. Immediately insert the OS CD into the notebook. 3. To reinstall the operating system: 1. After a few minutes, the Welcome to accept the agreement and continue. The Setup window is displayed. 7. Startup Guide 4-11 When prompted, press any key to continue setup using this partition. Press C to boot...
... and software you have installed on the notebook. 2. Connect the notebook to continue. Press enter to external power and turn off the notebook. 4. Press F8 to Setup screen opens. 6. Immediately insert the OS CD into the notebook. 3. To reinstall the operating system: 1. After a few minutes, the Welcome to accept the agreement and continue. The Setup window is displayed. 7. Startup Guide 4-11 When prompted, press any key to continue setup using this partition. Press C to boot...

Startup Guide
Page 44
... Library CD 1-12 drivers reinstalling 4-12 DVD drive creating data disc 2-7 creating movie disc 2-7 location 1-3 playing movies 2-7 setting region code 2-7 E external monitor connecting 2-8 port location 1-4 F front panel components 1-3 function hot keys 2-6 H hard drive activity status light 1-6 location 1-3, 1-5 troubleshooting 4-3 Hibernation mode 2-2 hot keys 2-6 I identifying components 1-2 increasing display brightness 2-6 infrared port connecting a device 2-8 location 1-3 printing 2-9 transferring files 2-9 using the port 2-9 inserting the battery pack 1-8 K keyboard status lights...
... Library CD 1-12 drivers reinstalling 4-12 DVD drive creating data disc 2-7 creating movie disc 2-7 location 1-3 playing movies 2-7 setting region code 2-7 E external monitor connecting 2-8 port location 1-4 F front panel components 1-3 function hot keys 2-6 H hard drive activity status light 1-6 location 1-3, 1-5 troubleshooting 4-3 Hibernation mode 2-2 hot keys 2-6 I identifying components 1-2 increasing display brightness 2-6 infrared port connecting a device 2-8 location 1-3 printing 2-9 transferring files 2-9 using the port 2-9 inserting the battery pack 1-8 K keyboard status lights...


