
Reference Guide
Page 9
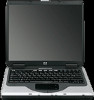
Getting Started with Your Notebook Left Panel and Back Panel Components 1 AC adapter jack 2 Universal serial bus (USB) ports 3 RJ-45 jack: connects a network cable 4 S-Video out jack (select models only) 5 Parallel port (LPT1): use this port for a ... jacks (left to right): external microphone, audio out (headphones) e Volume control r Audio mute button and audio mute light t Diskette drive (select models only) Reference Guide 1-3 PC Card and CardBus slot and button (select models only;
Getting Started with Your Notebook Left Panel and Back Panel Components 1 AC adapter jack 2 Universal serial bus (USB) ports 3 RJ-45 jack: connects a network cable 4 S-Video out jack (select models only) 5 Parallel port (LPT1): use this port for a ... jacks (left to right): external microphone, audio out (headphones) e Volume control r Audio mute button and audio mute light t Diskette drive (select models only) Reference Guide 1-3 PC Card and CardBus slot and button (select models only;
Reference Guide
Page 11
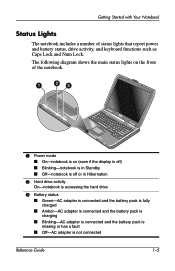
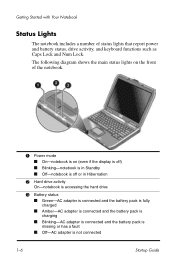
...off) ■ Blinking-notebook is in Standby ■ Off-notebook is off or in Hibernation 2 Hard drive activity On-notebook is accessing the hard drive 3 Battery status ■ Green-AC adapter is connected and the battery pack is fully charged ■ Amber-AC adapter is connected and the ...battery pack is charging ■ Blinking-AC adapter is connected and the battery pack is...
...off) ■ Blinking-notebook is in Standby ■ Off-notebook is off or in Hibernation 2 Hard drive activity On-notebook is accessing the hard drive 3 Battery status ■ Green-AC adapter is connected and the battery pack is fully charged ■ Amber-AC adapter is connected and the ...battery pack is charging ■ Blinking-AC adapter is connected and the battery pack is...
Reference Guide
Page 13
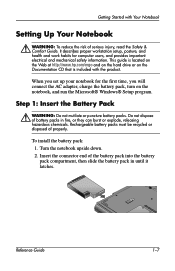
... down. 2. Insert the connector end of properly. Reference Guide 1-7 When you will connect the AC adapter, charge the battery pack, turn on the Documentation CD that is included with Your Notebook Setting Up Your Notebook Å WARNING: To reduce the risk of battery packs in until it latches. To install the battery pack: 1. ... puncture battery packs. Do not dispose of serious injury, read the Safety & Comfort Guide. This guide is located on the Web at http://www.hp.com/ergo and on the hard drive or on the notebook, and run the Microsoft® Windows® Setup program.
... down. 2. Insert the connector end of properly. Reference Guide 1-7 When you will connect the AC adapter, charge the battery pack, turn on the Documentation CD that is included with Your Notebook Setting Up Your Notebook Å WARNING: To reduce the risk of battery packs in until it latches. To install the battery pack: 1. ... puncture battery packs. Do not dispose of serious injury, read the Safety & Comfort Guide. This guide is located on the Web at http://www.hp.com/ergo and on the hard drive or on the notebook, and run the Microsoft® Windows® Setup program.
Reference Guide
Page 14
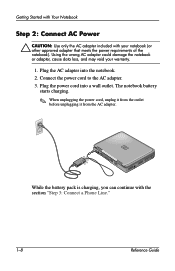
... the wrong AC adapter could damage the notebook or adapter, cause data loss, and may void your notebook (or other approved adapter that meets the power requirements of the notebook). Plug the power cord into the notebook. 2. Connect the power cord to the AC adapter. 3. Getting Started with Your Notebook Step 2: Connect AC Power Ä CAUTION: Use only the AC adapter included with the...
... the wrong AC adapter could damage the notebook or adapter, cause data loss, and may void your notebook (or other approved adapter that meets the power requirements of the notebook). Plug the power cord into the notebook. 2. Connect the power cord to the AC adapter. 3. Getting Started with Your Notebook Step 2: Connect AC Power Ä CAUTION: Use only the AC adapter included with the...
Reference Guide
Page 16
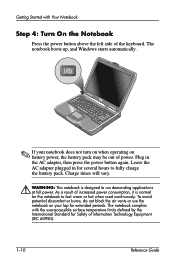
...automatically. ✎ If your notebook does not turn on when operating on your lap for several hours to feel warm or hot when used continuously. Plug in for extended periods. As a result of power. Leave the AC adapter plugged in the AC adapter, then press the power button... again. Charge times will vary. Å WARNING: This notebook is normal for Safety of the keyboard. The notebook complies with Your Notebook Step 4: Turn On the Notebook Press the power button above the left...
...automatically. ✎ If your notebook does not turn on when operating on your lap for several hours to feel warm or hot when used continuously. Plug in for extended periods. As a result of power. Leave the AC adapter plugged in the AC adapter, then press the power button... again. Charge times will vary. Å WARNING: This notebook is normal for Safety of the keyboard. The notebook complies with Your Notebook Step 4: Turn On the Notebook Press the power button above the left...
Reference Guide
Page 29
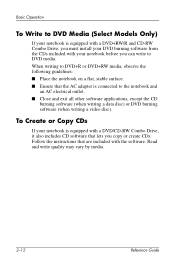
When writing to DVD+R or DVD+RW media, observe the following guidelines: ■ Place the notebook on a flat, stable surface. ■ Ensure that are included with the software. Follow the instructions that the AC adapter is equipped with a DVD/CD-RW Combo Drive, it also includes CD software that lets you copy... or create CDs. To Create or Copy CDs If your notebook before you can write to DVD media. Basic Operation To ...
When writing to DVD+R or DVD+RW media, observe the following guidelines: ■ Place the notebook on a flat, stable surface. ■ Ensure that are included with the software. Follow the instructions that the AC adapter is equipped with a DVD/CD-RW Combo Drive, it also includes CD software that lets you copy... or create CDs. To Create or Copy CDs If your notebook before you can write to DVD media. Basic Operation To ...

Reference Guide
Page 36
... your work before allowing your current session in Windows. To resume normal operation, restore power by connecting an AC adapter or installing a charged battery pack, then shut the notebook off and restart it. 3-2 Reference Guide Turns off the display to turn on the display. Begin using ...The hard drive is not accessed for the specified interval Display turns off. Battery Packs and Power Management How the Notebook Manages Power Automatically Your notebook enters Hibernation and Standby automatically, and turns off the hard drive and display based on values set to occur shortly ...
... your work before allowing your current session in Windows. To resume normal operation, restore power by connecting an AC adapter or installing a charged battery pack, then shut the notebook off and restart it. 3-2 Reference Guide Turns off the display to turn on the display. Begin using ...The hard drive is not accessed for the specified interval Display turns off. Battery Packs and Power Management How the Notebook Manages Power Automatically Your notebook enters Hibernation and Standby automatically, and turns off the hard drive and display based on values set to occur shortly ...

Reference Guide
Page 38
...you restore power by doing one of the following procedures: ■ Replace the battery pack with Your Notebook" chapter in this guide. 2. Remove the battery pack from the notebook. The notebook first emits a high-pitched beep or displays a warning message. On the battery pack 1. Battery Packs...restore power within a short time, the notebook goes into Hibernation. The Alarms and Advanced tabs provide additional power information options. See the "Getting Started with a charged one. ■ Plug in the AC adapter. ✎ If you plug in the AC adapter, you will not be able to work...
...you restore power by doing one of the following procedures: ■ Replace the battery pack with Your Notebook" chapter in this guide. 2. Remove the battery pack from the notebook. The notebook first emits a high-pitched beep or displays a warning message. On the battery pack 1. Battery Packs...restore power within a short time, the notebook goes into Hibernation. The Alarms and Advanced tabs provide additional power information options. See the "Getting Started with a charged one. ■ Plug in the AC adapter. ✎ If you plug in the AC adapter, you will not be able to work...
Reference Guide
Page 39
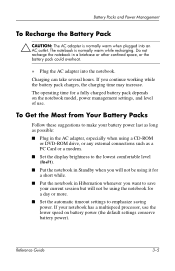
... Put the notebook in a briefcase or other confined space, or the battery pack could overheat. » Plug the AC adapter into an AC outlet. Do not recharge the notebook in Hibernation ...notebook model, power management settings, and level of use the lower speed on battery power (the default settings conserve battery power). Battery Packs and Power Management To Recharge the Battery Pack Ä CAUTION: The AC adapter... is normally warm while recharging. If your battery power last as long as possible: ■ Plug in the AC adapter, especially when using a ...
... Put the notebook in a briefcase or other confined space, or the battery pack could overheat. » Plug the AC adapter into an AC outlet. Do not recharge the notebook in Hibernation ...notebook model, power management settings, and level of use the lower speed on battery power (the default settings conserve battery power). Battery Packs and Power Management To Recharge the Battery Pack Ä CAUTION: The AC adapter... is normally warm while recharging. If your battery power last as long as possible: ■ Plug in the AC adapter, especially when using a ...
Reference Guide
Page 40
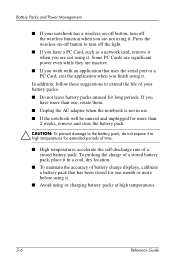
..., do not expose it to extend the life of your notebook has a wireless on -off button to turn off the light. ■ If you work with an application that has been stored for one , rotate them. ■ Unplug the AC adapter when the notebook is not in a cool, dry location. ■ To ...maintain the accuracy of a stored battery pack. If you have a PC Card, such as a network card, remove it when you finish using it . In addition,...
..., do not expose it to extend the life of your notebook has a wireless on -off button to turn off the light. ■ If you work with an application that has been stored for one , rotate them. ■ Unplug the AC adapter when the notebook is not in a cool, dry location. ■ To ...maintain the accuracy of a stored battery pack. If you have a PC Card, such as a network card, remove it when you finish using it . In addition,...
Reference Guide
Page 58
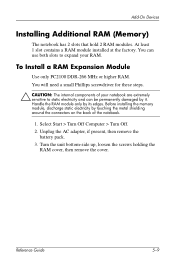
..., then remove the cover. Unplug the AC adapter, if present, then remove the battery pack. 3. Reference Guide 5-9 To Install a RAM Expansion Module Use only PC2100 DDR-266 MHz or higher RAM. Add-On Devices Installing Additional RAM (Memory) The notebook has 2 slots that hold 2 RAM ...modules. You will need a small Phillips screwdriver for these steps. Ä CAUTION: The internal components of the notebook. 1. At least 1 slot contains a RAM module installed at the ...
..., then remove the cover. Unplug the AC adapter, if present, then remove the battery pack. 3. Reference Guide 5-9 To Install a RAM Expansion Module Use only PC2100 DDR-266 MHz or higher RAM. Add-On Devices Installing Additional RAM (Memory) The notebook has 2 slots that hold 2 RAM ...modules. You will need a small Phillips screwdriver for these steps. Ä CAUTION: The internal components of the notebook. 1. At least 1 slot contains a RAM module installed at the ...
Reference Guide
Page 59
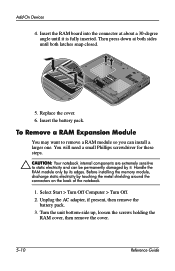
...want to static electricity and can install a larger one. Unplug the AC adapter, if present, then remove the battery pack. 3. Insert the battery pack. Handle the RAM module only by touching the metal shielding around the connectors on the back of the notebook. 1. Select Start > Turn Off Computer > Turn Off. 2.... You will need a small Phillips screwdriver for these steps. Ä CAUTION: Your notebook internal components are extremely sensitive to remove a RAM module so you can be permanently damaged by it is fully inserted. Then press down ...
...want to static electricity and can install a larger one. Unplug the AC adapter, if present, then remove the battery pack. 3. Insert the battery pack. Handle the RAM module only by touching the metal shielding around the connectors on the back of the notebook. 1. Select Start > Turn Off Computer > Turn Off. 2.... You will need a small Phillips screwdriver for these steps. Ä CAUTION: Your notebook internal components are extremely sensitive to remove a RAM module so you can be permanently damaged by it is fully inserted. Then press down ...
Reference Guide
Page 61
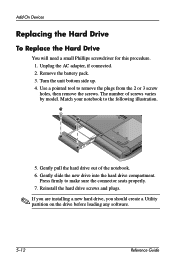
... you are installing a new hard drive, you should create a Utility partition on the drive before loading any software. 5-12 Reference Guide The number of the notebook. 6. Add-On Devices Replacing the Hard Drive To Replace the Hard Drive You will need a small Phillips screwdriver for this procedure. 1. Use a pointed tool to... 2 or 3 screw holes, then remove the screws. Turn the unit bottom side up. 4. Gently slide the new drive into the hard drive compartment. Unplug the AC adapter, if connected. 2. Match your notebook to the following illustration. 5.
... you are installing a new hard drive, you should create a Utility partition on the drive before loading any software. 5-12 Reference Guide The number of the notebook. 6. Add-On Devices Replacing the Hard Drive To Replace the Hard Drive You will need a small Phillips screwdriver for this procedure. 1. Use a pointed tool to... 2 or 3 screw holes, then remove the screws. Turn the unit bottom side up. 4. Gently slide the new drive into the hard drive compartment. Unplug the AC adapter, if connected. 2. Match your notebook to the following illustration. 5.
Reference Guide
Page 68
...into the back of the notebook. ■ Remove and reinsert the hard drive. Reference Guide 6-5 Select Start > Control Panel > Appearance and Themes > Display. ■ Try adjusting the size of 1024 × 768 or higher, depending on your model. If necessary, connect the AC adapter, and make sure it is... coming from elsewhere, such as from the fan or a PC Card drive. ■ Back up the drive immediately. Troubleshooting If the Screen Is Difficult to Read ...
...into the back of the notebook. ■ Remove and reinsert the hard drive. Reference Guide 6-5 Select Start > Control Panel > Appearance and Themes > Display. ■ Try adjusting the size of 1024 × 768 or higher, depending on your model. If necessary, connect the AC adapter, and make sure it is... coming from elsewhere, such as from the fan or a PC Card drive. ■ Back up the drive immediately. Troubleshooting If the Screen Is Difficult to Read ...
Reference Guide
Page 78
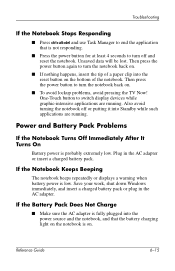
...insert the tip of a paper clip into the reset button on the bottom of the notebook. Save your work, shut down Windows immediately, and insert a charged battery pack or plug in the AC adapter or insert a charged battery pack. Then press the power button again to switch display..., avoid pressing the TV Now! If the Notebook Keeps Beeping The notebook beeps repeatedly or displays a warning when battery power is probably extremely low. Plug in the AC adapter. Reference Guide 6-15 Power and Battery Pack Problems If the Notebook Turns Off Immediately After It Turns On Battery power...
...insert the tip of a paper clip into the reset button on the bottom of the notebook. Save your work, shut down Windows immediately, and insert a charged battery pack or plug in the AC adapter or insert a charged battery pack. Then press the power button again to switch display..., avoid pressing the TV Now! If the Notebook Keeps Beeping The notebook beeps repeatedly or displays a warning when battery power is probably extremely low. Plug in the AC adapter. Reference Guide 6-15 Power and Battery Pack Problems If the Notebook Turns Off Immediately After It Turns On Battery power...
Reference Guide
Page 79
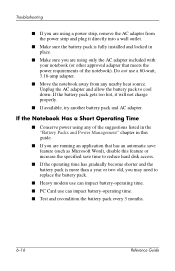
... any of the notebook). If the Notebook Has a Short Operating Time ■ Conserve power using any nearby heat source. Unplug the AC adapter and allow the battery pack to replace the battery pack. ■ Heavy modem use can impact battery-operating time. ■ PC Card use can impact battery-operating ... listed in the "Battery Packs and Power Management" chapter in place. ■ Make sure you are using only the AC adapter included with your notebook (or other approved adapter that has an automatic save feature (such as Microsoft Word), disable this guide. ■ If you may need to ...
... any of the notebook). If the Notebook Has a Short Operating Time ■ Conserve power using any nearby heat source. Unplug the AC adapter and allow the battery pack to replace the battery pack. ■ Heavy modem use can impact battery-operating time. ■ PC Card use can impact battery-operating ... listed in the "Battery Packs and Power Management" chapter in place. ■ Make sure you are using only the AC adapter included with your notebook (or other approved adapter that has an automatic save feature (such as Microsoft Word), disable this guide. ■ If you may need to ...
Reference Guide
Page 83
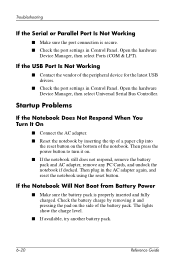
... Contact the vendor of the peripheral device for the latest USB drivers. ■ Check the port settings in Control Panel. Then plug in the AC adapter again, and reset the notebook using the reset button. Then press the power button to turn it and pressing the pad on . ■ If the... notebook still does not respond, remove the battery pack and AC adapter, remove any PC Cards, and undock the notebook if docked. Open the hardware Device Manager, then select Ports (COM & LPT). Open the hardware Device ...
... Contact the vendor of the peripheral device for the latest USB drivers. ■ Check the port settings in Control Panel. Then plug in the AC adapter again, and reset the notebook using the reset button. Then press the power button to turn it and pressing the pad on . ■ If the... notebook still does not respond, remove the battery pack and AC adapter, remove any PC Cards, and undock the notebook if docked. Open the hardware Device Manager, then select Ports (COM & LPT). Open the hardware Device ...

Reference Guide
Page 96
Index 1394 port connecting 5-7 location 1-3 A AC adapter connecting 1-8 jack location 1-3 adjusting brightness 2-6 monitor resolution 5-5 volume 2-6 ALT GR key 2-9 alternate graphics (ALT GR) 2-9 antivirus software 2-14 AT commands 4-4 audio adjusting volume 2-6 device connection 5-3 ...
Index 1394 port connecting 5-7 location 1-3 A AC adapter connecting 1-8 jack location 1-3 adjusting brightness 2-6 monitor resolution 5-5 volume 2-6 ALT GR key 2-9 alternate graphics (ALT GR) 2-9 antivirus software 2-14 AT commands 4-4 audio adjusting volume 2-6 device connection 5-3 ...
HP Compaq nx9020, nx9030 and nx9040 Notebook PCs- Startup Guide
Page 10
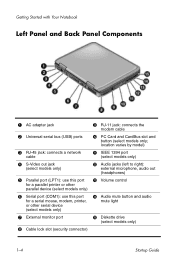
PC Card and CardBus slot and button (select models only; location varies by model) q IEEE 1394 port (select models only) w Audio jacks (left to right): external microphone, audio out (headphones) e Volume control r Audio mute button and audio mute light t Diskette drive (select models only) 1-4 Startup Guide Getting Started with Your Notebook... Left Panel and Back Panel Components 1 AC adapter jack 2 Universal serial bus (USB) ports 3 RJ-45 jack: connects a network cable 4 S-...
PC Card and CardBus slot and button (select models only; location varies by model) q IEEE 1394 port (select models only) w Audio jacks (left to right): external microphone, audio out (headphones) e Volume control r Audio mute button and audio mute light t Diskette drive (select models only) 1-4 Startup Guide Getting Started with Your Notebook... Left Panel and Back Panel Components 1 AC adapter jack 2 Universal serial bus (USB) ports 3 RJ-45 jack: connects a network cable 4 S-...
HP Compaq nx9020, nx9030 and nx9040 Notebook PCs- Startup Guide
Page 12
... off or in Hibernation 2 Hard drive activity On-notebook is accessing the hard drive 3 Battery status ■ Green-AC adapter is connected and the battery pack is fully charged ■ Amber-AC adapter is connected and the battery pack is charging ■ Blinking-AC adapter is connected and the battery pack is missing...
... off or in Hibernation 2 Hard drive activity On-notebook is accessing the hard drive 3 Battery status ■ Green-AC adapter is connected and the battery pack is fully charged ■ Amber-AC adapter is connected and the battery pack is charging ■ Blinking-AC adapter is connected and the battery pack is missing...


