
Maintenance and Service Guide
Page 6
..., ze4700, ze4600, ze4500, ze4400, ze4300, ze4200, and ze4100 Notebook PCs, HP Compaq nx9010, nx9008, nx9005, and nx9000 Notebook PCs, Compaq Evo Notebook 1050v and 1010v Series, and Compaq Presario 2500, 2100, and 1100 Series Mobile PCs. U.S. Information about the notebook computers and related products. This manual is for DPSP Partners America Online CompuServe HP Support Assist CD-ROM Microsoft® Windows®...
..., ze4700, ze4600, ze4500, ze4400, ze4300, ze4200, and ze4100 Notebook PCs, HP Compaq nx9010, nx9008, nx9005, and nx9000 Notebook PCs, Compaq Evo Notebook 1050v and 1010v Series, and Compaq Presario 2500, 2100, and 1100 Series Mobile PCs. U.S. Information about the notebook computers and related products. This manual is for DPSP Partners America Online CompuServe HP Support Assist CD-ROM Microsoft® Windows®...

Maintenance and Service Guide
Page 11
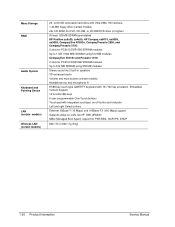
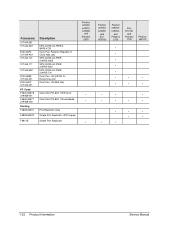
HP Compaq nx9010 Processor Memory Display Video Operating System Power States HP Compaq nx9008 Mobile Intel Pentium 4 (2.4-, 2.53-, 2.66-, and 3.06-GHz) Intel Celeron (2.0- and 2.8-GHz) At least 256 MB SDRAM preinstalled 14.1-inch ...accelerator with 16, 32, or 64 MB UMA graphics memory, 4x AGP graphics capability Windows XP Professional or Home preinstalled On, Standby, Hibernate, Off Service Manual Product Information 1-5 Windows XP Professional or Home preinstalled On, Standby, Hibernate, Off Processor Memory Display Video Operating System Power States Mobile Intel Pentium 4-M (1.8-, ...
HP Compaq nx9010 Processor Memory Display Video Operating System Power States HP Compaq nx9008 Mobile Intel Pentium 4 (2.4-, 2.53-, 2.66-, and 3.06-GHz) Intel Celeron (2.0- and 2.8-GHz) At least 256 MB SDRAM preinstalled 14.1-inch ...accelerator with 16, 32, or 64 MB UMA graphics memory, 4x AGP graphics capability Windows XP Professional or Home preinstalled On, Standby, Hibernate, Off Service Manual Product Information 1-5 Windows XP Professional or Home preinstalled On, Standby, Hibernate, Off Processor Memory Display Video Operating System Power States Mobile Intel Pentium 4-M (1.8-, ...
Maintenance and Service Guide
Page 17
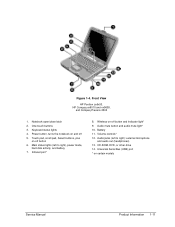
... Wireless on certain models Service Manual Product Information 1-11 Touch pad, scroll pad, Select buttons, plus on and off button 6. Volume controls* 12. CD-ROM, DVD, or other drive 14. Notebook open/close latch 2. Front View HP Pavilion ze5x00, HP Compaq nx9010 and nx9008, and Compaq Presario... 2500 1. Power button, turns the notebook on -off 5. Battery 11. Audio jacks (left to right): external microphone ...
... Wireless on certain models Service Manual Product Information 1-11 Touch pad, scroll pad, Select buttons, plus on and off button 6. Volume controls* 12. CD-ROM, DVD, or other drive 14. Notebook open/close latch 2. Front View HP Pavilion ze5x00, HP Compaq nx9010 and nx9008, and Compaq Presario... 2500 1. Power button, turns the notebook on -off 5. Battery 11. Audio jacks (left to right): external microphone ...

Maintenance and Service Guide
Page 18
S-Video port* 22. Figure 1-5. AC adapter jack 16. LAN port* 18. PCMCIA card and CardBus slot and button 26. External keyboard/mouse port 19. IEEE 1394 port* 25. Floppy drive* * on certain models 1-12 Product Information Service Manual Parallel port (LPT1), use this port for a parallel printer or other parallel device 20. Two universal Serial Bus (USB) ports 17. External monitor port 21. Modem port* 24. Back View HP Pavilion 5x00, HP Compaq nx9010, and nx9008 and Compaq Presario 2500 15. Kensington lock cable slot (security connector) 23.
S-Video port* 22. Figure 1-5. AC adapter jack 16. LAN port* 18. PCMCIA card and CardBus slot and button 26. External keyboard/mouse port 19. IEEE 1394 port* 25. Floppy drive* * on certain models 1-12 Product Information Service Manual Parallel port (LPT1), use this port for a parallel printer or other parallel device 20. Two universal Serial Bus (USB) ports 17. External monitor port 21. Modem port* 24. Back View HP Pavilion 5x00, HP Compaq nx9010, and nx9008 and Compaq Presario 2500 15. Kensington lock cable slot (security connector) 23.
Maintenance and Service Guide
Page 26
... drive (certain models) 24x CD-ROM, 8x DVD, CD-RW, or CD-RW/DVD drive (or higher) At least 128 MB SDRAM preinstalled HP Pavilion ze5x00, ze4x00, HP Compaq nx9010, nx9008, nx9005, Compaq Evo N1050v, Compaq Presario 2500, and Compaq Presario 2100: 2 slots for PC2100 DDR-266 SDRAM modules Up to 1 GB (1024..., fast IP, DMI, dRMON MBA (Managed Boot Agent) support for PXE/BINL, NCP/IPX, DHCP 802.11b or 802.11g (54g) 1-20 Product Information Service Manual Embedded numeric keypad. 12 function (Fn) keys 5 user-programmable One-Touch buttons Touch pad with 101/102 key emulation.
... drive (certain models) 24x CD-ROM, 8x DVD, CD-RW, or CD-RW/DVD drive (or higher) At least 128 MB SDRAM preinstalled HP Pavilion ze5x00, ze4x00, HP Compaq nx9010, nx9008, nx9005, Compaq Evo N1050v, Compaq Presario 2500, and Compaq Presario 2100: 2 slots for PC2100 DDR-266 SDRAM modules Up to 1 GB (1024..., fast IP, DMI, dRMON MBA (Managed Boot Agent) support for PXE/BINL, NCP/IPX, DHCP 802.11b or 802.11g (54g) 1-20 Product Information Service Manual Embedded numeric keypad. 12 function (Fn) keys 5 user-programmable One-Touch buttons Touch pad with 101/102 key emulation.
Maintenance and Service Guide
Page 27
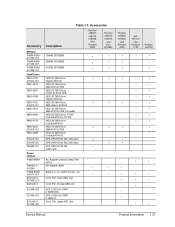
Accessories Pavilion ze5x00, nx9010, nx9008, and Presario 2500 Pavilion ze4x00, nx9005, and Evo N1050v •... (2w) SPS-CORD-AC PWR 2 WIRE-INTL SPS-CORD-AC PWR 2 WIRE-IT Cord, Pwr, Japan ABJ (2w) Pavilion ze4200, nx9000, and Presario 2100 • • • • • • • • • Evo N1010v and Presario ...• • Pavilion ze4100 • • • • • • • • Service Manual Product Information 1-21 Accessory Memory F4694-60901 317434-001 F4695-60901 317435-001 F4696-60901 317436-001 Hard Drives 0950-4193 319412-...
Accessories Pavilion ze5x00, nx9010, nx9008, and Presario 2500 Pavilion ze4x00, nx9005, and Evo N1050v •... (2w) SPS-CORD-AC PWR 2 WIRE-INTL SPS-CORD-AC PWR 2 WIRE-IT Cord, Pwr, Japan ABJ (2w) Pavilion ze4200, nx9000, and Presario 2100 • • • • • • • • • Evo N1010v and Presario ...• • Pavilion ze4100 • • • • • • • • Service Manual Product Information 1-21 Accessory Memory F4694-60901 317434-001 F4695-60901 317435-001 F4696-60901 317436-001 Hard Drives 0950-4193 319412-...
Maintenance and Service Guide
Page 28
...-8699 317444-031 8120-6313 317444-001 PC Cards F4640-60978 319468-051 F4640-60977 ...HP/Compaq Simple Port Replicator Pavilion ze5x00, nx9010, nx9008, and Presario 2500 • • • Pavilion ze4x00, nx9005, and Evo N1050v Pavilion ze4200, nx9000..., and Presario 2100 Evo N1010v and Presario 1100 Pavilion ze4100 • • • • • • • • • • • • • • • • • • • • • • • • • 1-22 Product Information Service Manual
...-8699 317444-031 8120-6313 317444-001 PC Cards F4640-60978 319468-051 F4640-60977 ...HP/Compaq Simple Port Replicator Pavilion ze5x00, nx9010, nx9008, and Presario 2500 • • • Pavilion ze4x00, nx9005, and Evo N1050v Pavilion ze4200, nx9000..., and Presario 2100 Evo N1010v and Presario 1100 Pavilion ze4100 • • • • • • • • • • • • • • • • • • • • • • • • • 1-22 Product Information Service Manual
Maintenance and Service Guide
Page 35
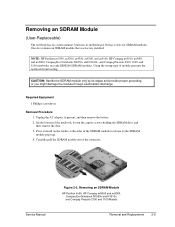
... Required Equipment 1 Phillips screwdriver Removal Procedure 1. Service Manual Figure 2-3. Press outward on the latches at the sides of module prevents the notebook from booting. Removing an SDRAM Module (User-Replaceable) The notebook has no system memory built into its edges and ...provide proper grounding, or you might damage the module through electrostatic discharge. NOTE: HP Pavilion ze5300, ze5200, ze4300, ze4200, and ze4100, HP Compaq nx9010, nx9005 and nx9000, Compaq Evo Notebook N1050v and N1010v...
... Required Equipment 1 Phillips screwdriver Removal Procedure 1. Service Manual Figure 2-3. Press outward on the latches at the sides of module prevents the notebook from booting. Removing an SDRAM Module (User-Replaceable) The notebook has no system memory built into its edges and ...provide proper grounding, or you might damage the module through electrostatic discharge. NOTE: HP Pavilion ze5300, ze5200, ze4300, ze4200, and ze4100, HP Compaq nx9010, nx9005 and nx9000, Compaq Evo Notebook N1050v and N1010v...
Maintenance and Service Guide
Page 36
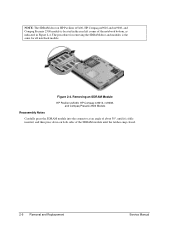
The procedure for removing the SDRAM door and modules is the same for all notebook models. Figure 2-4. Removing an SDRAM Module HP Pavilion ze5x00, HP Compaq nx9010, nx9008, and Compaq Presario 2500 Models Reassembly Notes Carefully press the SDRAM module into the connector at an angle of about 30°, until ...it is fully inserted, and then press down on HP Pavilion ze5x00, HP Compaq nx9010 and nx9008, and Compaq Presario 2500 models is located in the rear left corner of the SDRAM module until the latches snap closed...
The procedure for removing the SDRAM door and modules is the same for all notebook models. Figure 2-4. Removing an SDRAM Module HP Pavilion ze5x00, HP Compaq nx9010, nx9008, and Compaq Presario 2500 Models Reassembly Notes Carefully press the SDRAM module into the connector at an angle of about 30°, until ...it is fully inserted, and then press down on HP Pavilion ze5x00, HP Compaq nx9010 and nx9008, and Compaq Presario 2500 models is located in the rear left corner of the SDRAM module until the latches snap closed...

Maintenance and Service Guide
Page 38
..., and Compaq Presario 2500 models is fully inserted, and then press down on both sides of the notebook bottom, as indicated in Figure 2-6. Removing the Mini PCI Card HP Pavilion ze5x00, HP Compaq nx9010 and nx9008, and Compaq Presario 2500 Models Reassembly Notes Carefully press the Mini PCI card into the connector at an... 30°, until it is located in the front center area of the Mini PCI card until the latches snap closed. 2-8 Removal and Replacement Service Manual The procedure for removing the Mini PCI door and card is the same for all notebook models. Figure 2-6.
..., and Compaq Presario 2500 models is fully inserted, and then press down on both sides of the notebook bottom, as indicated in Figure 2-6. Removing the Mini PCI Card HP Pavilion ze5x00, HP Compaq nx9010 and nx9008, and Compaq Presario 2500 Models Reassembly Notes Carefully press the Mini PCI card into the connector at an... 30°, until it is located in the front center area of the Mini PCI card until the latches snap closed. 2-8 Removal and Replacement Service Manual The procedure for removing the Mini PCI door and card is the same for all notebook models. Figure 2-6.
Maintenance and Service Guide
Page 44
... the mating slots under the right side of the panel into place. 2-14 Removal and Replacement Service Manual Figure 2-10. Disconnecting the Speaker Cable Reassembly Note Insert the tabs on HP Pavilion 5300 and 5200, HP Compaq nx9010, and Compaq Presario 2500 models, disconnect the speaker cable as indicated in Figure 2-10. and right...
... the mating slots under the right side of the panel into place. 2-14 Removal and Replacement Service Manual Figure 2-10. Disconnecting the Speaker Cable Reassembly Note Insert the tabs on HP Pavilion 5300 and 5200, HP Compaq nx9010, and Compaq Presario 2500 models, disconnect the speaker cable as indicated in Figure 2-10. and right...
Maintenance and Service Guide
Page 45
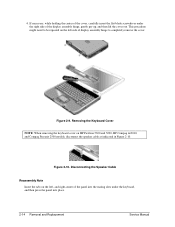
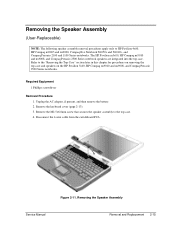
...Refer to the top case. 4. Removing the Speaker Assembly Service Manual Removal and Replacement 2-15 The HP Pavilion ze5x00, HP Compaq nx9010 and nx9008, and Compaq Presario 2500 Series notebook speakers are integrated into the top case. Removing the Speaker Assembly ...(User-Replaceable) NOTE: The following speaker assembly removal procedures apply only to HP Pavilion 4x00, HP Compaq nx9005 and nx9000, Compaq Evo Notebook...
...Refer to the top case. 4. Removing the Speaker Assembly Service Manual Removal and Replacement 2-15 The HP Pavilion ze5x00, HP Compaq nx9010 and nx9008, and Compaq Presario 2500 Series notebook speakers are integrated into the top case. Removing the Speaker Assembly ...(User-Replaceable) NOTE: The following speaker assembly removal procedures apply only to HP Pavilion 4x00, HP Compaq nx9005 and nx9000, Compaq Evo Notebook...
Maintenance and Service Guide
Page 49
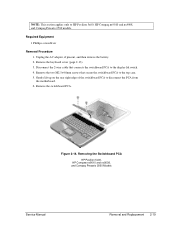
... display lid switch. 4. Remove the keyboard cover (page 2-13). 3. Figure 2-14. Remove the switchboard PCA. Removing the Switchboard PCA HP Pavilion 5x00, HP Compaw nx9010 and nx9008, and Compaq Presario 2500 Models Service Manual Removal and Replacement 2-19 NOTE: This section applies only to disconnect the PCA from the motherboard. 6. Remove the two M2... case. 5. Unplug the AC adapter, if present, and then remove the battery. 2. Gently lift up on the rear right edge of the switchboard PCA to HP Pavilion 5x00, HP Compaq nx9010 and nx9008, and Compaq Presario 2500 models.
... display lid switch. 4. Remove the keyboard cover (page 2-13). 3. Figure 2-14. Remove the switchboard PCA. Removing the Switchboard PCA HP Pavilion 5x00, HP Compaw nx9010 and nx9008, and Compaq Presario 2500 Models Service Manual Removal and Replacement 2-19 NOTE: This section applies only to disconnect the PCA from the motherboard. 6. Remove the two M2... case. 5. Unplug the AC adapter, if present, and then remove the battery. 2. Gently lift up on the rear right edge of the switchboard PCA to HP Pavilion 5x00, HP Compaq nx9010 and nx9008, and Compaq Presario 2500 models.
Maintenance and Service Guide
Page 51
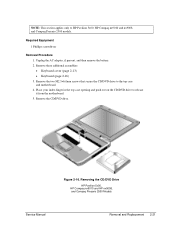
... Place your index finger in the top case opening and push out on the CD/DVD drive to HP Pavilion 5x00, HP Compaq nx9010 and nx9008, and Compaq Presario 2500 models. Required Equipment 1 Phillips screwdriver Removal Procedure 1. Remove the ...two M2.5×6.0mm screws that secure the CD/DVD drive to the top case and motherboard. 4. Removing the CD/DVD Drive HP Pavilion 5x00, HP Compaq nx9010 and HP nx9008, and Compaq Presario 2500 Models Service Manual...
... Place your index finger in the top case opening and push out on the CD/DVD drive to HP Pavilion 5x00, HP Compaq nx9010 and nx9008, and Compaq Presario 2500 models. Required Equipment 1 Phillips screwdriver Removal Procedure 1. Remove the ...two M2.5×6.0mm screws that secure the CD/DVD drive to the top case and motherboard. 4. Removing the CD/DVD Drive HP Pavilion 5x00, HP Compaq nx9010 and HP nx9008, and Compaq Presario 2500 Models Service Manual...
Maintenance and Service Guide
Page 56
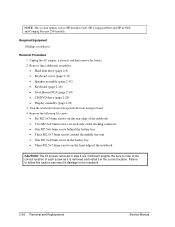
...Three M2.5×7.0mm screws on the front edge of the notebook • Two M2.5×6.0mm screws on each screw as it is removed and install it in damage to HP Pavilion 5x00, HP Compaq nx9010 and HP nx9008, and Compaq Presario 2500 models. Required Equipment 1 Phillips... screwdriver Removal Procedure 1. NOTE: This section applies only to the notebook. 2-26 Removal and Replacement Service Manual Be sure to follow this caution ...
...Three M2.5×7.0mm screws on the front edge of the notebook • Two M2.5×6.0mm screws on each screw as it is removed and install it in damage to HP Pavilion 5x00, HP Compaq nx9010 and HP nx9008, and Compaq Presario 2500 models. Required Equipment 1 Phillips... screwdriver Removal Procedure 1. NOTE: This section applies only to the notebook. 2-26 Removal and Replacement Service Manual Be sure to follow this caution ...

Maintenance and Service Guide
Page 57
Remove the two M2.5×7.0mm screws from the rear of the bottom case. Figure 2-20. Figure 2-19. Turn the notebook top side up with the rear panel facing forward. 6. Removing the Top Case Screws HP Pavilion 5x00, HP Compaq nx9010 and nx9008, and Compaq Presario 2500 Models Service Manual Removal and Replacement 2-27 Removing the Top Case Screws HP Pavilion 5x00, HP Compaq nx9010 and nx9008, and Compaq Presario 2500 Models 5.
Remove the two M2.5×7.0mm screws from the rear of the bottom case. Figure 2-20. Figure 2-19. Turn the notebook top side up with the rear panel facing forward. 6. Removing the Top Case Screws HP Pavilion 5x00, HP Compaq nx9010 and nx9008, and Compaq Presario 2500 Models Service Manual Removal and Replacement 2-27 Removing the Top Case Screws HP Pavilion 5x00, HP Compaq nx9010 and nx9008, and Compaq Presario 2500 Models 5.
Maintenance and Service Guide
Page 58
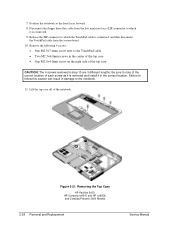
7. Removing the Top Case HP Pavilion 5x00, HP Compaq nx9010 and HP nx9008, and Compaq Presario 2500 Models 2-28 Removal and Replacement Service Manual Disconnect the floppy drive flex cable from the system board. 10. Position the notebook so the front faces forward. 8. Be sure to the notebook. 11. Remove the following 4 screws: • One ... in step 10 are 3 different lengths. Figure 2-21. Failure to which the TouchPad cable is connected. 9. Lift the top case off of the notebook. Release the ZIF connector to follow this caution can result in the correct location.
7. Removing the Top Case HP Pavilion 5x00, HP Compaq nx9010 and HP nx9008, and Compaq Presario 2500 Models 2-28 Removal and Replacement Service Manual Disconnect the floppy drive flex cable from the system board. 10. Position the notebook so the front faces forward. 8. Be sure to the notebook. 11. Remove the following 4 screws: • One ... in step 10 are 3 different lengths. Figure 2-21. Failure to which the TouchPad cable is connected. 9. Lift the top case off of the notebook. Release the ZIF connector to follow this caution can result in the correct location.
Maintenance and Service Guide
Page 61
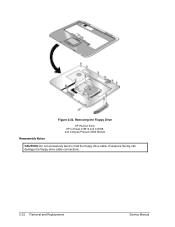
... remove the battery. 2. Remove the four M2.5×6.0mm screws that secure the floppy drive and floppy drive bezel to HP Pavilion 5x00, HP Compaq nx9010 and nx9008, and Compaq Presario 2500 models. Service Manual Removal and Replacement 2-31 Required Equipment • 1 Phillips screwdriver Removal Procedure 1. Remove the floppy drive bezel. Remove these additional...
... remove the battery. 2. Remove the four M2.5×6.0mm screws that secure the floppy drive and floppy drive bezel to HP Pavilion 5x00, HP Compaq nx9010 and nx9008, and Compaq Presario 2500 models. Service Manual Removal and Replacement 2-31 Required Equipment • 1 Phillips screwdriver Removal Procedure 1. Remove the floppy drive bezel. Remove these additional...
Maintenance and Service Guide
Page 62
Removing the Floppy Drive HP Pavilion 5x00, HP Compaq nx9010 and nx9008, and Compaq Presario 2500 Models CAUTION: Do not excessively bend or fold the floppy drive cable. Reassembly Notes Figure 2-23. Excessive flexing can damage the floppy drive cable connections. 2-32 Removal and Replacement Service Manual
Removing the Floppy Drive HP Pavilion 5x00, HP Compaq nx9010 and nx9008, and Compaq Presario 2500 Models CAUTION: Do not excessively bend or fold the floppy drive cable. Reassembly Notes Figure 2-23. Excessive flexing can damage the floppy drive cable connections. 2-32 Removal and Replacement Service Manual
Maintenance and Service Guide
Page 65
... case. 5. Service Manual Removal and Replacement 2-35 Required Equipment 1 Phillips screwdriver Removal Procedure 1. Unplug the AC adapter, if present, and then remove the battery. 2. Remove the audio PCA shield. Remove the two M2.0×3.0mm flathead screws that secure the audio PCA shield to HP Pavilion 5300 and 5200, HP Compaq nx9010, and Compaq...
... case. 5. Service Manual Removal and Replacement 2-35 Required Equipment 1 Phillips screwdriver Removal Procedure 1. Unplug the AC adapter, if present, and then remove the battery. 2. Remove the audio PCA shield. Remove the two M2.0×3.0mm flathead screws that secure the audio PCA shield to HP Pavilion 5300 and 5200, HP Compaq nx9010, and Compaq...


