Warranty Guide
Page 2
... repair or replace, as projector Limited hardware warranty HP Digital Projector Cables, Remote Control, and other parts (purchased separately) 90 days Limited hardware warranty hp digital projector limited warranty statement extent of purchase. 2. For software products, HP's limited warranty applies only to a failure to that you get the most out of your HP Digital Projector. HP shall have been subject to incidental use (whichever comes first) Limited hardware warranty HP Digital Projector Cables, Remote Control, and other parts...
... repair or replace, as projector Limited hardware warranty HP Digital Projector Cables, Remote Control, and other parts (purchased separately) 90 days Limited hardware warranty hp digital projector limited warranty statement extent of purchase. 2. For software products, HP's limited warranty applies only to a failure to that you get the most out of your HP Digital Projector. HP shall have been subject to incidental use (whichever comes first) Limited hardware warranty HP Digital Projector Cables, Remote Control, and other parts...
User Guide
Page 4
... image settings 34 To adjust the audio 34 To adjust the projector setup 35 Using the On-Screen Menu 36 To change settings using the on-screen menu 37 Quick choice menu 38 Select input menu 39 Adjust picture menu 40 Setup menu 42 Help menu 42 4 Maintaining the Projector Performing Routine Maintenance 43 To get the projector status 43 To clean the projector lens 44 To replace the lamp module 44 To replace the battery in the remote control 46 Upgrading the Projector 47 To update the firmware 47 5 Installing...
... image settings 34 To adjust the audio 34 To adjust the projector setup 35 Using the On-Screen Menu 36 To change settings using the on-screen menu 37 Quick choice menu 38 Select input menu 39 Adjust picture menu 40 Setup menu 42 Help menu 42 4 Maintaining the Projector Performing Routine Maintenance 43 To get the projector status 43 To clean the projector lens 44 To replace the lamp module 44 To replace the battery in the remote control 46 Upgrading the Projector 47 To update the firmware 47 5 Installing...
User Guide
Page 8
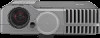
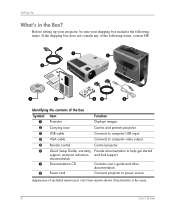
Appearance of the box Symbol Item 1 Projector Function Displays images. 2 Carrying case Carries and protects projector. 3 USB cable Connects to computer USB input. 4 VGA cable Connects to computer video output. 5 Remote control Control projector. 6 Quick Setup Guide, warranty, Provide documentation to power source. Functionality is the same. 8 User's Guide Before setting up your projector, be sure your shipping box includes the following items. If the shipping box does not contain any of the following items, contact...
Appearance of the box Symbol Item 1 Projector Function Displays images. 2 Carrying case Carries and protects projector. 3 USB cable Connects to computer USB input. 4 VGA cable Connects to computer video output. 5 Remote control Control projector. 6 Quick Setup Guide, warranty, Provide documentation to power source. Functionality is the same. 8 User's Guide Before setting up your projector, be sure your shipping box includes the following items. If the shipping box does not contain any of the following items, contact...
User Guide
Page 10
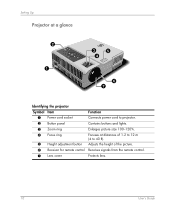
Adjusts the height of 1.2 to 12 m (4 to projector. Focuses at a glance 2 1 3 5 4 6 7 Identifying the projector Symbol Item 1 Power cord socket 2 Button panel 3 Zoom ring 4 Focus ring 5 Height adjustment button 6 Receiver for remote control 7 Lens cover Function Connects power cord to 40 ft). Receives signals from the remote control. Enlarges picture size 100-120%. Contains buttons and lights. Protects lens. 10 User's Guide Setting Up Projector at distances of the picture.
Adjusts the height of 1.2 to 12 m (4 to projector. Focuses at a glance 2 1 3 5 4 6 7 Identifying the projector Symbol Item 1 Power cord socket 2 Button panel 3 Zoom ring 4 Focus ring 5 Height adjustment button 6 Receiver for remote control 7 Lens cover Function Connects power cord to 40 ft). Receives signals from the remote control. Enlarges picture size 100-120%. Contains buttons and lights. Protects lens. 10 User's Guide Setting Up Projector at distances of the picture.
User Guide
Page 12
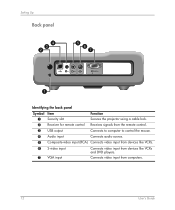
Setting Up Back panel 4 3 2 5 6 7 in in S VGA in 1 Identifying the back panel Symbol Item 1 Security slot Function Secures the projector using a cable lock. 2 Receiver for remote control Receives signals from the remote control. 3 USB output Connects to computer to control the mouse. 4 Audio input Connects audio source. 5 Composite-video input (RCA) Connects video input from devices like VCRs and DVD players. Connects video input from devices like VCRs. 6 S-video input 7 VGA input Connects video input from computers. 12 User's Guide
Setting Up Back panel 4 3 2 5 6 7 in in S VGA in 1 Identifying the back panel Symbol Item 1 Security slot Function Secures the projector using a cable lock. 2 Receiver for remote control Receives signals from the remote control. 3 USB output Connects to computer to control the mouse. 4 Audio input Connects audio source. 5 Composite-video input (RCA) Connects video input from devices like VCRs and DVD players. Connects video input from devices like VCRs. 6 S-video input 7 VGA input Connects video input from computers. 12 User's Guide
User Guide
Page 24
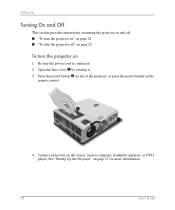
Connect and power on 1. Setting Up Turning On and Off This section provides instructions on turning the projector on and off. ■ "To turn the projector on" on page 24 ■ "To turn the projector off" on page 25 To turn the projector on the source, such as computer, handheld organizer, or DVD player. Be sure the power cord is connected. 2. Press the power button 2 on top of the projector, or press the power button on page 15 for more information. 24 User's Guide See "Setting Up the Projector" on the remote control. 2 1 4. Open the lens cover 1 by rotating it. 3.
Connect and power on 1. Setting Up Turning On and Off This section provides instructions on turning the projector on and off. ■ "To turn the projector on" on page 24 ■ "To turn the projector off" on page 25 To turn the projector on the source, such as computer, handheld organizer, or DVD player. Be sure the power cord is connected. 2. Press the power button 2 on top of the projector, or press the power button on page 15 for more information. 24 User's Guide See "Setting Up the Projector" on the remote control. 2 1 4. Open the lens cover 1 by rotating it. 3.
User Guide
Page 30
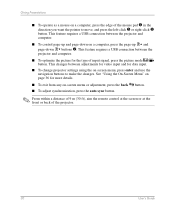
... page-up and page-down buttons 2. This feature requires a USB connection between the projector and computer. ■ To optimize the picture for the type of input signal, press the picture mode / button. See "Using the On-Screen Menu" on page 36 for data input. ■ To change projector settings using the on -screen menu or adjustment, press the back ■ To adjust synchronization, press the auto sync button. This changes between adjustments for video input and for more details. ■...
... page-up and page-down buttons 2. This feature requires a USB connection between the projector and computer. ■ To optimize the picture for the type of input signal, press the picture mode / button. See "Using the On-Screen Menu" on page 36 for data input. ■ To change projector settings using the on -screen menu or adjustment, press the back ■ To adjust synchronization, press the auto sync button. This changes between adjustments for video input and for more details. ■...
User Guide
Page 34
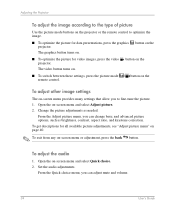
... User's Guide To adjust the audio 1. The graphics button turns on the remote control. button on the ■ To switch between these settings, press the picture mode / button on . Open the on -screen menu and select Quick choice. 2. Set the audio adjustments. Open the on -screen menu and select Adjust picture. 2. From the Adjust picture menu, you to fine-tune the picture. 1. button on the projector or the remote control to optimize the image. ■ To optimize the picture for data presentations, press the graphics projector. Adjusting the Projector...
... User's Guide To adjust the audio 1. The graphics button turns on the remote control. button on the ■ To switch between these settings, press the picture mode / button on . Open the on -screen menu and select Quick choice. 2. Set the audio adjustments. Open the on -screen menu and select Adjust picture. 2. From the Adjust picture menu, you to fine-tune the picture. 1. button on the projector or the remote control to optimize the image. ■ To optimize the picture for data presentations, press the graphics projector. Adjusting the Projector...
User Guide
Page 37
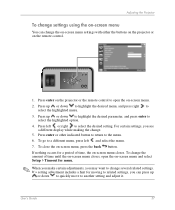
... display while making the change. 5. Press left and select the menu. 7. To go to a different menu, press left or right to select the desired setting. Adjusting the Projector To change settings using the on-screen menu You can press up or down to quickly move to another setting and adjust it. SCREENSHOT auto sync back 1. Press enter on the projector or the remote control to open the on -screen menu closes. If a setting adjustment...
... display while making the change. 5. Press left and select the menu. 7. To go to a different menu, press left or right to select the desired setting. Adjusting the Projector To change settings using the on-screen menu You can press up or down to quickly move to another setting and adjust it. SCREENSHOT auto sync back 1. Press enter on the projector or the remote control to open the on -screen menu closes. If a setting adjustment...

User Guide
Page 38
Adjusts the volume. 38 User's Guide The remote control and projector have buttons to zero. Sets difference between light and dark areas. Searches for the next available signal from the screen. Brightens or darkens the image. Stops audio output. Removes all images from an input source. Adjusting the Projector Quick choice menu Quick choice Keystone Reset keystone Next input Picture mode Brightness Contrast Hide Mute Volume Corrects the slanted sides of picture. You can optimize the picture for the...
Adjusts the volume. 38 User's Guide The remote control and projector have buttons to zero. Sets difference between light and dark areas. Searches for the next available signal from the screen. Brightens or darkens the image. Stops audio output. Removes all images from an input source. Adjusting the Projector Quick choice menu Quick choice Keystone Reset keystone Next input Picture mode Brightness Contrast Hide Mute Volume Corrects the slanted sides of picture. You can optimize the picture for the...
User Guide
Page 40
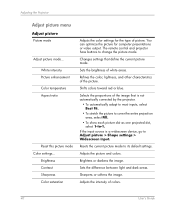
... Color temperature Aspect ratio Reset this picture mode Color settings... The remote control and projector have buttons to its default settings. Sets the brightness of colors. 40 User's Guide Adjusts the picture and colors. Sharpens or softens the image. Adjusting the Projector Adjust picture menu Adjust picture Picture mode Adjust picture mode... Resets the current picture mode to change the picture mode. Sets the difference between light and dark areas. Shifts colors toward red or blue. You can optimize the picture for the type of picture. Adjusts the intensity of white...
... Color temperature Aspect ratio Reset this picture mode Color settings... The remote control and projector have buttons to its default settings. Sets the brightness of colors. 40 User's Guide Adjusts the picture and colors. Sharpens or softens the image. Adjusting the Projector Adjust picture menu Adjust picture Picture mode Adjust picture mode... Resets the current picture mode to change the picture mode. Sets the difference between light and dark areas. Shifts colors toward red or blue. You can optimize the picture for the type of picture. Adjusts the intensity of white...
User Guide
Page 42
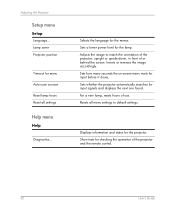
... operation of the projector and the remote control. 42 User's Guide Resets all settings Help menu Help Diagnostics... Adjusts the image to default settings. Inverts or reverses the image accordingly. For a new lamp, resets hours of or behind the screen. Show tests for input signals and displays the next one found. Sets a lower power level for the menus. Selects the language for the lamp. Sets how many seconds the on-screen menu waits for the projector. Lamp saver Projector position Timeout for menu Auto-scan sources Reset lamp hours Reset all menu settings...
... operation of the projector and the remote control. 42 User's Guide Resets all settings Help menu Help Diagnostics... Adjusts the image to default settings. Inverts or reverses the image accordingly. For a new lamp, resets hours of or behind the screen. Show tests for input signals and displays the next one found. Sets a lower power level for the menus. Selects the language for the lamp. Sets how many seconds the on-screen menu waits for the projector. Lamp saver Projector position Timeout for menu Auto-scan sources Reset lamp hours Reset all menu settings...
User Guide
Page 45
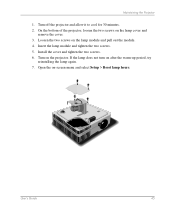
Loosen the two screws on the projector. Insert the lamp module and tighten the two screws. 5. Turn on the lamp module and pull out the module. 4. User's Guide 45 Install the cover and tighten the two screws. 6. Open the on the lamp cover and remove the cover. 3. On the bottom of the projector, loosen the two screws on -screen menu and select Setup > Reset lamp hours. Turn off the projector and allow it to cool for 30 minutes. 2. Maintaining the Projector 1. If the lamp does not turn on after the warm-up period, try reinstalling the lamp again. 7.
Loosen the two screws on the projector. Insert the lamp module and tighten the two screws. 5. Turn on the lamp module and pull out the module. 4. User's Guide 45 Install the cover and tighten the two screws. 6. Open the on the lamp cover and remove the cover. 3. On the bottom of the projector, loosen the two screws on -screen menu and select Setup > Reset lamp hours. Turn off the projector and allow it to cool for 30 minutes. 2. Maintaining the Projector 1. If the lamp does not turn on after the warm-up period, try reinstalling the lamp again. 7.
User Guide
Page 55
... help correct them. ■ "Troubleshooting Suggestions" on page 55 ■ "Testing the Projector" on page 62 User's Guide 55 See the Support Guide included with the projector. ■ "Start-up problems" on page 56 ■ "Picture problems" on page 57 ■ "Sound problems" on page 61 ■ "Interruption problems" on page 61 ■ "Remote control problems" on page 63 Troubleshooting Suggestions To use this section, find the problem statement that is fixed. 6 Fixing Problems...
... help correct them. ■ "Troubleshooting Suggestions" on page 55 ■ "Testing the Projector" on page 62 User's Guide 55 See the Support Guide included with the projector. ■ "Start-up problems" on page 56 ■ "Picture problems" on page 57 ■ "Sound problems" on page 61 ■ "Interruption problems" on page 61 ■ "Remote control problems" on page 63 Troubleshooting Suggestions To use this section, find the problem statement that is fixed. 6 Fixing Problems...
User Guide
Page 56
... lamp indicator is plugged into an outlet with power. ❏ Press the power button again. If this does not fix the problem, install a new lamp. ❏ The projector lamp has reached the end of its life. If the projector makes a "ticking" sound, if the projector lamp does not turn off the projector and wait for assistance. Replace the lamp. 56 User's Guide If the warning light turns on or blinking: ❏ The projector lamp is on or blinks again, contact HP...
... lamp indicator is plugged into an outlet with power. ❏ Press the power button again. If this does not fix the problem, install a new lamp. ❏ The projector lamp has reached the end of its life. If the projector makes a "ticking" sound, if the projector lamp does not turn off the projector and wait for assistance. Replace the lamp. 56 User's Guide If the warning light turns on or blinking: ❏ The projector lamp is on or blinks again, contact HP...
User Guide
Page 57
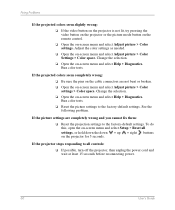
... input. Then set the correct input port where the equipment is connected. ❏ Verify that the projector is enabled for example, press the Fn + F4 function keys to Off and select the correct input source. User's Guide 57 Fixing Problems Picture problems If the image is not displayed on the screen, but the HP startup screen is displayed: ❏ Press the source button on the projector or remote control. ❏ Turn off and on, open the on-screen menu...
... input. Then set the correct input port where the equipment is connected. ❏ Verify that the projector is enabled for example, press the Fn + F4 function keys to Off and select the correct input source. User's Guide 57 Fixing Problems Picture problems If the image is not displayed on the screen, but the HP startup screen is displayed: ❏ Press the source button on the projector or remote control. ❏ Turn off and on, open the on-screen menu...
User Guide
Page 58
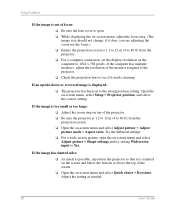
... -screen menu, adjust the focus ring. (The image size should not change; Try the different settings. ❏ For a wide-screen picture, open . ❏ While displaying the on -screen menu and select Adjust picture > Shape settings and try setting Widescreen input to the wrong position setting. If the computer has multiple monitors, adjust the resolution of focus: ❏ Be sure the lens cover is 1.2 to 12 m (4 to 40 ft) from the projector. ❏ For a computer connection, set to Yes. Adjust...
... -screen menu, adjust the focus ring. (The image size should not change; Try the different settings. ❏ For a wide-screen picture, open . ❏ While displaying the on -screen menu and select Adjust picture > Shape settings and try setting Widescreen input to the wrong position setting. If the computer has multiple monitors, adjust the resolution of focus: ❏ Be sure the lens cover is 1.2 to 12 m (4 to 40 ft) from the projector. ❏ For a computer connection, set to Yes. Adjust...

User Guide
Page 59
If the image is flickering or unstable: ❏ Press the auto sync button on -screen menu and select Adjust picture > Adjust picture mode > Aspect ratio. If the image is stretched: ❏ Open the on the projector panel or remote control. ❏ For a computer connection, set the display resolution to 1024 x 768 pixels. See the computer manual or the projector's video port guide. Fixing Problems If a scrolling or cut-off image is displayed: ❏ Press the auto sync button on the projector or remote control. ❏ For a computer connection, turn on...
If the image is flickering or unstable: ❏ Press the auto sync button on -screen menu and select Adjust picture > Adjust picture mode > Aspect ratio. If the image is stretched: ❏ Open the on the projector panel or remote control. ❏ For a computer connection, set the display resolution to 1024 x 768 pixels. See the computer manual or the projector's video port guide. Fixing Problems If a scrolling or cut-off image is displayed: ❏ Press the auto sync button on the projector or remote control. ❏ For a computer connection, turn on...
User Guide
Page 60
... the cable connectors are completely wrong and you cannot fix them: ❏ Reset the projection settings to the factory-default settings. To do this, open the on-screen menu and select Setup > Reset all controls: ❏ If possible, turn off the projector, then unplug the power cord and wait at least 15 seconds before reconnecting power. 60 User's Guide Change the selection. ❏ Open the on the projector for 5 seconds. Run color tests. ❏ Reset the picture settings...
... the cable connectors are completely wrong and you cannot fix them: ❏ Reset the projection settings to the factory-default settings. To do this, open the on-screen menu and select Setup > Reset all controls: ❏ If possible, turn off the projector, then unplug the power cord and wait at least 15 seconds before reconnecting power. 60 User's Guide Change the selection. ❏ Open the on the projector for 5 seconds. Run color tests. ❏ Reset the picture settings...
User Guide
Page 78
... input menu definitions 39 setup menu definitions 42 Index 76 using 36, 37 optimizing image 34 P picture adjusting 34 picture mode changing 30, 34 definition 34 power turning off 25 turning on 24 presentations changing source 32 from a computer 31 projector adjusting 33 identifying parts 10 maintaining 43 setting up 15 troubleshooting 55 upgrading 47 R rear panel see back panel rear projection installation setting up 52 remote control battery replacement 46 identifying 13 using 29 reset 60 resetting projection settings 60 projector 60 S safety information LED 71 User's Guide
... input menu definitions 39 setup menu definitions 42 Index 76 using 36, 37 optimizing image 34 P picture adjusting 34 picture mode changing 30, 34 definition 34 power turning off 25 turning on 24 presentations changing source 32 from a computer 31 projector adjusting 33 identifying parts 10 maintaining 43 setting up 15 troubleshooting 55 upgrading 47 R rear panel see back panel rear projection installation setting up 52 remote control battery replacement 46 identifying 13 using 29 reset 60 resetting projection settings 60 projector 60 S safety information LED 71 User's Guide


