
Quick Setup and User's Guide
Page 4
... Setup Step 1: Unpack the Compaq iPAQ Desktop Personal Computer 1 Step 2: Identify Rear Panel Components and Confirm Voltage Setting 2 USB Connectors 3 Legacy Module 3 Step 3: Connect External Devices 4 Step 4: Connect the Power Cords 5 Step 5: Identify the Front Panel Components 6 Step 6: Turn On the Personal Computer and Install the Operating System. . . . . .7 Customizing the Monitor Display 7 Protecting Your Software 7 Compaq Restore CD 7 Registration 8 Turning Off the Personal Computer 8 Chapter 1 Working with the Compaq Easy Access Keyboard Programming the Easy Access Buttons...
... Setup Step 1: Unpack the Compaq iPAQ Desktop Personal Computer 1 Step 2: Identify Rear Panel Components and Confirm Voltage Setting 2 USB Connectors 3 Legacy Module 3 Step 3: Connect External Devices 4 Step 4: Connect the Power Cords 5 Step 5: Identify the Front Panel Components 6 Step 6: Turn On the Personal Computer and Install the Operating System. . . . . .7 Customizing the Monitor Display 7 Protecting Your Software 7 Compaq Restore CD 7 Registration 8 Turning Off the Personal Computer 8 Chapter 1 Working with the Compaq Easy Access Keyboard Programming the Easy Access Buttons...
Quick Setup and User's Guide
Page 5
... Uninstalling the iPAQ Desktop Security Bar 3-1 Removing and Replacing the Side Access Panels 3-2 Adding System Memory 3-4 Adding or Removing a Memory Module 3-4 Upgrading the Primary Hard Drive 3-8 Chapter 4 Accessing the Internet & Using Network Communications Accessing the Internet 4-1 Using the Optional USB Modem 4-1 Choosing an Internet Service Provider 4-1 Using Network Communications 4-2 NIC-Based Alerts 4-2 Remote Wakeup Support 4-2 Interpreting the Network Status Lights 4-2 Disabling the Autosensing Capabilities 4-3 Installing Network Drivers 4-3 Chapter 5 Using the...
... Uninstalling the iPAQ Desktop Security Bar 3-1 Removing and Replacing the Side Access Panels 3-2 Adding System Memory 3-4 Adding or Removing a Memory Module 3-4 Upgrading the Primary Hard Drive 3-8 Chapter 4 Accessing the Internet & Using Network Communications Accessing the Internet 4-1 Using the Optional USB Modem 4-1 Choosing an Internet Service Provider 4-1 Using Network Communications 4-2 NIC-Based Alerts 4-2 Remote Wakeup Support 4-2 Interpreting the Network Status Lights 4-2 Disabling the Autosensing Capabilities 4-3 Installing Network Drivers 4-3 Chapter 5 Using the...
Quick Setup and User's Guide
Page 6
... Management 6-18 Remote ROM Flash 6-19 Using Remote ROM Flash 6-19 Remote Security Management 6-20 Remote Wakeup and Remote Shutdown 6-20 NIC-Based Alerts 6-21 Replicating Your Setup 6-21 Dual-State Power Button 6-22 Power Management 6-23 World Wide Web Site 6-23 Building Blocks and Partners 6-24 Desktop Management Interface (DMI 6-24 Wired for Management 6-24 Compaq Management Solutions Partners Program 6-25 Chapter 7 For More Information Using the Compaq iPAQ Reference Library CD 7-1 Appendix A Specifications Quick Setup & User's Guide...
... Management 6-18 Remote ROM Flash 6-19 Using Remote ROM Flash 6-19 Remote Security Management 6-20 Remote Wakeup and Remote Shutdown 6-20 NIC-Based Alerts 6-21 Replicating Your Setup 6-21 Dual-State Power Button 6-22 Power Management 6-23 World Wide Web Site 6-23 Building Blocks and Partners 6-24 Desktop Management Interface (DMI 6-24 Wired for Management 6-24 Compaq Management Solutions Partners Program 6-25 Chapter 7 For More Information Using the Compaq iPAQ Reference Library CD 7-1 Appendix A Specifications Quick Setup & User's Guide...
Quick Setup and User's Guide
Page 8
... Mouse Connector q PS/2 Keyboard Connector w Serial Connector e Parallel Port Connector r Serial Number t Power Cord Connector Quick Setup & User's Guide 2 Step 2: Identify Rear Panel Components and Confirm Voltage Setting Quick Setup iPAQ Desktop Personal Computer with Legacy Module Installed 1 Monitor Connector 2 Universal Serial Bus (USB) Connectors 3 Ethernet RJ-45 Connector 4 Line-Out Audio Connector 5 Line-In Audio Connector 6 Legacy Module Connector 7 Voltage Select Switch Set the voltage select switch to match the voltage of the power outlet to which the computer will be connected...
... Mouse Connector q PS/2 Keyboard Connector w Serial Connector e Parallel Port Connector r Serial Number t Power Cord Connector Quick Setup & User's Guide 2 Step 2: Identify Rear Panel Components and Confirm Voltage Setting Quick Setup iPAQ Desktop Personal Computer with Legacy Module Installed 1 Monitor Connector 2 Universal Serial Bus (USB) Connectors 3 Ethernet RJ-45 Connector 4 Line-Out Audio Connector 5 Line-In Audio Connector 6 Legacy Module Connector 7 Voltage Select Switch Set the voltage select switch to match the voltage of the power outlet to which the computer will be connected...
Quick Setup and User's Guide
Page 9
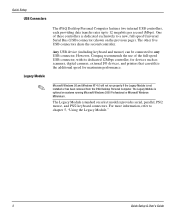
... as scanners, digital cameras, external I/O devices, and printers that can be connected to a new, full-speed Universal Serial Bus (USB) connector (shown on the previous page). The Legacy Module (standard on systems running Microsoft Windows 2000 Professional or Microsoft Windows Millennium. Quick Setup USB Connectors Legacy Module The iPAQ Desktop Personal Computer features two internal USB controllers, each providing data transfer rates up to chapter 5, "Using the Legacy Module." 3 Quick Setup & User's Guide
... as scanners, digital cameras, external I/O devices, and printers that can be connected to a new, full-speed Universal Serial Bus (USB) connector (shown on the previous page). The Legacy Module (standard on systems running Microsoft Windows 2000 Professional or Microsoft Windows Millennium. Quick Setup USB Connectors Legacy Module The iPAQ Desktop Personal Computer features two internal USB controllers, each providing data transfer rates up to chapter 5, "Using the Legacy Module." 3 Quick Setup & User's Guide
Quick Setup and User's Guide
Page 10
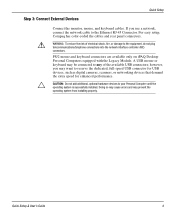
.... Quick Setup Step 3: Connect External Devices Å Ä Connect the monitor, mouse, and keyboard cables. Quick Setup & User's Guide 4 WARNING: To reduce the risk of the available USB connectors; however, you use a network, connect the network cable to the Ethernet RJ-45 Connector. Doing so may cause errors and may be connected to your Personal Computer until the operating system is successfully installed. A USB mouse or keyboard may prevent the operating system from installing properly. CAUTION: Do not add additional, optional hardware devices to...
.... Quick Setup Step 3: Connect External Devices Å Ä Connect the monitor, mouse, and keyboard cables. Quick Setup & User's Guide 4 WARNING: To reduce the risk of the available USB connectors; however, you use a network, connect the network cable to the Ethernet RJ-45 Connector. Doing so may cause errors and may be connected to your Personal Computer until the operating system is successfully installed. A USB mouse or keyboard may prevent the operating system from installing properly. CAUTION: Do not add additional, optional hardware devices to...
Quick Setup and User's Guide
Page 13
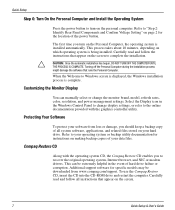
.../support. Carefully read and follow the instructions that runs the Personal Computer. Quick Setup Step 6: Turn On the Personal Computer and Install the Operating System Press the power button to turn on making backup copies of your operating system or backup utility documentation for specific models may be extremely helpful in the Windows Control Panel to change the monitor brand, model, refresh rates, color, resolution, and power management settings. When the Welcome to Windows screen is displayed...
.../support. Carefully read and follow the instructions that runs the Personal Computer. Quick Setup Step 6: Turn On the Personal Computer and Install the Operating System Press the power button to turn on making backup copies of your operating system or backup utility documentation for specific models may be extremely helpful in the Windows Control Panel to change the monitor brand, model, refresh rates, color, resolution, and power management settings. When the Welcome to Windows screen is displayed...
Quick Setup and User's Guide
Page 14
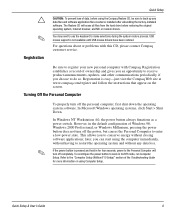
... to work in On/Off mode, run Computer Setup. However, in for more information on the screen. Registration is not available until USB mouse drivers have been restored. To reconfigure the power button to conserve energy without any data files and software application files created or installed after unbundling the factory-installed software. Quick Setup & User's Guide 8 In Microsoft Windows operating systems, click Start > Shut Down. Refer to the "Computer Setup Utilities (F10 Setup)" section...
... to work in On/Off mode, run Computer Setup. However, in for more information on the screen. Registration is not available until USB mouse drivers have been restored. To reconfigure the power button to conserve energy without any data files and software application files created or installed after unbundling the factory-installed software. Quick Setup & User's Guide 8 In Microsoft Windows operating systems, click Start > Shut Down. Refer to the "Computer Setup Utilities (F10 Setup)" section...
Quick Setup and User's Guide
Page 18
... removing a drive other than a hard drive, make sure that no media, such as a diskette, CD-ROM, or DVD-ROM, is located on the left side of work and damage to liquids, temperature extremes, or products that have magnetic fields such as monitors or speakers. I Do not use excessive force when inserting a drive. Quick Setup & User's Guide 2-1 CAUTION: To prevent loss of the iPAQ Desktop Personal Computer. I If a drive must be used with...
... removing a drive other than a hard drive, make sure that no media, such as a diskette, CD-ROM, or DVD-ROM, is located on the left side of work and damage to liquids, temperature extremes, or products that have magnetic fields such as monitors or speakers. I Do not use excessive force when inserting a drive. Quick Setup & User's Guide 2-1 CAUTION: To prevent loss of the iPAQ Desktop Personal Computer. I If a drive must be used with...
Quick Setup and User's Guide
Page 24
... first remove the security bar, if installed. Before beginning these procedures, ensure that a drive installed in the Troubleshooting Guide for more information. Depending upon how it is installed, the Security Bar can damage the electronic components of the applicable instructions, cautions, and warnings in this guide. Quick Setup & User's Guide 3-1 Uninstalling the iPAQ Desktop Security Bar When installed, the iPAQ Desktop Security Bar protects the memory modules and internal hard drive...
... first remove the security bar, if installed. Before beginning these procedures, ensure that a drive installed in the Troubleshooting Guide for more information. Depending upon how it is installed, the Security Bar can damage the electronic components of the applicable instructions, cautions, and warnings in this guide. Quick Setup & User's Guide 3-1 Uninstalling the iPAQ Desktop Security Bar When installed, the iPAQ Desktop Security Bar protects the memory modules and internal hard drive...

Quick Setup and User's Guide
Page 27
... DIMMs are not supported; For proper system operation, the DIMMs must be careful not to replace the preinstalled DIMM with gold-plated metal contacts to "Removing and Replacing the Side Access Panels" on the personal computer can damage the electronic components of the contacts. Remove the right access panel. Adding System Memory and Upgrading the Internal Hard Drive Adding System Memory The memory sockets on page 3-2. 3-4 Quick Setup & User's Guide This computer...
... DIMMs are not supported; For proper system operation, the DIMMs must be careful not to replace the preinstalled DIMM with gold-plated metal contacts to "Removing and Replacing the Side Access Panels" on the personal computer can damage the electronic components of the contacts. Remove the right access panel. Adding System Memory and Upgrading the Internal Hard Drive Adding System Memory The memory sockets on page 3-2. 3-4 Quick Setup & User's Guide This computer...
Quick Setup and User's Guide
Page 35
... BIOS hang I operating system hang I processor missing I operating temperature exceeded Remote Wakeup Support ✎ Remote Wakeup support allows the system administrator to turn on power to the online Remote Management Administrators Guide. Interpreting the Network Status Lights The integrated NIC includes network status lights: I The 100TX light illuminates during 100-Mbps operation. 4-2 Quick Setup & User's Guide I The link/activity light illuminates when the system is powered off. The Personal Computer can send hardware and operating system failure...
... BIOS hang I operating system hang I processor missing I operating temperature exceeded Remote Wakeup Support ✎ Remote Wakeup support allows the system administrator to turn on power to the online Remote Management Administrators Guide. Interpreting the Network Status Lights The integrated NIC includes network status lights: I The 100TX light illuminates during 100-Mbps operation. 4-2 Quick Setup & User's Guide I The link/activity light illuminates when the system is powered off. The Personal Computer can send hardware and operating system failure...
Quick Setup and User's Guide
Page 36
...-45 network connection. Quick Setup & User's Guide 4-3 Accessing the Internet & Using Network Communications If Remote Wakeup is enabled, the link/activity light will be installed from diskettes included with the network operating system or are supplied for the Microsoft Windows NT version 4.0 and Windows 95, Windows 98, or Windows 2000 operating systems, depending on which system was preinstalled on the capabilities of your network. ✎ 4. Select the Network icon, located in one mode only. 1. Change the Speed...
...-45 network connection. Quick Setup & User's Guide 4-3 Accessing the Internet & Using Network Communications If Remote Wakeup is enabled, the link/activity light will be installed from diskettes included with the network operating system or are supplied for the Microsoft Windows NT version 4.0 and Windows 95, Windows 98, or Windows 2000 operating systems, depending on which system was preinstalled on the capabilities of your network. ✎ 4. Select the Network icon, located in one mode only. 1. Change the Speed...
Quick Setup and User's Guide
Page 49
... again to access the utility. 3. The risk of rendering a drive permanently inaccessible is enabled. 4. With the MultiBay hard drive installed, turn on page 12 for information about the alternate delimiter characters. Before exiting, click File > Save Changes and Exit. 6-10 Quick Setup & User's Guide Enabling or Disabling DriveLock on password and setup password may also be set and used in the lower-right corner of drives in Windows, click Start > Shut Down...
... again to access the utility. 3. The risk of rendering a drive permanently inaccessible is enabled. 4. With the MultiBay hard drive installed, turn on page 12 for information about the alternate delimiter characters. Before exiting, click File > Save Changes and Exit. 6-10 Quick Setup & User's Guide Enabling or Disabling DriveLock on password and setup password may also be set and used in the lower-right corner of drives in Windows, click Start > Shut Down...
Quick Setup and User's Guide
Page 54
... currently supported only on iPAQ legacy free models. Desktop Management 3. Installing a Cable Lock Fingerprint Identification Technology ✎ Eliminating the need to enter end-user passwords, Compaq Fingerprint Identification Technology tightens network security, simplifies the login process, and reduces the costs associated with the Legacy Module installed, not on Compaq iPAQ PCs with managing corporate networks. Affordably priced and supported by the Compaq iPAQ Desktop Personal Computer, it with the key. Quick Setup & User's Guide 6-15...
... currently supported only on iPAQ legacy free models. Desktop Management 3. Installing a Cable Lock Fingerprint Identification Technology ✎ Eliminating the need to enter end-user passwords, Compaq Fingerprint Identification Technology tightens network security, simplifies the login process, and reduces the costs associated with the Legacy Module installed, not on Compaq iPAQ PCs with managing corporate networks. Affordably priced and supported by the Compaq iPAQ Desktop Personal Computer, it with the key. Quick Setup & User's Guide 6-15...

Quick Setup and User's Guide
Page 62
... modify, or disable Power Management settings for the monitor. Quick Setup & User's Guide 6-23 To access Display Properties, right-click on the Timeouts menu. 3. Enable, customize, or disable timeouts. Access the Computer Setup menu. 2. Use Display Properties to shut down these components) can be enabled, customized, or disabled using Computer Setup. 1. Power Management Desktop Management Power Management is a feature that saves energy by Compaq and third-party suppliers, and develop operating-system specific support software, to the Troubleshooting Guide for more detailed...
... modify, or disable Power Management settings for the monitor. Quick Setup & User's Guide 6-23 To access Display Properties, right-click on the Timeouts menu. 3. Enable, customize, or disable timeouts. Access the Computer Setup menu. 2. Use Display Properties to shut down these components) can be enabled, customized, or disabled using Computer Setup. 1. Power Management Desktop Management Power Management is a feature that saves energy by Compaq and third-party suppliers, and develop operating-system specific support software, to the Troubleshooting Guide for more detailed...

Quick Setup and User's Guide
Page 63
... Manageability Guide. Building Blocks and Partners Compaq management solutions are based on configuring the DMI software, refer to provide standardized management of locating, accessing, evaluating, and installing the latest support software easier. Desktop Management Interface (DMI) The Desktop Management Task Force (DMTF) is necessary for Management initiative is focused on your Personal Computer available. Compaq, as a Steering Committee and Technical Committee member of the serial number, refer to run Windows 98, Windows...
... Manageability Guide. Building Blocks and Partners Compaq management solutions are based on configuring the DMI software, refer to provide standardized management of locating, accessing, evaluating, and installing the latest support software easier. Desktop Management Interface (DMI) The Desktop Management Task Force (DMTF) is necessary for Management initiative is focused on your Personal Computer available. Compaq, as a Steering Committee and Technical Committee member of the serial number, refer to run Windows 98, Windows...
Quick Setup and User's Guide
Page 70
...) 2, 5-1 PS/2 mouse (Legacy Module) 2, 5-1 serial (Legacy Module) 2, 5-1 USB 2, 6 connector locations 2 D delimiter characters, keyboard 6-12 desktop management 6-1-6-25 disabling DriveLock 6-10 display settings 7 documentation, additional product 7-1 DriveLock password changing 6-11 entering 6-11 DriveLock security 6-5 DriveLock, enabling or disabling 6-10 drivers, installing network 4-3 dual-state power button 6, 8 DVD-ROM drive 2-1 E Easy Access Buttons 1-1 Easy Access Keyboard 1-1 easy-carry handle 2 enabling DriveLock 6-10 Ethernet RJ-45 connector 2 external devices, connecting 4 Index-i
...) 2, 5-1 PS/2 mouse (Legacy Module) 2, 5-1 serial (Legacy Module) 2, 5-1 USB 2, 6 connector locations 2 D delimiter characters, keyboard 6-12 desktop management 6-1-6-25 disabling DriveLock 6-10 display settings 7 documentation, additional product 7-1 DriveLock password changing 6-11 entering 6-11 DriveLock security 6-5 DriveLock, enabling or disabling 6-10 drivers, installing network 4-3 dual-state power button 6, 8 DVD-ROM drive 2-1 E Easy Access Buttons 1-1 Easy Access Keyboard 1-1 easy-carry handle 2 enabling DriveLock 6-10 Ethernet RJ-45 connector 2 external devices, connecting 4 Index-i
Quick Setup and User's Guide
Page 71
...controller (NIC) connection 4 network service boot 6-2 network status lights, interpreting 4-2 NIC-based alerts 4-2 notes Blink LED during Energy Save 6-22 calling Compaq 6-24 drive blank 2-4, 2-5 Fingerprint Identification Technology 6-15 keyboard delimiters 6-9, 6-12 language chosen during Setup 7-2 Legacy Module 5-1 memory module installation 3-7 monitor timeouts 6-23 network cables 4-2 network drivers 4-2 power button shutoff 8 power disconnection 6-20 power-on or setup password 6-9, 6-12, 6-13 Prefailure Warranty 6-16 product documentation 7-1 reconfiguring power button 8 Remote ROM Flash...
...controller (NIC) connection 4 network service boot 6-2 network status lights, interpreting 4-2 NIC-based alerts 4-2 notes Blink LED during Energy Save 6-22 calling Compaq 6-24 drive blank 2-4, 2-5 Fingerprint Identification Technology 6-15 keyboard delimiters 6-9, 6-12 language chosen during Setup 7-2 Legacy Module 5-1 memory module installation 3-7 monitor timeouts 6-23 network cables 4-2 network drivers 4-2 power button shutoff 8 power disconnection 6-20 power-on or setup password 6-9, 6-12, 6-13 Prefailure Warranty 6-16 product documentation 7-1 reconfiguring power button 8 Remote ROM Flash...
Quick Setup and User's Guide
Page 72
... 8 Remote System Installation 6-2 remote wakeup support 4-2 removable drives, optional 2-1 removable media boot control 6-5 S security cable lock provision 6-14 Fingerprint Identification Technology 6-15 iPAQ Desktop Security Bar 3-1, 6-12 mounting holes 6-13 password 6-6 security bar 6-6 serial connector (Legacy Module) 2, 4 serial interface control 6-5 serial number 2 setup password changing 6-9 deleting 6-9 entering 6-8 establishing 6-7 side access panels removing and replacing 3-1 SMART hard drive 2-1 software updating and management 6-18-6-24 specifications A-1 SuperDisk LS-120 drive...
... 8 Remote System Installation 6-2 remote wakeup support 4-2 removable drives, optional 2-1 removable media boot control 6-5 S security cable lock provision 6-14 Fingerprint Identification Technology 6-15 iPAQ Desktop Security Bar 3-1, 6-12 mounting holes 6-13 password 6-6 security bar 6-6 serial connector (Legacy Module) 2, 4 serial interface control 6-5 serial number 2 setup password changing 6-9 deleting 6-9 entering 6-8 establishing 6-7 side access panels removing and replacing 3-1 SMART hard drive 2-1 software updating and management 6-18-6-24 specifications A-1 SuperDisk LS-120 drive...


