

User Manual
Page 2
... 4 Battery warning 4 Notes on Installation 4 Caution 5 1 Introduction 6 1.1 Features 6 1.2 Package Contents 6 1.3 Product Overview 7 2 Getting Started 8 2.1 Inserting the Memory Card 8 2.2 Installing in Vehicles 9 2.2.1 2.2.2 Mount to Windshield 9 Adjust the camcorder position 10 2.3 Connecting to Power 11 2.4 Powering the Camcorder On / Off 12 2.4.1 Auto Power On/Off 12 2.4.2 Manual Power On/Off 12 2.5 Initial Settings 13 2.5.1 Set Automatic Recording 13 2.5.2 Set the Date and Time 13 3 Using the Camcorder 14 3.1 Recording Videos 14 3.1.1 3.1.2 Record videos...
... 4 Battery warning 4 Notes on Installation 4 Caution 5 1 Introduction 6 1.1 Features 6 1.2 Package Contents 6 1.3 Product Overview 7 2 Getting Started 8 2.1 Inserting the Memory Card 8 2.2 Installing in Vehicles 9 2.2.1 2.2.2 Mount to Windshield 9 Adjust the camcorder position 10 2.3 Connecting to Power 11 2.4 Powering the Camcorder On / Off 12 2.4.1 Auto Power On/Off 12 2.4.2 Manual Power On/Off 12 2.5 Initial Settings 13 2.5.1 Set Automatic Recording 13 2.5.2 Set the Date and Time 13 3 Using the Camcorder 14 3.1 Recording Videos 14 3.1.1 3.1.2 Record videos...

User Manual
Page 3
3.1.3 Emergency Recording 15 3.1.4 3.1.5 Driver Fatigue Alert 15 LDWS (Lane Departure Warning Systems) ..........16 3.1.6 The Recording Screen 17 3.1.7 Taking Photographs 18 3.2 Playback Videos and Photos 19 3.2.1 Playing Videos 20 3.2.2 Viewing Photos 20 3.2.3 3.2.4 The Playback Screen 21 Deleting Files 22 4 Adjusting the Settings 23 4.1 Using the Menu 23 4.2 Menu Tree 24 5 Installing the Software 27 6 Specifications 28 2
3.1.3 Emergency Recording 15 3.1.4 3.1.5 Driver Fatigue Alert 15 LDWS (Lane Departure Warning Systems) ..........16 3.1.6 The Recording Screen 17 3.1.7 Taking Photographs 18 3.2 Playback Videos and Photos 19 3.2.1 Playing Videos 20 3.2.2 Viewing Photos 20 3.2.3 3.2.4 The Playback Screen 21 Deleting Files 22 4 Adjusting the Settings 23 4.1 Using the Menu 23 4.2 Menu Tree 24 5 Installing the Software 27 6 Specifications 28 2

User Manual
Page 4
... installation. If this can radiate radio frequency energy and, if not installed and used in accordance with Part 15 of Waste Electrical and Electronic Equipment and/or Battery by turning the equipment off and on, the user is accurate and complete. Operation ...digital camcorder, pursuant to the applicable take-back scheme for compliance could void the user's authority to change the technical specifications without prior notice. You must accept any errors and omissions that to change without prior notice. The recycling of electrical and electronic equipment and/or battery...
... installation. If this can radiate radio frequency energy and, if not installed and used in accordance with Part 15 of Waste Electrical and Electronic Equipment and/or Battery by turning the equipment off and on, the user is accurate and complete. Operation ...digital camcorder, pursuant to the applicable take-back scheme for compliance could void the user's authority to change the technical specifications without prior notice. You must accept any errors and omissions that to change without prior notice. The recycling of electrical and electronic equipment and/or battery...

User Manual
Page 5
... Compatibility of Radio and Telecom camcorder (1995/5/EC); Do not touch the lens with the requirements set out in unclear videos or snapshots. Recycle the camcorder observing local regulations. Clean the lens on a tinted window. Make sure that the lens is not hindered by the tinted window. 4 Improper charging of the battery may explode if exposed to disassemble the camcorder and remove the battery. Do NOT install...
... Compatibility of Radio and Telecom camcorder (1995/5/EC); Do not touch the lens with the requirements set out in unclear videos or snapshots. Recycle the camcorder observing local regulations. Clean the lens on a tinted window. Make sure that the lens is not hindered by the tinted window. 4 Improper charging of the battery may explode if exposed to disassemble the camcorder and remove the battery. Do NOT install...

User Manual
Page 6
... warning to the speed camera set points, may damage the camcorder, cause electric shock and void your reference only. The values displayed in this product. Exposing the camcorder to local laws and vehicles safety considerations, do not manually operate the camcorder while driving. Never short-circuit the battery. Due to open flames can cause explosion. Before you start using the Car Camcorder it is...
... warning to the speed camera set points, may damage the camcorder, cause electric shock and void your reference only. The values displayed in this product. Exposing the camcorder to local laws and vehicles safety considerations, do not manually operate the camcorder while driving. Never short-circuit the battery. Due to open flames can cause explosion. Before you start using the Car Camcorder it is...

User Manual
Page 7
This camcorder is specifically designed for real time video and audio recording when driving. 1.1 Features • Full HD camera (1920x1080 @ 30fps) • 2.4" LCD color screen • Up to 140 ゚ Wide angle lens • Motion detection • Automatic Emergency recording for collision detection • Supports micro-SDHC up to 32GB (Class 6 or greater speed required for purchasing this advanced camcorder. 1 Introduction Thank you for HD video recording) 1.2 Package Contents The...
This camcorder is specifically designed for real time video and audio recording when driving. 1.1 Features • Full HD camera (1920x1080 @ 30fps) • 2.4" LCD color screen • Up to 140 ゚ Wide angle lens • Motion detection • Automatic Emergency recording for collision detection • Supports micro-SDHC up to 32GB (Class 6 or greater speed required for purchasing this advanced camcorder. 1 Introduction Thank you for HD video recording) 1.2 Package Contents The...

User Manual
Page 14
Press the menu. Press the / button to another field. 4. Press the / button to adjust the value and press the button to move to select On and press the button. 4. Press the / button to select Automatic Record and press the button. 3. Note: When the battery is depleted, you must reset the date/time before the function -automatic record is complete. 2.5 Initial Settings Before using the camcorder, we recommend you to...
Press the menu. Press the / button to another field. 4. Press the / button to adjust the value and press the button to move to select On and press the button. 4. Press the / button to select Automatic Record and press the button. 3. Note: When the battery is depleted, you must reset the date/time before the function -automatic record is complete. 2.5 Initial Settings Before using the camcorder, we recommend you to...

User Manual
Page 15
... video file is not linked to stop recording. See Using the Menu (4.1). 2. Or, press the button to the ignition system. Press the button to turn off the car camcorder. 3.1.2 Manual Video Recording 1. To work around this issue, please do one of recording. Manually turn on the memory card. Manually plug in the memory card will be overwritten. 14 button to turn on and starts recording. Note: 1. If the memory card capacity is possible with your vehicle model. - Recording will automatically stop...
... video file is not linked to stop recording. See Using the Menu (4.1). 2. Or, press the button to the ignition system. Press the button to turn off the car camcorder. 3.1.2 Manual Video Recording 1. To work around this issue, please do one of recording. Manually turn on the memory card. Manually plug in the memory card will be overwritten. 14 button to turn on and starts recording. Note: 1. If the memory card capacity is possible with your vehicle model. - Recording will automatically stop...

User Manual
Page 16
... remind the driver should take a rest after 30 minutes as enclosed ) will be automatically deleted when a new emergency recording file is detected, the camcorder will recalculate the alert time If the car stop the recording, press the button. 3.1.3 Emergency Recording During normal video recording, press the button to drive for over 5 minutes . 15 The "Emergency" message will be displayed immediately on the screen when the emergency recording files are...
... remind the driver should take a rest after 30 minutes as enclosed ) will be automatically deleted when a new emergency recording file is detected, the camcorder will recalculate the alert time If the car stop the recording, press the button. 3.1.3 Emergency Recording During normal video recording, press the button to drive for over 5 minutes . 15 The "Emergency" message will be displayed immediately on the screen when the emergency recording files are...

User Manual
Page 18
... the current recording date and time. 4 Guide icon (Menu) Press the button to stop the recording. 17 button to switch to Playback 6 Resolution 1080P (1920x1080) / 720P (1280x720) 7 Battery Indicates the remaining battery power. 8 Prompt (Reset of date / time) Remind the user to reset the Date / Time before start to use the camcorder. 9 Guide icon (Stop) Press the button to enter the OSD menu. 5 Guide icon Press the (Playback) mode. 3.1.6 The Recording Screen 6 1 7 2 8 3 9 4 10 5 No. Indicates sound will not be recorded with the 2 Voice Record video.
... the current recording date and time. 4 Guide icon (Menu) Press the button to stop the recording. 17 button to switch to Playback 6 Resolution 1080P (1920x1080) / 720P (1280x720) 7 Battery Indicates the remaining battery power. 8 Prompt (Reset of date / time) Remind the user to reset the Date / Time before start to use the camcorder. 9 Guide icon (Stop) Press the button to enter the OSD menu. 5 Guide icon Press the (Playback) mode. 3.1.6 The Recording Screen 6 1 7 2 8 3 9 4 10 5 No. Indicates sound will not be recorded with the 2 Voice Record video.

User Manual
Page 19
From the standby screen, press the button to take photos of the current scene. 10 Guide icon (Emergency) Press the button to continuously record the video in one file until the recording is in progress, press the button to stop the recording first. 18 Note: If recording is manually stopped. 3.1.7 Taking Photographs You can also use this camcorder to take a photo.
From the standby screen, press the button to take photos of the current scene. 10 Guide icon (Emergency) Press the button to continuously record the video in one file until the recording is in progress, press the button to stop the recording first. 18 Note: If recording is manually stopped. 3.1.7 Taking Photographs You can also use this camcorder to take a photo.

User Manual
Page 21
... the following : 1. Press the button to pause the playback. Press the button to select Picture and press the button. 5. Press the / button to browse for the desired photo file and press the button to view the file in progress, press the button to select File Playback and press the button. 4. Press the / button to enter the OSD menu. 3. 3.2.1 Playing Videos To play the video. 6. If recording is in full screen. 20 Press the / button to stop recording. 2.
... the following : 1. Press the button to pause the playback. Press the button to select Picture and press the button. 5. Press the / button to browse for the desired photo file and press the button to view the file in progress, press the button to select File Playback and press the button. 4. Press the / button to enter the OSD menu. 3. 3.2.1 Playing Videos To play the video. 6. If recording is in full screen. 20 Press the / button to stop recording. 2.

User Manual
Page 25
... after video recording starts. Enable or disable sound recording with the video. Video / Emergency / Picture Press / button to adjust the value, press the button to automatically record video after the camcorder is turned on menu items and available menu options. You may customize it between-1.3~+1.3. Set the date and time. Set the duration for the display to automatically turn off right after an hour of driving. Enable/Disable the date stamp. Set the desired video resolution. Set the recording duration...
... after video recording starts. Enable or disable sound recording with the video. Video / Emergency / Picture Press / button to adjust the value, press the button to automatically record video after the camcorder is turned on menu items and available menu options. You may customize it between-1.3~+1.3. Set the date and time. Set the duration for the display to automatically turn off right after an hour of driving. Enable/Disable the date stamp. Set the desired video resolution. Set the recording duration...

User Manual
Page 26
... / Disable the collision detection. Under motion detection mode, the camcorder will automatically start recording when any collision is detected, the camcorder will be displayed as a reminder. Menu option LDWS Description Available option When the LDWS is on the screen. If this function is enabled and any object movement is detected. High Sensitivity / Normal Sensitivity / Low Sensitivity / off Delay Shutdown Set the...
... / Disable the collision detection. Under motion detection mode, the camcorder will automatically start recording when any collision is detected, the camcorder will be displayed as a reminder. Menu option LDWS Description Available option When the LDWS is on the screen. If this function is enabled and any object movement is detected. High Sensitivity / Normal Sensitivity / Low Sensitivity / off Delay Shutdown Set the...

User Manual
Page 27
Video / Emergency / Picture Format the memory card Warning: Once the memory card is deleted, it CANNOT be restored or recovered. Menu option Language File Deletion Format Default Description high contrast, high discrepancy environment. Set the on the micro SD card will be deleted and CANNOT be restored or recovered. Yes / No Reset all options to the default settings. Yes / No 26 Available option English / Simplified Chinese Delete the file(s) Warning: Once a file is formatted, ALL content on -screen display menu language.
Video / Emergency / Picture Format the memory card Warning: Once the memory card is deleted, it CANNOT be restored or recovered. Menu option Language File Deletion Format Default Description high contrast, high discrepancy environment. Set the on the micro SD card will be deleted and CANNOT be restored or recovered. Yes / No Reset all options to the default settings. Yes / No 26 Available option English / Simplified Chinese Delete the file(s) Warning: Once a file is formatted, ALL content on -screen display menu language.

Quick Start Guide
Page 2
... to ensure a clear view even when it rains. 3. Clean the lens on Installation 1. Make sure that the lens is sealed internally. Install the device near the rear-view mirror to disassemble the camcorder and remove the battery. Doing so may be left on a tinted window. Recycle the camcorder observing local regulations. Always charge using the provided system. Do not install the device on the lens and will obstruct your...
... to ensure a clear view even when it rains. 3. Clean the lens on Installation 1. Make sure that the lens is sealed internally. Install the device near the rear-view mirror to disassemble the camcorder and remove the battery. Doing so may be left on a tinted window. Recycle the camcorder observing local regulations. Always charge using the provided system. Do not install the device on the lens and will obstruct your...

Quick Start Guide
Page 8
... polymer battery and is not a malfunction. 2.4 Powering the Camcorder On / Off Once the vehicle engine is started , the camcorder automatically powers on . 2.5 Initial Settings Before using the camcorder, we recommend you to enable the Automatic Record function and set up the camcorder and charge the built-in battery. 1. This is characteristic of your vehicle. 2.3 Connecting to Power Use only the supplied car adapter to power up the correct date and time. 7
... polymer battery and is not a malfunction. 2.4 Powering the Camcorder On / Off Once the vehicle engine is started , the camcorder automatically powers on . 2.5 Initial Settings Before using the camcorder, we recommend you to enable the Automatic Record function and set up the camcorder and charge the built-in battery. 1. This is characteristic of your vehicle. 2.3 Connecting to Power Use only the supplied car adapter to power up the correct date and time. 7

Quick Start Guide
Page 9
... recording. Manually plug in the power adapter into the socket to begin emergency recording mode. Note: On some vehicle models, the automatic power up and off the car camcorder. 3.1.2 Emergency Recording During normal video recording, press the button to turn off feature of the following: - The emergency recording file is switched off . A 4 GB memory card can save up to 5 emergency video files, and 8 GB (or above) memory card can save up to stop recording manually. With some cars, the recording...
... recording. Manually plug in the power adapter into the socket to begin emergency recording mode. Note: On some vehicle models, the automatic power up and off the car camcorder. 3.1.2 Emergency Recording During normal video recording, press the button to turn off feature of the following: - The emergency recording file is switched off . A 4 GB memory card can save up to 5 emergency video files, and 8 GB (or above) memory card can save up to stop recording manually. With some cars, the recording...
Product Information
Page 1
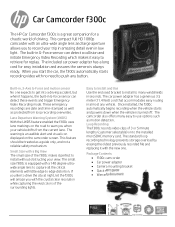
... trigger Emergency Video Recording mode. The standard loop recording technology prevents storage overload by erasing the oldest previously recorded file and replacing it with a Big View The small size of driving. This feature should be treated as protected from the current lane. The included car power adapter has a long cord for easy installation and assures the camera is an audible alert and visual icon displayed on the...
... trigger Emergency Video Recording mode. The standard loop recording technology prevents storage overload by erasing the oldest previously recorded file and replacing it with a Big View The small size of driving. This feature should be treated as protected from the current lane. The included car power adapter has a long cord for easy installation and assures the camera is an audible alert and visual icon displayed on the...

Product Information
Page 2
... other countries. Look us up to change without notice. Microsoft, Windows, XP, Vista, and Windows 7 are trademarks, registered trademarks or service marks of purchase Questions about the HP Car Camcorder f300c? Actual product image may vary from Hewlett-Packard. Car Camcorder f300c SPECIFICATIONS Display Dimensions Sensor Type Effective Pixels Video Resolutions Video Format Still Image Resolution Still Image Format ISO Sensitivity G-Sensor Lens Specifications Microphone 2.4 inch LCD Color Panel (TFT), 112K Pixels (480 x 234...
... other countries. Look us up to change without notice. Microsoft, Windows, XP, Vista, and Windows 7 are trademarks, registered trademarks or service marks of purchase Questions about the HP Car Camcorder f300c? Actual product image may vary from Hewlett-Packard. Car Camcorder f300c SPECIFICATIONS Display Dimensions Sensor Type Effective Pixels Video Resolutions Video Format Still Image Resolution Still Image Format ISO Sensitivity G-Sensor Lens Specifications Microphone 2.4 inch LCD Color Panel (TFT), 112K Pixels (480 x 234...


